jack FIAT FIORINO 2014 Owner handbook (in English)
[x] Cancel search | Manufacturer: FIAT, Model Year: 2014, Model line: FIORINO, Model: FIAT FIORINO 2014Pages: 210, PDF Size: 4.9 MB
Page 126 of 210
125
SAFETY
MAINTENANCE
AND CARE
TECHNICAL
SPECIFICATIONS
INDEX
DASHBOARDAND CONTROLS
STARTING
AND DRIVING
WARNING
LIGHTS AND
MESSAGES
IN AN
EMERGENCY
IF A TYRE
IS PUNCTURED
Cargo versions
The vehicle is supplied with a regular size
spare wheel. Alternatively, the vehicle may
be equipped with a “Fix&Go fast tyre re-
pair kit” (see instructions in next section).
Combi versions
The vehicle is supplied with a “Fix&Go fast
tyre repair kit” (see instructions in next
section). As an alternative to the Fix&Go
kit, the vehicle may be equipped with a
regular size spare wheel.
Wheel changing and correct use of the jack
and spare wheel call for some precautions
as listed below.
The spare wheel (for ver-
sions/markets, where provid-
ed) is specific for your vehicle. There-
fore, it must not be used on vehicles
of a different model. Do not use spare
wheels of different models on your ve-
hicle. The spare wheel must only be
used in an emergency. Use it as short-
ly as possible.
WARNING
Indicate that the vehicle is
stationary according to the
laws in force: emergency lights, re-
fracting warning triangle, etc. Pas-
sengers should leave the vehicle, par-
ticularly if it is very loaded, and wait
for the wheel to be changed away
from on-coming traffic. In case of
steep slopes or rough slopes, place
wedges or other materials suitable to
stop the vehicle under the wheels. Re-
pair and refit the standard wheel as
soon as possible. Do not apply grease
to the bolt threading before assem-
bly: the bolts could come loose un-
expectedly.
WARNING
Use the jack only to replace
wheels on the vehicle with
which it is supplied or on other vehi-
cles of the same model. Never use the
jack for other purposes, such as lift-
ing other vehicle models. Never use the
jack to carry out repairs under the ve-
hicle. Incorrect positioning of the jack
may cause the lifted vehicle to fall. Do
not use the jack for loads higher than
those shown on the label.
WARNING
Incorrect wheel cap assem-
bly may cause it to come off
when the vehicle is travelling. Never
tamper with the inflation valve. Nev-
er introduce tools of any kind be-
tween rim and tyre. Regularly check
the pressure of the tyres and small
spare wheel referring to the values
shown in the “Technical Specifica-
tions” section.
WARNING
123-154 Fiorino GB 1ed:123-154 Fiorino GB 1ed 3-12-2009 15:33 Pagina 125
Page 127 of 210
126
SAFETY
MAINTENANCE
AND CARE
TECHNICAL
SPECIFICATIONS
INDEX
DASHBOARDAND CONTROLS
STARTING
AND DRIVING
WARNING
LIGHTS AND
MESSAGES
IN AN
EMERGENCY
Important notes:
❒the jack weight is 1.76 kg;
❒the jack requires no adjustment;
❒the jack cannot be repaired. If it breaks
it must be replaced with a new jack;
❒no tool other than the cranking device
has to be fitted on the jack.To replace a tyre proceed as follows:
❒stop the vehicle in a position so that it
is not a danger for on-coming traffic in
a location where you can replace the
wheel safely. The ground must be flat
and compact.
❒Turn the engine off and pull up the
handbrake.
❒Engage first gear or reverse.
fig. 2F0T0119mfig. 3F0T0122m
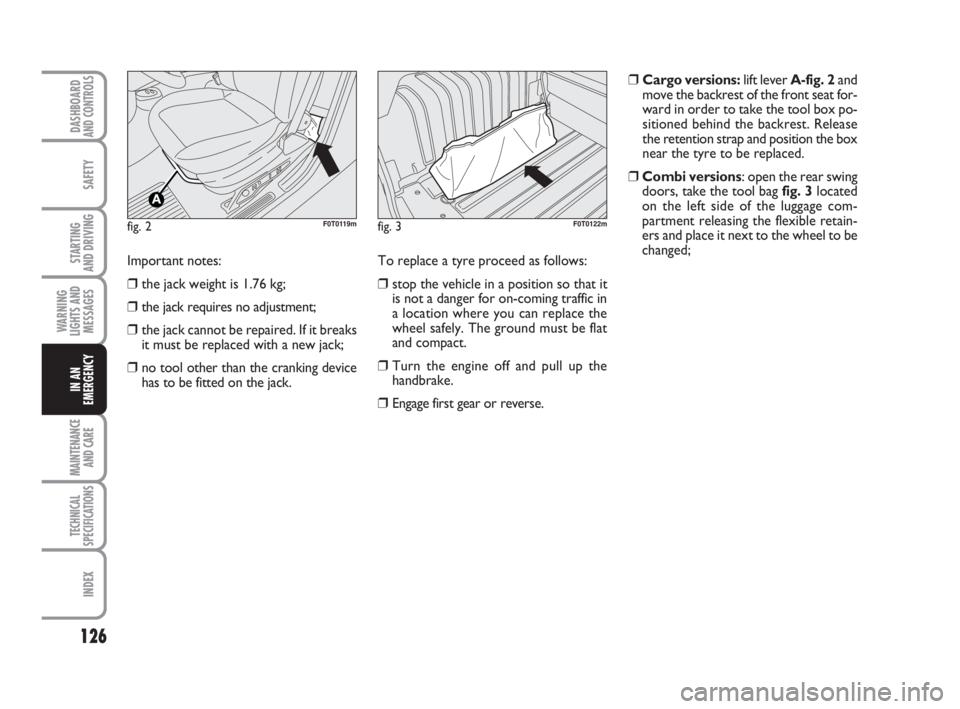
❒Cargo versions:lift lever A-fig. 2and
move the backrest of the front seat for-
ward in order to take the tool box po-
sitioned behind the backrest. Release
the retention strap and position the box
near the tyre to be replaced.
❒Combi versions: open the rear swing
doors, take the tool bag fig. 3located
on the left side of the luggage com-
partment releasing the flexible retain-
ers and place it next to the wheel to be
changed;
123-154 Fiorino GB 1ed:123-154 Fiorino GB 1ed 3-12-2009 15:33 Pagina 126
Page 128 of 210
127
SAFETY
MAINTENANCE
AND CARE
TECHNICAL
SPECIFICATIONS
INDEX
DASHBOARDAND CONTROLS
STARTING
AND DRIVING
WARNING
LIGHTS AND
MESSAGES
IN AN
EMERGENCY
fig. 4F0T0120m
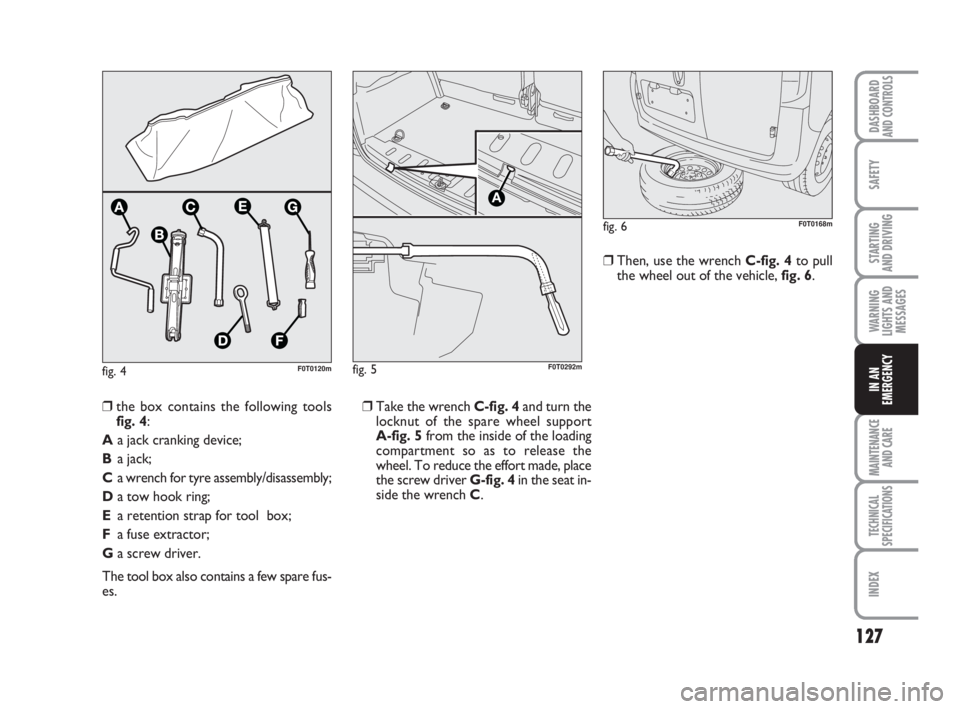
❒Take the wrench C-fig. 4and turn the
locknut of the spare wheel support
A-fig. 5from the inside of the loading
compartment so as to release the
wheel. To reduce the effort made, place
the screw driver G-fig. 4in the seat in-
side the wrench C.❒Then, use the wrench C-fig. 4to pull
the wheel out of the vehicle, fig. 6.
❒the box contains the following tools
fig. 4:
Aa jack cranking device;
Ba jack;
Ca wrench for tyre assembly/disassembly;
Da tow hook ring;
Ea retention strap for tool box;
Fa fuse extractor;
Ga screw driver.
The tool box also contains a few spare fus-
es.
fig. 6F0T0168m
fig. 5
A
F0T0292m
123-154 Fiorino GB 1ed:123-154 Fiorino GB 1ed 3-12-2009 15:33 Pagina 127
Page 129 of 210
128
SAFETY
MAINTENANCE
AND CARE
TECHNICAL
SPECIFICATIONS
INDEX
DASHBOARDAND CONTROLS
STARTING
AND DRIVING
WARNING
LIGHTS AND
MESSAGES
IN AN
EMERGENCY
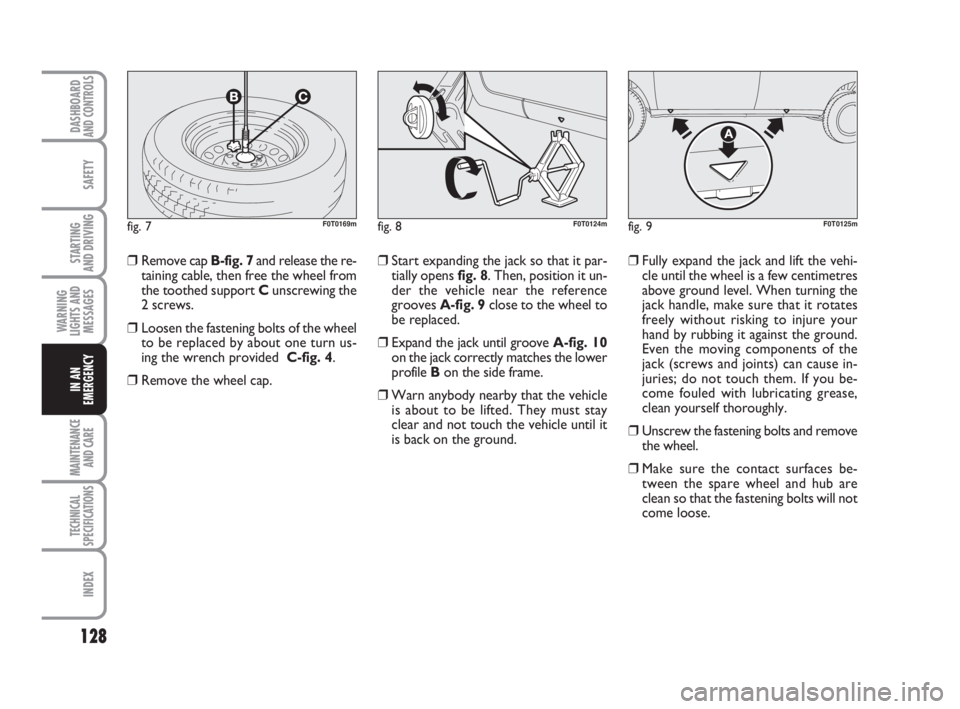
❒Start expanding the jack so that it par-
tially opens fig. 8. Then, position it un-
der the vehicle near the reference
grooves A-fig. 9close to the wheel to
be replaced.
❒Expand the jack until groove A-fig. 10
on the jack correctly matches the lower
profile Bon the side frame.
❒Warn anybody nearby that the vehicle
is about to be lifted. They must stay
clear and not touch the vehicle until it
is back on the ground.❒Fully expand the jack and lift the vehi-
cle until the wheel is a few centimetres
above ground level. When turning the
jack handle, make sure that it rotates
freely without risking to injure your
hand by rubbing it against the ground.
Even the moving components of the
jack (screws and joints) can cause in-
juries; do not touch them. If you be-
come fouled with lubricating grease,
clean yourself thoroughly.
❒Unscrew the fastening bolts and remove
the wheel.
❒Make sure the contact surfaces be-
tween the spare wheel and hub are
clean so that the fastening bolts will not
come loose.
fig. 8F0T0124mfig. 9F0T0125m
❒Remove cap B-fig. 7and release the re-
taining cable, then free the wheel from
the toothed support Cunscrewing the
2 screws.
❒Loosen the fastening bolts of the wheel
to be replaced by about one turn us-
ing the wrench provided C-fig. 4.
❒Remove the wheel cap.
fig. 7F0T0169m
123-154 Fiorino GB 1ed:123-154 Fiorino GB 1ed 3-12-2009 15:33 Pagina 128
Page 130 of 210
129
SAFETY
MAINTENANCE
AND CARE
TECHNICAL
SPECIFICATIONS
INDEX
DASHBOARDAND CONTROLS
STARTING
AND DRIVING
WARNING
LIGHTS AND
MESSAGES
IN AN
EMERGENCY
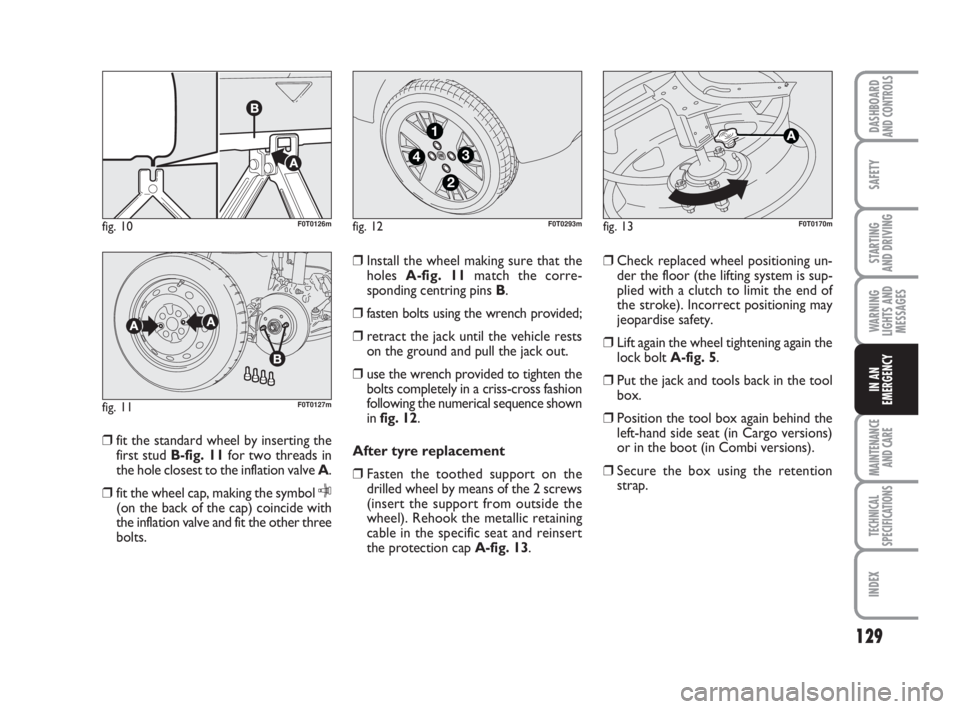
❒fit the standard wheel by inserting the
first stud B-fig. 11for two threads in
the hole closest to the inflation valve A.
❒fit the wheel cap, making the symbol
C(on the back of the cap) coincide with
the inflation valve and fit the other three
bolts.❒Install the wheel making sure that the
holes A-fig. 11match the corre-
sponding centring pins B.
❒fasten bolts using the wrench provided;
❒retract the jack until the vehicle rests
on the ground and pull the jack out.
❒use the wrench provided to tighten the
bolts completely in a criss-cross fashion
following the numerical sequence shown
in fig. 12.
After tyre replacement
❒Fasten the toothed support on the
drilled wheel by means of the 2 screws
(insert the support from outside the
wheel). Rehook the metallic retaining
cable in the specific seat and reinsert
the protection cap A-fig. 13.❒Check replaced wheel positioning un-
der the floor (the lifting system is sup-
plied with a clutch to limit the end of
the stroke). Incorrect positioning may
jeopardise safety.
❒Lift again the wheel tightening again the
lock boltA-fig. 5.
❒Put the jack and tools back in the tool
box.
❒Position the tool box again behind the
left-hand side seat (in Cargo versions)
or in the boot (in Combi versions).
❒Secure the box using the retention
strap.
fig. 10F0T0126m
fig. 11F0T0127m
fig. 12
4
1
3
2
F0T0293mfig. 13F0T0170m
123-154 Fiorino GB 1ed:123-154 Fiorino GB 1ed 3-12-2009 15:33 Pagina 129
Page 202 of 210
201
WARNING
LIGHTS AND
MESSAGES
DASHBOARDAND CONTROLS
SAFETY
STARTING
AND DRIVING
IN AN
EMERGENCY
MAINTENANCE
AND CARE
TECHNICAL
SPECIFICATIONS
INDEX
– beam alignment ................................ 70
– leveling ............................................... 70
– trim adjust ......................................... 70
Heater system/
Heating and ventilation ...................... 43
High beams
– bulb replacement ............................. 138
– control ............................................... 49
– flashing ............................................... 49
High mounted brake lights
– bulb replacement ............................. 141
Hill Holder system ................................. 73
Identification data .................................. 178
Ignition device ......................................... 13
In an emergency................................ 123
Instrument board ................................... 6
Instrument panel .................................... 5
Instruments ............................................. 14
Interior equipment ................................ 56
Interior ..................................................... 176
Isofix seat (provision for installation) 93
Jack ............................................................ 129
Keys
– mechanical key ................................. 8
– key with remote control ............... 8Lamps
– bulb types .......................................... 135
– general ............................................... 134
– interior bulb replacement .............. 142
– outer lighting bulb replacement ... 137
Lane change function ............................. 50
Level checks ............................................ 162
Low beams
– bulb replacement ............................. 138
– control ............................................... 49
Luggage rack/ski rack ............................ 72
Maintenance and care..................... 155
Manual AC system ................................. 46
Max. speeds ............................................. 189
MSR system ............................................. 74
Multi/function display ............................ 21
Number plate light
– bulb replacement ............................. 141
Oddments tray ....................................... 56
Outer lights ............................................. 49
Paintwork (maintenance) ..................... 174
Park sensors ............................................ 77 EOBD system ......................................... 76
ESP system ............................................... 72
Fiat CODE (system) ............................. 7
Fix&Go (device) ..................................... 130
Fluids and lubricants .............................. 193
Fog lights
– bulb replacement ............................. 139
– control ............................................... 55
Follow me home (device) .................... 50
Front roof lights ...........................142-143
Front seat arm rest ............................... 56
Fuel cap .................................................... 81
Fuel system .............................................. 182
Fuel
– consumption ..................................... 195
– economy ............................................ 106
– system shutoff .................................. 56
Fuses (replacement) .............................. 145
Glass cleaning ......................................... 51
Glove box ................................................ 56
Handbrake ............................................... 104
Hazard warning lights ............................ 55
Head rests ............................................... 38
Headlamps
– beam adjustment abroad ............... 70
200-208 Fiorino GB 1ed:202-208 Fiorino GB 1ed 2-12-2009 16:32 Pagina 201