display FIAT FIORINO 2019 Owner handbook (in English)
[x] Cancel search | Manufacturer: FIAT, Model Year: 2019, Model line: FIORINO, Model: FIAT FIORINO 2019Pages: 220, PDF Size: 6.22 MB
Page 113 of 220
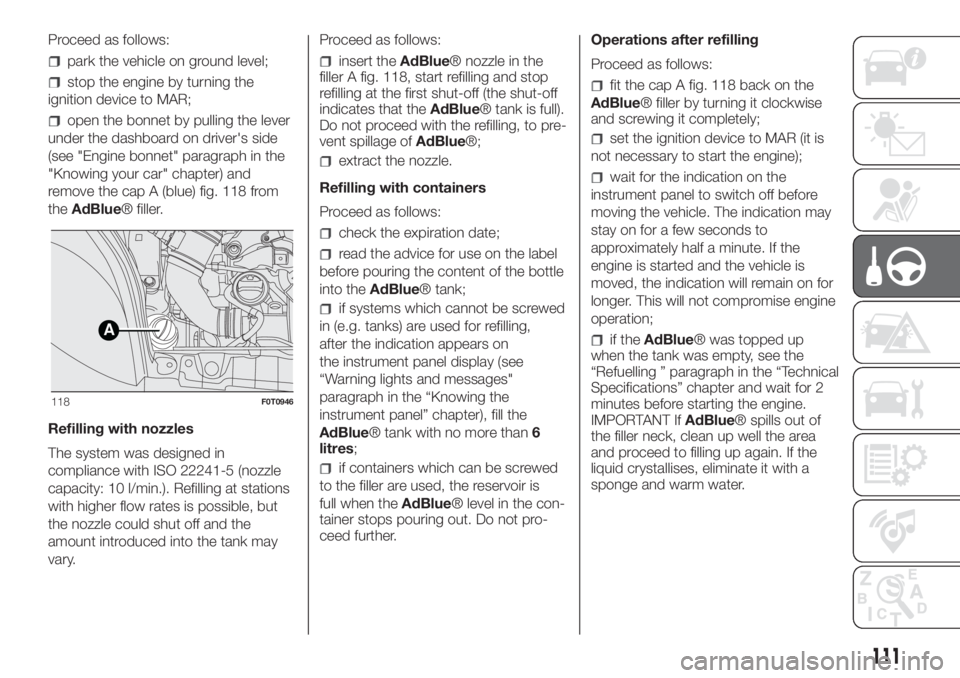
Proceed as follows:
park the vehicle on ground level;
stop the engine by turning the
ignition device to MAR;
open the bonnet by pulling the lever
under the dashboard on driver's side
(see "Engine bonnet" paragraph in the
"Knowing your car" chapter) and
remove the cap A (blue) fig. 118 from
theAdBlue® filler.
Refilling with nozzles
The system was designed in
compliance with ISO 22241-5 (nozzle
capacity: 10 l/min.). Refilling at stations
with higher flow rates is possible, but
the nozzle could shut off and the
amount introduced into the tank may
vary.Proceed as follows:
insert theAdBlue® nozzle in the
filler A fig. 118, start refilling and stop
refilling at the first shut-off (the shut-off
indicates that theAdBlue® tank is full).
Do not proceed with the refilling, to pre-
vent spillage ofAdBlue®;
extract the nozzle.
Refilling with containers
Proceed as follows:
check the expiration date;
read the advice for use on the label
before pouring the content of the bottle
into theAdBlue® tank;
if systems which cannot be screwed
in (e.g. tanks) are used for refilling,
after the indication appears on
the instrument panel display (see
“Warning lights and messages"
paragraph in the “Knowing the
instrument panel” chapter), fill the
AdBlue® tank with no more than
litres;
if containers which can be screwed
to the filler are used, the reservoir is
full when theAdBlue® level in the con-
tainer stops pouring out. Do not pro-
ceed further.Operations after refilling
Proceed as follows:
fit the cap A fig. 118 back on the
AdBlue® filler by turning it clockwise
and screwing it completely;
set the ignition device to MAR (it is
not necessary to start the engine);
wait for the indication on the
instrument panel to switch off before
moving the vehicle. The indication may
stay on for a few seconds to
approximately half a minute. If the
engine is started and the vehicle is
moved, the indication will remain on for
longer. This will not compromise engine
operation;
if theAdBlue® was topped up
when the tank was empty, see the
“Refuelling ” paragraph in the “Technical
Specifications” chapter and wait for 2
minutes before starting the engine.
IMPORTANT IfAdBlue® spills out of
the filler neck, clean up well the area
and proceed to filling up again. If the
liquid crystallises, eliminate it with a
sponge and warm water.A
118F0T0946
111
6
Page 114 of 220
IMPORTANT
DO NOT EXCEED THE
MAXIMUM LEVEL: this could cause
damage to the reservoir. UREA
freezes at under -11 °C. Although
the system is designed to operate
below the freezing point of the
UREA, it is advisable not to fill the
tank beyond the maximum level
because if the UREA freezes the
system can be damaged. Follow the
instructions in the “Topping up
AdBlue® diesel emissions additive
(UREA)” paragraph in this chapter.
If the UREA is spilled on painted
surfaces or aluminium, immediately
clean the area with water and use
absorbent material to collect the
fluid that has been spilled on the
ground.
Do not try to start the engine if
UREA was accidentally added to
the Diesel fuel tank, this can result
in serious engine damage, contact
a Fiat Dealership.
Do not add additives or other
fluids to AdBlue®, doing so could
damage the system.
The use of non-conforming or
degraded AdBlue® may lead to
indications appearing on the instru-
ment panel display (see “Warning
lights and messages" paragraph in
the “Knowing the instrument panel”
chapter).
Never pour AdBlue® into
another container: it could be con-
taminated.
In case of damage to the
sewage system of exhaust gas
resulting from the use of additives /
tap water, the introduction of diesel
fuel, or at least by not fulfilling the
requirements, the warranty expires.
If the AdBlue® runs out, see
“Warning lights and messages"
paragraph in the “Knowing the
instrument panel” chapter to con-
tinue using the vehicle normally.
AdBlue® (UREA) storage
AdBlue® (UREA) is a very stable prod-
uct with a long shelf life. Stored at tem-
peratures LOWER than 32 °C, it has a
shelf life of at least one year.
Follow the instructions on the label of
the container.
112)
METHANE ENGINES
(NATURAL POWER)
METHANE GAS FILLER
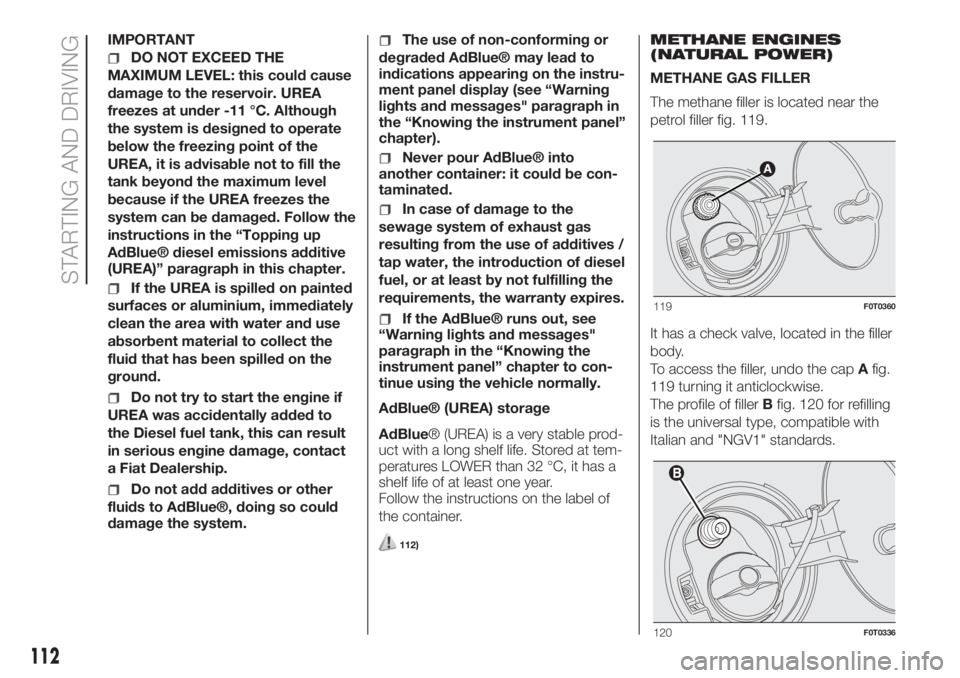
The methane filler is located near the
petrol filler fig. 119.
It has a check valve, located in the filler
body.
To access the filler, undo the capAfig.
119 turning it anticlockwise.
The profile of fillerBfig. 120 for refilling
is the universal type, compatible with
Italian and "NGV1" standards.
119F0T0360
120F0T0336
112
STARTING AND DRIVING
Page 142 of 220
FUEL CUT-OFF
SYSTEM
134)
This intervenes in the case of an impact
causing:
the interruption of the fuel supply
with the engine consequently cutting
out;
the automatic unlocking of the
doors;
turning on the lights inside the car.
When the system has been triggered,
the message “Fuel cut off, see
handbook” is displayed on some
versions.
IMPORTANT Check carefully for fuel
leaks, for instance in the engine
compartment, under the vehicle or near
the tank area.
After a crash, turn the ignition key to
STOP to avoid draining the battery.
The following procedure should be
carried out to restore the correct
operation of the vehicle:
turn the ignition key to MAR;
activate the right direction indicator;
deactivate the right direction
indicator;
activate the left direction indicator;
deactivate the left direction indicator;
activate the right direction indicator;
deactivate the right direction
indicator;
activate the left direction indicator;
deactivate the left direction indicator;
turn the ignition key to STOP.
Natural Power versions
In the event of an impact to the car, the
petrol and injection supply is cut off
immediately, causing the engine to cut
out and, as a result, the safety solenoid
valves to close.
WARNING
134)If, after an impact, you smell fuel or
notice leaks from the fuel system, do
not reactivate the system to avoid the risk
of fire.
TOWING THE
VEHICLE
The tow ring provided with the vehicle
is located in the tool box located behind
the left seat backrest (Cargo versions)
or in the boot (Combi versions).
ATTACHING THE TOW
HOOK
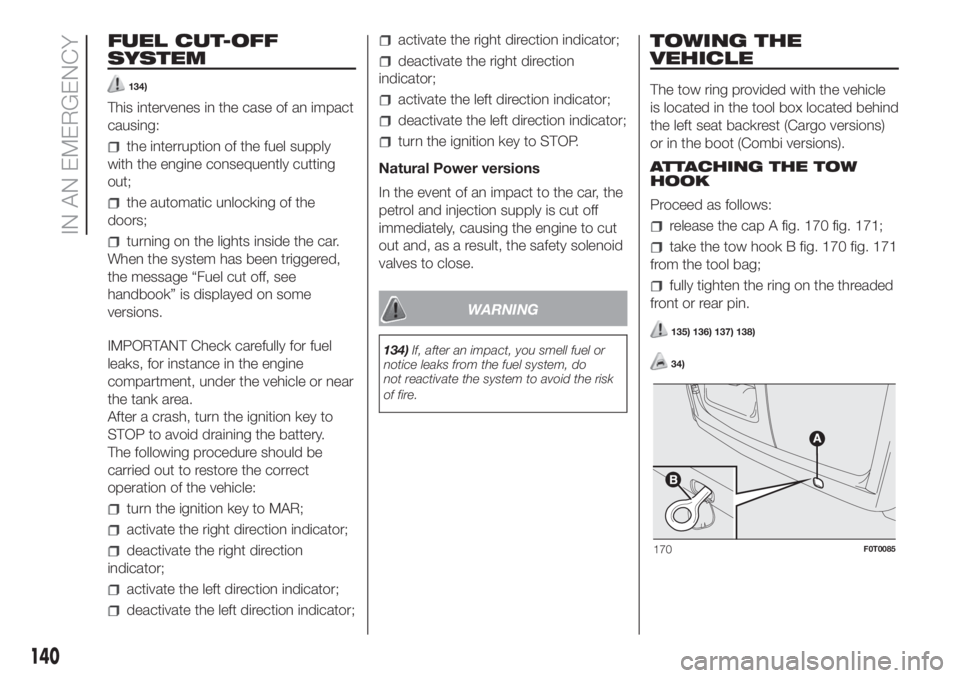
Proceed as follows:
release the cap A fig. 170 fig. 171;
take the tow hook B fig. 170 fig. 171
from the tool bag;
fully tighten the ring on the threaded
front or rear pin.
135) 136) 137) 138)
34)
170F0T0085
140
IN AN EMERGENCY
Page 191 of 220
RADIO
(for versions/markets, where provided)
The radio has been designed according
to the specifications of the passenger
compartment, with a personalised
design matching the style of the
dashboard perfectly.
TIPS
Road safety
Please, learn how to use all different
radio functions (e.g. save stations)
before beginning to drive.
Reception conditions
Reception conditions change
constantly while driving. Reception may
be interfered with by the presence of
mountains, buildings or bridges,
especially when you are far away from
the broadcaster.
IMPORTANT The volume may be
increased when receiving traffic
information and news.
161)
Care and maintenance
Clean the cover with a soft anti-static
cloth only. Cleaning and polishing
products may damage the surface.ANTITHEFT PROTECTION
The radio is equipped with an anti-theft
protection system based on the
exchange of information between the
radio and the electronic control unit
(Body Computer) present on the
vehicle.
This system guarantees maximum
safety and prevents the secret code
from being entered each time the radio
power supply is disconnected.
If the check has a positive outcome, the
radio will start to function, whereas if
the comparison codes are not the
same or if the electronic control unit
(Body Computer) is replaced, the
device will ask the user to enter the
secret code according to the procedure
described in the paragraph below.
Entering the secret code
When the radio is switched on, if the
secret code is requested, the display
will show the word "Code" for about 2
seconds followed by four dashes "- -
- -".
The code is made up of four digits from
1 to 6, each corresponding to one of
the dashes.
To enter the first digit, press the
corresponding button of the preset
stations (from 1 to 6). Enter the other
code digits in the same way.If the four digits are not entered within
20 seconds, the display will show
"Enter code----".Ifthis occurs, it is
not considered an incorrect code entry.
After entering the fourth digit (within
20 seconds), the radio will work.
If an incorrect code is entered, the radio
will emit a sound and the display
shows the text "Radio blocked/wait" to
notify the user of the need to enter
the correct code.
Each time the user enters an incorrect
code, the waiting time will gradually
increase (1 min, 2 min, 4 min, 8 min, 16
min, 30 min,1h, 2h, 4h, 8h, 16h, 24h)
up to a maximum of 24 hours. The
waiting time will be shown on the
display with the text "Radio blocked/
wait". After the text has disappeared it
is possible to start the code entering
procedure again.
Vehicle radio passport
This document certifies ownership of
the car radio. The car radio passport
shows the radio model, serial number
and secret code.
IMPORTANT Keep the radio passport in
a safe place so that you can give the
information to the relevant authorities if
the radio is stolen.
189
Page 198 of 220
GENERAL INFORMATION
The radio offers the following functions:
Radio section
PLL tuning with FM/AM/MW
frequency bands;
RDS (Radio Data System) with TA
(traffic alerts) function - TP (traffic
programmes) - EON (Enhanced Other
Network) - REG (regional programmes);
AF: search selection for alternative
frequencies in RDS mode;
automatic/manual tuning into
stations;
FM Multipath detector;
manual storing of 30 stations: 18 on
FM band (6 on FM1, 6 on FM2, 6 on
FMT), 12 on MW band;
automatic storing (AUTOSTORE
function) of 6 stations in the dedicated
FM band;
SPEED VOLUME function:
automatic volume adjustment
according to the vehicle speed;
automatic Stereo/Mono selection.
CD section
Direct selection of the disc;
Track selection (forward/back);
Fast advance (forward/back) through
tracks;
CD Display function: display of disc
name and time elapsed since the
start of the track
Playing of audio CDs, CD-Rs and
CD-RWs.
44)
MP3 CD section
MP3-Info function (ID3-TAG);
Folder selection (previous/next);
Track selection (forward/back);
Fast advance (forward/back) through
tracks;
MP3 Display function: display of
name of folder, ID3-TAG information,
time elapsed since the start of the
track, name of the file;
Reading of audio or data CD, CD-R
and CD-RW.
Audio section
Mute/Pause function;
Soft-Mute function;
Loudness function
7-band graphic equaliser
Separate bass/treble adjustment
Right/left channel balance.FUNCTIONS AND
ADJUSTMENTS
SWITCHING ON THE RADIO
The car radio comes on when the
ON/OFF button/knob is briefly pressed.
When the radio is turned on with the
key extracted from the ignition, it
switches off automatically after about
20 minutes.
SWITCHING OFF THE RADIO
Keep the ON/OFF button/knob
pressed.
SELECTING THE RADIO
FUNCTIONS
By pressing the FM AS button quickly
and repeatedly, the following audio
sources can be selected cyclically:
TUNER (“FM1”, “FM2”, “FMA”).
By pressing the AM button briefly and
repeatedly, the following audio sources
can be selected cyclically:
TUNER (“MW1”, “MW2”).
SELECTING THE CD/CD CHANGER
FUNCTION
By briefly pressing the CD button, the
CD/CD CHANGER audio source can
be selected (only with a CD loaded).
MUTE/PAUSE FUNCTION (zeroing
the volume)
Press the MUTE button briefly to
activate the Mute function.
196
MULTIMEDIA
Page 199 of 220
Press the Mute button again to
deactivate the MUTE function.
The Mute function will be overridden
when there is an incoming traffic alert (if
the TA function is on) or if an
emergency alarm is received. The
function will be reactivated when the
alert is over.
AUDIO SETTINGS
The functions that can be selected from
the audio menu change depending on
the context: AM/FM/CD/CD
CHANGER.
Press the AUDIO button briefly to
change the Audio functions. After the
AUDIO button is first pressed, the
display will show the bass level value
for the source activated at that time
(e.g. in FM mode the display will show
the wording "FM Bass +2").
Use the
buttons to scroll through
the menu functions. To change the
setting of the function selected use the
buttons.
The current status of the selected
function appears on the display.
The functions managed by the Menu
are:
BASS (adjustment of bass tones);
TREBLE (adjustment of high tones);
BALANCE (right/left balance
adjustment);
FADER (front/back balance
adjustment);
LOUDNESS (LOUDNESS function
on/off);
EQUALISER (activation and
selection of factory-set equaliser levels);
USER EQUALISER (customised
equaliser setting).
MENU
MENU button functions
Press the button MENU briefly to
activate the Menu function. The display
will show the first menu item that can
be adjusted (AF) ("AF Switching On" on
the display).
Use the
orbuttons to scroll
through the Menu functions. To change
the setting of the function selected
use the
orbuttons.
The current status of the selected
function appears on the display.
The functions managed by the Menu
are:
AF SWITCHING (alternative
frequency search) (ON/OFF);
TRAFFIC INFORMATION (ON/OFF);
REGIONAL MODE (ON/OFF);
MP3 DISPLAY (CD MP3 / CD
CHANGER data);
SPEED VOLUME (volume change
based on speed);
RADIO ON VOLUME (radio
maximum limit on/off);
AUX OFFSET (alignment of the
portable device volume to that of the
other sources) (for versions/markets,
where provided);
RADIO OFF (switching-off mode);
SYSTEM RESET reset of factory
settings.
Press the button MENU again to exit
the Menu function.
IMPORTANT The AF SWITCHING,
TRAFFIC INFORMATION and
REGIONAL MODE adjustments are only
possible in FM mode.
RADIO (Tuner)
When the radio is turned on, it will
activate the last source listened
to before it was switched off: Radio,
CD, CD MP3.
To select the Radio function when
another audio source is being listened
to, briefly press the FM, AS or AM
buttons, depending on the desired
band.
SELECTING A FREQUENCY BAND
With the Radio mode active, press
the FM, AS or AM button briefly and
repeatedly to select the desired
reception band.
197
Page 200 of 220
Each time the button is pressed the
following bands are selected cyclically:
Pressing the FM AS button: “FM1”,
“FM2” or “FMA”;
Pressing the AM button: “MW1”,
“MW2”.
Each band is highlighted by the name
in the display. The last station selected
on the respective frequency band will
be tuned into.
PRESET BUTTONS
The buttons numbered from 1 to 6 are
used to set the following preset
stations:
18 in the AM band; 6 in FM1, 6 in
FM2, 6 in FMT or "FMA" (on some
versions);
12 in the MW band.
To listen to a preset station, select the
desired frequency band and then briefly
press the corresponding preset button
(from 1 to 6).
By pressing the preset button for more
than 2 seconds, the tuned station will
be stored. The storing phase is
confirmed by an acoustic signal.
AUTOMATIC TUNING
Briefly press the
orbutton to start
the automatic tuning search for the
next station that can be received in the
selected direction.If the button
orpressed down
longer, the fast search starts. When the
button is released, the tuner will stop
on the next station that can be
received.
If the TA function (traffic news) is on, the
tuner searches only for stations that
broadcast traffic news.
MANUAL TUNING
This is used to manually search for
stations in the preselected band. Select
the desired frequency band and then
press the
orbutton briefly and
repeatedly to start to the search in the
desired direction. If the
orbutton
is pressed longer, the fast search will
start and then stop when the button is
released.
AUTOSTORE FUNCTION (automatic
station storage)
To activate the Autostore function, hold
the FM AS button pressed until a beep
is heard. With this function, the radio
automatically stores the 6 stations with
the strongest signal in decreasing
order on the FMA frequency band.
During the automatic storing process,
the text “Autostore” flashes on the
display.Press the FM AS button again to stop
the Autostore function: the radio will
again tune into the station listened
to before the activation of the function.
When the Autostore scan is concluded,
the radio will automatically tune into
the first preset station on the FMA band
(preset 1).
The stations that have a strong signal at
that moment are then automatically
stored in the preselected band in the
buttons numbered 1 to 6.
When the Autostore function is
activated within the MW band, the FMA
band is automatically selected and the
function is performed.
IMPORTANT Sometimes the Autostore
function is not able to find 6 stations
with a strong signal. In this case, the
strongest stations stored will be
duplicated in the free preset buttons.
IMPORTANT When the Autostore
function is activated, the stations that
were previously stored in the FMA band
are deleted.
198
MULTIMEDIA
Page 201 of 220
EMERGENCY ALARM RECEPTION
The radio can receive emergency
alerts in RDS mode in exceptional
circumstances or when there are
dangerous situations (earthquakes,
floods, etc.), if these are being
transmitted by the broadcaster tuned
into.
This function is activated automatically
and cannot be turned off.
The word ALARM will be shown in the
display during the transmission of an
emergency announcement. The volume
of the radio changes during this
announcement in the same way as
during traffic news.
CD PLAYER
This chapter describes the variants
regarding the operation of the CD
player only: as far as the operation of
the radio is concerned, refer to the
description in the "Functions and
Adjustments" chapter.
SELECTING THE CD PLAYER
To activate the CD player built-into the
equipment, proceed as follows:
insert a CD with the equipment
switched on: the first track will start to
play;
or
if a CD has already been loaded,
switch on the radio and then briefly
press the CD button to select the “CD”
operating mode: the last track listened
to will start to play.
LOADING/EJECTING A CD
To load the CD, insert it gently into the
slot to activate the motorised loading
system, which will position it correctly.
Press the button
, with the device
turned on, to activate the CD motorised
ejecting system. After ejection, the last
audio source listened to before playing
the CD will be heard.
If the CD is not removed from the radio,
it will automatically be reloaded about
20 seconds later and will tune into
Tuner mode (Radio).
The CD cannot be ejected if the radio is
off.
If the ejected CD is reloaded without
having removed it completely from the
slot, the radio will not switch to the
CD source.
Possible error messages
If the loaded CD cannot be played (e.g.
a CD ROM has been inserted or the
CD is inserted the wrong way round or
there is reading error) the display shows
the words “CD Disc error”.CD MP3 PLAYER
SELECTING MP3 SESSIONS ON
HYBRID DISCS
If a hybrid disc is inserted (Mixed Mode,
Enhanced, CD-Extra) also containing
MP3 files, the radio automatically starts
playing the audio session. It is possible
to move to the MP3 session whilst
playing by keeping the CD button
pressed for more than 2 seconds.
IMPORTANT When the function
is activated the radio may take a few
seconds to start playback. Whilst
checking the disc the display will show
"CD Reading". If no MP3 files are
detected, the radio will resume playing
the audio session from the point where
it was interrupted.
SELECTING NEXT/PREVIOUS
FOLDER
Press the
button to select one of the
next folders or press the
button to
select a previous folder. The display will
show the number and the name of
the folder (e.g. “DIR 2 XXXXXX”).
XXXXXX: name of the folder (the display
will only show the first 8 characters).
The folders are selected cyclically: the
first folder is selected after the last
folder and vice versa.
199
Page 202 of 220
CD CHANGER (CDC)
45)
This chapter only describes the variants
regarding the operation of the CD
Changer (for versions and markets
where provided); as far as the operation
of the radio is concerned, refer to the
description in the "FUNCTIONS AND
ADJUSTMENTS" chapter.
CD CHANGER SELECTION
Turn the radio on and briefly and
repeatedly press the button CD until the
“CD CHANGER” function is selected.
SELECT CD
Press button
to select the next CD
or button
to select the previous CD.
If there is no disc present in the CD
changer in the selected position, the
words “NO CD” will appear briefly
on the display. The next disc will then
automatically be played.
WARNING
161)If the volume is too loud this could be
dangerous for the driver and for
passengers when driving in traffic. Always
adjust the volume so that you can still
hear background noises.
WARNING
44)Multimedia CDs include data tracks in
addition to the audio tracks. Playing this
type of CD can cause hissing at a volume
that may jeopardise road safety as well
as cause damage to the final stages and
the speakers.
45)To install and connect a Lineaccessori
CD Changer please refer exclusively to
the Fiat Dealership.
MOPAR®CONNECT
(where provided)
These services let you keep your
vehicle under control at all times and
receive assistance in the event of
accident, theft or breakdown.
To have these services, install the
Mopar®ConnectDevice on your
vehicle from the country (list available
on the www.driveuconnect.eu website)
and request activation by following the
instructions received at the email
address given when your vehicle was
handed over to you.
To use the connected services, you
must download theUconnect™ LIVE
App or access the
www.driveuconnect.eu portal.
You can find all the details about the
services in theMopar®Connectsec-
tion of the www.driveuconnect.eu por-
tal.
PRIVACY MODE
Privacy mode lets you disable the “Find
car”, “Notify Area” and “Notify Speed”
services, which allow registered
customers to locate their cars, for a
fixed time.
200
MULTIMEDIA
Page 204 of 220
WARNING
INTERIOR FITTINGS
Never travel with the glove compartment open: it could injure the passenger in the event of a crash.
The cigar lighter gets extremely hot. Handle it carefully and make sure children don't touch it: risk of fire and/or burning.
Do not use the ashtray as a waste paper basket: it may catch fire in contact with cigarette stubs.
Do not use the book rest in a vertical position with the vehicle in motion.
ROOF RACK/SKI RACK
Fully comply with the regulations in force concerning maximum clearance.
After travelling for a few kilometres, check to ensure that the fixing screws for the attachments are well tightened.
INTERIOR
Never use flammable products, such as petroleum ether or modified petrol, to clean the inside of the vehicle. The electrostatic charges
which are generated by rubbing during the cleaning operation may cause a fire.
Do not keep aerosol cans in the vehicle: they might explode. Aerosol cans must not be exposed to temperatures of more than 50°C.
When the vehicle is exposed to sunlight, the temperature inside can greatly exceed this value.
EOBD SYSTEM
If, when the ignition key is turned to MAR, thewarning light does not switch on, switches on constantly or flashes when driving (on
certain versions together with the message on the display), contact a Fiat Dealership as soon as possible. The operation of thewarning
light may be checked by the traffic police using specific devices. Comply with the laws and regulations of the country where you are driving.
WHEELS AND TYRES
You must not exceed 160 km/h on snow tyres with a “Q” mark; in any case, make sure you stick to the rules of the highway code.
POWER SUPPLY
Modifications or repairs to the supply system that are not carried out correctly or do not take the system technical specifications into
account can cause malfunctions leading to the risk of fire.
RIM PROTECTOR TYRES
DO NOT fit wheel hub caps when using integral hub caps fixed (with springs) to the steel rim and after sale tyres provided with a Rim
Protector. Use of unsuitable tyres and wheel caps may cause sudden decrease of tyre pressure.
203