start FIAT FIORINO 2019 Owner handbook (in English)
[x] Cancel search | Manufacturer: FIAT, Model Year: 2019, Model line: FIORINO, Model: FIAT FIORINO 2019Pages: 220, PDF Size: 6.22 MB
Page 163 of 220
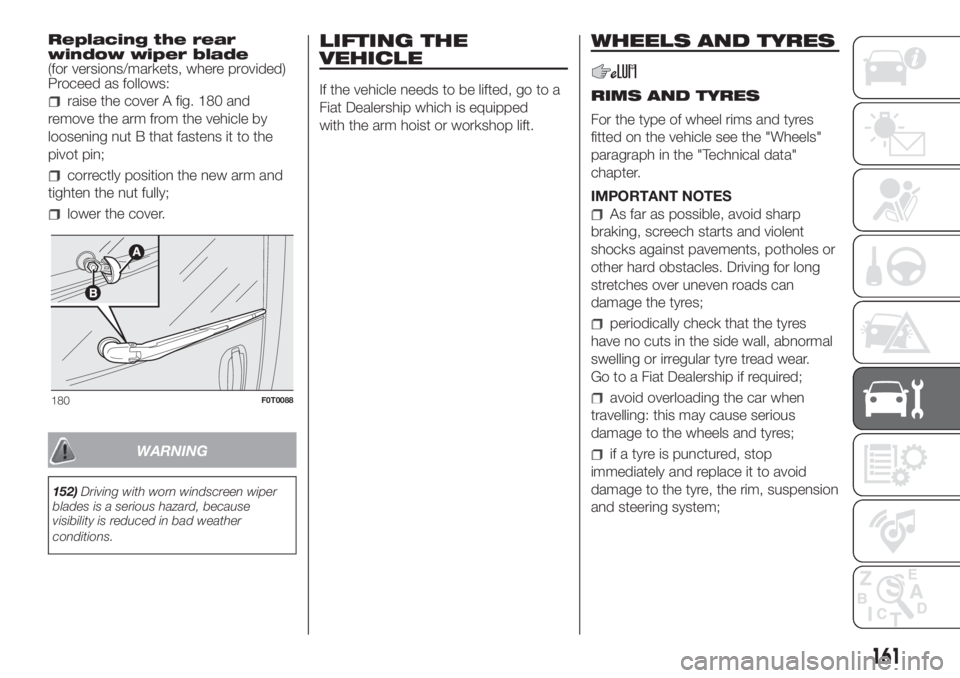
Replacing the rear
window wiper blade
(for versions/markets, where provided)
Proceed as follows:
raise the cover A fig. 180 and
remove the arm from the vehicle by
loosening nut B that fastens it to the
pivot pin;
correctly position the new arm and
tighten the nut fully;
lower the cover.
WARNING
152)Driving with worn windscreen wiper
blades is a serious hazard, because
visibility is reduced in bad weather
conditions.
LIFTING THE
VEHICLE
If the vehicle needs to be lifted, go to a
Fiat Dealership which is equipped
with the arm hoist or workshop lift.
WHEELS AND TYRES
RIMS AND TYRES
For the type of wheel rims and tyres
fitted on the vehicle see the "Wheels"
paragraph in the "Technical data"
chapter.
IMPORTANT NOTES
As far as possible, avoid sharp
braking, screech starts and violent
shocks against pavements, potholes or
other hard obstacles. Driving for long
stretches over uneven roads can
damage the tyres;
periodically check that the tyres
have no cuts in the side wall, abnormal
swelling or irregular tyre tread wear.
Go to a Fiat Dealership if required;
avoid overloading the car when
travelling: this may cause serious
damage to the wheels and tyres;
if a tyre is punctured, stop
immediately and replace it to avoid
damage to the tyre, the rim, suspension
and steering system;
180F0T0088
161
Page 191 of 220
RADIO
(for versions/markets, where provided)
The radio has been designed according
to the specifications of the passenger
compartment, with a personalised
design matching the style of the
dashboard perfectly.
TIPS
Road safety
Please, learn how to use all different
radio functions (e.g. save stations)
before beginning to drive.
Reception conditions
Reception conditions change
constantly while driving. Reception may
be interfered with by the presence of
mountains, buildings or bridges,
especially when you are far away from
the broadcaster.
IMPORTANT The volume may be
increased when receiving traffic
information and news.
161)
Care and maintenance
Clean the cover with a soft anti-static
cloth only. Cleaning and polishing
products may damage the surface.ANTITHEFT PROTECTION
The radio is equipped with an anti-theft
protection system based on the
exchange of information between the
radio and the electronic control unit
(Body Computer) present on the
vehicle.
This system guarantees maximum
safety and prevents the secret code
from being entered each time the radio
power supply is disconnected.
If the check has a positive outcome, the
radio will start to function, whereas if
the comparison codes are not the
same or if the electronic control unit
(Body Computer) is replaced, the
device will ask the user to enter the
secret code according to the procedure
described in the paragraph below.
Entering the secret code
When the radio is switched on, if the
secret code is requested, the display
will show the word "Code" for about 2
seconds followed by four dashes "- -
- -".
The code is made up of four digits from
1 to 6, each corresponding to one of
the dashes.
To enter the first digit, press the
corresponding button of the preset
stations (from 1 to 6). Enter the other
code digits in the same way.If the four digits are not entered within
20 seconds, the display will show
"Enter code----".Ifthis occurs, it is
not considered an incorrect code entry.
After entering the fourth digit (within
20 seconds), the radio will work.
If an incorrect code is entered, the radio
will emit a sound and the display
shows the text "Radio blocked/wait" to
notify the user of the need to enter
the correct code.
Each time the user enters an incorrect
code, the waiting time will gradually
increase (1 min, 2 min, 4 min, 8 min, 16
min, 30 min,1h, 2h, 4h, 8h, 16h, 24h)
up to a maximum of 24 hours. The
waiting time will be shown on the
display with the text "Radio blocked/
wait". After the text has disappeared it
is possible to start the code entering
procedure again.
Vehicle radio passport
This document certifies ownership of
the car radio. The car radio passport
shows the radio model, serial number
and secret code.
IMPORTANT Keep the radio passport in
a safe place so that you can give the
information to the relevant authorities if
the radio is stolen.
189
Page 198 of 220
GENERAL INFORMATION
The radio offers the following functions:
Radio section
PLL tuning with FM/AM/MW
frequency bands;
RDS (Radio Data System) with TA
(traffic alerts) function - TP (traffic
programmes) - EON (Enhanced Other
Network) - REG (regional programmes);
AF: search selection for alternative
frequencies in RDS mode;
automatic/manual tuning into
stations;
FM Multipath detector;
manual storing of 30 stations: 18 on
FM band (6 on FM1, 6 on FM2, 6 on
FMT), 12 on MW band;
automatic storing (AUTOSTORE
function) of 6 stations in the dedicated
FM band;
SPEED VOLUME function:
automatic volume adjustment
according to the vehicle speed;
automatic Stereo/Mono selection.
CD section
Direct selection of the disc;
Track selection (forward/back);
Fast advance (forward/back) through
tracks;
CD Display function: display of disc
name and time elapsed since the
start of the track
Playing of audio CDs, CD-Rs and
CD-RWs.
44)
MP3 CD section
MP3-Info function (ID3-TAG);
Folder selection (previous/next);
Track selection (forward/back);
Fast advance (forward/back) through
tracks;
MP3 Display function: display of
name of folder, ID3-TAG information,
time elapsed since the start of the
track, name of the file;
Reading of audio or data CD, CD-R
and CD-RW.
Audio section
Mute/Pause function;
Soft-Mute function;
Loudness function
7-band graphic equaliser
Separate bass/treble adjustment
Right/left channel balance.FUNCTIONS AND
ADJUSTMENTS
SWITCHING ON THE RADIO
The car radio comes on when the
ON/OFF button/knob is briefly pressed.
When the radio is turned on with the
key extracted from the ignition, it
switches off automatically after about
20 minutes.
SWITCHING OFF THE RADIO
Keep the ON/OFF button/knob
pressed.
SELECTING THE RADIO
FUNCTIONS
By pressing the FM AS button quickly
and repeatedly, the following audio
sources can be selected cyclically:
TUNER (“FM1”, “FM2”, “FMA”).
By pressing the AM button briefly and
repeatedly, the following audio sources
can be selected cyclically:
TUNER (“MW1”, “MW2”).
SELECTING THE CD/CD CHANGER
FUNCTION
By briefly pressing the CD button, the
CD/CD CHANGER audio source can
be selected (only with a CD loaded).
MUTE/PAUSE FUNCTION (zeroing
the volume)
Press the MUTE button briefly to
activate the Mute function.
196
MULTIMEDIA
Page 200 of 220
Each time the button is pressed the
following bands are selected cyclically:
Pressing the FM AS button: “FM1”,
“FM2” or “FMA”;
Pressing the AM button: “MW1”,
“MW2”.
Each band is highlighted by the name
in the display. The last station selected
on the respective frequency band will
be tuned into.
PRESET BUTTONS
The buttons numbered from 1 to 6 are
used to set the following preset
stations:
18 in the AM band; 6 in FM1, 6 in
FM2, 6 in FMT or "FMA" (on some
versions);
12 in the MW band.
To listen to a preset station, select the
desired frequency band and then briefly
press the corresponding preset button
(from 1 to 6).
By pressing the preset button for more
than 2 seconds, the tuned station will
be stored. The storing phase is
confirmed by an acoustic signal.
AUTOMATIC TUNING
Briefly press the
orbutton to start
the automatic tuning search for the
next station that can be received in the
selected direction.If the button
orpressed down
longer, the fast search starts. When the
button is released, the tuner will stop
on the next station that can be
received.
If the TA function (traffic news) is on, the
tuner searches only for stations that
broadcast traffic news.
MANUAL TUNING
This is used to manually search for
stations in the preselected band. Select
the desired frequency band and then
press the
orbutton briefly and
repeatedly to start to the search in the
desired direction. If the
orbutton
is pressed longer, the fast search will
start and then stop when the button is
released.
AUTOSTORE FUNCTION (automatic
station storage)
To activate the Autostore function, hold
the FM AS button pressed until a beep
is heard. With this function, the radio
automatically stores the 6 stations with
the strongest signal in decreasing
order on the FMA frequency band.
During the automatic storing process,
the text “Autostore” flashes on the
display.Press the FM AS button again to stop
the Autostore function: the radio will
again tune into the station listened
to before the activation of the function.
When the Autostore scan is concluded,
the radio will automatically tune into
the first preset station on the FMA band
(preset 1).
The stations that have a strong signal at
that moment are then automatically
stored in the preselected band in the
buttons numbered 1 to 6.
When the Autostore function is
activated within the MW band, the FMA
band is automatically selected and the
function is performed.
IMPORTANT Sometimes the Autostore
function is not able to find 6 stations
with a strong signal. In this case, the
strongest stations stored will be
duplicated in the free preset buttons.
IMPORTANT When the Autostore
function is activated, the stations that
were previously stored in the FMA band
are deleted.
198
MULTIMEDIA
Page 201 of 220
EMERGENCY ALARM RECEPTION
The radio can receive emergency
alerts in RDS mode in exceptional
circumstances or when there are
dangerous situations (earthquakes,
floods, etc.), if these are being
transmitted by the broadcaster tuned
into.
This function is activated automatically
and cannot be turned off.
The word ALARM will be shown in the
display during the transmission of an
emergency announcement. The volume
of the radio changes during this
announcement in the same way as
during traffic news.
CD PLAYER
This chapter describes the variants
regarding the operation of the CD
player only: as far as the operation of
the radio is concerned, refer to the
description in the "Functions and
Adjustments" chapter.
SELECTING THE CD PLAYER
To activate the CD player built-into the
equipment, proceed as follows:
insert a CD with the equipment
switched on: the first track will start to
play;
or
if a CD has already been loaded,
switch on the radio and then briefly
press the CD button to select the “CD”
operating mode: the last track listened
to will start to play.
LOADING/EJECTING A CD
To load the CD, insert it gently into the
slot to activate the motorised loading
system, which will position it correctly.
Press the button
, with the device
turned on, to activate the CD motorised
ejecting system. After ejection, the last
audio source listened to before playing
the CD will be heard.
If the CD is not removed from the radio,
it will automatically be reloaded about
20 seconds later and will tune into
Tuner mode (Radio).
The CD cannot be ejected if the radio is
off.
If the ejected CD is reloaded without
having removed it completely from the
slot, the radio will not switch to the
CD source.
Possible error messages
If the loaded CD cannot be played (e.g.
a CD ROM has been inserted or the
CD is inserted the wrong way round or
there is reading error) the display shows
the words “CD Disc error”.CD MP3 PLAYER
SELECTING MP3 SESSIONS ON
HYBRID DISCS
If a hybrid disc is inserted (Mixed Mode,
Enhanced, CD-Extra) also containing
MP3 files, the radio automatically starts
playing the audio session. It is possible
to move to the MP3 session whilst
playing by keeping the CD button
pressed for more than 2 seconds.
IMPORTANT When the function
is activated the radio may take a few
seconds to start playback. Whilst
checking the disc the display will show
"CD Reading". If no MP3 files are
detected, the radio will resume playing
the audio session from the point where
it was interrupted.
SELECTING NEXT/PREVIOUS
FOLDER
Press the
button to select one of the
next folders or press the
button to
select a previous folder. The display will
show the number and the name of
the folder (e.g. “DIR 2 XXXXXX”).
XXXXXX: name of the folder (the display
will only show the first 8 characters).
The folders are selected cyclically: the
first folder is selected after the last
folder and vice versa.
199
Page 203 of 220
IMPORTANT Vehicle position tracing
remains active for the assistance
services, where provided, in the event
of accident or vehicle theft, but is not
visible to the customer.
PRIVACY MODE activation
procedure
Proceed as follows:
take note of the total odometer
reading;
make sure that the instrument panel
is off;
Send the following text message to
+393424112613: “PRIVACY
PRIVACY ZFA3340000P123456
12532). You can find the chassis
number in the registration document;
before starting the engine, wait
to receive the text message confirming
that Privacy mode has been activated
and indicating when it expires.
When you have received the
confirmation, you can start your trip in
the knowledge that the vehicle will
not be traced until the indicated expiry
time. If it expires while you are still
travelling, Privacy mode will be
extended until you turn off the engine
(instrument panel off).If you receive a text message indicating
that your request was not successful,
you must be aware that the vehicle will
continue to be visible to the registered
customer.
If you have any doubts or problems
during activation, consult the FAQ on
the www.driveuconnect.eu portal,
contact the Fiat Dealership or contact
Customer Care.
OFFICIAL TYPE
APPROVALS
All radio equipment supplied with the
vehicle complies with the 2014/53/EU
directive.
For further information visit the
www.mopar.eu/owner or http://
aftersales.fiat.com/elum/ websites.
201
Page 215 of 220
INDEX
A
BS...............................72
Additive for diesel emissions
AdBlue (Urea)...................114
Airbags (general warnings)...........95
Alarm...............................12
Arrangement possibilities for
Universal Isofix child restraint
system on seats of vehicle........88
ASR system.........................74
Battery...........................157
Replacement...................157
Battery (recharging)................159
Bonnet
Closing.........................30
Opening........................29
Brake fluid.........................157
Brake lights (bulb replacement).....128
Bump starting......................139
Carrying children safely
Arrangement possibilities for
child restraint systems...........85
Child restraint systems...........83
Safety regulations...............89
Cartridge replacement..............123
Ceiling light with movable lens
(changing a bulb)................130
Changing a wheel..................117
Chassis marking...................165
Checking levels....................152CO2 emissions....................186
Comfort-Matic transmission........102
Coupling the tow ring..............140
Courtesy lights......................24
Cruise Control.....................104
Cylinder marking...................165
Dashboard..........................8
Dead Lock..........................10
Dead Lock device...................10
Demanding vehicle use.............151
Digital display
Setup menu.....................44
Digital display
Control buttons..................44
Standard screen.................44
Dimensions........................171
Cargo versions.................171
Combi versions................173
Dipped beam headlights.............22
Dipped/main beam headlights......127
Dipped/main beam headlights
(bulb replacement)...............127
Direction indicators.............23-128
Direction indicators
(bulb replacement)...............128
Direction indicators
(changing a bulb)................128
Doors (unlocking/locking)............14
Double rear wing doors..............15
Driver protection ladder..............32
EBD system........................72
Electric windows
Electric front windows...........28
Manual front windows...........29
Engine.............................167
Engine compartment fuse box
table............................135
Engine compartment fuses.........132
Engine coolant.....................156
Engine marking....................165
Engine oil..........................156
ESC (system).......................73
Exterior lights.......................22
Fiat CODE system..................11
Fix&Go automatic kit...............122
Fix&Go Automatic quick tyre
pressure restoration.............122
Flashing............................22
Fluids and lubricants...............182
Fog lights......................23-128
Fog lights (bulb replacement).......128
Follow Me Home....................23
Front airbags........................90
Front airbag driver's side.........91
Passenger side front airbag......91
Front airbags
Manually deactivating the front
airbag and side bag.............91
Front ceiling light...................130
Page 216 of 220
Front ceiling light with map
reading lights (changing a
bulb)............................130
Front light clusters.................127
Front light clusters (bulb
replacement)....................127
Fuel consumption..................186
Fuel cut-off system.................140
Fuel tank cap......................110
Fuses (replacement)................132
Gear lever.........................102
Handbrake........................100
Handbrake lever...................100
Hazard warning lights..............117
Headrests
Front ............................19
Rear............................19
Heating and ventilation..............27
Hill Holder (system)..................73
Identification data..................164
Ignition device
starting.........................11
Steering lock....................11
Inflation pressure...................170
Instrument panel....................40
Isofix child restraint systems
(setup)...........................87
Arrangement possibilities for
child restraint system on seats
of vehicle........................88Isofix child seat assembly setup......87
iTPMS..............................76
Jack..............................117
Jump starting......................139
Keys
Key with remote control...........9
Mechanical key...................9
Ordering additional remote
controls.........................10
Lifting the vehicle..................161
Light bulbs
Bulb types.....................125
Luggage compartment
Extending the boot..............34
Removing the parcel shelf........33
Removing the rear seat..........34
Repositioning the rear seat.......34
Luggage compartment
Emergency opening.............33
Main beam headlights..............22
Maintenance and care - regular
checks..........................151
Maintenance and care -
Scheduled Servicing.............143
Maintenance and care -
scheduled servicing plan.........144
Manual climate control system.......27
Manually deactivating the front
airbag and side bag...............91
Mopar® Connect..................200MSR system........................74
Multifunction display
Control buttons..................45
Setup menu.....................46
Standard screen.................45
Number plate lights................129
Number plate lights (bulb
replacement)....................129
Official type approvals.............201
On-board instruments...............40
Ordering additional remote
controls..........................10
Parcel shelf.........................33
Parking lights.......................22
Parking sensors....................106
Parking the vehicle.................101
Partitions...........................31
Securing the load................32
Passenger compartment fuse
box table........................138
Passenger compartment fuses......136
Performance.......................175
Power steering fluid................157
Pre-tensioners......................80
Prescriptions for vehicle at end
of life...........................187
pressure restoring..................123
Procedure for diesel versions.........98
INDEX
Page 217 of 220
Procedure for petrol versions.........98
Radio.............................189
Rear ceiling light...................131
Rear fog lights.......................23
Rear fog lights
(changing a bulb)................128
Rear light clusters..................128
Rear light clusters (bulb
replacement)....................128
Rear view mirrors
Door mirrors.....................21
Rear view mirrors
Interior mirror....................21
Rear window washer................26
Rear Window Wiper............26-160
Refuelling..........................178
Refuelling the vehicle...............110
Repair procedure..................122
Replacing a bulb...................124
Replacing an exterior bulb..........127
Replacing an interior bulb...........130
Replacing interior bulbs.............130
Replacing the rear window wiper
blade...........................161
Replacing the windscreen wiper
blades..........................160
SBR system........................80
Seat belts
Use .............................79Seats
Foldaway passenger seat........18
Front seats......................17
Rear seats......................18
Service schedule...................144
Setup menu.........................44
Side airbags
Side bag........................94
Side bags...........................94
Side lights.........................127
Side lights (changing a bulb)........127
Side lights/rear fog light
(changing a bulb)................128
Side/tail lights.......................22
Sliding side doors...................14
Speed block.......................105
Start&Stop system.................108
Starting the engine..................98
Steering lock........................11
Steering wheel......................20
Symbols.............................4
Third brake lights..................129
Third brake lights (changing a
bulb)............................129
Topping up Adblue diesel
emissions additive (UREA)........110
Towing the vehicle..................140
Towing trailers.....................115
Traction Plus system.................78
Transmission.......................102Trip computer.......................46
Vehicle summary identification
and paintwork plate..............164
Version with methane system
(Natural Power)...................35
Warning lights and messages.......48
Weights and loads.................176
Wheel replacement procedure......118
Wheels............................169
Wheels and tyres...................161
Rims and tyres.................161
Window washing....................26
Windscreen wiper...............26-160
Windscreen/rear window washer
fluid.............................156