roof FIAT FIORINO 2019 Owner handbook (in English)
[x] Cancel search | Manufacturer: FIAT, Model Year: 2019, Model line: FIORINO, Model: FIAT FIORINO 2019Pages: 220, PDF Size: 6.22 MB
Page 26 of 220
Each time the stalk is moved, the
instrument panel warning light
comes on and the corresponding
message appears on the display (see
“Warning lights and messages” in
the "Knowing the instrument panel"
chapter) for as long as the function
remains on. The warning light comes
on when the stalk is first operated and
stays on until the function is
automatically deactivated. Each
movement of the stalk only increases
the amount of time the lights stay on.
Deactivation
Keep the stalk pulled towards the
steering wheel for more than 2
seconds.INTERIOR LIGHTS
CEILING LIGHT WITH
SPOT LIGHTS
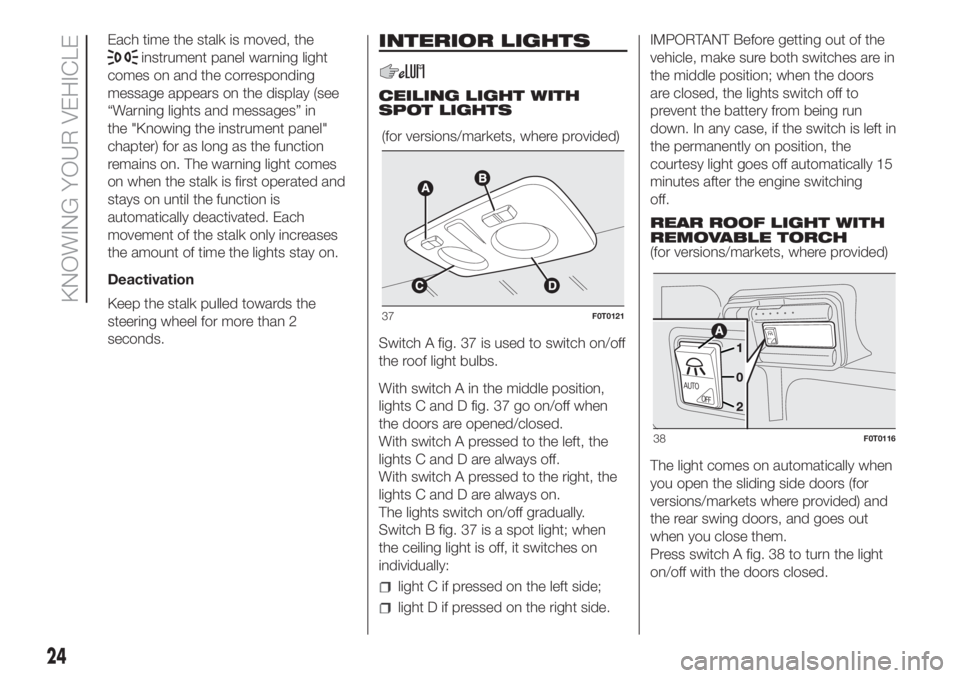
Switch A fig. 37 is used to switch on/off
the roof light bulbs.
With switch A in the middle position,
lights C and D fig. 37 go on/off when
the doors are opened/closed.
With switch A pressed to the left, the
lights C and D are always off.
With switch A pressed to the right, the
lights C and D are always on.
The lights switch on/off gradually.
Switch B fig. 37 is a spot light; when
the ceiling light is off, it switches on
individually:
light C if pressed on the left side;
light D if pressed on the right side.IMPORTANT Before getting out of the
vehicle, make sure both switches are in
the middle position; when the doors
are closed, the lights switch off to
prevent the battery from being run
down. In any case, if the switch is left in
the permanently on position, the
courtesy light goes off automatically 15
minutes after the engine switching
off.
REAR ROOF LIGHT WITH
REMOVABLE TORCH
(for versions/markets, where provided)
The light comes on automatically when
you open the sliding side doors (for
versions/markets where provided) and
the rear swing doors, and goes out
when you close them.
Press switch A fig. 38 to turn the light
on/off with the doors closed. (for versions/markets, where provided)
37F0T0121
AUTO
AUTOOFF
38F0T0116
24
KNOWING YOUR VEHICLE
Page 27 of 220
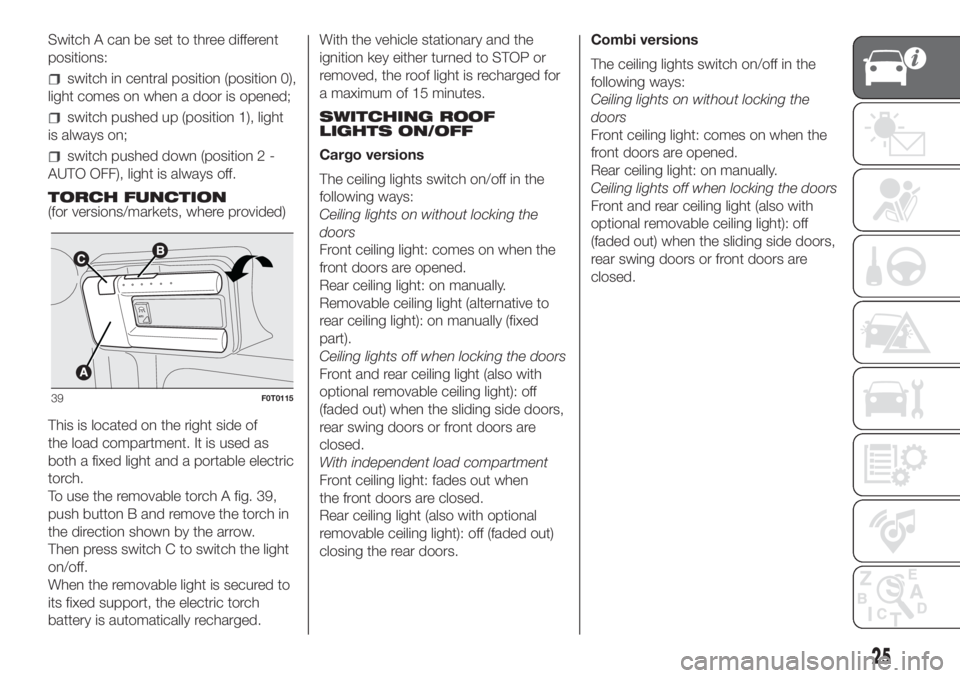
Switch A can be set to three different
positions:
switch in central position (position 0),
light comes on when a door is opened;
switch pushed up (position 1), light
is always on;
switch pushed down (position 2 -
AUTO OFF), light is always off.
TORCH FUNCTION
(for versions/markets, where provided)
This is located on the right side of
the load compartment. It is used as
both a fixed light and a portable electric
torch.
To use the removable torch A fig. 39,
push button B and remove the torch in
the direction shown by the arrow.
Then press switch C to switch the light
on/off.
When the removable light is secured to
its fixed support, the electric torch
battery is automatically recharged.With the vehicle stationary and the
ignition key either turned to STOP or
removed, the roof light is recharged for
a maximum of 15 minutes.
SWITCHING ROOF
LIGHTS ON/OFF
Cargo versions
The ceiling lights switch on/off in the
following ways:
Ceiling lights on without locking the
doors
Front ceiling light: comes on when the
front doors are opened.
Rear ceiling light: on manually.
Removable ceiling light (alternative to
rear ceiling light): on manually (fixed
part).
Ceiling lights off when locking the doors
Front and rear ceiling light (also with
optional removable ceiling light): off
(faded out) when the sliding side doors,
rear swing doors or front doors are
closed.
With independent load compartment
Front ceiling light: fades out when
the front doors are closed.
Rear ceiling light (also with optional
removable ceiling light): off (faded out)
closing the rear doors.Combi versions
The ceiling lights switch on/off in the
following ways:
Ceiling lights on without locking the
doors
Front ceiling light: comes on when the
front doors are opened.
Rear ceiling light: on manually.
Ceiling lights off when locking the doors
Front and rear ceiling light (also with
optional removable ceiling light): off
(faded out) when the sliding side doors,
rear swing doors or front doors are
closed.
A
UT
O
39F0T0115
25
Page 128 of 220
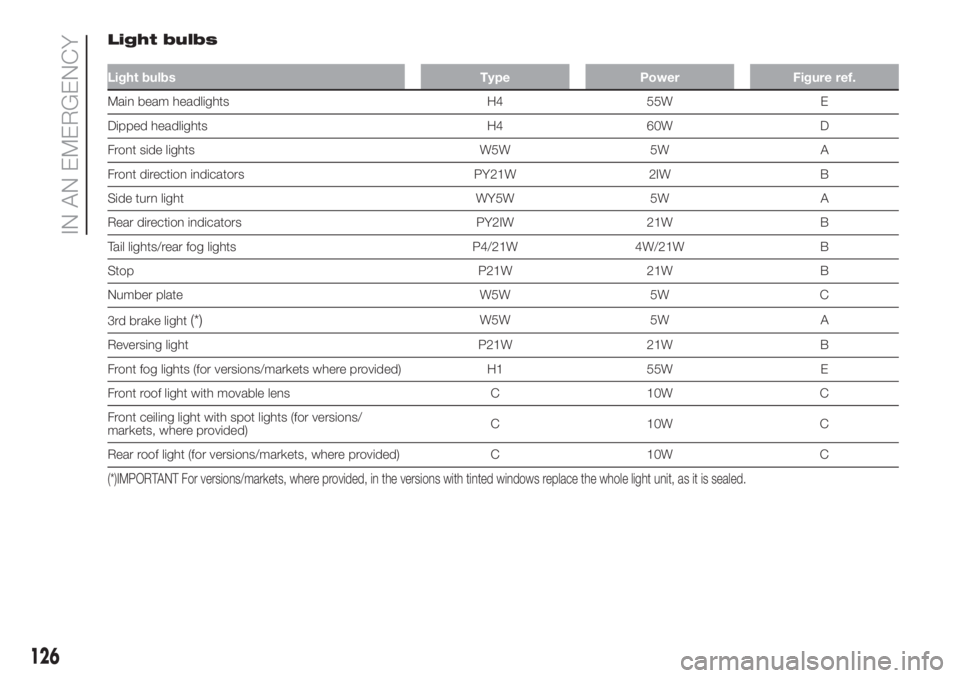
Light bulbs
Light bulbs Type Power Figure ref.
Main beam headlights H4 55W E
Dipped headlights H4 60W D
Front side lights W5W 5W A
Front direction indicators PY21W 2IW B
Side turn light WY5W 5W A
Rear direction indicators PY2IW 21W B
Tail lights/rear fog lights P4/21W 4W/21W B
Stop P21W 21W B
Number plate W5W 5W C
3rd brake light
(*)W5W 5W A
Reversing light P21W 21W B
Front fog lights (for versions/markets where provided) H1 55W E
Front roof light with movable lens C 10W C
Front ceiling light with spot lights (for versions/
markets, where provided)C 10W C
Rear roof light (for versions/markets, where provided) C 10W C
(*)IMPORTANT For versions/markets, where provided, in the versions with tinted windows replace the whole light unit, as it is sealed.
126
IN AN EMERGENCY
Page 132 of 220
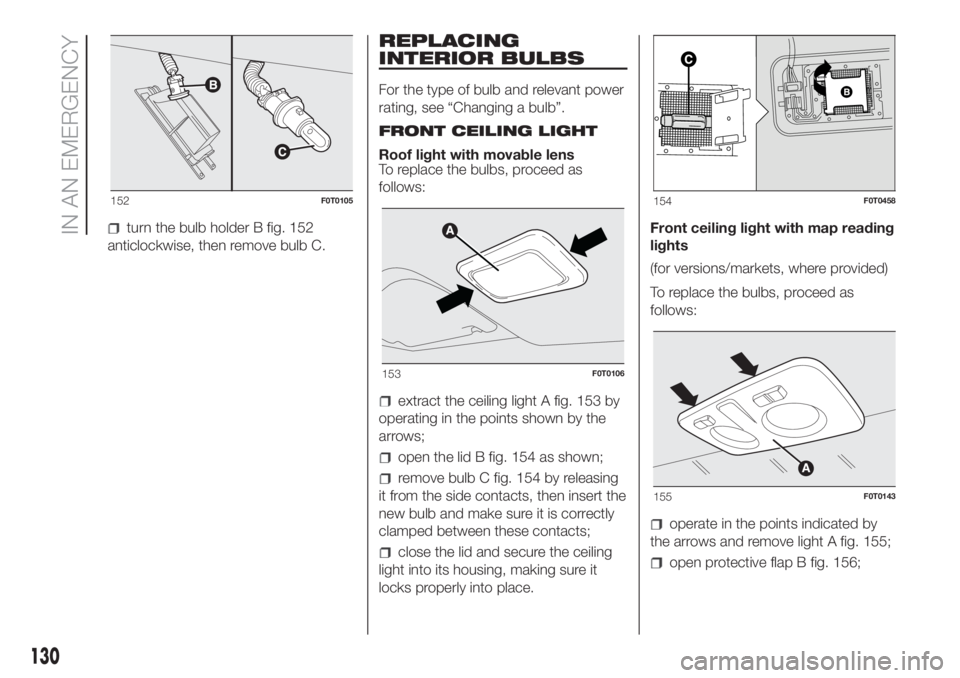
turn the bulb holder B fig. 152
anticlockwise, then remove bulb C.
REPLACING
INTERIOR BULBS
For the type of bulb and relevant power
rating, see “Changing a bulb”.
FRONT CEILING LIGHT
Roof light with movable lens
To replace the bulbs, proceed as
follows:
extract the ceiling light A fig. 153 by
operating in the points shown by the
arrows;
open the lid B fig. 154 as shown;
remove bulb C fig. 154 by releasing
it from the side contacts, then insert the
new bulb and make sure it is correctly
clamped between these contacts;
close the lid and secure the ceiling
light into its housing, making sure it
locks properly into place.Front ceiling light with map reading
lights
(for versions/markets, where provided)
To replace the bulbs, proceed as
follows:
operate in the points indicated by
the arrows and remove light A fig. 155;
open protective flap B fig. 156;
152F0T0105
153F0T0106
154F0T0458
155F0T0143
130
IN AN EMERGENCY
Page 174 of 220
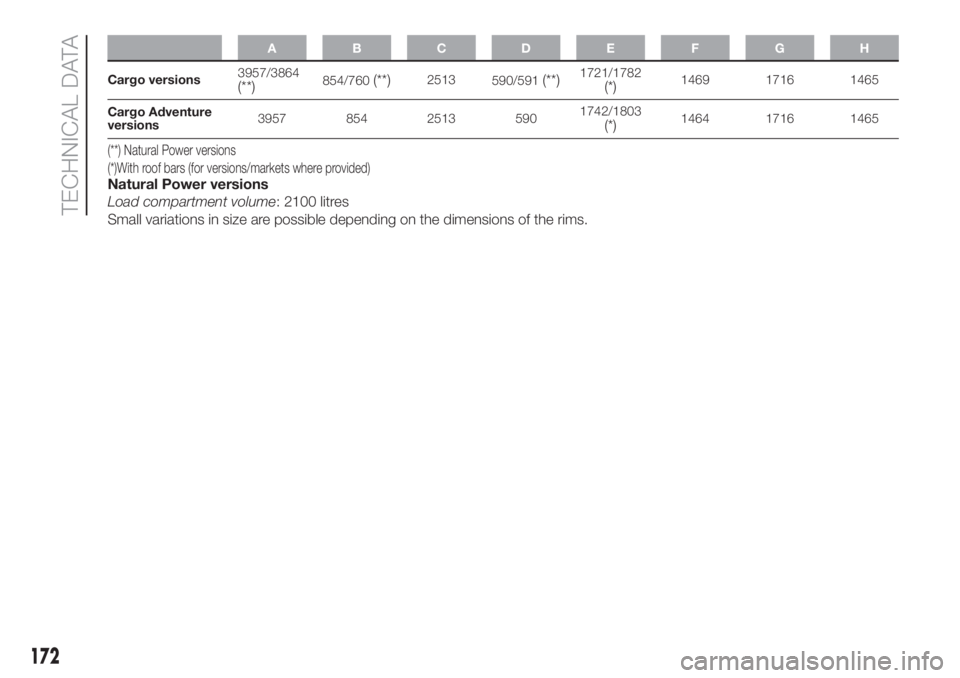
ABCDE FGH
Cargo versions3957/3864(**)854/760(**)2513
590/591(**)1721/1782(*)1469 1716 1465
Cargo Adventure
versions3957 854 2513 5901742/1803
(*)1464 1716 1465
(**) Natural Power versions
(*)With roof bars (for versions/markets where provided)
Natural Power versions
Load compartment volume: 2100 litres
Small variations in size are possible depending on the dimensions of the rims.
172
TECHNICAL DATA
Page 175 of 220
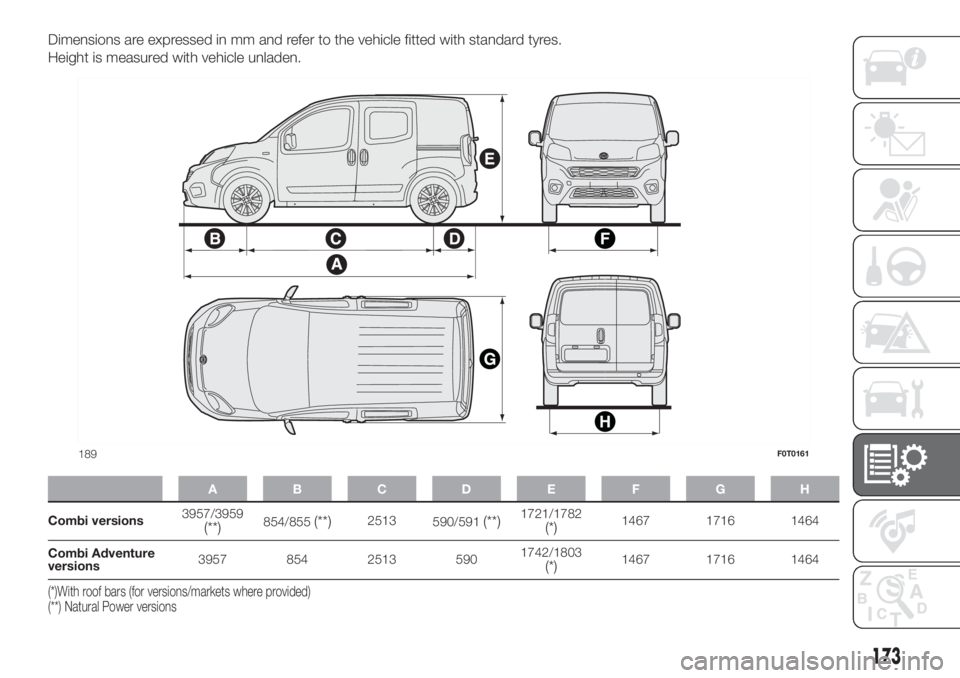
Dimensions are expressed in mm and refer to the vehicle fitted with standard tyres.
Height is measured with vehicle unladen.
ABCDE FGH
Combi versions3957/3959(**)854/855(**)2513
590/591(**)1721/1782(*)1467 1716 1464
Combi Adventure
versions3957 854 2513 5901742/1803
(*)1467 1716 1464
(**) Natural Power versions (*)With roof bars (for versions/markets where provided)
189F0T0161
173
Page 179 of 220
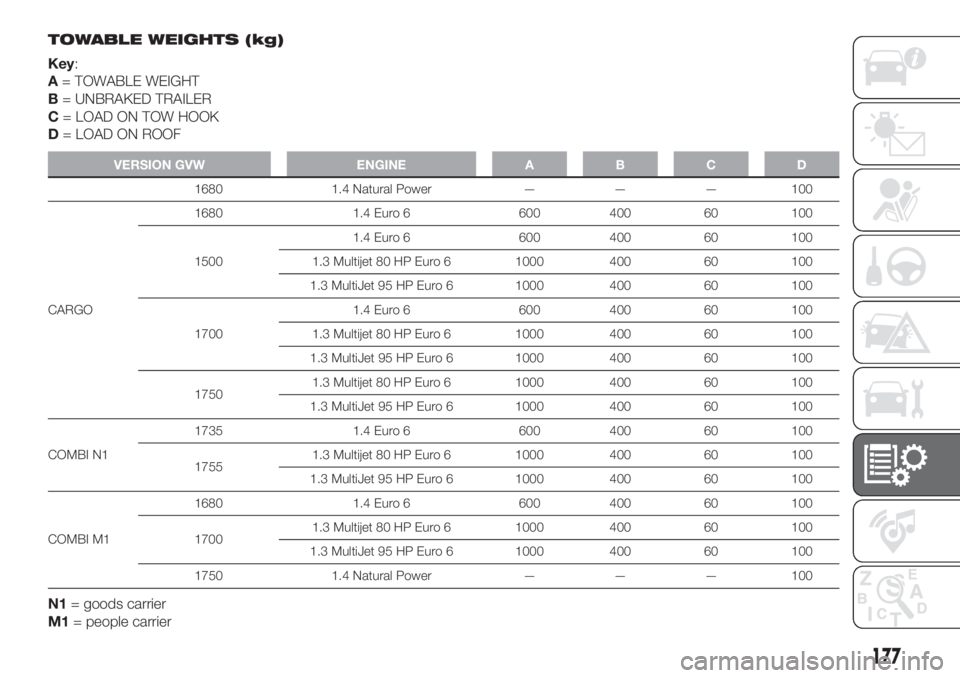
TOWABLE WEIGHTS (kg)
Key:
A= TOWABLE WEIGHT
B= UNBRAKED TRAILER
C= LOAD ON TOW HOOK
D= LOAD ON ROOF
VERSION GVW ENGINE A B C D
1680 1.4 Natural Power — — — 100
CARGO1680 1.4 Euro 6 600 400 60 100
15001.4 Euro 6 600 400 60 100
1.3 Multijet 80 HP Euro 6 1000 400 60 100
1.3 MultiJet 95 HP Euro 6 1000 400 60 100
17001.4 Euro 6 600 400 60 100
1.3 Multijet 80 HP Euro 6 1000 400 60 100
1.3 MultiJet 95 HP Euro 6 1000 400 60 100
17501.3 Multijet 80 HP Euro 6 1000 400 60 100
1.3 MultiJet 95 HP Euro 6 1000 400 60 100
COMBI N11735 1.4 Euro 6 600 400 60 100
17551.3 Multijet 80 HP Euro 6 1000 400 60 100
1.3 MultiJet 95 HP Euro 6 1000 400 60 100
COMBI M11680 1.4 Euro 6 600 400 60 100
17001.3 Multijet 80 HP Euro 6 1000 400 60 100
1.3 MultiJet 95 HP Euro 6 1000 400 60 100
1750 1.4 Natural Power — — — 100
N1= goods carrier
M1= people carrier
177
Page 188 of 220
FUEL CONSUMPTION AND CO2EMISSIONS
The fuel consumption and CO2emission figures declared by the manufacturer are determined on the basis of the type-approval
tests laid down by the applicable standards in the country where the vehicle is registered.
The type of route, traffic situations, weather conditions, driving style, general conditions of the vehicle, trim level/equipment/
accessories, climate control system, vehicle load, roof rack, other situations that affect aerodynamics or air drag may lead
to different fuel consumption levels than those measured. The fuel consumption will only become more regular after driving the
first 3000 km.
To find the specific fuel consumption and CO
2emission figures for this vehicle, please refer to the data in the Certificate of
Conformity, and the related documentation that accompanies the vehicle.
186
TECHNICAL DATA
Page 204 of 220
WARNING
INTERIOR FITTINGS
Never travel with the glove compartment open: it could injure the passenger in the event of a crash.
The cigar lighter gets extremely hot. Handle it carefully and make sure children don't touch it: risk of fire and/or burning.
Do not use the ashtray as a waste paper basket: it may catch fire in contact with cigarette stubs.
Do not use the book rest in a vertical position with the vehicle in motion.
ROOF RACK/SKI RACK
Fully comply with the regulations in force concerning maximum clearance.
After travelling for a few kilometres, check to ensure that the fixing screws for the attachments are well tightened.
INTERIOR
Never use flammable products, such as petroleum ether or modified petrol, to clean the inside of the vehicle. The electrostatic charges
which are generated by rubbing during the cleaning operation may cause a fire.
Do not keep aerosol cans in the vehicle: they might explode. Aerosol cans must not be exposed to temperatures of more than 50°C.
When the vehicle is exposed to sunlight, the temperature inside can greatly exceed this value.
EOBD SYSTEM
If, when the ignition key is turned to MAR, thewarning light does not switch on, switches on constantly or flashes when driving (on
certain versions together with the message on the display), contact a Fiat Dealership as soon as possible. The operation of thewarning
light may be checked by the traffic police using specific devices. Comply with the laws and regulations of the country where you are driving.
WHEELS AND TYRES
You must not exceed 160 km/h on snow tyres with a “Q” mark; in any case, make sure you stick to the rules of the highway code.
POWER SUPPLY
Modifications or repairs to the supply system that are not carried out correctly or do not take the system technical specifications into
account can cause malfunctions leading to the risk of fire.
RIM PROTECTOR TYRES
DO NOT fit wheel hub caps when using integral hub caps fixed (with springs) to the steel rim and after sale tyres provided with a Rim
Protector. Use of unsuitable tyres and wheel caps may cause sudden decrease of tyre pressure.
203
Page 205 of 220
WARNING
ROOF RACK/SKI RACK
Distribute the load evenly and pay attention to side winds when driving.
Never exceed the maximum permitted loads (see chapter "Technical specifications").
INSTRUMENT PANEL
If the needle for the engine coolant temperature reaches the red area, stop the engine immediately and contact a Fiat Dealership.
“COMFORT-MATIC" TRANSMISSION Messages on the display
If the warning light(together with the message in the display) continues to remain on in the panel, go to a Fiat Dealership.
If the message is still shown in the display, contact a Fiat Dealership.
To keep the clutch in good condition, do not use the accelerator to keep the car stationary (e.g. when stopped facing uphill); the clutch
could be damaged by overheating. Use the brake pedal instead and operate the accelerator only when you are ready to set off.
BODYWORK
Some automatic systems equipped with old generation blades and/or with a poor maintenance can damage the paint, promoting the
creation of microscoring which give an opaque/coated appearance to the paint, especially on dark colours. In this case, just lightly polish with
specific products.
WARNING
BODYWORK
Detergents pollute the environment. The vehicle should be washed in areas equipped for collecting and purifying the liquid used in the
washing process.
204