clock FIAT FREEMONT 2013 Owner handbook (in English)
[x] Cancel search | Manufacturer: FIAT, Model Year: 2013, Model line: FREEMONT, Model: FIAT FREEMONT 2013Pages: 352, PDF Size: 5.22 MB
Page 256 of 352
NOTE:Assemble components 2 and 3 by seating the
small ball at the end of component 2 in the small hole at
the end of component 3. This will lock these compo-
nents together. Assemble components 1 and 2 so that
the wheel nut socket at the end of component 1 faces
upward when seated on component 2. This will make it
easier to rotate the assembly when operating the
winch mechanism.
2. Fit the assembled jack-handle over the winch drive nut located in the jack storage area. Rotate the
jack-handle assembly counterclockwise until the
spare tire is on the ground with enough cable slack
to allow you to pull the spare tire out from under-
neath the vehicle.
The winch mechanism is designed for use
with the jack-handle only. Use of an air
wrench or other power tools is not rec-
ommended and it can damage the winch.
3. Pull the spare tire out from underneath the vehicle and raise it upright so the tire's tread is on the
ground.
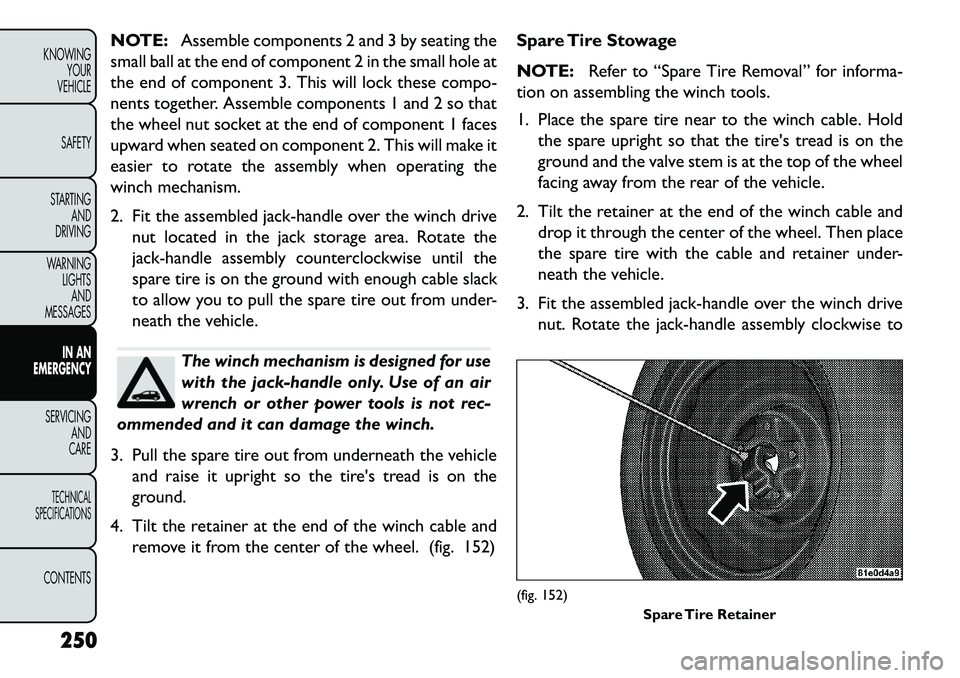
4. Tilt the retainer at the end of the winch cable and remove it from the center of the wheel. (fig. 152) Spare Tire Stowage
NOTE:
Refer to “Spare Tire Removal” for informa-
tion on assembling the winch tools.
1. Place the spare tire near to the winch cable. Hold the spare upright so that the tire's tread is on the
ground and the valve stem is at the top of the wheel
facing away from the rear of the vehicle.
2. Tilt the retainer at the end of the winch cable and drop it through the center of the wheel. Then place
the spare tire with the cable and retainer under-
neath the vehicle.
3. Fit the assembled jack-handle over the winch drive nut. Rotate the jack-handle assembly clockwise to
(fig. 152) Spare Tire Retainer
250
KNOWING YOUR
VEHICLE
SAFETY
STARTING AND
DRIVING
WARNING LIGHTSAND
MESSAGES
IN AN
EMERGENC
Y
SERVICING AND
C
ARETECHNICAL
SPECIFICATIONSCONTENTS
Page 258 of 352
Do not attempt to raise the vehicle by
jacking on locations other than those
indicated in the Jacking Instructions for
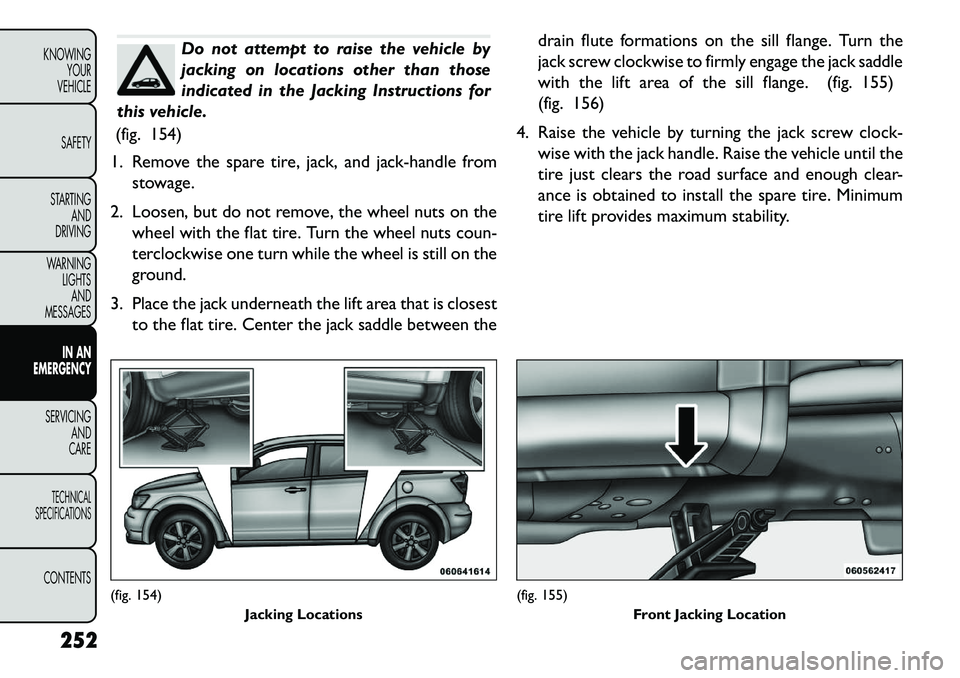
this vehicle.
(fig. 154)
1. Remove the spare tire, jack, and jack-handle from stowage.
2. Loosen, but do not remove, the wheel nuts on the wheel with the flat tire. Turn the wheel nuts coun-
terclockwise one turn while the wheel is still on the
ground.
3. Place the jack underneath the lift area that is closest to the flat tire. Center the jack saddle between the drain flute formations on the sill flange. Turn the
jack screw clockwise to firmly engage the jack saddle
with the lift area of the sill flange. (fig. 155)
(fig. 156)
4. Raise the vehicle by turning the jack screw clock- wise with the jack handle. Raise the vehicle until the
tire just clears the road surface and enough clear-
ance is obtained to install the spare tire. Minimum
tire lift provides maximum stability.
(fig. 154) Jacking Locations
(fig. 155)Front Jacking Location
252
KNOWING YOUR
VEHICLE
SAFETY
STARTING AND
DRIVING
WARNING LIGHTSAND
MESSAGES
IN AN
EMERGENC
Y
SERVICING AND
C
ARETECHNICAL
SPECIFICATIONSCONTENTS
Page 260 of 352
NOTE:
For vehicles so equipped, do not attempt to install acenter cap or wheel cover on the compact spare.
Refer to “Compact Spare Tire” and to “Limited-Use Spare” under “Tires — General Information” in
“Technical Specifications” for additional warnings,
cautions, and information about the spare tire, its
use, and operation.
7. Install the wheel nuts with the cone-shaped end of the nut toward the wheel. Lightly tighten the wheel
nuts.
WARNING!
To avoid the risk of forcing the vehicle
of
f the jack, do not tighten the wheel
nuts fully until the vehicle has been lowered.
Failure to follow this warning may result in per-
sonal injury.
8. Lower the vehicle by turning the jack screw coun- terclockwise with the jack handle.
9. Finish tightening the lug nuts. Push down on the wrench while at the end of the handle for increased
leverage. Tighten the lug nuts in a star pattern until
each nut has been tightened twice. The correct
tightness of each lug nut is 130 N·m. If in doubt
about the correct tightness, have them checked with a torque wrench by you authorized dealer or
service station.
10. Lower the jack to its fully closed position.
11. Place the deflated (flat) tire in the cargo area. Do
not stow the deflated tire in the spare tire
stowage location. Have the deflated (flat) tire
repaired or replaced as soon as possible.
12. To stow the winch cable and retainer, fit the assembled jack-handle over the winch drive nut.
Rotate the jack-handle assembly clockwise until
you hear the winch mechanism click three times. It
cannot be over tightened.
13. Stow the jack-handle and jack. Remove the wheel blocks from the vehicle and release the park brake.
14. Check the tire pressure as soon as possible. Adjust the tire pressure as required.
ROAD TIRE INSTALLATION
Vehicles Equipped With Wheel Covers
1. Mount the road tire on the axle.
2.
To ease the installation process for steel wheels with
wheel covers, install two lug nuts on the mounting
studs which are on each side of the valve stem. Install
the lug nuts with the cone shaped end of the nut
toward the wheel. Lightly tighten the lug nuts.
254
KNOWING YOUR
VEHICLE
SAFETY
STARTING AND
DRIVING
WARNING LIGHTSAND
MESSAGES
IN AN
EMERGENC
Y
SERVICING AND
C
ARETECHNICAL
SPECIFICATIONSCONTENTS
Page 261 of 352
WARNING!
To avoid the risk of forcing the vehicle
of
f the jack, do not tighten the wheel
nuts fully until the vehicle has been lowered.
Failure to follow this warning may result in per-
sonal injury.
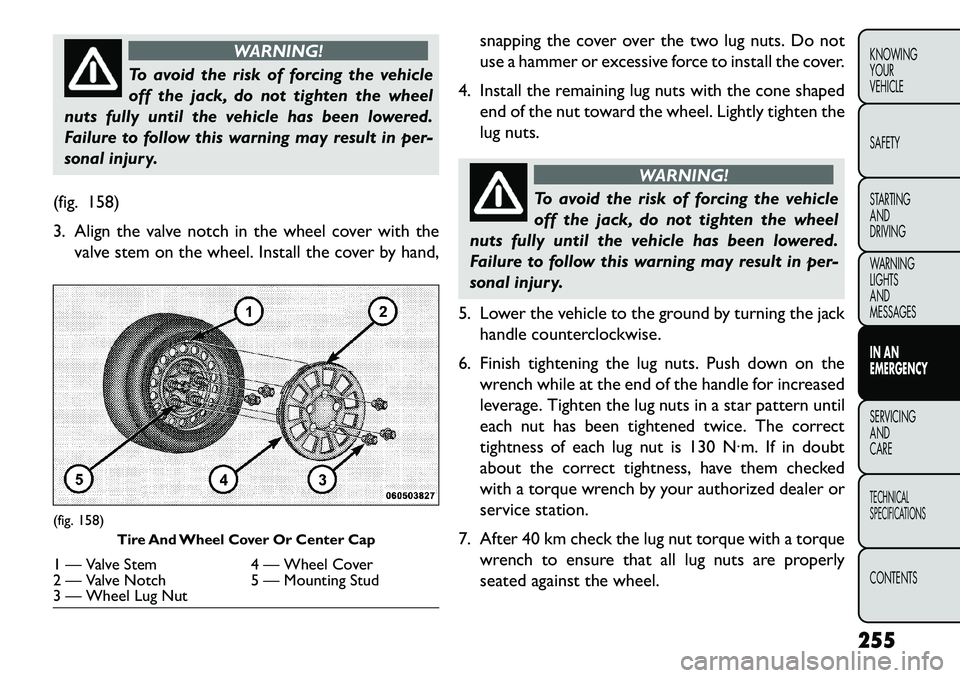
(fig. 158)
3. Align the valve notch in the wheel cover with the valve stem on the wheel. Install the cover by hand, snapping the cover over the two lug nuts. Do not
use a hammer or excessive force to install the cover.
4. Install the remaining lug nuts with the cone shaped end of the nut toward the wheel. Lightly tighten the
lug nuts.
WARNING!
To avoid the risk of forcing the vehicle
of
f the jack, do not tighten the wheel
nuts fully until the vehicle has been lowered.
Failure to follow this warning may result in per-
sonal injury.
5. Lower the vehicle to the ground by turning the jack handle counterclockwise.
6. Finish tightening the lug nuts. Push down on the wrench while at the end of the handle for increased
leverage. Tighten the lug nuts in a star pattern until
each nut has been tightened twice. The correct
tightness of each lug nut is 130 N·m. If in doubt
about the correct tightness, have them checked
with a torque wrench by your authorized dealer or
service station.
7. After 40 km check the lug nut torque with a torque wrench to ensure that all lug nuts are properly
seated against the wheel.
(fig. 158) Tire And Wheel Cover Or Center Cap1 — Valve Stem 4 — Wheel Cover
2 — Valve Notch 5 — Mounting Stud
3 — Wheel Lug Nut
255
KNOWING
YOUR
VEHICLE
SAFETY
STARTING
AND
DRIVING
WARNING
LIGHTS
AND
MESSAGES
IN AN
EMERGENCY
SERVICING
AND
C ARETECHNICAL
SPECIFICATIONSCONTENTS
Page 262 of 352
Vehicles Without Wheel Covers
1. Mount the road tire on the axle.
2. Install the remaining lug nuts with the cone shapedend of the nut toward the wheel. Lightly tighten the
lug nuts.
WARNING!
To avoid the risk of forcing the vehicle
of
f the jack, do not tighten the wheel
nuts fully until the vehicle has been lowered.
Failure to follow this warning may result in per-
sonal injury.
3. Lower the vehicle to the ground by turning the jack handle counterclockwise.
4. Finish tightening the lug nuts. Push down on the wrench while at the end of the handle for increased
leverage. Tighten the lug nuts in a star pattern until
each nut has been tightened twice. The correct
tightness of each lug nut is 130 N·m. If in doubt
about the correct tightness, have them checked
with a torque wrench by your authorized dealer or
service station.
5. After 40 km check the lug nut torque with a torque wrench to ensure that all lug nuts are properly
seated against the wheel. TIREFIT KIT (for versions/markets,
where provided)
Small punctures up to 6 mm in the tire tread can be
sealed with TIREFIT. Foreign objects (e.g., screws or
nails) should not be removed from the tire. TIREFIT
can be used in outside temperatures down to approxi-
mately 20°C.
This kit will provide a temporary tire seal, allowing you
to drive your vehicle up to 160 km with a maximum
speed of 88 km/h.
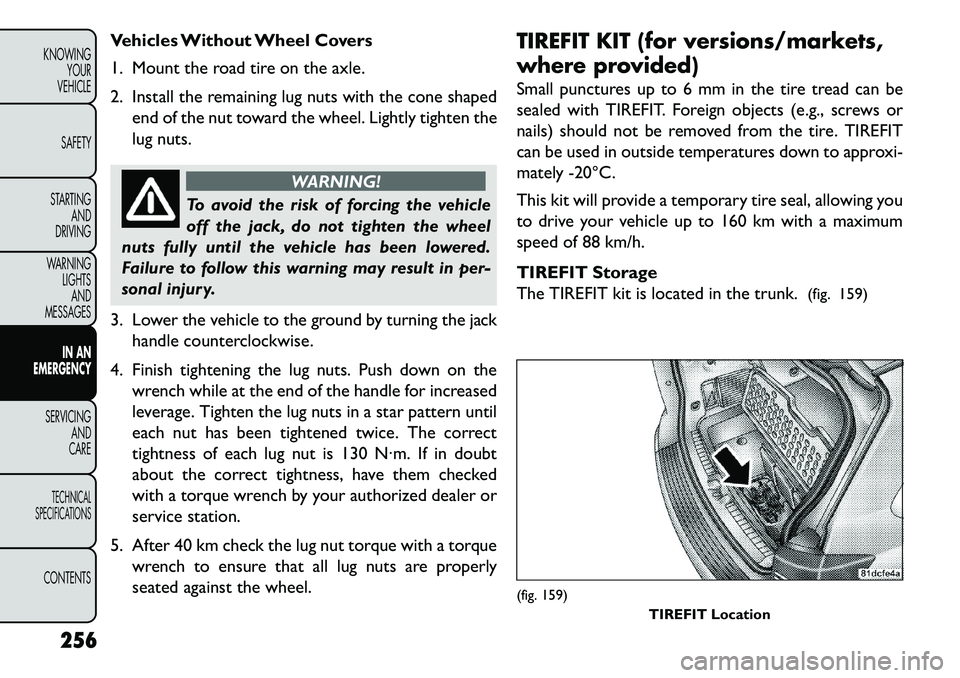
TIREFIT Storage
The TIREFIT kit is located in the trunk.
(fig. 159)
(fig. 159)
TIREFIT Location
256
KNOWING YOUR
VEHICLE
SAFETY
STARTING AND
DRIVING
WARNING LIGHTSAND
MESSAGES
IN AN
EMERGENC
Y
SERVICING AND
C
ARETECHNICAL
SPECIFICATIONSCONTENTS
Page 271 of 352
LIGHTS BULBS – Outside Bulb No.
Low Beam Headlamp . . . . . . . . . . . . . . . . . . . . H11
High Beam Headlamp . . . . . . . . . . . . . . . HB3/9005
Front Turn Signal . . . . . . . . . . . . . . PY27W/3757AK
Front Position Lamp . . . . . . . . . . . . . . . . . . . W5W
Front Fog Lamp . . . . . . . . . . . . . . . . . . . . PSX24W
Rear Fog Lamp . . . . . . . . . . . . . . . . . . . . . . PS19W
Side Repeater Lamp . . . . . . . . . . . . . . . . . . WY5W
Center High Mounted Stop Lamp (CHMSL) . . . LED(Serviced at Authorized Dealer)
Rear Tail/Stop . . . . . . . . . . . . . . . . . . . . . . . . . LED (Serviced at Authorized Dealer)
Rear Tail Liftgate . . . . . . . . . . . . . . . . . . . . . . . LED
(Serviced at Authorized Dealer)
Rear Turn Signal . . . . . . . . . . . . . . . . . . . . WY21W
Backup Lamp . . . . . . . . . . . . . . . . . . . . . . . W21W
License Lamp . . . . . . . . . . . . . . . . . . . . . . . . . . 168 BULB REPLACEMENT
Where possible, it is advisable to have
bulbs changed at a FIAT Dealership.
Proper operation and orientation of the
external lights are essential for driving safety and
complying with the law.
LOW BEAM/HIGH BEAM/FRONT TURN
SIGNAL AND FRONT POSITION LAMP
1. Open the hood.
NOTE: It may be necessary to remove the air cleaner
filter housing and position the Totally Integrated Power
Module (TIPM) aside to replace certain lamps in the left
headlamp housing.
2. Rotate the applicable bulb and connector assembly ¼ turn counterclockwise and remove the assembly
from the headlamp housing. (fig. 161)
3. Disconnect the bulb from the harness connector and then connect the replacement bulb.Do not touch the new bulb with your
fingers. Oil contamination will severely
shorten bulb life. If the bulb comes in
contact with any oily surface, clean the bulb with
rubbing alcohol.
265
KNOWING
YOUR
VEHICLE
SAFETY
STARTING
AND
DRIVING
WARNING
LIGHTS
AND
MESSAGES
IN AN
EMERGENCY
SERVICING
AND
C ARETECHNICAL
SPECIFICATIONSCONTENTS
Page 272 of 352

4. Install the bulb and connector assembly into theheadlamp housing and rotate it ¼ turn clockwise to
lock it in place.
FRONT FOG LAMP
NOTE: Turn the steering wheel to the right if replac-
ing the left front fog lamp or to the left if replacing the
right front fog lamp to allow for easier access to the
front of the wheel well.
1. Remove the fasteners retaining the front lower wheel well access panel and remove the access
panel.
2. Remove the electrical connector from the fog lamp housing. (fig. 162)
3. Firmly grasp the bulb by the two side latches and squeeze them together to unlock the bulb from the
back of the front fog lamp housing.
4. Pull the bulb straight out from the keyed opening in the housing.
5. Align the index tabs of the replacement front fog lamp bulb with the slots in the collar of the bulb
opening on the back of the front fog lamp housing.(fig. 161)1 — Front Turn Signal Lamp Bulb
2 — Low Beam Headlamp Bulb
3 — Front Position Bulb
4 — High Beam Headlamp Bulb
(fig. 162)
266
KNOWING YOUR
VEHICLE
SAFETY
STARTING AND
DRIVING
WARNING LIGHTSAND
MESSAGES
IN AN
EMERGENC
Y
SERVICING AND
C
ARETECHNICAL
SPECIFICATIONSCONTENTS
Page 275 of 352
with the other hand. Use the trim stick and hand
pressure together to disengage the taillamp housing
from the vehicle.
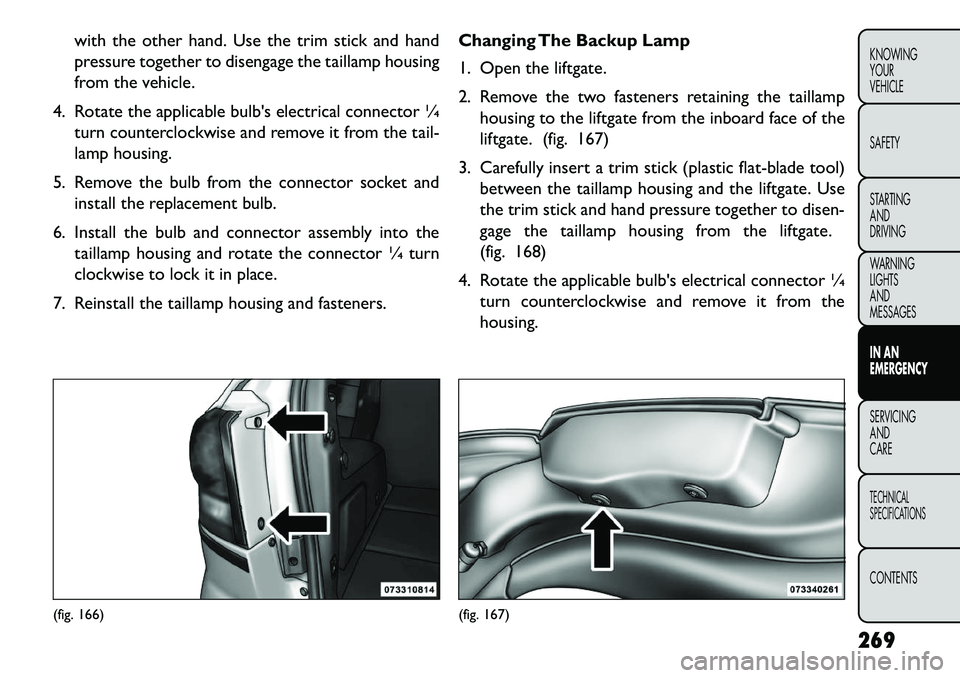
4. Rotate the applicable bulb's electrical connector ¼ turn counterclockwise and remove it from the tail-
lamp housing.
5. Remove the bulb from the connector socket and install the replacement bulb.
6. Install the bulb and connector assembly into the taillamp housing and rotate the connector ¼ turn
clockwise to lock it in place.
7. Reinstall the taillamp housing and fasteners. Changing The Backup Lamp
1. Open the liftgate.
2. Remove the two fasteners retaining the taillamp
housing to the liftgate from the inboard face of the
liftgate. (fig. 167)
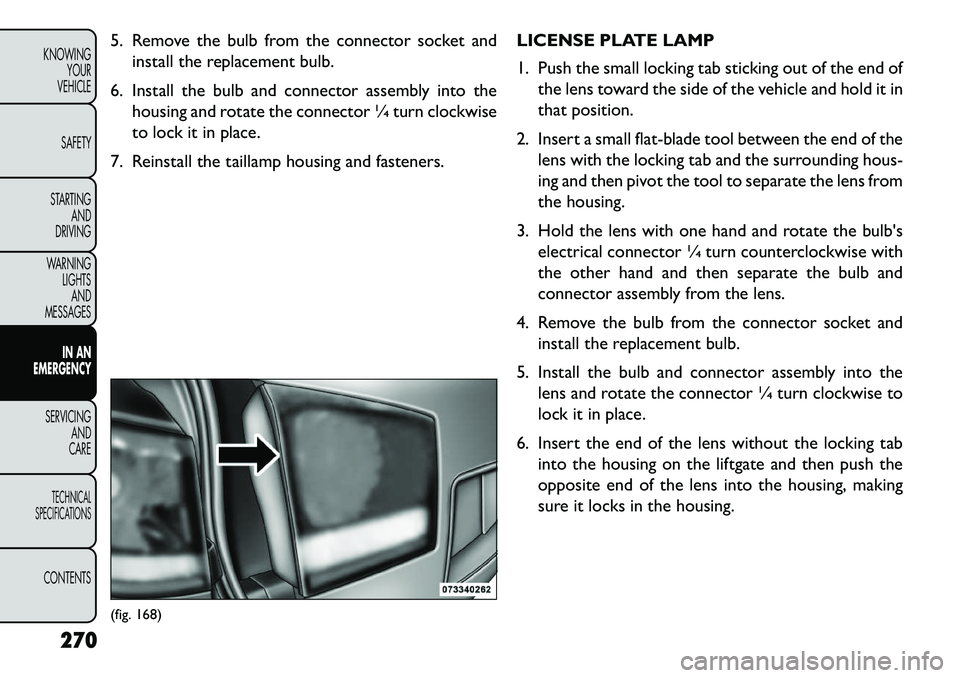
3. Carefully insert a trim stick (plastic flat-blade tool) between the taillamp housing and the liftgate. Use
the trim stick and hand pressure together to disen-
gage the taillamp housing from the liftgate.
(fig. 168)
4. Rotate the applicable bulb's electrical connector ¼ turn counterclockwise and remove it from the
housing.
(fig. 166)
(fig. 167)
269
KNOWING
YOUR
VEHICLE
SAFETY
STARTING
AND
DRIVING
WARNING
LIGHTS
AND
MESSAGES
IN AN
EMERGENCY
SERVICING
AND
C ARETECHNICAL
SPECIFICATIONSCONTENTS
Page 276 of 352
5. Remove the bulb from the connector socket andinstall the replacement bulb.
6. Install the bulb and connector assembly into the housing and rotate the connector ¼ turn clockwise
to lock it in place.
7. Reinstall the taillamp housing and fasteners. LICENSE PLATE LAMP
1. Push the small locking tab sticking out of the end of
the lens toward the side of the vehicle and hold it in
that position.
2. Insert a small flat-blade tool between the end of the lens with the locking tab and the surrounding hous-
ing and then pivot the tool to separate the lens from
the housing.
3. Hold the lens with one hand and rotate the bulb's electrical connector ¼ turn counterclockwise with
the other hand and then separate the bulb and
connector assembly from the lens.
4. Remove the bulb from the connector socket and install the replacement bulb.
5. Install the bulb and connector assembly into the lens and rotate the connector ¼ turn clockwise to
lock it in place.
6. Insert the end of the lens without the locking tab into the housing on the liftgate and then push the
opposite end of the lens into the housing, making
sure it locks in the housing.(fig. 168)
270
KNOWING YOUR
VEHICLE
SAFETY
STARTING AND
DRIVING
WARNING LIGHTSAND
MESSAGES
IN AN
EMERGENC
Y
SERVICING AND
C
ARETECHNICAL
SPECIFICATIONSCONTENTS