interior lights FIAT FREEMONT 2013 Owner handbook (in English)
[x] Cancel search | Manufacturer: FIAT, Model Year: 2013, Model line: FREEMONT, Model: FIAT FREEMONT 2013Pages: 352, PDF Size: 5.22 MB
Page 194 of 352
This vehicle may be equipped with a driver and/or front
passenger seat belt buckle switch that detects whether
the driver or front passenger seat belt is fastened. The
seat belt buckle switch may adjust the inflation rate of
the Advanced Front Air Bags.
This vehicle is equipped with Supplemental Side Air Bag
Inflatable Curtains (SABIC) to protect the driver, front,
and rear passengers sitting next to a window. The
SABIC air bags are located above the side windows and
their covers are also labeled: SRS AIRBAG.
This vehicle is equipped with Supplemental Seat-
Mounted Side Air Bags (SAB). The SABs are marked
with an air bag label sewn into the outboard side of the
front seats.
NOTE:
Air Bag covers may not be obvious in the interiortrim, but they will open during air bag deployment.
After any accident, the vehicle should be taken to an authorized dealer immediately.
Air Bag System Components
Your vehicle may be equipped with the following air bag
system components:
Occupant Restraint Controller (ORC)
Air Bag Warning Light
Steering Wheel and Column Instrument Panel
Knee Impact Bolster
Driver Advanced Front Air Bag
Passenger Advanced Front Air Bag
Supplemental Seat-Mounted Side Air Bags (SAB)
Supplemental Side Air Bag Inflatable Curtains
(SABIC)
Front and Side Impact Sensors
Front Seat Belt Pretensioners
Seat Belt Buckle Switch
ADVANCED FRONT AIR BAG FEATURES
The Advanced Front Air Bag system has multistage
driver and front passenger air bags. This system pro-
vides output appropriate to the severity and type of
collision as determined by the Occupant Restraint
Controller (ORC), which may receive information
from the front impact sensors.
The first stage inflator is triggered immediately during
an impact that requires air bag deployment. This low
output is used in less severe collisions. A higher energy
output is used for more severe collisions.
188
KNOWING YOUR
VEHICLE
SAFETY
STARTING AND
DRIVING
W
ARNING LIGHTS AND
MESSAGES
IN AN
EMERGENCY
SERVICING AND
CARETECHNICAL
SPECIFICATIONSCONTENTS
Page 196 of 352
Supplemental Side Air Bag Inflatable Curtain
(SABIC)
SABIC air bags may offer side-impact and vehicle roll-
over protection to front and rear seat outboard occu-
pants in addition to that provided by the body struc-
ture. Each air bag features inflated chambers placed
adjacent to the head of each outboard occupant that
reduce the potential for side-impact head injuries. The
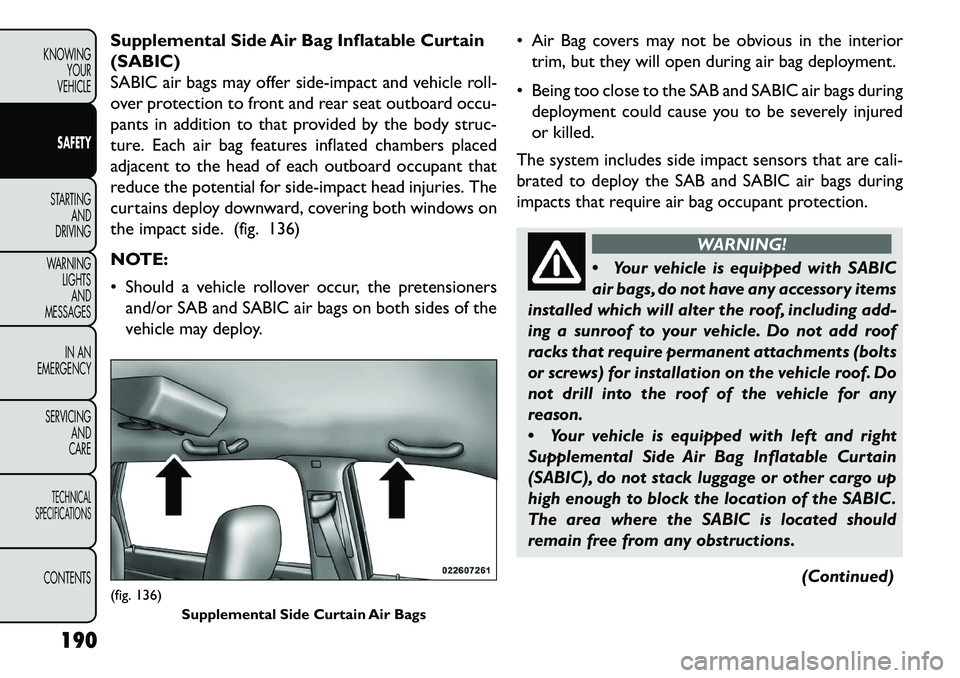
curtains deploy downward, covering both windows on
the impact side. (fig. 136)
NOTE:
Should a vehicle rollover occur, the pretensionersand/or SAB and SABIC air bags on both sides of the
vehicle may deploy. Air Bag covers may not be obvious in the interior
trim, but they will open during air bag deployment.
Being too close to the SAB and SABIC air bags during deployment could cause you to be severely injured
or killed.
The system includes side impact sensors that are cali-
brated to deploy the SAB and SABIC air bags during
impacts that require air bag occupant protection.
WARNING!
Y
our vehicle is equipped with SABIC
air bags, do not have any accessory items
installed which will alter the roof, including add-
ing a sunroof to your vehicle. Do not add roof
racks that require permanent attachments (bolts
or screws) for installation on the vehicle roof. Do
not drill into the roof of the vehicle for any
reason.
Your vehicle is equipped with left and right
Supplemental Side Air Bag Inflatable Curtain
(SABIC), do not stack luggage or other cargo up
high enough to block the location of the SABIC.
The area where the SABIC is located should
remain free from any obstructions.
(Continued)
(fig. 136)Supplemental Side Curtain Air Bags
190
KNOWING YOUR
VEHICLE
SAFETY
STARTING AND
DRIVING
W
ARNING LIGHTS AND
MESSAGES
IN AN
EMERGENCY
SERVICING AND
CARETECHNICAL
SPECIFICATIONSCONTENTS
Page 201 of 352
NOTE:In a rollover the pretensioners and/or SAB
and SABIC air bags may deploy on both sides of the
vehicle.
Front And Side Impact Sensors
In front and side impacts, impact sensors can aid the
ORC in determining appropriate response to impact
events.
Enhanced Accident Response System
In the event of an impact causing air bag deployment, if
the communication network remains intact, and the
power remains intact, depending on the nature of the
event the ORC will determine whether to have the
Enhanced Accident Response System perform the fol-
lowing functions:
Cut off fuel to the engine.
Flash hazard lights as long as the battery has power or until the ignition is cycled off.
Turn on the interior lights, which remain on as long as the battery has power or until the ignition key is
removed.
Unlock the doors automatically.
In order to reset the Enhanced Accident Response
System functions after an event, the ignition switch
must be changed from IGN ON to IGN OFF. If A Deployment Occurs
The Advanced Front Air Bags are designed to deflate
immediately after deployment.
NOTE:
Front and/or side air bags will not deploy in
all collisions. This does not mean something is wrong
with the air bag system.
If you do have a collision which deploys the air bags, any
or all of the following may occur:
The nylon air bag material may sometimes cause abrasions and/or skin reddening to the driver and
front passenger as the air bags deploy and unfold.
The abrasions are similar to friction rope burns or
those you might get sliding along a carpet or gymna-
sium floor. They are not caused by contact with
chemicals. They are not permanent and normally
heal quickly. However, if you haven't healed signifi-
cantly within a few days, or if you have any blistering,
see your doctor immediately.
As the air bags deflate, you may see some smoke-like particles. The particles are a normal by-product of
the process that generates the non-toxic gas used for
air bag inflation. These airborne particles may irritate
the skin, eyes, nose, or throat. If you have skin or eye
irritation, rinse the area with cool water. For nose or
throat irritation, move to fresh air. If the irritation
continues, see your doctor. If these particles settle
195
KNOWING
YOUR
VEHICLE
SAFETY
STARTING
AND
DRIVING
W
ARNING
LIGHTS
AND
MESSAGES
IN AN
EMERGENCY
SERVICING
AND
CARETECHNICAL
SPECIFICATIONSCONTENTS
Page 209 of 352
(Continued)
Do not leave the key fob in or near the vehicle,
and do not leave Keyless Enter-N-Go™ in the
ACC or ON/RUN mode.A child could operate
power windows, other controls, or move the ve-
hicle.
Do not leave animals or children inside parked
vehicles in hot weather; interior heat buildup
may cause serious injury or death.
KEYLESS ENTERNGO™
This feature allows the driver to op-
erate the ignition switch with the
push of a button, as long as the Re-
mote Keyless Entry (RKE) transmit-
ter is in the passenger compartment.
NORMAL STARTING – GASOLINE ENGINE
Using The ENGINE START/STOP Button
1. The transmission must be in PARK or NEUTRAL.
2. Press and hold the brake pedal while pressing the ENGINE START/STOP button once.
3. The system takes over and attempts to start the vehicle. If the vehicle fails to start, the starter will
disengage automatically after 10 seconds. 4. If you wish to stop the cranking of the engine prior
to the engine starting, press the button again.
NOTE: Normal starting of either a cold or a warm
engine is obtained without pumping or pressing the
accelerator pedal.
To Turn Off The Engine Using ENGINE
START/STOP Button
1. Place the shift lever in PARK, then press and release the ENGINE START/STOP button.
2. The ignition switch will return to the OFF position.
3. If the shift lever is not in PARK and the vehicle speed is above 8 km/h, the ENGINE START/STOP button
must be held for two seconds before the engine
shuts off. The ignition switch position will remain in
the ACC position until the shift lever is in PARK and
the button is pressed twice to the OFF position. If
the shift lever is not in PARK and the ENGINE
START/STOP button is pressed once, the EVIC will
display a “Vehicle Not In Park” message and the
engine will remain running. Never leave a vehicle out
of the PARK position, or it could roll.
203KNOWING
YOUR
VEHICLE
SAFETY
STARTING
AND
DRIVING
WARNING
LIGHTS
AND
MESSA
GES
IN AN
EMERGENCY
SERVICING
AND
CARETECHNICAL
SPECIFICATIONSCONTENTS
Page 266 of 352

If the tire inflates to the recommended pres-
sure or is at least 1.8 Bar pressure within 15
minutes:
1. Press the Power Button (4) to turn off the TIREFITkit.
2. Remove the Speed Limit sticker from the top of the Sealant Bottle (1) and place the sticker on the
instrument panel.
3. Immediately disconnect the Sealant Hose (6) from the valve stem, reinstall the cap on the fitting at the
end of the hose, and place the TIREFIT kit in the
vehicle storage location. Quickly proceed to (D)
“Drive Vehicle”.
The metal end fitting from Power Plug
(8) may get hot after use, so it should be
handled carefully.
Failure to reinstall the cap on the fitting at the
end of the Sealant Hose (6) can result in sealant
contacting your skin, clothing, and the vehicle’s
interior. It can also result in sealant contacting
internalTIREFIT kit components which may cause
permanent damage to the kit .
(A) Whenever You Stop To Use TIREFIT:
1. Pull over to a safe location and turn on the vehicle’s Hazard Warning flashers. 2. Verify that the valve stem (on the wheel with the
deflated tire) is in a position that is near to the
ground. This will allow the TIREFIT Hoses (6) and
(7) to reach the valve stem and keep the TIREFIT kit
flat on the ground. This will provide the best posi-
tioning of the kit when injecting the sealant into the
deflated tire and running the air pump. Move the
vehicle as necessary to place the valve stem in this
position before proceeding.
3. Place the transmission in PARK (auto transmission) or in Gear (manual transmission) and turn Off the
ignition.
4. Set the parking brake.
(B) Setting Up To Use TIREFIT:
1. Turn the Mode Select Knob (5) to the Sealant Mode position.
2. Uncoil the Sealant Hose (6) and then remove the cap from the fitting at the end of the hose.
3. Place the TIREFIT kit flat on the ground next to the deflated tire.
4. Remove the cap from the valve stem and then screw the fitting at the end of the Sealant Hose (6) onto
the valve stem.
5. Uncoil the Power Plug (8) and insert the plug into the vehicle’s 12 Volt power outlet.
260
KNOWING YOUR
VEHICLE
SAFETY
STARTING AND
DRIVING
WARNING LIGHTSAND
MESSAGES
IN AN
EMERGENC
Y
SERVICING AND
C
ARETECHNICAL
SPECIFICATIONSCONTENTS
Page 268 of 352
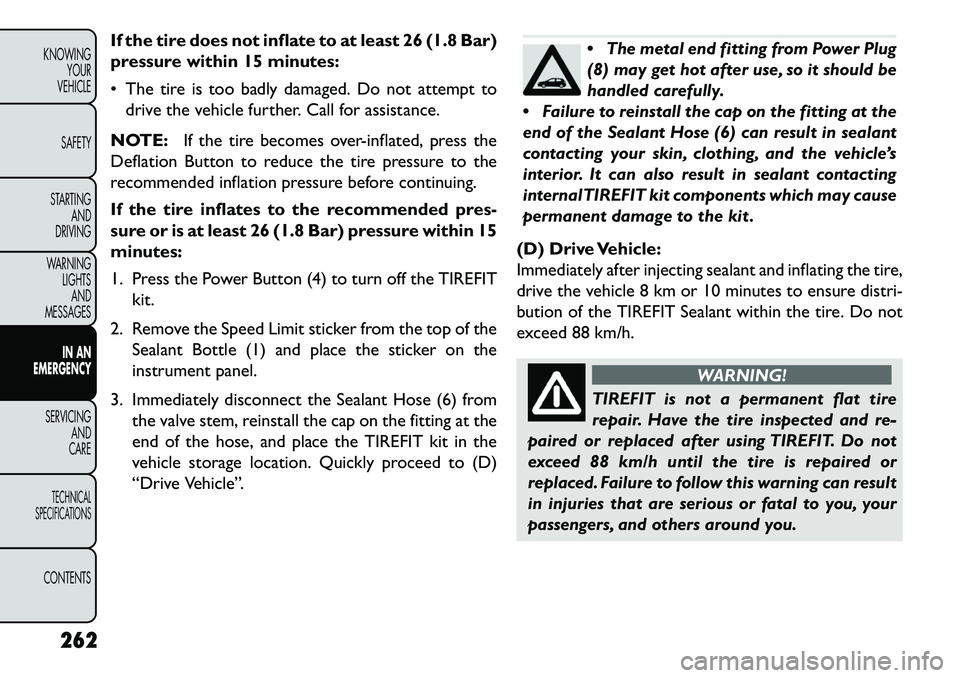
If the tire does not inflate to at least 26 (1.8 Bar)
pressure within 15 minutes:
The tire is too badly damaged. Do not attempt todrive the vehicle further. Call for assistance.
NOTE: If the tire becomes over-inflated, press the
Deflation Button to reduce the tire pressure to the
recommended inflation pressure before continuing.
If the tire inflates to the recommended pres-
sure or is at least 26 (1.8 Bar) pressure within 15
minutes:
1. Press the Power Button (4) to turn off the TIREFIT
kit.
2. Remove the Speed Limit sticker from the top of the Sealant Bottle (1) and place the sticker on the
instrument panel.
3. Immediately disconnect the Sealant Hose (6) from the valve stem, reinstall the cap on the fitting at the
end of the hose, and place the TIREFIT kit in the
vehicle storage location. Quickly proceed to (D)
“Drive Vehicle”.
The metal end fitting from Power Plug
(8) may get hot after use, so it should be
handled carefully.
Failure to reinstall the cap on the fitting at the
end of the Sealant Hose (6) can result in sealant
contacting your skin, clothing, and the vehicle’s
interior. It can also result in sealant contacting
internalTIREFIT kit components which may cause
permanent damage to the kit .
(D) Drive Vehicle:
Immediately after injecting sealant and inflating the tire,
drive the vehicle 8 km or 10 minutes to ensure distri-
bution of the TIREFIT Sealant within the tire. Do not
exceed 88 km/h.
WARNING!
TIREFIT is not a permanent flat tire
re
pair. Have the tire inspected and re-
paired or replaced after using TIREFIT. Do not
exceed 88 km/h until the tire is repaired or
replaced. Failure to follow this warning can result
in injuries that are serious or fatal to you, your
passengers, and others around you.
262
KNOWING YOUR
VEHICLE
SAFETY
STARTING AND
DRIVING
WARNING LIGHTSAND
MESSAGES
IN AN
EMERGENC
Y
SERVICING AND
C
ARETECHNICAL
SPECIFICATIONSCONTENTS
Page 270 of 352

5. Position the new Sealant Bottle (1) in the housing sothat the Sealant Hose (6) aligns with the hose slot in
the front of the housing. Press the bottle into the
housing. An audible click will be heard indicating the
bottle is locked into place.
6. Verify that the cap is installed on the fitting at the end of the Sealant Hose (6) and return the hose to
its storage area (located on the bottom of the air
pump).
7. Return the TIREFIT kit to its storage location in the vehicle. REPLACEMENT BULBS
All the inside bulbs are brass or glass wedge base.
Aluminum base bulbs are not approved and should not
be used for replacement.
LIGHT BULBS – Interior Bulb Number
Courtesy/Reading Lamps (Incandescent) . . . . . . 578
Courtesy/Reading Lamps
(Optional LED) . . . . . . . . . . . . . . . . . . . . . . . . LED
(Serviced at Authorized Dealer)
Glove Box Lamp . . . . . . . . . . . . . . . . . . . . . . . . 194
Cargo Lamp . . . . . . . . . . . . . . . . . . . . . . . . . . . 579
Optional Door Map
Pocket/Cupholder . . . . . . . . . . . . . . . . . . . . . . LED (Serviced at Authorized Dealer)
NOTE: For lighted switches, see your authorized
dealer for replacement instructions.
264
KNOWING YOUR
VEHICLE
SAFETY
STARTING AND
DRIVING
WARNING LIGHTSAND
MESSAGES
IN AN
EMERGENC
Y
SERVICING AND
C
ARETECHNICAL
SPECIFICATIONSCONTENTS
Page 277 of 352
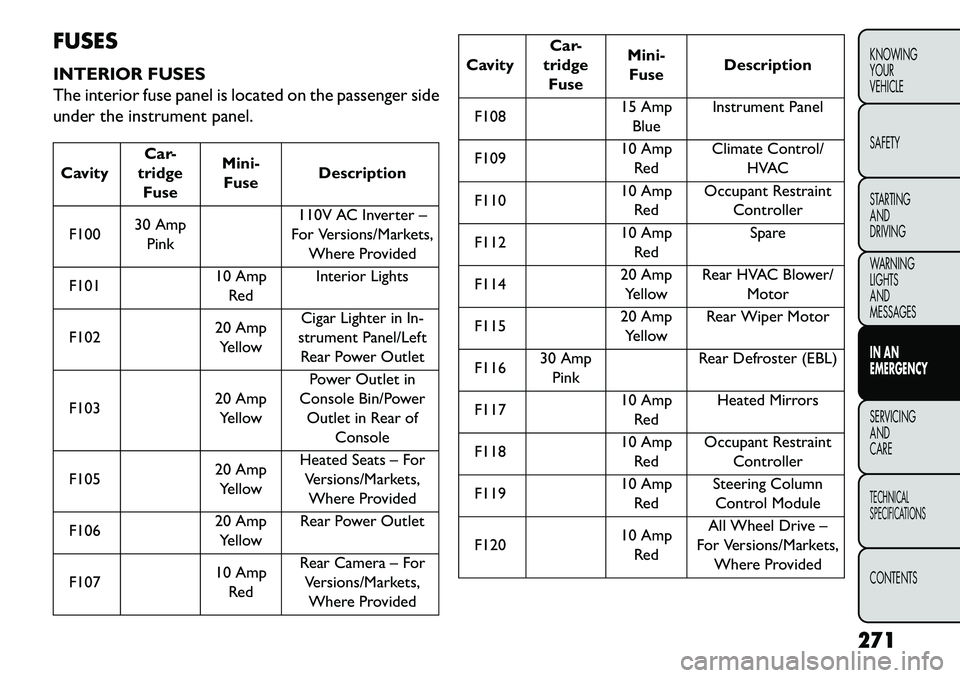
FUSES
INTERIOR FUSES
The interior fuse panel is located on the passenger side
under the instrument panel.CavityCar-
tridge Fuse Mini-
Fuse Description
F100 30 Amp
Pink 110V AC Inverter –
For Versions/Markets, Where Provided
F101 10 Amp
Red Interior Lights
F102 20 Amp
Yellow Cigar Lighter in In-
strument Panel/Left Rear Power Outlet
F103 20 Amp
Yellow Power Outlet in
Console Bin/Power
Outlet in Rear of Console
F105 20 Amp
Yellow Heated Seats – For
Versions/Markets,Where Provided
F106 20 Amp
Yellow Rear Power Outlet
F107 10 Amp
Red Rear Camera – For
Versions/Markets,Where Provided
Cavity Car-
tridge Fuse Mini-
Fuse Description
F108 15 Amp
Blue Instrument Panel
F109 10 Amp
Red Climate Control/
HVAC
F110 10 Amp
Red Occupant Restraint
Controller
F112 10 Amp
Red Spare
F114 20 Amp
Yellow Rear HVAC Blower/
Motor
F115 20 Amp
Yellow Rear Wiper Motor
F116 30 Amp
Pink Rear Defroster (EBL)
F117 10 Amp
Red Heated Mirrors
F118 10 Amp
Red Occupant Restraint
Controller
F119 10 Amp
Red Steering Column
Control Module
F120 10 Amp
Red All Wheel Drive –
For Versions/Markets, Where Provided
271
KNOWING
YOUR
VEHICLE
SAFETY
STARTING
AND
DRIVING
WARNING
LIGHTS
AND
MESSAGES
IN AN
EMERGENCY
SERVICING
AND
C ARETECHNICAL
SPECIFICATIONSCONTENTS
Page 279 of 352
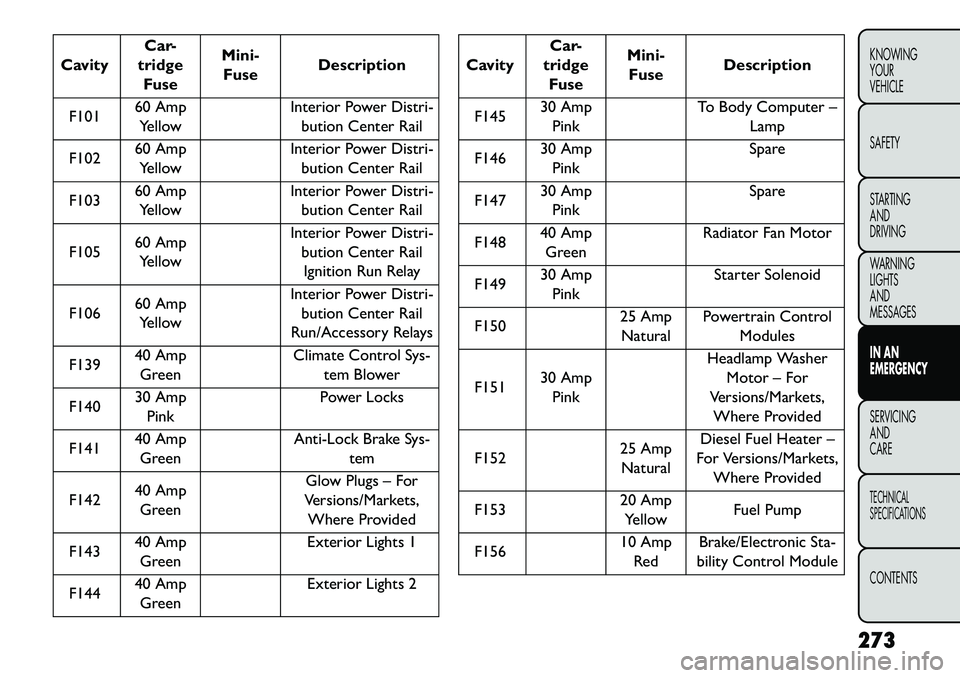
CavityCar-
tridge Fuse Mini-
Fuse Description
F101 60 Amp
Yellow Interior Power Distri-
bution Center Rail
F102 60 Amp
Yellow Interior Power Distri-
bution Center Rail
F103 60 Amp
Yellow Interior Power Distri-
bution Center Rail
F105 60 Amp
Yellow Interior Power Distri-
bution Center RailIgnition Run Relay
F106 60 Amp
Yellow Interior Power Distri-
bution Center Rail
Run/Accessory Relays
F139 40 Amp
Green Climate Control Sys-
tem Blower
F140 30 Amp
Pink Power Locks
F141 40 Amp
Green Anti-Lock Brake Sys-
tem
F142 40 Amp
Green Glow Plugs – For
Versions/Markets, Where Provided
F143 40 Amp
Green Exterior Lights 1
F144 40 Amp
Green Exterior Lights 2
Cavity
Car-
tridge Fuse Mini-
Fuse Description
F145 30 Amp
Pink To Body Computer –
Lamp
F146 30 Amp
Pink Spare
F147 30 Amp
Pink Spare
F148 40 Amp
Green Radiator Fan Motor
F149 30 Amp
Pink Starter Solenoid
F150 25 Amp
Natural Powertrain Control
Modules
F151 30 Amp
Pink Headlamp Washer
Motor – For
Versions/Markets, Where Provided
F152 25 Amp
Natural Diesel Fuel Heater –
For Versions/Markets, Where Provided
F153 20 Amp
Yellow Fuel Pump
F156 10 Amp
Red Brake/Electronic Sta-
bility Control Module
273
KNOWING
YOUR
VEHICLE
SAFETY
STARTING
AND
DRIVING
WARNING
LIGHTS
AND
MESSAGES
IN AN
EMERGENCY
SERVICING
AND
C ARETECHNICAL
SPECIFICATIONSCONTENTS
Page 280 of 352

CavityCar-
tridge Fuse Mini-
Fuse Description
F157 10 Amp
Red Transfer Case Mod-
ule – For Versions/
Markets, Where Pro- vided
F158 10 Amp
Red Active Hood Module
– For Versions/
Markets, Where Pro-
vided
F159 10 Amp
Red Spare
F160 20 Amp
Yellow Interior Lights
F161 20 Amp
Yellow Horn
F162 50 Amp
Red Cabin Heater #1/
Vacuum Pump – For Versions/Markets,Where Provided
F163 50 Amp
Red Cabin Heater #2 –
For Versions/Markets,
Where Provided
F164 25 Amp
Natural Powertrain Auto
Shutdown
F165 20 Amp
Yellow Powertrain Shutdown
Cavity Car-
tridge Fuse Mini-
Fuse Description
F166 20 Amp
Yellow Spare
F167 30 Amp
Green Powertrain Shutdown
F168 10 Amp
Red Air Conditioner
Clutch
F169 40 Amp
Green Emissions – Partial
Zero Emissions Ve- hicle Motor
F170 15 Amp
Blue Emissions – Partial
Zero Emissions Ve- hicle Actuators
F172 20 Amp
Yellow Spare
F173 25 Amp
Natural Anti Lock Brake
Valves
F174 20 Amp
Yellow Siren – For Versions/
Markets, Where Pro- vided
F175 30 Amp
Green Spare
F176 10 Amp
Red Powertrain Control
Modules
274
KNOWING YOUR
VEHICLE
SAFETY
STARTING AND
DRIVING
WARNING LIGHTSAND
MESSAGES
IN AN
EMERGENC
Y
SERVICING AND
C
ARETECHNICAL
SPECIFICATIONSCONTENTS