headlamp FIAT FREEMONT 2013 Owner handbook (in English)
[x] Cancel search | Manufacturer: FIAT, Model Year: 2013, Model line: FREEMONT, Model: FIAT FREEMONT 2013Pages: 352, PDF Size: 5.22 MB
Page 271 of 352

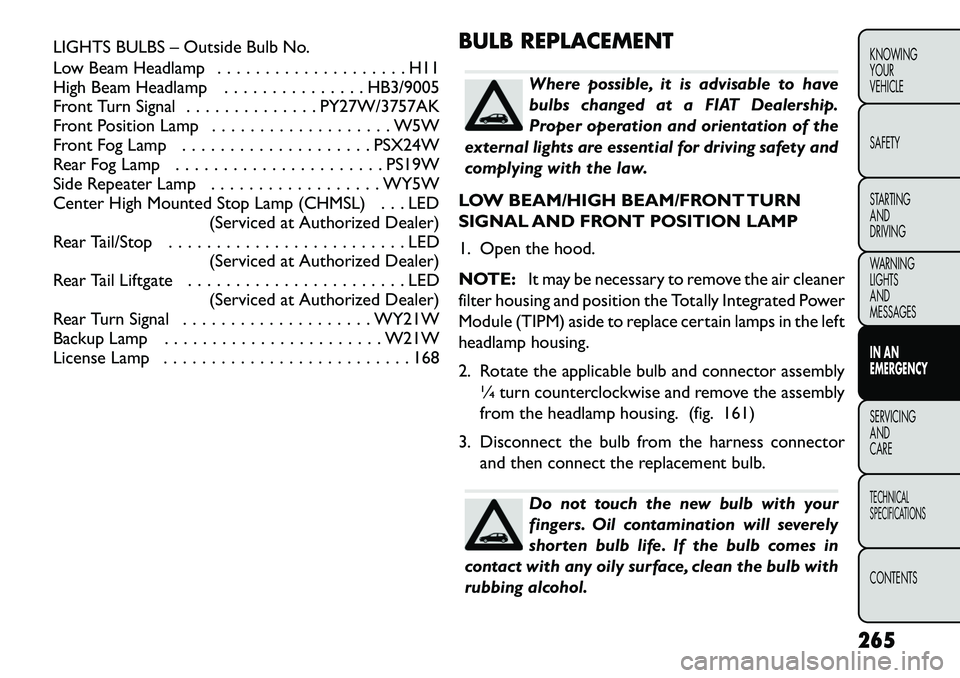
LIGHTS BULBS – Outside Bulb No.
Low Beam Headlamp . . . . . . . . . . . . . . . . . . . . H11
High Beam Headlamp . . . . . . . . . . . . . . . HB3/9005
Front Turn Signal . . . . . . . . . . . . . . PY27W/3757AK
Front Position Lamp . . . . . . . . . . . . . . . . . . . W5W
Front Fog Lamp . . . . . . . . . . . . . . . . . . . . PSX24W
Rear Fog Lamp . . . . . . . . . . . . . . . . . . . . . . PS19W
Side Repeater Lamp . . . . . . . . . . . . . . . . . . WY5W
Center High Mounted Stop Lamp (CHMSL) . . . LED(Serviced at Authorized Dealer)
Rear Tail/Stop . . . . . . . . . . . . . . . . . . . . . . . . . LED (Serviced at Authorized Dealer)
Rear Tail Liftgate . . . . . . . . . . . . . . . . . . . . . . . LED
(Serviced at Authorized Dealer)
Rear Turn Signal . . . . . . . . . . . . . . . . . . . . WY21W
Backup Lamp . . . . . . . . . . . . . . . . . . . . . . . W21W
License Lamp . . . . . . . . . . . . . . . . . . . . . . . . . . 168 BULB REPLACEMENT
Where possible, it is advisable to have
bulbs changed at a FIAT Dealership.
Proper operation and orientation of the
external lights are essential for driving safety and
complying with the law.
LOW BEAM/HIGH BEAM/FRONT TURN
SIGNAL AND FRONT POSITION LAMP
1. Open the hood.
NOTE: It may be necessary to remove the air cleaner
filter housing and position the Totally Integrated Power
Module (TIPM) aside to replace certain lamps in the left
headlamp housing.
2. Rotate the applicable bulb and connector assembly ¼ turn counterclockwise and remove the assembly
from the headlamp housing. (fig. 161)
3. Disconnect the bulb from the harness connector and then connect the replacement bulb.Do not touch the new bulb with your
fingers. Oil contamination will severely
shorten bulb life. If the bulb comes in
contact with any oily surface, clean the bulb with
rubbing alcohol.
265
KNOWING
YOUR
VEHICLE
SAFETY
STARTING
AND
DRIVING
WARNING
LIGHTS
AND
MESSAGES
IN AN
EMERGENCY
SERVICING
AND
C ARETECHNICAL
SPECIFICATIONSCONTENTS
Page 272 of 352

4. Install the bulb and connector assembly into theheadlamp housing and rotate it ¼ turn clockwise to
lock it in place.
FRONT FOG LAMP
NOTE: Turn the steering wheel to the right if replac-
ing the left front fog lamp or to the left if replacing the
right front fog lamp to allow for easier access to the
front of the wheel well.
1. Remove the fasteners retaining the front lower wheel well access panel and remove the access
panel.
2. Remove the electrical connector from the fog lamp housing. (fig. 162)
3. Firmly grasp the bulb by the two side latches and squeeze them together to unlock the bulb from the
back of the front fog lamp housing.
4. Pull the bulb straight out from the keyed opening in the housing.
5. Align the index tabs of the replacement front fog lamp bulb with the slots in the collar of the bulb
opening on the back of the front fog lamp housing.(fig. 161)1 — Front Turn Signal Lamp Bulb
2 — Low Beam Headlamp Bulb
3 — Front Position Bulb
4 — High Beam Headlamp Bulb
(fig. 162)
266
KNOWING YOUR
VEHICLE
SAFETY
STARTING AND
DRIVING
WARNING LIGHTSAND
MESSAGES
IN AN
EMERGENC
Y
SERVICING AND
C
ARETECHNICAL
SPECIFICATIONSCONTENTS
Page 279 of 352

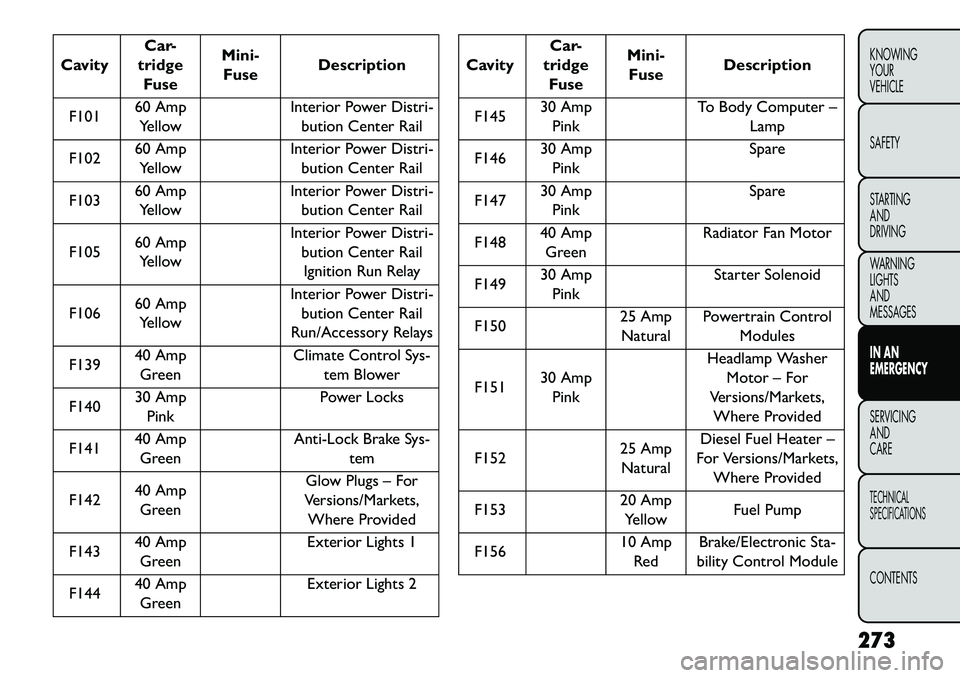
CavityCar-
tridge Fuse Mini-
Fuse Description
F101 60 Amp
Yellow Interior Power Distri-
bution Center Rail
F102 60 Amp
Yellow Interior Power Distri-
bution Center Rail
F103 60 Amp
Yellow Interior Power Distri-
bution Center Rail
F105 60 Amp
Yellow Interior Power Distri-
bution Center RailIgnition Run Relay
F106 60 Amp
Yellow Interior Power Distri-
bution Center Rail
Run/Accessory Relays
F139 40 Amp
Green Climate Control Sys-
tem Blower
F140 30 Amp
Pink Power Locks
F141 40 Amp
Green Anti-Lock Brake Sys-
tem
F142 40 Amp
Green Glow Plugs – For
Versions/Markets, Where Provided
F143 40 Amp
Green Exterior Lights 1
F144 40 Amp
Green Exterior Lights 2
Cavity
Car-
tridge Fuse Mini-
Fuse Description
F145 30 Amp
Pink To Body Computer –
Lamp
F146 30 Amp
Pink Spare
F147 30 Amp
Pink Spare
F148 40 Amp
Green Radiator Fan Motor
F149 30 Amp
Pink Starter Solenoid
F150 25 Amp
Natural Powertrain Control
Modules
F151 30 Amp
Pink Headlamp Washer
Motor – For
Versions/Markets, Where Provided
F152 25 Amp
Natural Diesel Fuel Heater –
For Versions/Markets, Where Provided
F153 20 Amp
Yellow Fuel Pump
F156 10 Amp
Red Brake/Electronic Sta-
bility Control Module
273
KNOWING
YOUR
VEHICLE
SAFETY
STARTING
AND
DRIVING
WARNING
LIGHTS
AND
MESSAGES
IN AN
EMERGENCY
SERVICING
AND
C ARETECHNICAL
SPECIFICATIONSCONTENTS
Page 290 of 352

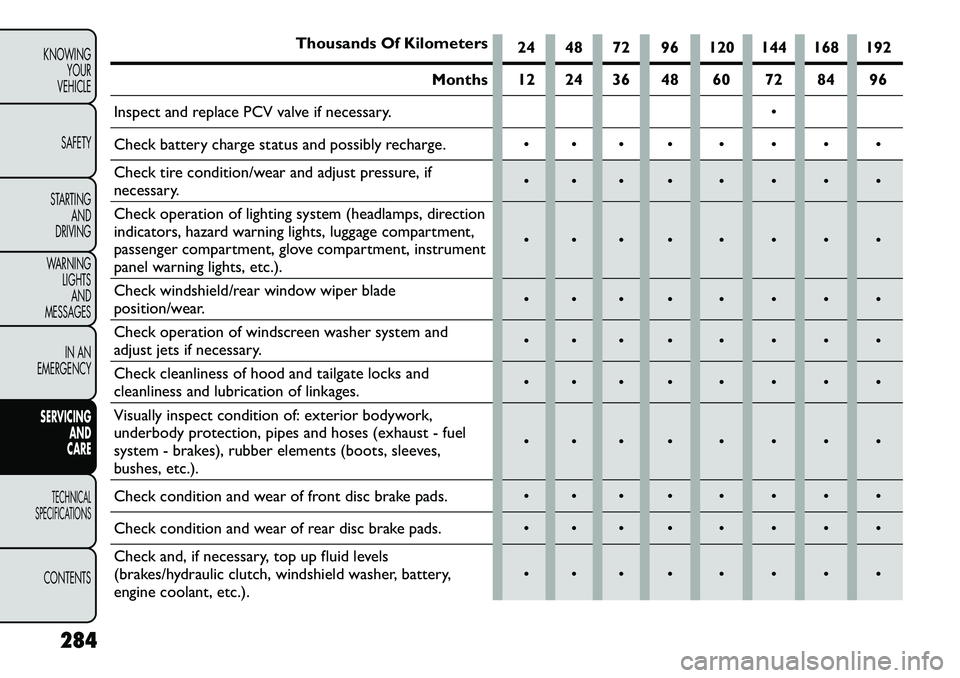
Thousands Of Kilometers24 48 72 96 120 144 168 192
Months 12 24 36 48 60 72 84 96
Inspect and replace PCV valve if necessary.
Check battery charge status and possibly recharge.
Check tire condition/wear and adjust pressure, if
necessary.
Check operation of lighting system (headlamps, direction
indicators, hazard warning lights, luggage compartment,
passenger compartment, glove compartment, instrument
panel warning lights, etc.).
Check windshield/rear window wiper blade
position/wear.
Check operation of windscreen washer system and
adjust jets if necessary.
Check cleanliness of hood and tailgate locks and
cleanliness and lubrication of linkages.
Visually inspect condition of: exterior bodywork,
underbody protection, pipes and hoses (exhaust - fuel
system - brakes), rubber elements (boots, sleeves,
bushes, etc.).
Check condition and wear of front disc brake pads.
Check condition and wear of rear disc brake pads.
Check and, if necessary, top up fluid levels
(brakes/hydraulic clutch, windshield washer, battery,
engine coolant, etc.).
284
KNOWING YOUR
VEHICLE
SAFETY
STARTING AND
DRIVING
WARNING LIGHTSAND
MESSAGES
IN AN
EMERGENCY
SERVICING AND
C
ARETECHNICAL
SPECIFICATIONSCONTENTS