oil pressure FIAT FREEMONT 2013 Owner handbook (in English)
[x] Cancel search | Manufacturer: FIAT, Model Year: 2013, Model line: FREEMONT, Model: FIAT FREEMONT 2013Pages: 352, PDF Size: 5.22 MB
Page 28 of 352
Left/Right Front Door Ajar (one or more doorsopen, with a single chime if speed is above 1.6 km/h)
Left/Right Rear Door Ajar (one or more doors open, with a single chime if speed is above 1.6 km/h)
Door(s) Ajar (with a single chime if vehicle is in motion)
Liftgate Ajar (with a single chime)
Low Washer Fluid (with a single chime)
Ignition or Accessory On
Vehicle Not in Park (for versions/markets, where provided)
Key Left Vehicle
Key Not Detected
Low Tire Pressure (with a single chime). Refer to information on “Tire Pressure” and “Tire Pressure
Monitor” in “Starting And Operating”.
Service TPM System (with a single chime). Refer to information on “Tire Pressure Monitor” in “Starting
And Operating”.
Check Gascap (refer to “Adding Fuel” in “Technical Specifications”)
Oil Change Required (with a single chime) Check Gascap (refer to “Adding Fuel” in “Starting
And Operating”)
Oil Change Due (with a single chime)
Exhaust System — Regeneration Required Now. Under conditions of exclusive short duration and
low speed driving and low speed driving cycles, the
engine and exhaust after-treatment system may
never reach the conditions required to remove the
trapped PM. If this occurs the “Exhaust System Re-
generation Required Now” message will be displayed
on the EVIC. By driving your vehicle at highway
speeds for as little as 30 minutes, you can remedy the
condition in the particulate filter system by allowing
the trapped PM to be removed to restore the system
to normal operating condition.
Exhaust Service Required — See Dealer Now. The engine will be de-rated to prevent permanent dam-
age to the after-treatment system. If this condition
occurs, it is necessary to have your vehicle serviced
by your local authorized dealer.
22
KNOWING YOUR
VEHICLE
SAFETY
S
TARTING AND
DRIVING
WARNING LIGHTSAND
MESSAGES
IN AN
EMERGENCY
SERVICING AND
CARETECHNICAL
SPECIFICATIONSCONTENTS
Page 30 of 352
EVIC RED TELLTALE LIGHTS
This area will show reconfigurable red telltales. These
telltales include:
Door AjarThis light will turn on to indicate that one or
more doors may be ajar.
Oil Pressure Warning Light This light indicates low engine oil pressure. If the
light turns on while driving, stop the vehicle and
shut off the engine as soon as possible. A chime will
sound for four minutes when this light turns on.
Do not operate the vehicle until the cause is corrected.
This light does not show how much oil is in the engine.
The engine oil level must be checked under the hood.
Charging System Light This light shows the status of the electrical
charging system. The light should come on when
the ignition is first cycled ON and remain on briefly as
a bulb check. If the light stays on or comes on while
driving, turn off some of the vehicle's non-essential
electrical devices or increase engine speed (if at idle). If
the charging system light remains on, it means that the
vehicle is experiencing a problem with the charging
system. Obtain SERVICE IMMEDIATELY. See an autho-
rized dealer. If jump starting is required, refer to “Jump Starting
Procedures” in “In An Emergency”.
Electronic Throttle Control (ETC) Light
This light informs you of a problem with the
Electronic Throttle Control (ETC) system.
The light will come on when the ignition is
first turned ON and remain on briefly as a
bulb check. If the light does not come on during
starting, have the system checked by an authorized
dealer.
If a problem is detected, the light will come on while
the engine is running. Cycle the ignition key when the
vehicle has completely stopped and the shift lever is
placed in the PARK position (for versions/markets,
where provided). The light should turn off.
If the light remains lit with the engine running, your
vehicle will usually be drivable. However, see an autho-
rized dealer for service as soon as possible. If the light
is flashing when the engine is running, immediate ser-
vice is required. You may experience reduced perfor-
mance, an elevated/rough idle or engine stall and your
vehicle may require towing.
Engine Temperature Warning Light This light warns of an overheated engine condi-
tion. As temperatures rise and the gauge ap-
proaches H,this indicator will illuminate and a
24
KNOWING
YOUR
VEHICLE
SAFETY
S
TARTING AND
DRIVING
WARNING LIGHTSAND
MESSAGES
IN AN
EMERGENCY
SERVICING AND
CARETECHNICAL
SPECIFICATIONSCONTENTS
Page 34 of 352
VEHICLE INFO (CUSTOMER
INFORMATION FEATURES) (for
versions/markets, where provided)
Press and release the UP or DOWN button until
“Vehicle Info” displays in the EVIC and press the SE-
LECT button. Press the UP and DOWN button to
scroll through the available information displays that
may be equipped.
Coolant Temp
Displays the actual coolant temperature.
Oil Temperature
Displays the actual oil temperature.
Oil Pressure
Displays the actual oil pressure.
Trans Temperature
Displays the actual transmission temperature.
Engine Hours
Displays the number of hours of engine operation.MESSAGES
In the Main Menu, press and release the UP or DOWN
button until “Messages: XX” displays highlighted in the
EVIC. If there is more than one message, pressing the
SELECT button will display a stored warning message.
Press and release the UP and DOWN buttons if there
is more than one message to step through the remain-
ing stored messages. If there are no message, pressing
the SELECT button will do nothing.
TURN MENU OFF
Select from Main Menu using the DOWN button.
Pressing the SELECT button blanks the menu display.
Pressing any one of the four steering wheel buttons
brings the menu back.
28
KNOWING YOUR
VEHICLE
SAFETY
S
TARTING AND
DRIVING
WARNING LIGHTSAND
MESSAGES
IN AN
EMERGENCY
SERVICING AND
CARETECHNICAL
SPECIFICATIONSCONTENTS
Page 207 of 352
PERIODIC SAFETY CHECKS YOU SHOULD
MAKE OUTSIDE THE VEHICLE
Tires
Examine tires for excessive tread wear and uneven
wear patterns. Check for stones, nails, glass, or other
objects lodged in the tread or sidewall. Inspect the
tread for cuts and cracks. Inspect sidewalls for cuts,
cracks and bulges. Check the wheel nuts for tightness.
Check the tires (including spare) for proper cold infla-
tion pressure.
Lights
Have someone observe the operation of brake lights
and exterior lights while you work the controls. Check
turn signal and high beam indicator lights on the instru-
ment panel.Door Latches
Check for positive closing, latching, and locking.
Fluid Leaks
Check area under vehicle after overnight parking for
fuel, engine coolant, oil, or other fluid leaks. Also, if
gasoline fumes are detected or if fuel, power steering
fluid, or brake fluid leaks are suspected, the cause
should be located and corrected immediately.
201
KNOWING
YOUR
VEHICLE
SAFETY
STARTING
AND
DRIVING
WARNING
LIGHTS
AND
MESSAGES
IN AN
EMERGENCY
SERVICING
AND
CARETECHNICAL
SPECIFICATIONSCONTENTS
Page 266 of 352

If the tire inflates to the recommended pres-
sure or is at least 1.8 Bar pressure within 15
minutes:
1. Press the Power Button (4) to turn off the TIREFITkit.
2. Remove the Speed Limit sticker from the top of the Sealant Bottle (1) and place the sticker on the
instrument panel.
3. Immediately disconnect the Sealant Hose (6) from the valve stem, reinstall the cap on the fitting at the
end of the hose, and place the TIREFIT kit in the
vehicle storage location. Quickly proceed to (D)
“Drive Vehicle”.
The metal end fitting from Power Plug
(8) may get hot after use, so it should be
handled carefully.
Failure to reinstall the cap on the fitting at the
end of the Sealant Hose (6) can result in sealant
contacting your skin, clothing, and the vehicle’s
interior. It can also result in sealant contacting
internalTIREFIT kit components which may cause
permanent damage to the kit .
(A) Whenever You Stop To Use TIREFIT:
1. Pull over to a safe location and turn on the vehicle’s Hazard Warning flashers. 2. Verify that the valve stem (on the wheel with the
deflated tire) is in a position that is near to the
ground. This will allow the TIREFIT Hoses (6) and
(7) to reach the valve stem and keep the TIREFIT kit
flat on the ground. This will provide the best posi-
tioning of the kit when injecting the sealant into the
deflated tire and running the air pump. Move the
vehicle as necessary to place the valve stem in this
position before proceeding.
3. Place the transmission in PARK (auto transmission) or in Gear (manual transmission) and turn Off the
ignition.
4. Set the parking brake.
(B) Setting Up To Use TIREFIT:
1. Turn the Mode Select Knob (5) to the Sealant Mode position.
2. Uncoil the Sealant Hose (6) and then remove the cap from the fitting at the end of the hose.
3. Place the TIREFIT kit flat on the ground next to the deflated tire.
4. Remove the cap from the valve stem and then screw the fitting at the end of the Sealant Hose (6) onto
the valve stem.
5. Uncoil the Power Plug (8) and insert the plug into the vehicle’s 12 Volt power outlet.
260
KNOWING YOUR
VEHICLE
SAFETY
STARTING AND
DRIVING
WARNING LIGHTSAND
MESSAGES
IN AN
EMERGENC
Y
SERVICING AND
C
ARETECHNICAL
SPECIFICATIONSCONTENTS
Page 269 of 352
(E) After Driving:
Pull over to a safe location. Refer to “Whenever You
Stop to Use TIREFIT” before continuing.
1. Turn the Mode Select Knob (5) to the Air Modeposition.
2. Uncoil the power plug and insert the plug into the vehicle's 12 Volt power outlet.
3. Uncoil the Air Pump Hose (7) (black in color) and screw the fitting at the end of hose (7) onto the
valve stem.
4. Check the pressure in the tire by reading the Pres- sure Gauge (3).
If tire pressure is less than 1.3 Bar, the tire is too
badly damaged. Do not attempt to drive the vehicle
further. Call for assistance.
If the tire pressure is 1.3 bar or higher:
1. Press the Power Button (4) to turn on TIREFIT and inflate the tire to the pressure indicated on the tire
and loading information label on the driver-side
door opening.
NOTE: If the tire becomes over-inflated, press the
Deflation Button to reduce the tire pressure to the
recommended inflation pressure before continuing. 2. Disconnect the TIREFIT kit from the valve stem,
reinstall the cap on the valve stem and unplug from
12 Volt outlet.
3. Place the TIREFIT kit in its proper storage area in the vehicle.
4. Have the tire inspected and repaired or replaced at the earliest opportunity at an authorized dealer or
tire service center.
5. Replace the Sealant Bottle (1) and Sealant Hose (6) assembly at your authorized dealer as soon as pos-
sible. Refer to “(F) Sealant Bottle and Hose Replace-
ment.”
NOTE: When having the tire serviced, advise the
authorized dealer or service center that the tire has
been sealed using the TIREFIT service kit.
(F) Sealant Bottle And Hose Replacement:
1. Uncoil the Sealant Hose (6) (clear in color).
2. Locate the round Sealant Bottle release button in the recessed area under the sealant bottle.
3. Press the Sealant Bottle release button. The Sealant Bottle (1) will pop up. Remove the bottle and
dispose of it accordingly.
4. Clean any remaining sealant from the TIREFIT hous- ing.
263
KNOWING
YOUR
VEHICLE
SAFETY
STARTING
AND
DRIVING
WARNING
LIGHTS
AND
MESSAGES
IN AN
EMERGENCY
SERVICING
AND
C ARETECHNICAL
SPECIFICATIONSCONTENTS
Page 292 of 352
Periodic Checks
Every1,000 km or before long journeys, check and, if
necessary, restore:
engine coolant;
brake fluid;
windshield washer fluid level;
power steering fluid;
tire inflation pressure and condition;
operation of lighting system (headlights, direction indicators, hazard warning lights, etc.);
operation of windshield washer/wiper system and positioning/wear of windshield/rear window wiper
blades.
Every 3,000 km, check and top up, if required, the
engine oil level.
Heavy-Duty Use Of The Car
If the car is used mainly under one of the following
conditions:
towing a trailer or caravan;
dusty roads;
short, repeated journeys (less than 7-8 km) at sub- zero outside temperatures; engine often idling or driving long distances at low
speeds or long periods of idleness.
You should perform the following inspections more
frequently than shown on the Scheduled Servicing Plan:
check front disc brake pad conditions and wear;
check cleanliness of hood and trunk locks, cleanli- ness and lubrication of linkage;
visually inspect conditions of: engine, transmission, pipes and hoses (exhaust - fuel system - brakes) and
rubber elements (boots - sleeves - bushes - etc.);
check battery charge and battery fluid level (electro- lyte);
visually inspect condition of the accessory drive belts;
check and, if necessary, change engine oil and replace oil filter;
check and, if necessary, replace pollen filter;
check and, if necessary, replace air cleaner.
MAINTENANCE SCHEDULE — DIESEL
ENGINE
Required Maintenance Intervals
Refer to the Maintenance Schedules on the following
pages for the required maintenance intervals.
286
KNOWING YOUR
VEHICLE
SAFETY
STARTING AND
DRIVING
WARNING LIGHTSAND
MESSAGES
IN AN
EMERGENCY
SERVICING AND
C
ARETECHNICAL
SPECIFICATIONSCONTENTS
Page 295 of 352
* Regardless of the distance covered, the timing belt
must be changed every 4 years for particularly demand-
ing use (cold climates, city driving, long periods of
idling) or at least every 5 years.
** If the car is used for less than 10,000 km per year, it
is necessary to replace engine oil and cartridge every
12 months.
*** The actual interval for replacement of engine oil
and cartridge depends by vehicle usage conditions and
is shown through a gauge or a message (if available) on
the dashboard.
Failure to perform the required mainte-
nance items may result in damage to the
vehicle.Periodic Checks
Every
1,000 km or before long journeys, check and, if
necessary, restore:
engine coolant;
brake fluid;
windshield washer fluid level;
power steering fluid;
tire inflation pressure and condition;
operation of lighting system (headlights, direction indicators, hazard warning lights, etc.);
operation of windshield washer/wiper system and positioning/wear of windshield/rear window wiper
blades.
Every 3,000 km, check and top up, if required, the
engine oil level.
289
KNOWING
YOUR
VEHICLE
SAFETY
STARTING
AND
DRIVING
WARNING
LIGHTS
AND
MESSAGES
IN AN
EMERGENCY
SERVICING
AND
CARETECHNICAL
SPECIFICATIONSCONTENTS
Page 297 of 352
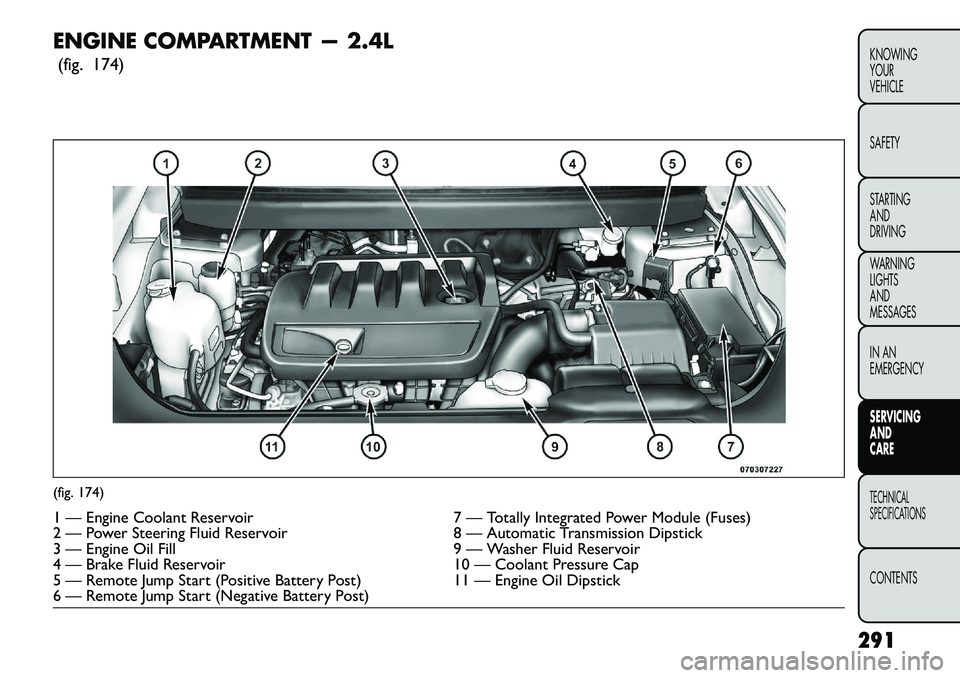
ENGINE COMPARTMENT — 2.4L(fig. 174)(fig. 174)1 — Engine Coolant Reservoir 7 — Totally Integrated Power Module (Fuses)
2 — Power Steering Fluid Reservoir 8 — Automatic Transmission Dipstick
3 — Engine Oil Fill 9 — Washer Fluid Reservoir
4 — Brake Fluid Reservoir 10 — Coolant Pressure Cap
5 — Remote Jump Start (Positive Battery Post) 11 — Engine Oil Dipstick
6 — Remote Jump Start (Negative Battery Post)
291
KNOWING
YOUR
VEHICLE
SAFETY
STARTING
AND
DRIVING
WARNING
LIGHTS
AND
MESSAGES
IN AN
EMERGENCY
SERVICING
AND
CARETECHNICAL
SPECIFICATIONSCONTENTS
Page 301 of 352
SAFE or a crosshatch zone marked with MIN at the low
end of the range and MAX at the high end of the range.
Adding 1 Liter of oil when the reading is at the low end
of the range marking will raise the oil level to the high
end of the range marking.
Do not overfill the engine. Overfilling the
engine will cause oil aeration, which can
lead to loss of oil pressure and an in-
crease in oil temperature.This could damage your
engine.Also, be sure the oil fill cap is replaced and
tightened after adding oil.
Checking Oil Level – Diesel Engine
To assure proper engine lubrication, the engine oil
must be maintained at the correct level. Check the oil
level at regular intervals, such as every fuel stop.
The best time to check the engine oil level is about five
minutes after a fully warmed engine is shut off or
before starting the engine after it has sat overnight.
Checking the oil while the vehicle is on level ground will
improve the accuracy of the oil level readings. Maintain
the oil level between the MIN and MAX markings on
the dipstick. Adding 1 Liter of oil when the reading is at
the MIN mark will result in a MAX reading on these
engines.
Car maintenance should be done at a
FIAT Dealership. For routine and minor
maintenance operations you wish to
carry out yourself, we do recommend you have
the proper equipment , genuine FIAT spare parts
and the necessary fluids; do not however carry out
these operations if you have no experience.
Change Engine Oil – Gasoline Engine
Refer to the “Maintenance Schedule” for the proper
maintenance intervals.
Change Engine Oil – Diesel Engine
Refer to the “Maintenance Schedule” for the proper
maintenance intervals.
Engine Oil Viscosity – 2.4L And 3.6L Gasoline
Engine
SAE 5W-30 engine oil is recommended for all operating
temperatures. This engine oil improves low tempera-
ture starting and vehicle fuel economy.
The engine oil filler cap also shows the recommended
engine oil viscosity for your vehicle. For information on
engine oil filler cap location, refer to “Engine Compart-
ment” in “Servicing And Care” for further information.
295
KNOWING
YOUR
VEHICLE
SAFETY
STARTING
AND
DRIVING
WARNING
LIGHTS
AND
MESSAGES
IN AN
EMERGENCY
SERVICING
AND
CARETECHNICAL
SPECIFICATIONSCONTENTS