CD player FIAT FREEMONT 2014 1.G Owners Manual
[x] Cancel search | Manufacturer: FIAT, Model Year: 2014, Model line: FREEMONT, Model: FIAT FREEMONT 2014 1.GPages: 388, PDF Size: 4.13 MB
Page 59 of 388
WARNING!
• Donotplaceitemsoverthetopofthe
Ac t
ive Head Restraint , such as coats,
seat covers or portable DVD players.These items
may interfere with the operation of the Active
Head Restraint in the event of a collision and
could result in serious injury or death.
• Active Head Restraints may be deployed if they
are struck by an object such as a hand, foot or
loose cargo. To avoid accidental deployment of
the Active Head Restraint ensure that all cargo is
secured, as loose cargo could contact the Active
Head Restraint during sudden stops. Failure to
follow this warning could cause personal injury if
the Active Head Restraint is deployed.
Head Restraints — Second Row Seats
The rear seats are equipped with adjustable head re-
straints. To raise the head restraint, pull upward on the
head restraint. To lower the head restraint, press the
adjustment button, located on the base of the head
restraint, and push downward on the head restraint.
(fig. 31)
NOTE:
•
The head restraints should only be removed by qualified
technicians, for service purposes only. If any of the head
restraints require removal, see your authorized dealer.
• For proper routing of a Child Seat Tether, refer to “Occupant Restraints” in “Safety”.
WARNING!
Driving a vehicle with the head restraints
removed or improperly adjusted could
cause serious injury or death in the event of a
collision. The head restraints should be checked
prior to operating the vehicle and never adjusted
while the vehicle is in motion.
(Continued)
(fig. 31)
Adjustment Button
53
KNOWING
YOUR
VEHICLE
SAFETY
STARTING
AND
DRIVING
W
ARNING
LIGHTS
AND
MESSAGES
IN AN
EMERGENCY
SERVICING
AND CARE
TECHNICAL
SPECIFICATIONS
CONTENTS
Page 72 of 388
CLIMATE CONTROLS
The air conditioning and heating system is designed to
make you comfortable in all types of weather. This
system can be operated through either the instrument
panel or through the Uconnect® system display.
When the Uconnect® system is in different modes
(Radio, Player, Settings, More, etc.) the driver and
passenger temperature settings will be indicated at the
top of the display.
Manual Climate Controls With Touchscreen
(for versions/markets, where provided)
Hard-Keys
Hard-keys are located on the left and right side of the
Uconnect® 4.3 screen in the center of the instrument
panel. There are also hard-keys located below the
Uconnect® touch screen. (fig. 47) (fig. 48)
Soft-Keys
Soft-keys are accessible on the Uconnect® system
screen.
(fig. 49) (fig. 50)
(fig. 47)
(fig. 48)Manual Temperature Controls — Hard-Keys
66
KNOWINGYOUR
VEHICLE
SAFETY
STARTING AND
DRIVING
W
ARNING LIGHTS AND
MESSAGES
IN AN
EMERGENCY
SERVICING AND CARE
TECHNICAL
SPECIFICATIONS
CONTENTS
Page 109 of 388
WARNING!
Do not operate this vehicle with a con-
sole compar t
ment lid in the open posi-
tion. Cellular phones, music players, and other
handheld electronic devices should be stowed
while driving. Use of these devices while driving
can cause an accident due to distraction, result-
ing in death or injury.
Sliding Armrest (for automatic transmission
only)
The center console armrest can also be slid rearward
for easy access to the storage area.
(fig. 80)
FLIP 'N STOW™ FRONT PASSENGER SEAT
STORAGE (for versions/markets, where
provided)
The seat latch release-loop is located in the center of
the seat cushion between the seat cushion and the
seatback. Pull the loop upward to release the latch and
then forward to open the seat to the detent position.
(fig. 81)
NOTE: Make sure that objects inside the bin do not
interfere with the latch before closing the seat. Push
the seat cushion downward after closing it to make
sure it latches to the base.
(fig. 80)
Sliding Armrest(fig. 81)Front Passenger Seat Storage Compartment
103
KNOWING
YOUR
VEHICLE
SAFETY
STARTING
AND
DRIVING
W
ARNING
LIGHTS
AND
MESSAGES
IN AN
EMERGENCY
SERVICING
AND CARE
TECHNICAL
SPECIFICATIONS
CONTENTS
Page 170 of 388
Video Screen
NOTE:Typically there are two different ways to
operate the features of the Video Entertainment Sys-
tem (VES™).
• The Remote Control
• The Touch-Screen Radio (for versions/markets, where provided)
Play Video Games
Connect the video game console to the Auxiliary RCA
input jacks located on the back of the center console. Audio/Video RCA Jacks (AUX Jacks)
on the rear of the center console
enable the monitor to display video
directly from a video camera, con-
nect video games for display on the
screen, or play music directly from an
MP3 player.
1. Video in (yellow)
2. Left audio in (white)
3. Right audio in (red)
When connecting an external source to the AUX
input, be sure to follow the standard color coding for
the VES™ jacks: NOTE:
Certain high-end video games, such as Playsta-
tion3 and XBox360 will exceed the power limit of the
vehicle's Power Inverter. Refer to the Power Inverter
section in your vehicle's Owner's Manual for more
information.
Ensure the remote control channel selector switch and
Headphone switch (IR channel) are the same number.
Using The Remote Control
1. Press the MODE button on the Remote Control.
2. While looking at the video screen, highlight AUX 1, by either pressing Up/Down/Left/Right buttons or
by repeatedly pressing the MODE button, then
press ENTER on the Remote Control.
Using The Touchscreen Radio Controls
1. Touch the “MORE” soft-key.
2. Touch the “Rear Entertainment” soft-key to display the Rear Entertainment Controls.
3. If the Rear Entertainment is turned off, touch the “Power” soft-key.
4. Touch the “1” or “2” soft-key for the channel desired and press “Source” soft-key to select the
desired mode.
164
KNOWING YOUR
VEHICLE
SAFETY
STARTING AND
DRIVING
W
ARNING LIGHTS AND
MESSAGES
IN AN
EMERGENCY
SERVICING AND CARE
TECHNICAL
SPECIFICATIONS
CONTENTS
Page 176 of 388
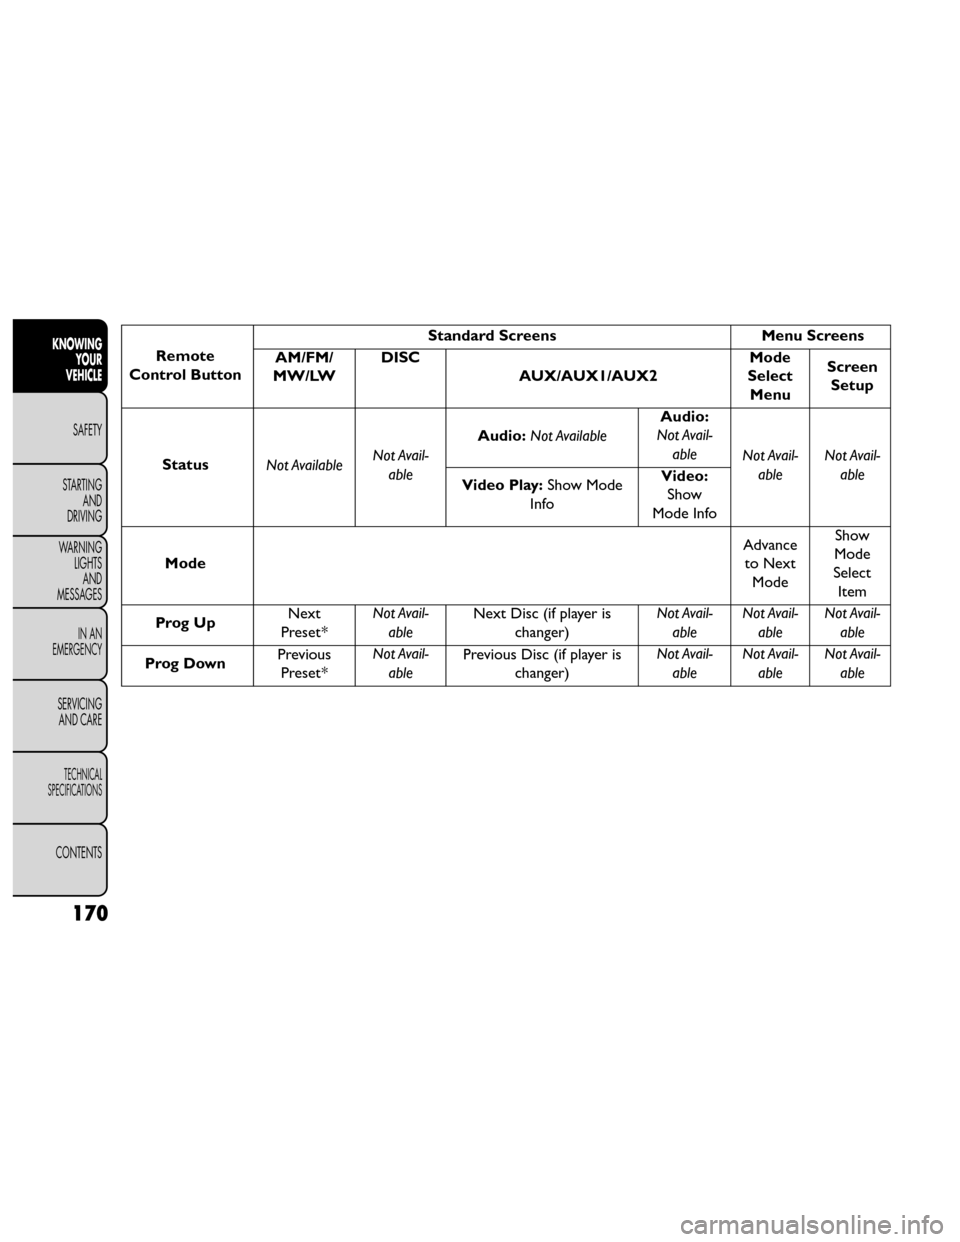
Remote
Control Button Standard Screens
Menu Screens
AM/FM/
MW/LW DISC
AUX/AUX1/AUX2 Mode
Select Menu Screen
Setup
Status Not Available Not Avail-
able Audio:
Not Available Audio:
Not Avail-
able Not Avail-
able Not Avail-
able
Video Play: Show Mode
Info Video:
Show
Mode Info
Mode Advance
to Next Mode Show
Mode
Select Item
Prog Up Next
Preset* Not Avail-
able Next Disc (if player is
changer) Not Avail-
able Not Avail-
able Not Avail-
able
Prog Down Previous
Preset* Not Avail-
able Previous Disc (if player is
changer) Not Avail-
able Not Avail-
able Not Avail-
able
170
KNOWING YOUR
VEHICLE
SAFETY
STARTING AND
DRIVING
W
ARNING LIGHTS AND
MESSAGES
IN AN
EMERGENCY
SERVICING AND CARE
TECHNICAL
SPECIFICATIONS
CONTENTS
Page 178 of 388
10. PROG Up/Down – When listening to a radiomode, pressing PROG Up selects the next preset
and pressing PROG Down selects the previous
preset stored in the radio. When listening to com-
pressed audio on a data disc, PROG Up selects the
next directory and PROG Down selects the pre-
vious directory. When listening to a disc in a radio
with a multiple-disc changer, PROG Up selects the
next disc and PROG Down selects the previous
disc.
11. MUTE – Press to mute the headphone audio out- put for the selected channel.
12. SLOW – Press to slow playback of a DVD disc. Press play (▸) to resume normal play.
13. STATUS – Press to display the current status while in a video mode display.
14. MODE – Press to change the mode of the selected channel. See the Mode Selection section of this
manual for details on changing modes.
15. SETUP – When in a video mode, press the SETUP button to access the display settings (see the
display settings section) to access the DVD setup menu, select the menu button on the radio. When
a disc is loaded in the DVD player (for versions/
markets, where provided) and the VES™ mode is
selected and the disc is stopped, press the SETUP
button to access the DVD Setup menu. (see the
DVD Setup Menu of this manual.)
16. BACK – When navigating in menu mode, press to return to the previous screen. When navigating a
DVDs disc menu, the operation depends on the
disc’s contents.
17. ◂◂– In radio modes, press to seek to the previous
tunable station. In disc modes, press and hold to
fast rewind through the current audio track or
video chapter. In menu modes use to navigate in
the menu.
18. ENTER – Press to select the highlighted option in a menu.
19. ▴/ NEXT – In radio modes, press to select to the
next station. In disc modes, press to advance to
the next audio track or video chapter. In menu
modes, use to navigate in the menu.
172
KNOWING YOUR
VEHICLE
SAFETY
STARTING AND
DRIVING
W
ARNING LIGHTS AND
MESSAGES
IN AN
EMERGENCY
SERVICING AND CARE
TECHNICAL
SPECIFICATIONS
CONTENTS
Page 179 of 388
Remote Control Storage
The video screen(s) come with a built in storage
compartment for the remote control which is acces-
sible when the screen is opened. To remove the re-
mote, use your index finger to pull and rotate the
remote towards you. Do not try to pull the remote
straight down as it will be very difficult to remove. To
return the remote back into its storage area, insert one
long edge of the remote into the two retaining clips
first, and then rotate the remote back up into the other
two retaining clips until it snaps back into position.
(fig. 123)
Locking The Remote Control
All remote control functionality can be disabled as a
parental control feature.
• To disable the Remote Control from making anychanges, press the Video Lock button and follow the
radio’s instructions (select menu, rear ves, lock). If
the vehicle is not equipped with a DVD player, follow
the radio’s instructions to turn Video Lock on. The
radio and the video screen(s) indicate when Video
Lock is active.
• Pressing the Video Lock again or turning the ignition OFF turns Video Lock OFF and allows remote con-
trol operation of the VES™.
Replacing The Remote Control Batteries
The remote control requires two AAA batteries for
operation. To replace the batteries:
• Locate the battery compartment on the back of the remote, then slide the battery cover downward.
• Replace the batteries, making sure to orient them according to the polarity diagram shown.
• Replace the battery compartment cover.
(fig. 123) The Remote Control Storage
173
KNOWING
YOUR
VEHICLE
SAFETY
STARTING
AND
DRIVING
W
ARNING
LIGHTS
AND
MESSAGES
IN AN
EMERGENCY
SERVICING
AND CARE
TECHNICAL
SPECIFICATIONS
CONTENTS
Page 186 of 388
Listening To Audio With The Screen Closed
To listen to only audio portion of the channel with the
screen closed:
• Set the audio to the desired source and channel.
• Close the video screen.
• To change the current audio mode, press the remotecontrol’s MODE button. This will automatically se-
lect the next available audio mode without using the
MODE/SOURCE Select menu.
If the screen is closed and there is no audio heard,
verify that the headphones are turned on (the ON
indicator is illuminated) and the headphone selector
switch is on the desired channel. If the headphones are
turned on, press the remote control’s power button to
turn audio on. If audio is still not heard, check that fully
charged batteries are installed in the headphones.
Disc Formats
The DVD player is capable of playing the following
types of discs (12 cm or 8 cm diameter):
• DVD-Video discs (MPEG-2 video compression) (see notes about DVD Region Codes)
• Audio Compact Discs (CDs)
• CD Data discs with MP3 and WMA compressed audio format files
• Video CDs (MPEG-1 video compression) DVD Region Codes
The DVD player and many DVD discs are coded by
geographic region. These region codes must match in
order for the disc to play. If the region code for the
DVD disc does not match the region code for the
player, the disc will stop playing and a warning will be
displayed.
DVD Audio Support
When a DVD-Audio disc is inserted in the DVD player,
the DVD-Audio title on the disc is played by default
(most DVD-Audio discs also have a Video title, but the
Video title is ignored). All multi-channel program ma-
terial is automatically mixed down to two channels,
which may result in a lowered apparent volume level.
If you increase the volume level to account for this
change in level, remember to lower the volume before
changing the disc or to another mode.
Recorded Discs
The DVD player will play CD-R and CD-RW discs
recorded in CD-Audio or Video-CD format, or as a
CD-ROM containing MP3 or WMA files. The player
will also play DVD-Video content recorded to a
DVD-R, DVD-RW and DVD-ROM discs.
If you record a disc using a personal computer, there
may be cases where the DVD player may not be able to
play some or the entire disc, even if it is recorded in a
180
KNOWING
YOUR
VEHICLE
SAFETY
STARTING AND
DRIVING
W
ARNING LIGHTS AND
MESSAGES
IN AN
EMERGENCY
SERVICING AND CARE
TECHNICAL
SPECIFICATIONS
CONTENTS
Page 187 of 388
compatible format and is playable on other players. To
help avoid playback problems, use the following guide-
lines when recording discs.
• Open sessions are ignored. Only sessions that areclosed are playable.
• For multi-session CDs that contain only multiple CD-Audio sessions, the player will renumber the
tracks so each track number is unique.
• For CD Data (or CD-ROM) discs, always use the ISO-9660 (Level 1 or Level 2), Joliet, or UDF format.
CD-DA may also be used for PCM Audio contained
on CD-Based Data.
• The player recognizes a maximum of 512 files and 99 folders per CD-R and CD-RW disc.
• Mixed media recordable DVD formats will only play the Video_TS portion of the disc.
If you are still having trouble writing a disc that is
playable in the DVD player, check with the disc record-
ing software publisher for more information about
burning playable discs.
The recommended method for labeling recordable
discs (CD-R, CD-RW, DVD-R and DVD-RW) is with a
permanent marker. Do not use adhesive labels as they
may separate from the disc, become stuck, and cause
permanent damage to the DVD player. Compressed Audio Files (MP3, WMA AND
ACC)
The DVD player is capable of playing MP3 (MPEG-1
Audio Layer 3 with data bitrates from 32 to 320 kbit/s,
including variable bit rates), WMA (All Standard 8.x,
9.x Windows Media Audio) and ACC (MPEG-4 audio;
sampling frequencies 8 to 48 kHz; mono and stereo)
audio files with the from a CD Data disc (usually a
CD-R or CD-RW).
• The DVD player always uses the file extension to
determine the audio format, so MP3 files must always
end with the extension ".mp3" or ".MP3", WMA files
must always end with the extension ".wma" or
"WMA", and ACC files must end with the extensions
“.acc” or “.m4a”. To prevent incorrect playback, do
not use these extensions for any other types of files.
• For MP3 files, ID3 tag data v1, v1.1, v2 and v2.4 (such as artist name, track title, album, etc.) are supported.
• Any file that is copy protected (such as those down- loaded from many online music stores) will not play.
The DVD player will automatically skip the file and
begin playing the next available file.
• Other compression formats such as AAC, MP3 Pro, Ogg Vorbis, and ATRAC3 will not play. The DVD
player will automatically skip the file and begin playing
the next available file.
181
KNOWING
YOUR
VEHICLE
SAFETY
STARTING
AND
DRIVING
W
ARNING
LIGHTS
AND
MESSAGES
IN AN
EMERGENCY
SERVICING
AND CARE
TECHNICAL
SPECIFICATIONS
CONTENTS
Page 188 of 388
• If you are creating your own files, the recommendedfixed bit rate for MP3 files is between 96 and
192Kbps and the recommended fixed bit rate for
WMA files is between 64 and 192Kbps. Variable bit
rates are also supported. For both formats, the
recommended sample rate is either 44.1kHz or
48kHz.
• To change the current file, use the remote control’s or DVD player’s ▴button to advance to the next file,
or the ▾button to return to the start of the current
or previous file.
• To change the current directory, use the remote control’s PROG UP and Down buttons or Rewind/
skip back and fast fwd/skip forward. Disc Errors
If the DVD player is unable to read the disc, a "Disc
Error" message is displayed on the Radio display and
the disc is automatically ejected. A dirty, damaged, or
incompatible disc format are all potential causes for a
"Disc Error" message.
If a disc has a damaged track which results in audible or
visible errors that persists for 2.0 seconds, the DVD
player will attempt to continue playing the disc by
skipping forward 1.0 to 3.0 seconds at a time. If the end
of the disc is reached, the DVD player will return to the
beginning of the disc and attempt to play the start of
the first track.
The DVD player may shut down during extremely hot
conditions, such as when the vehicle’s interior tem-
perature is above 120°F. When this occurs, the DVD
player will display "High Temp" and will shut off the
display until a safe temperature is reached. This shut-
down is necessary to protect the optics of the DVD
player.
182
KNOWING
YOUR
VEHICLE
SAFETY
STARTING AND
DRIVING
W
ARNING LIGHTS AND
MESSAGES
IN AN
EMERGENCY
SERVICING AND CARE
TECHNICAL
SPECIFICATIONS
CONTENTS