clock FIAT FREEMONT 2015 1.G User Guide
[x] Cancel search | Manufacturer: FIAT, Model Year: 2015, Model line: FREEMONT, Model: FIAT FREEMONT 2015 1.GPages: 412, PDF Size: 3.37 MB
Page 93 of 412
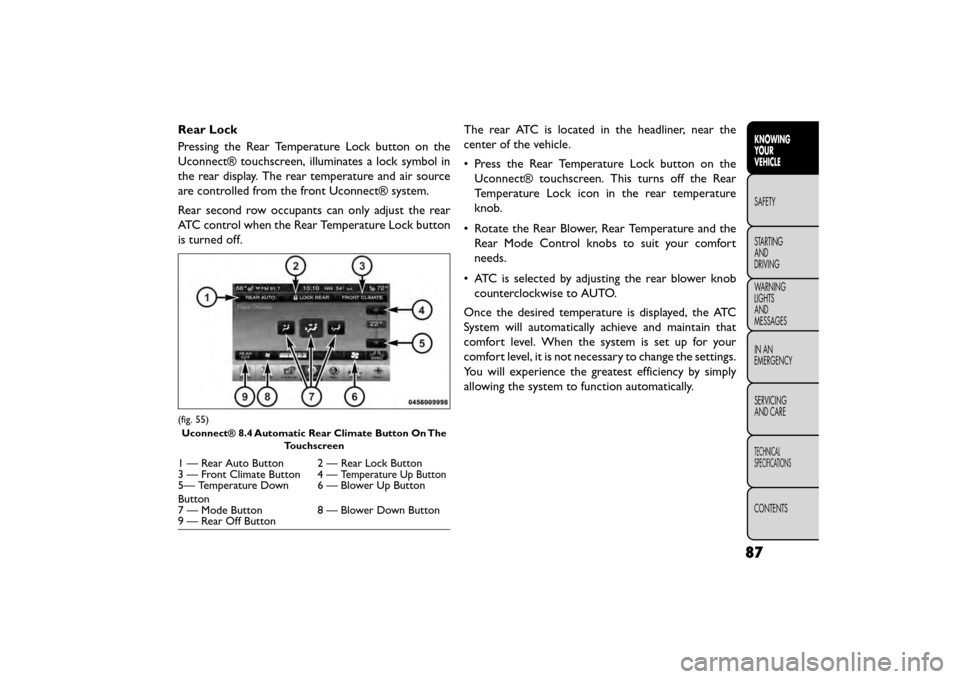
Rear Lock
Pressing the Rear Temperature Lock button on the
Uconnect® touchscreen, illuminates a lock symbol in
the rear display. The rear temperature and air source
are controlled from the front Uconnect® system.
Rear second row occupants can only adjust the rear
ATC control when the Rear Temperature Lock button
is turned off.The rear ATC is located in the headliner, near the
center of the vehicle.
• Press the Rear Temperature Lock button on the
Uconnect® touchscreen. This turns off the Rear
Temperature Lock icon in the rear temperature
knob.
• Rotate the Rear Blower, Rear Temperature and the Rear Mode Control knobs to suit your comfort
needs.
• ATC is selected by adjusting the rear blower knob counterclockwise to AUTO.
Once the desired temperature is displayed, the ATC
System will automatically achieve and maintain that
comfort level. When the system is set up for your
comfort level, it is not necessary to change the settings.
You will experience the greatest efficiency by simply
allowing the system to function automatically.
(fig. 55) Uconnect® 8.4 Automatic Rear Climate Button On The Touchscreen
1 — Rear Auto Button 2 — Rear Lock Button
3 — Front Climate Button 4 —Temperature Up Button5— Temperature Down
Button 6 — Blower Up Button
7 — Mode Button 8 — Blower Down Button
9 — Rear Off Button
87
KNOWING
YOUR
VEHICLE
SAFETY
STAR
TING
AND
DRIVING
WARNING
LIGHTS
AND
MESSAGES
IN AN
EMERGENCY
SERVICING
AND CARE
TECHNICAL
SPECIFICATIONS
CONTENTS
Page 94 of 412
NOTE:It is not necessary to move the temperature
settings for cold or hot vehicles. The system automati-
cally adjusts the temperature, mode and fan speed to
provide comfort as quickly as possible.
(fig. 56)
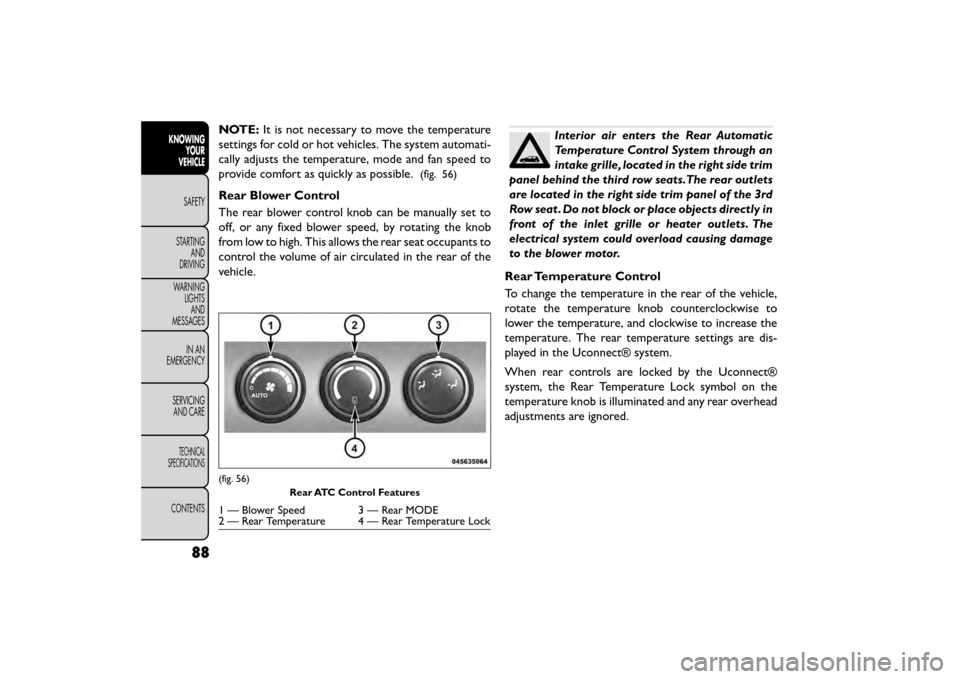
Rear Blower Control
The rear blower control knob can be manually set to
off, or any fixed blower speed, by rotating the knob
from low to high. This allows the rear seat occupants to
control the volume of air circulated in the rear of the
vehicle.
Interior air enters the Rear Automatic
Temperature Control System through an
intake grille, located in the right side trim
panel behind the third row seats.The rear outlets
are located in the right side trim panel of the 3rd
Row seat . Do not block or place objects directly in
front of the inlet grille or heater outlets. The
electrical system could overload causing damage
to the blower motor.
Rear Temperature Control
To change the temperature in the rear of the vehicle,
rotate the temperature knob counterclockwise to
lower the temperature, and clockwise to increase the
temperature. The rear temperature settings are dis-
played in the Uconnect® system.
When rear controls are locked by the Uconnect®
system, the Rear Temperature Lock symbol on the
temperature knob is illuminated and any rear overhead
adjustments are ignored.
(fig. 56) Rear ATC Control Features
1 — Blower Speed 3 — Rear MODE
2 — Rear Temperature 4 — Rear Temperature Lock
88
KNOWINGYOUR
VEHICLE
SAFETY
STAR
TINGAND
DRIVING
WARNING LIGHTSAND
MESSAGES
IN AN
EMERGENCY
SERVICINGAND CARE
TECHNICAL
SPECIFICATIONS
CONTENTS
Page 98 of 412
LIGHTS
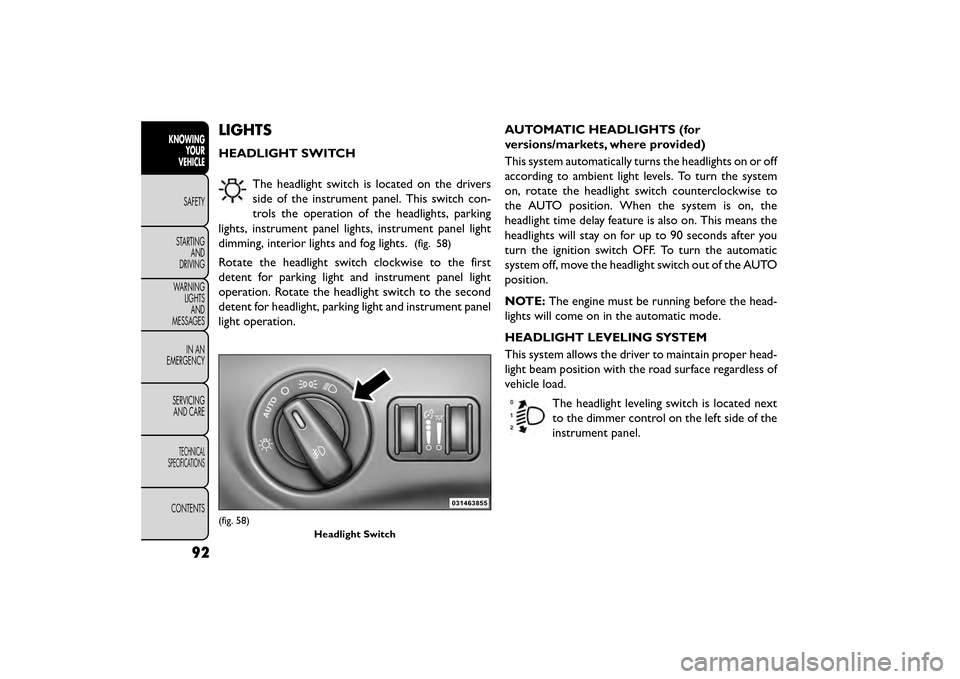
HEADLIGHT SWITCHThe headlight switch is located on the drivers
side of the instrument panel. This switch con-
trols the operation of the headlights, parking
lights, instrument panel lights, instrument panel light
dimming, interior lights and fog lights.
(fig. 58)
Rotate the headlight switch clockwise to the first
detent for parking light and instrument panel light
operation. Rotate the headlight switch to the second
detent for headlight, parking light and instrument panel
light operation. AUTOMATIC HEADLIGHTS (for
versions/markets, where provided)
This system automatically turns the headlights on or off
according to ambient light levels. To turn the system
on, rotate the headlight switch counterclockwise to
the AUTO position. When the system is on, the
headlight time delay feature is also on. This means the
headlights will stay on for up to 90 seconds after you
turn the ignition switch OFF. To turn the automatic
system off, move the headlight switch out of the AUTO
position.
NOTE:
The engine must be running before the head-
lights will come on in the automatic mode.
HEADLIGHT LEVELING SYSTEM
This system allows the driver to maintain proper head-
light beam position with the road surface regardless of
vehicle load.
The headlight leveling switch is located next
to the dimmer control on the left side of the
instrument panel.
(fig. 58) Headlight Switch
92
KNOWINGYOUR
VEHICLE
SAFETY
STAR
TINGAND
DRIVING
WARNING LIGHTSAND
MESSAGES
IN AN
EMERGENCY
SERVICINGAND CARE
TECHNICAL
SPECIFICATIONS
CONTENTS
Page 189 of 412
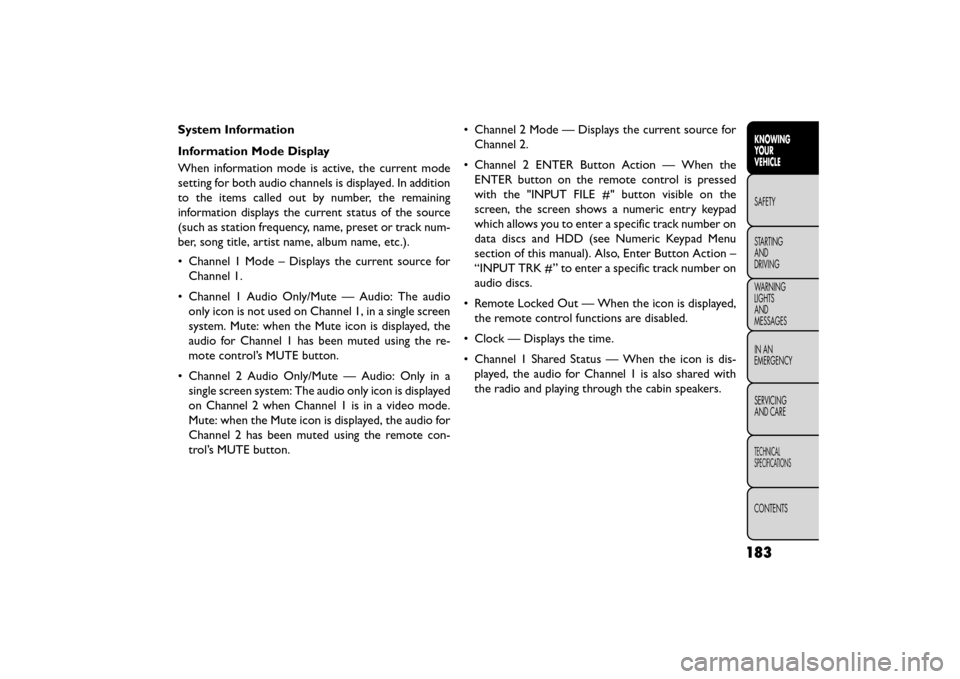
System Information
Information Mode Display
When information mode is active, the current mode
setting for both audio channels is displayed. In addition
to the items called out by number, the remaining
information displays the current status of the source
(such as station frequency, name, preset or track num-
ber, song title, artist name, album name, etc.).
• Channel 1 Mode – Displays the current source forChannel 1.
• Channel 1 Audio Only/Mute — Audio: The audio only icon is not used on Channel 1, in a single screen
system. Mute: when the Mute icon is displayed, the
audio for Channel 1 has been muted using the re-
mote control’s MUTE button.
• Channel 2 Audio Only/Mute — Audio: Only in a single screen system: The audio only icon is displayed
on Channel 2 when Channel 1 is in a video mode.
Mute: when the Mute icon is displayed, the audio for
Channel 2 has been muted using the remote con-
trol’s MUTE button. • Channel 2 Mode — Displays the current source for
Channel 2.
• Channel 2 ENTER Button Action — When the ENTER button on the remote control is pressed
with the "INPUT FILE #" button visible on the
screen, the screen shows a numeric entry keypad
which allows you to enter a specific track number on
data discs and HDD (see Numeric Keypad Menu
section of this manual). Also, Enter Button Action –
“INPUT TRK #” to enter a specific track number on
audio discs.
• Remote Locked Out — When the icon is displayed, the remote control functions are disabled.
• Clock — Displays the time.
• Channel 1 Shared Status — When the icon is dis- played, the audio for Channel 1 is also shared with
the radio and playing through the cabin speakers.
183
KNOWING
YOUR
VEHICLE
SAFETY
STAR
TING
AND
DRIVING
WARNING
LIGHTS
AND
MESSAGES
IN AN
EMERGENCY
SERVICING
AND CARE
TECHNICAL
SPECIFICATIONS
CONTENTS
Page 291 of 412
SPARE TIRE REMOVAL
NOTE:On seven-passenger models, fold the third-
row passenger seats flat. This will provide more space
when accessing the jacking tools and when operating
the winch mechanism.
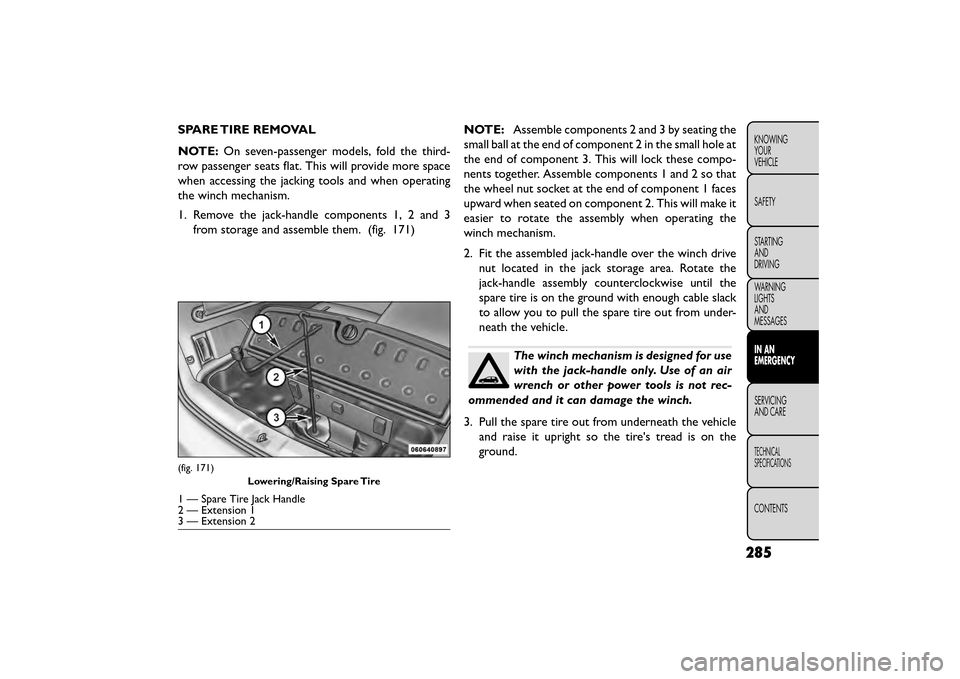
1. Remove the jack-handle components 1, 2 and 3 from storage and assemble them. (fig. 171) NOTE:
Assemble components 2 and 3 by seating the
small ball at the end of component 2 in the small hole at
the end of component 3. This will lock these compo-
nents together. Assemble components 1 and 2 so that
the wheel nut socket at the end of component 1 faces
upward when seated on component 2. This will make it
easier to rotate the assembly when operating the
winch mechanism.
2. Fit the assembled jack-handle over the winch drive nut located in the jack storage area. Rotate the
jack-handle assembly counterclockwise until the
spare tire is on the ground with enough cable slack
to allow you to pull the spare tire out from under-
neath the vehicle.
The winch mechanism is designed for use
with the jack-handle only. Use of an air
wrench or other power tools is not rec-
ommended and it can damage the winch.
3. Pull the spare tire out from underneath the vehicle and raise it upright so the tire's tread is on the
ground.
(fig. 171)
Lowering/Raising Spare Tire
1 — Spare Tire Jack Handle
2 — Extension 1
3 — Extension 2
285
KNOWING
YOUR
VEHICLE
SAFETY
STARTING
AND
DRIVING
WARNING
LIGHTS
AND
MESSAGES
IN AN
EMERGENCY
SERVICING
AND
CARE
TECHNICAL
SPECIFICATIONS
CONTENTS
Page 292 of 412
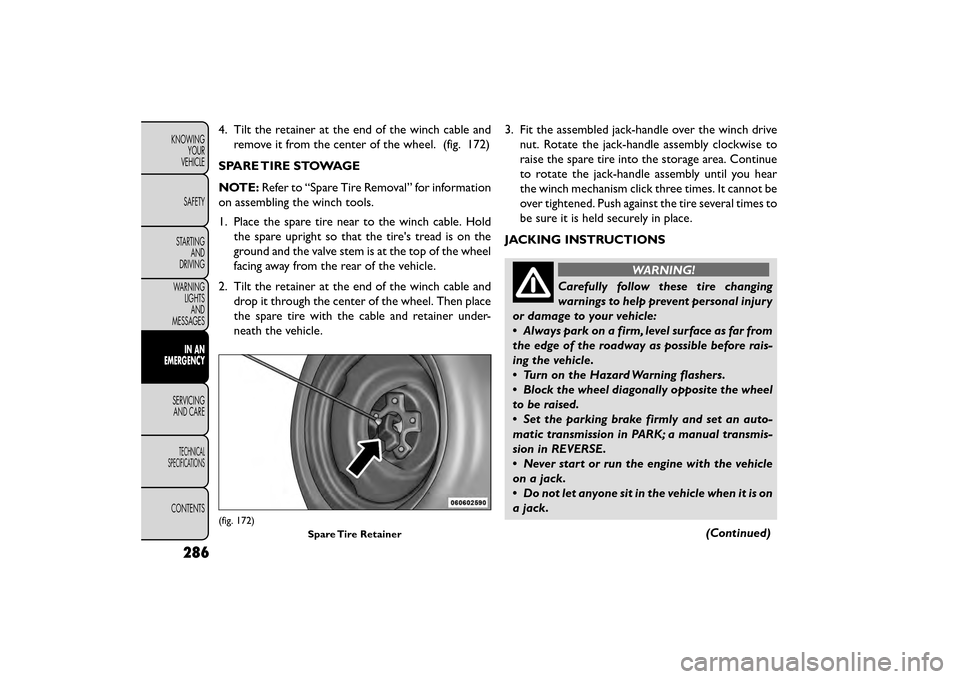
4. Tilt the retainer at the end of the winch cable andremove it from the center of the wheel. (fig. 172)
SPARE TIRE STOWAGE
NOTE: Refer to “Spare Tire Removal” for information
on assembling the winch tools.
1. Place the spare tire near to the winch cable. Hold the spare upright so that the tire's tread is on the
ground and the valve stem is at the top of the wheel
facing away from the rear of the vehicle.
2. Tilt the retainer at the end of the winch cable and drop it through the center of the wheel. Then place
the spare tire with the cable and retainer under-
neath the vehicle. 3. Fit the assembled jack-handle over the winch drive
nut. Rotate the jack-handle assembly clockwise to
raise the spare tire into the storage area. Continue
to rotate the jack-handle assembly until you hear
the winch mechanism click three times. It cannot be
over tightened. Push against the tire several times to
be sure it is held securely in place.
JACKING INSTRUCTIONS
WARNING!
Carefully follow these tire changing
warnin gs
to help prevent personal injury
or damage to your vehicle:
• Always park on a firm, level surface as far from
the edge of the roadway as possible before rais-
ing the vehicle.
• Turn on the Hazard Warning flashers.
• Block the wheel diagonally opposite the wheel
to be raised.
• Set the parking brake firmly and set an auto-
matic transmission in PARK; a manual transmis-
sion in REVERSE.
• Never start or run the engine with the vehicle
on a jack.
• Do not let anyone sit in the vehicle when it is on
a jack.
(Continued)
(fig. 172)Spare Tire Retainer
286
KNOWINGYOUR
VEHICLE
SAFETY
STARTING AND
DRIVING
WARNING LIGHTSAND
MESSAGES
IN AN
EMERGENCY
SER VICING
AND
CARE
TECHNICAL
SPECIFICATIONS
CONTENTS
Page 293 of 412
WARNING! (Continued)
• Do not get under the vehicle when it is on a
jack. If you need to get under a raised vehicle,
take it to a service center where it can be raised
on a lift .
• Only use the jack in the positions indicated and
for lifting this vehicle during a tire change.
• If working on or near a roadway, be extremely
careful of motor traffic .
• To assure that spare tires, flat or inflated, are
securely stowed, spares must be stowed with the
valve stem facing the ground.
(fig. 173)
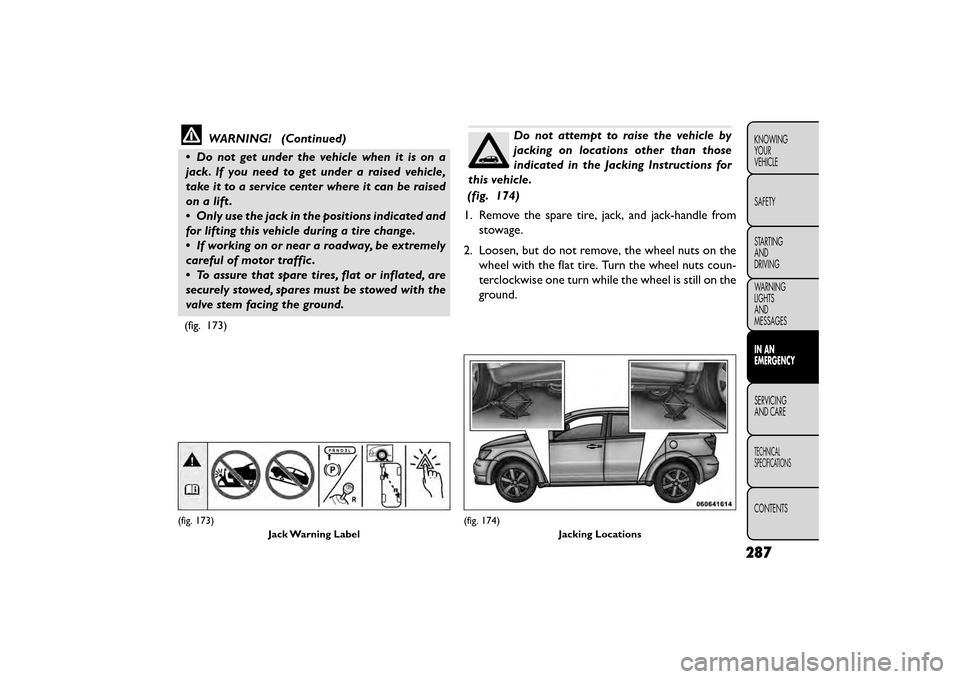
Do not attempt to raise the vehicle by
jacking on locations other than those
indicated in the Jacking Instructions for
this vehicle.
(fig. 174)
1. Remove the spare tire, jack, and jack-handle from stowage.
2. Loosen, but do not remove, the wheel nuts on the wheel with the flat tire. Turn the wheel nuts coun-
terclockwise one turn while the wheel is still on the
ground.
(fig. 173)
Jack Warning Label(fig. 174) Jacking Locations
287
KNOWING
YOUR
VEHICLE
SAFETY
STARTING
AND
DRIVING
WARNING
LIGHTS
AND
MESSAGES
IN AN
EMERGENCY
SERVICING
AND
CARE
TECHNICAL
SPECIFICATIONS
CONTENTS
Page 294 of 412
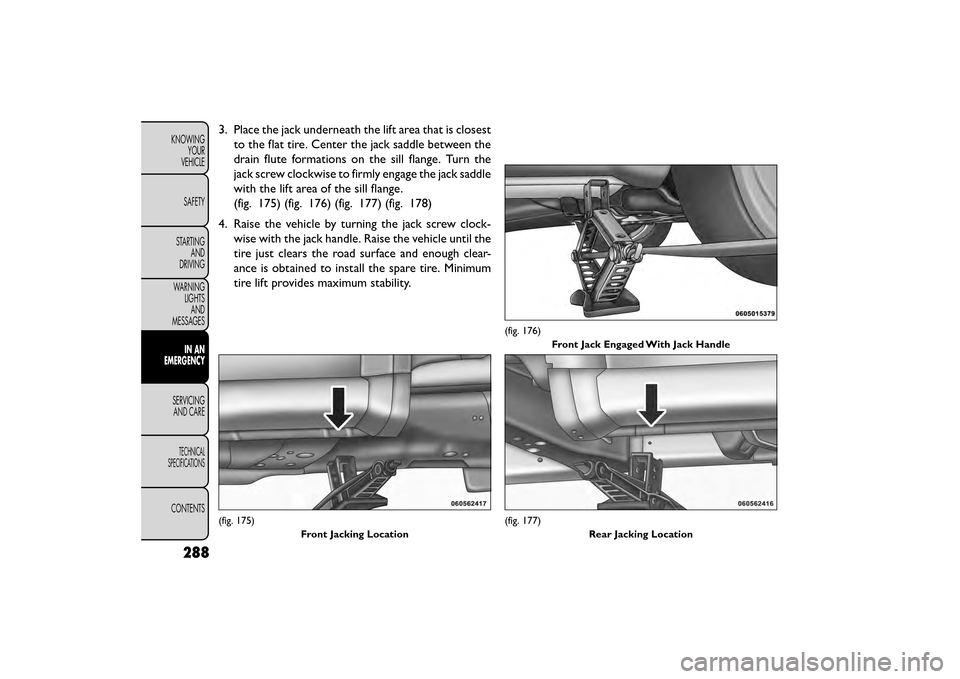
3. Place the jack underneath the lift area that is closestto the flat tire. Center the jack saddle between the
drain flute formations on the sill flange. Turn the
jack screw clockwise to firmly engage the jack saddle
with the lift area of the sill flange.
(fig. 175) (fig. 176) (fig. 177) (fig. 178)
4. Raise the vehicle by turning the jack screw clock- wise with the jack handle. Raise the vehicle until the
tire just clears the road surface and enough clear-
ance is obtained to install the spare tire. Minimum
tire lift provides maximum stability.
(fig. 175)
Front Jacking Location
(fig. 176)Front Jack Engaged With Jack Handle
(fig. 177) Rear Jacking Location
288
KNOWINGYOUR
VEHICLE
SAFETY
STARTING AND
DRIVING
WARNING LIGHTSAND
MESSAGES
IN AN
EMERGENCY
SER VICING
AND
CARE
TECHNICAL
SPECIFICATIONS
CONTENTS
Page 296 of 412
NOTE:
• For vehicles so equipped, do not attempt to install acenter cap or wheel cover on the compact spare.
• Refer to “Compact Spare Tire” and to “Limited-Use Spare” under “Tires — General Information” in
“Technical Specifications” for additional warnings,
cautions, and information about the spare tire, its
use, and operation.
7. Install the wheel nuts with the cone-shaped end of the nut toward the wheel. Lightly tighten the wheel
nuts.
WARNING!
To avoid the risk of forcing the vehicle
off t
he jack, do not tighten the wheel
nuts fully until the vehicle has been lowered.
Failure to follow this warning may result in per-
sonal injury.
8. Lower the vehicle by turning the jack screw coun- terclockwise with the jack handle. 9. Finish tightening the lug nuts. Push down on the
wrench while at the end of the handle for increased
leverage. Tighten the lug nuts in a star pattern until
each nut has been tightened twice. Refer to “Torque
Specifications” in this section for proper lug nut
torque. If in doubt about the correct tightness, have
them checked with a torque wrench by your autho-
rized dealer or service station.
10. Lower the jack to its fully closed position.
11. Place the deflated (flat) tire in the cargo area. Do
not stow the deflated tire in the spare tire
stowage location. Have the deflated (flat) tire
repaired or replaced as soon as possible.
12. To stow the winch cable and retainer, fit the assembled jack-handle over the winch drive nut.
Rotate the jack-handle assembly clockwise until
you hear the winch mechanism click three times. It
cannot be over tightened.
13. Stow the jack-handle and jack. Remove the wheel blocks from the vehicle and release the park brake.
14. Check the tire pressure as soon as possible. Adjust the tire pressure as required.
290
KNOWING YOUR
VEHICLE
SAFETY
STARTING AND
DRIVING
WARNING LIGHTSAND
MESSAGES
IN AN
EMERGENCY
SER VICING
AND
CARE
TECHNICAL
SPECIFICATIONS
CONTENTS
Page 297 of 412
ROAD TIRE INSTALLATION
Vehicles Equipped With Wheel Covers
1. Mount the road tire on the axle.
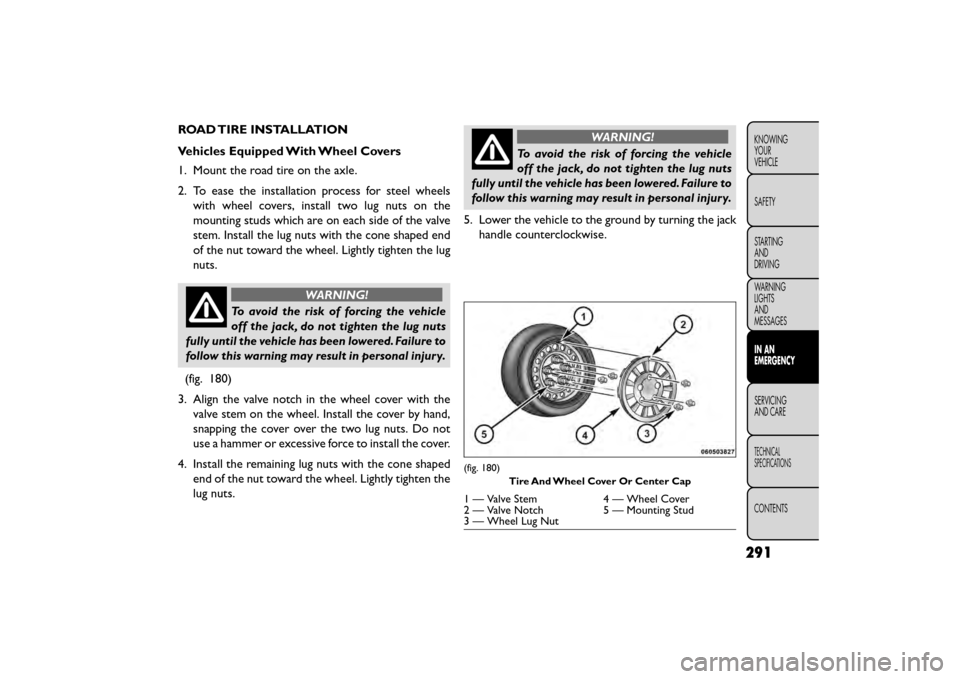
2. To ease the installation process for steel wheelswith wheel covers, install two lug nuts on the
mounting studs which are on each side of the valve
stem. Install the lug nuts with the cone shaped end
of the nut toward the wheel. Lightly tighten the lug
nuts.
WARNING!
To avoid the risk of forcing the vehicle
off t
he jack, do not tighten the lug nuts
fully until the vehicle has been lowered. Failure to
follow this warning may result in personal injury.
(fig. 180)
3. Align the valve notch in the wheel cover with the valve stem on the wheel. Install the cover by hand,
snapping the cover over the two lug nuts. Do not
use a hammer or excessive force to install the cover.
4. Install the remaining lug nuts with the cone shaped end of the nut toward the wheel. Lightly tighten the
lug nuts.
WARNING!
To avoid the risk of forcing the vehicle
off t
he jack, do not tighten the lug nuts
fully until the vehicle has been lowered. Failure to
follow this warning may result in personal injury.
5. Lower the vehicle to the ground by turning the jack handle counterclockwise.
(fig. 180)
Tire And Wheel Cover Or Center Cap
1 — Valve Stem 4 — Wheel Cover
2 — Valve Notch 5 — Mounting Stud
3 — Wheel Lug Nut
291
KNOWING
YOUR
VEHICLE
SAFETY
STARTING
AND
DRIVING
WARNING
LIGHTS
AND
MESSAGES
IN AN
EMERGENCY
SER VICING
AND
CARE
TECHNICAL
SPECIFICATIONS
CONTENTS