sensor FIAT FULLBACK 2016 1.G Owners Manual
[x] Cancel search | Manufacturer: FIAT, Model Year: 2016, Model line: FULLBACK, Model: FIAT FULLBACK 2016 1.GPages: 312, PDF Size: 13.67 MB
Page 43 of 312
OFF— all lamps off
— position, tail, licence plate and
instrument panel lamps on
— headlamps and other lamps go
on
Type 2
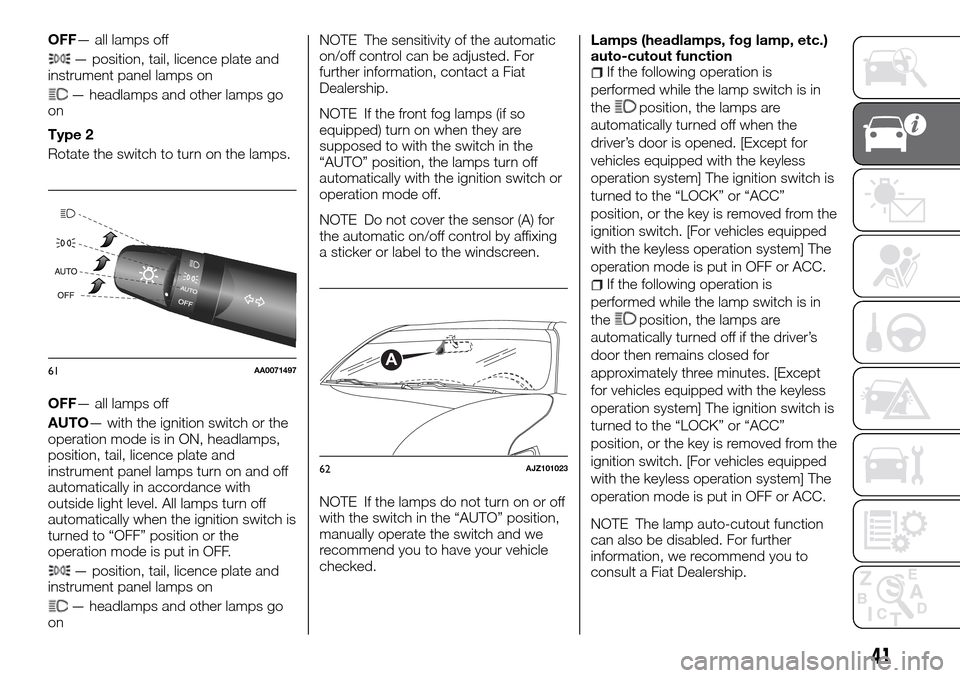
Rotate the switch to turn on the lamps.
OFF— all lamps off
AUTO— with the ignition switch or the
operation mode is in ON, headlamps,
position, tail, licence plate and
instrument panel lamps turn on and off
automatically in accordance with
outside light level. All lamps turn off
automatically when the ignition switch is
turned to “OFF” position or the
operation mode is put in OFF.
— position, tail, licence plate and
instrument panel lamps on
— headlamps and other lamps go
onNOTE The sensitivity of the automatic
on/off control can be adjusted. For
further information, contact a Fiat
Dealership.
NOTE If the front fog lamps (if so
equipped) turn on when they are
supposed to with the switch in the
“AUTO” position, the lamps turn off
automatically with the ignition switch or
operation mode off.
NOTE Do not cover the sensor (A) for
the automatic on/off control by affixing
a sticker or label to the windscreen.
NOTE If the lamps do not turn on or off
with the switch in the “AUTO” position,
manually operate the switch and we
recommend you to have your vehicle
checked.Lamps (headlamps, fog lamp, etc.)
auto-cutout function
If the following operation is
performed while the lamp switch is in
the
position, the lamps are
automatically turned off when the
driver’s door is opened. [Except for
vehicles equipped with the keyless
operation system] The ignition switch is
turned to the “LOCK” or “ACC”
position, or the key is removed from the
ignition switch. [For vehicles equipped
with the keyless operation system] The
operation mode is put in OFF or ACC.
If the following operation is
performed while the lamp switch is in
the
position, the lamps are
automatically turned off if the driver’s
door then remains closed for
approximately three minutes. [Except
for vehicles equipped with the keyless
operation system] The ignition switch is
turned to the “LOCK” or “ACC”
position, or the key is removed from the
ignition switch. [For vehicles equipped
with the keyless operation system] The
operation mode is put in OFF or ACC.
NOTE The lamp auto-cutout function
can also be disabled. For further
information, we recommend you to
consult a Fiat Dealership.
61AA0071497A
62AJZ101023
41
Page 50 of 312
keyless operation key is used to lock
the vehicle.
If the vehicle is equipped with the
keyless operation system, when the
keyless operation function is used to
lock the vehicle.
Auto cut-out function:
if the lamp is left switched on with the
ignition switch is in the “LOCK” or
“ACC” position or the operation mode
is in OFF or ACC, and a door is
opened, it goes off automatically after
approximately 30 minutes. The lamp will
illuminate again after it automatically
goes off in the following cases:
When the ignition switch is turned to
the “ON” position or the operation
mode is put in ON.
When the keyless entry system or
the keyless operation system is
operated.
When all doors are closed.
C — OFF
The lamp goes off regardless of
whether a door is open or closed.
NOTE When the key was used to start
the engine, if the key is removed while
the doors are closed, the lamp is
illuminated and after a few seconds it
goes off.
NOTE When the keyless operation
function was used to start the engine, if
the operation mode is put in OFF while
the door are closed, the lampilluminates and after about 15 seconds
it goes off (if so equipped).
NOTE The time until the lamp goes off
(delayed off) can be adjusted. For
details, please consult a Fiat Dealership.
NOTE The auto cut-out function
cannot be operated when the room
lamp switch is in the “ON” position (1).
Also, this function can be deactivated.
For details, please consult a Fiat
Dealership.
Map lamps
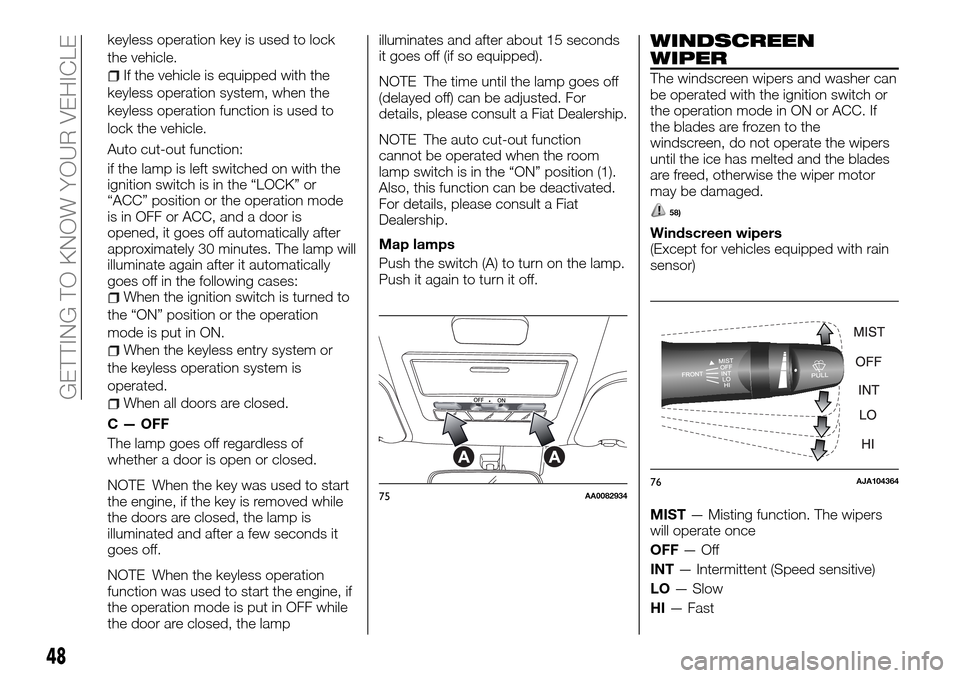
Push the switch (A) to turn on the lamp.
Push it again to turn it off.
WINDSCREEN
WIPER
The windscreen wipers and washer can
be operated with the ignition switch or
the operation mode in ON or ACC. If
the blades are frozen to the
windscreen, do not operate the wipers
until the ice has melted and the blades
are freed, otherwise the wiper motor
may be damaged.
58)
Windscreen wipers
(Except for vehicles equipped with rain
sensor)
MIST— Misting function. The wipers
will operate once
OFF—Off
INT— Intermittent (Speed sensitive)
LO— Slow
HI— Fast
75AA008293476AJA104364
48
GETTING TO KNOW YOUR VEHICLE
Page 51 of 312
To adjust intermittent intervals
With the lever in the “INT” (speed
sensitive intermittent operation)
position, the intermittent intervals can
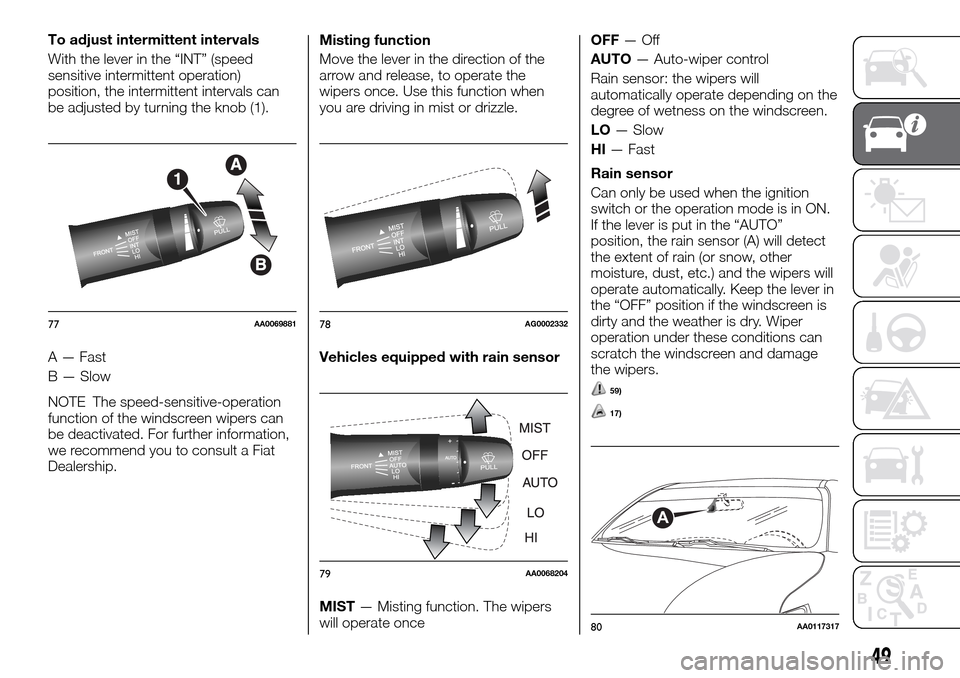
be adjusted by turning the knob (1).
A — Fast
B — Slow
NOTE The speed-sensitive-operation
function of the windscreen wipers can
be deactivated. For further information,
we recommend you to consult a Fiat
Dealership.Misting function
Move the lever in the direction of the
arrow and release, to operate the
wipers once. Use this function when
you are driving in mist or drizzle.
Vehicles equipped with rain sensor
MIST— Misting function. The wipers
will operate onceOFF—Off
AUTO— Auto-wiper control
Rain sensor: the wipers will
automatically operate depending on the
degree of wetness on the windscreen.
LO— Slow
HI— Fast
Rain sensor
Can only be used when the ignition
switch or the operation mode is in ON.
If the lever is put in the “AUTO”
position, the rain sensor (A) will detect
the extent of rain (or snow, other
moisture, dust, etc.) and the wipers will
operate automatically. Keep the lever in
the “OFF” position if the windscreen is
dirty and the weather is dry. Wiper
operation under these conditions can
scratch the windscreen and damage
the wipers.
59)
17)
77AA006988178AG0002332
79AA0068204
A
80AA0117317
49
Page 52 of 312
NOTE To protect the rubber parts of
the wipers, this operation of the wipers
does not take place even if the lever is
put in the “AUTO” position when the
vehicle is stationary and the ambient
temperature is about 0 °C or lower.
NOTE Do not cover the sensor by
affixing a sticker or label to the
windscreen. Also, do not put any
water-repellent coating on the
windscreen. The rain sensor would not
be able to detect the extent of rain, and
the wipers might stop working normally.
In the following cases, the rain sensor
may be malfunctioning. For further
information, we recommend you to
consult a Fiat Dealership:
When the wipers operate at a
constant interval despite changes in the
extent of rain.
When the wipers do not operate
even though it is raining.
The wipers may automatically operate
when things such as insects or foreign
objects are affixed to the windscreen on
top of the rain sensor or when the
windscreen is frozen. Objects affixed to
the windscreen will stop the wipers
when the wipers cannot remove them.
To operate the wipers again, move the
lever in the “LO” or “HI” position. Also,
the wipers may operate automatically
due to strong direct sunlight orelectromagnetic wave. To stop the
wipers, place the lever in the “OFF”
position.
Contact a Fiat Dealership when
replacing the windscreen or reinforcing
the glass around the sensor.
To adjust the sensitivity of the rain
sensor
With the lever in the “AUTO” (rain
sensor) position, it is possible to adjust
the sensitivity of the rain sensor by
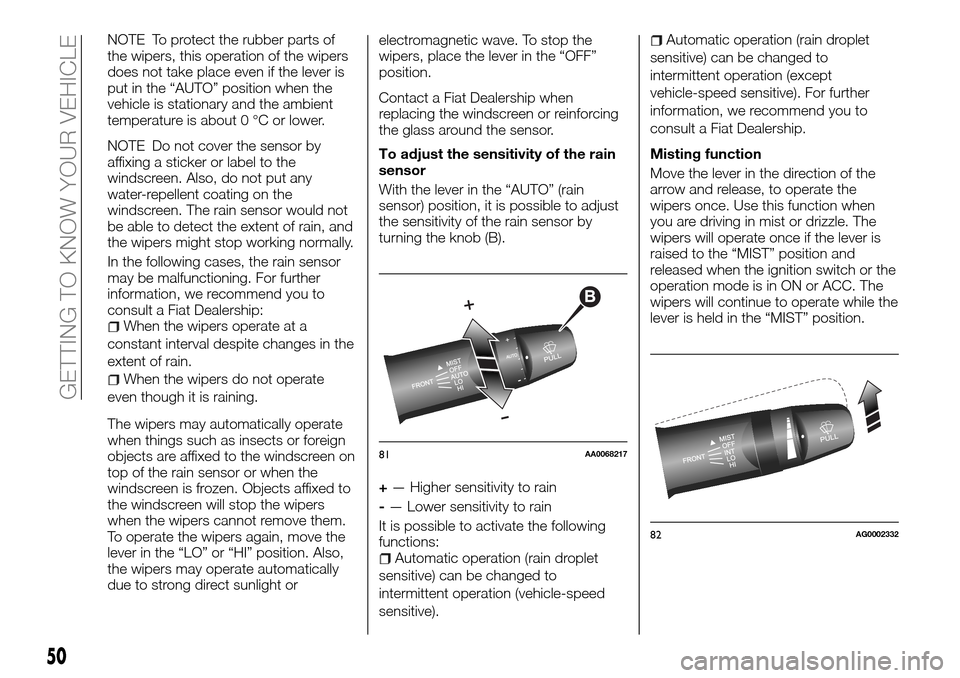
turning the knob (B).
+— Higher sensitivity to rain
-— Lower sensitivity to rain
It is possible to activate the following
functions:
Automatic operation (rain droplet
sensitive) can be changed to
intermittent operation (vehicle-speed
sensitive).
Automatic operation (rain droplet
sensitive) can be changed to
intermittent operation (except
vehicle-speed sensitive). For further
information, we recommend you to
consult a Fiat Dealership.
Misting function
Move the lever in the direction of the
arrow and release, to operate the
wipers once. Use this function when
you are driving in mist or drizzle. The
wipers will operate once if the lever is
raised to the “MIST” position and
released when the ignition switch or the
operation mode is in ON or ACC. The
wipers will continue to operate while the
lever is held in the “MIST” position.
81AA0068217
82AG0002332
50
GETTING TO KNOW YOUR VEHICLE
Page 54 of 312
59)With the ignition switch or the
operation mode in ON and the lever in the
“AUTO” position, the wipers may
automatically operate in the situations
described below. If your hands get
trapped, you could suffer injuries or the
wipers could malfunction. Be sure to turn
the ignition switch to the “LOCK” position
or put the operation mode in OFF, or move
lever to the “OFF” position to deactivate
the rain sensor: when cleaning the outside
surface of the windscreen, if you touch or
wipe with a cloth on top of the rain sensor;
when using an automatic car wash; when a
physical shock is applied to the windscreen
or to the rain sensor.
IMPORTANT
17)Do not activate the rain sensor when
washing the car in an automatic car wash.
AIR CONDITIONING
SYSTEM
Ventilators
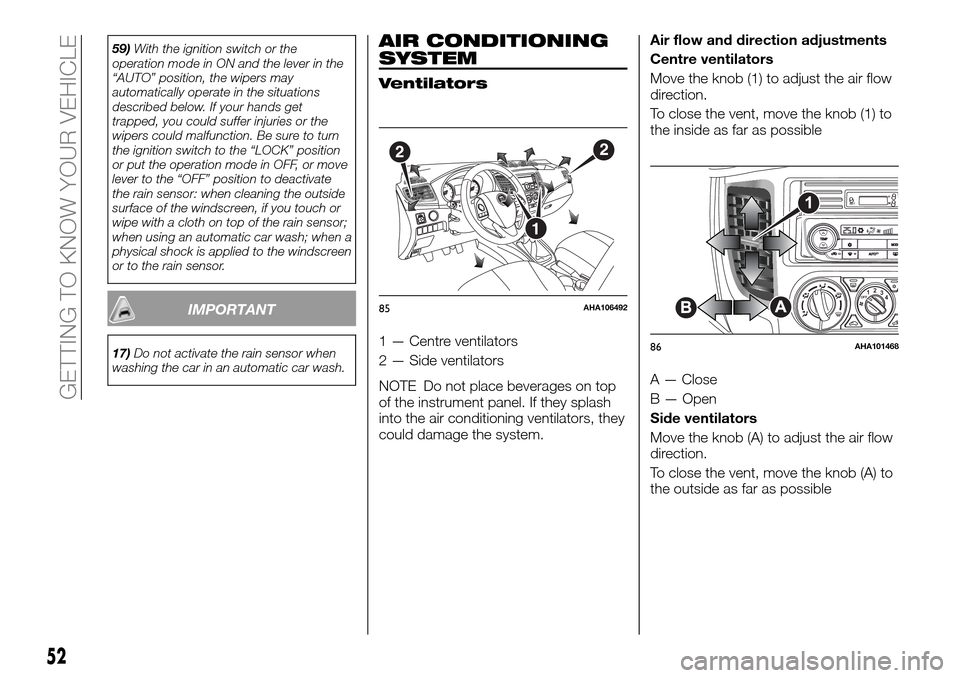
1 — Centre ventilators
2 — Side ventilators
NOTE Do not place beverages on top
of the instrument panel. If they splash
into the air conditioning ventilators, they
could damage the system.Air flow and direction adjustments
Centre ventilators
Move the knob (1) to adjust the air flow
direction.
To close the vent, move the knob (1) to
the inside as far as possible
A — Close
B — Open
Side ventilators
Move the knob (A) to adjust the air flow
direction.
To close the vent, move the knob (A) to
the outside as far as possible
56
7
8120
140
160
180
200
LROFF3 2 14
22
1
85AHA106492
SETH
M
OFF12
3
4
86AHA101468
52
GETTING TO KNOW YOUR VEHICLE
Page 63 of 312
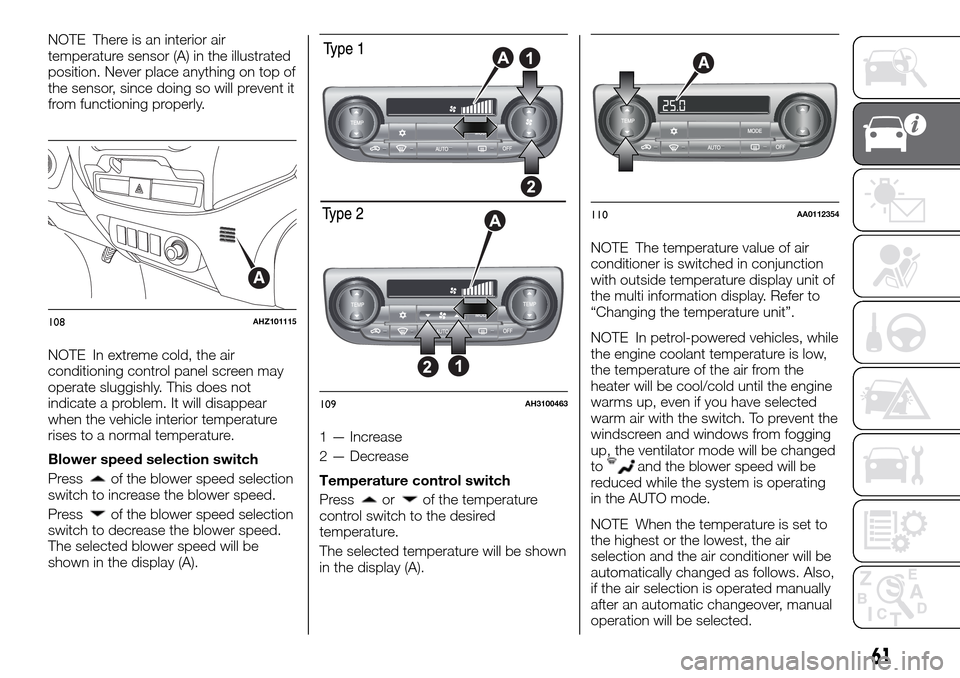
NOTE There is an interior air
temperature sensor (A) in the illustrated
position. Never place anything on top of
the sensor, since doing so will prevent it
from functioning properly.
NOTE In extreme cold, the air
conditioning control panel screen may
operate sluggishly. This does not
indicate a problem. It will disappear
when the vehicle interior temperature
rises to a normal temperature.
Blower speed selection switch
Press
of the blower speed selection
switch to increase the blower speed.
Press
of the blower speed selection
switch to decrease the blower speed.
The selected blower speed will be
shown in the display (A).1 — Increase
2 — Decrease
Temperature control switch
Pressorof the temperature
control switch to the desired
temperature.
The selected temperature will be shown
in the display (A).NOTE The temperature value of air
conditioner is switched in conjunction
with outside temperature display unit of
the multi information display. Refer to
“Changing the temperature unit”.
NOTE In petrol-powered vehicles, while
the engine coolant temperature is low,
the temperature of the air from the
heater will be cool/cold until the engine
warms up, even if you have selected
warm air with the switch. To prevent the
windscreen and windows from fogging
up, the ventilator mode will be changed
to
and the blower speed will be
reduced while the system is operating
in the AUTO mode.
NOTE When the temperature is set to
the highest or the lowest, the air
selection and the air conditioner will be
automatically changed as follows. Also,
if the air selection is operated manually
after an automatic changeover, manual
operation will be selected.
A
108AHZ101115
109AH3100463
A
110AA0112354
61
Page 84 of 312
engine warning lamp flashes, have the
system checked as soon as possible at
an authorised Fiat Dealership.
In diesel-powered vehicles, in case
cetane number (EN590) 51 or higher is
not available, use cetane number 45 or
higher.
In diesel-powered vehicles, poor-quality
diesel fuel can cause deposits form in
the injector, resulting in black smoke
and rough idling. If these problems
occur, you are advised to add a
cleaning additive to the diesel fuel when
you refuel the vehicle. The additive will
break up and remove the deposits,
thereby returning the engine to a normal
condition. Be sure to use a FCA
GENUINE DIESEL FUEL SYSTEM
CLEANER. Using an unsuitable additive
could make the engine malfunction. For
detailed, please contact the nearest
authorised Fiat Dealership.
IMPORTANT
33)For unleaded petrol-powered vehicles,
the use of leaded fuel can result in serious
damage to the engine and catalytic
converter. Do not use the leaded fuel.
34)Do not use more than 10 %
concentration of ethanol (grain alcohol) by
volume. Use of more than 10 %
concentration may lead to damage to your
vehicle fuel system, engine, engine sensors
and exhaust system.35)Do not operate your vehicle on petrol
containing methanol. Using this type of
alcohol could adversely affect the vehicle’s
performance and damage critical parts of
the vehicle’s fuel system.
36)Diesel-powered vehicles to comply with
the Euro 4 and Euro 5 regulation are
designed to use only diesel fuel that meets
the EN 590 standard. Use of any other type
of diesel fuel would adversely affect the
engine’s performance and durability.
37)Your vehicle is designed to use only
diesel fuel that meets the EN 590 standard.
Use of any other type of diesel fuel (bio
diesel, methylester, etc.) would adversely
affect the engine’s performance and
durability.
38)For diesel engines, only use diesel fuel
for motor vehicles in accordance with EN
590 European specifications. The use of
other products or mixtures may damage
the engine beyond repair and consequently
invalidate the warranty, due to the damage
caused. If you accidentally introduce other
types of fuel into the tank, do not start the
engine. Empty the tank. If the engine has
been run for even an extremely limited
amount of time, you must not only drain the
fuel tank, but the rest of the supply circuit
as well.
FILLING THE FUEL
TANK
86) 87) 88) 89) 90) 91) 92) 93) 94) 95) 96)
Fuel tank capacity: 75 litres.
1. Before filling with fuel, stop the
engine.
2. The fuel tank filler is located on the
rear left side of your vehicle.
Type 1,2
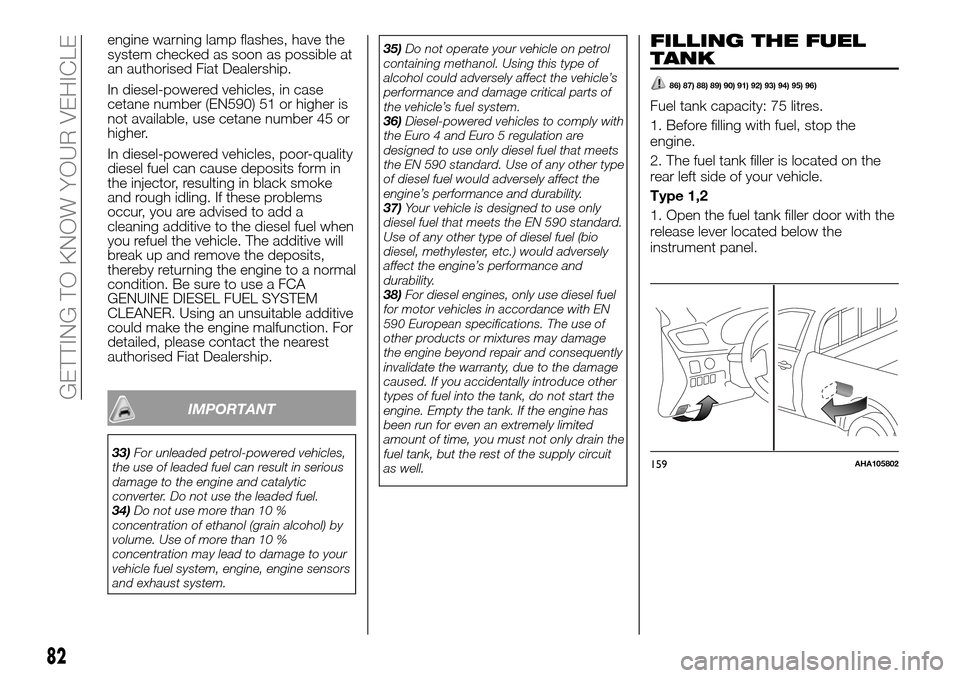
1. Open the fuel tank filler door with the
release lever located below the
instrument panel.
159AHA105802
82
GETTING TO KNOW YOUR VEHICLE
Page 107 of 312
SBR SYSTEM
Seat belt reminder
(where provided)
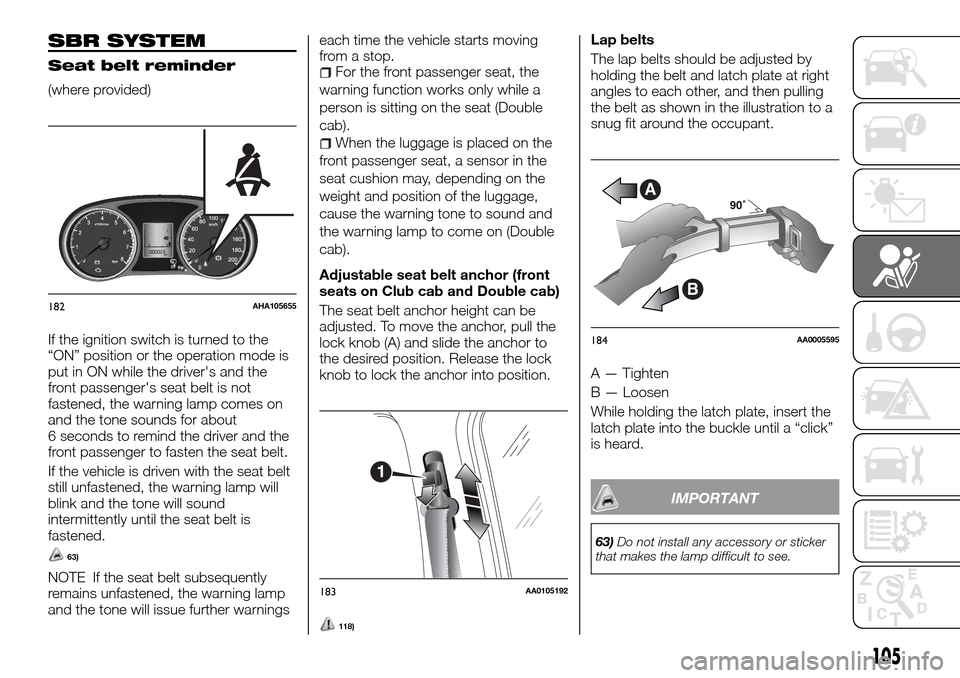
If the ignition switch is turned to the
“ON” position or the operation mode is
put in ON while the driver's and the
front passenger's seat belt is not
fastened, the warning lamp comes on
and the tone sounds for about
6 seconds to remind the driver and the
front passenger to fasten the seat belt.
If the vehicle is driven with the seat belt
still unfastened, the warning lamp will
blink and the tone will sound
intermittently until the seat belt is
fastened.
63)
NOTE If the seat belt subsequently
remains unfastened, the warning lamp
and the tone will issue further warningseach time the vehicle starts moving
from a stop.
For the front passenger seat, the
warning function works only while a
person is sitting on the seat (Double
cab).
When the luggage is placed on the
front passenger seat, a sensor in the
seat cushion may, depending on the
weight and position of the luggage,
cause the warning tone to sound and
the warning lamp to come on (Double
cab).
Adjustable seat belt anchor (front
seats on Club cab and Double cab)
The seat belt anchor height can be
adjusted. To move the anchor, pull the
lock knob (A) and slide the anchor to
the desired position. Release the lock
knob to lock the anchor into position.
118)
Lap belts
The lap belts should be adjusted by
holding the belt and latch plate at right
angles to each other, and then pulling
the belt as shown in the illustration to a
snug fit around the occupant.
A — Tighten
B — Loosen
While holding the latch plate, insert the
latch plate into the buckle until a “click”
is heard.
IMPORTANT
63)Do not install any accessory or sticker
that makes the lamp difficult to see.
182AHA105655
183AA0105192
B
A
184AA0005595
105
Page 120 of 312
SUPPLEMENTAL
RESTRAINT SYSTEM
AIRBAG
The information for SRS airbags
includes important information
concerning the driver’s and front
passenger’s airbags, the driver’s knee
airbag, the side airbags and the curtain
airbags.
The SRS driver’s and front passenger’s
airbags are designed to supplement the
primary protection of the driver and
front passenger side seat belt systems
by providing those occupants with
protection against head and chest
injuries in certain moderate-to-severe
frontal collisions.
The SRS driver airbag employ a dual
stage airbag system (if so equipped).
The SRS driver and front passenger
airbag is controlled by the impact
sensors (at the front of the vehicle) and
the control unit (near the centre of the
vehicle at floor level).
The SRS driver’s knee airbag (if so
equipped) is designed to supplement
the primary protection of the driver’s
seat belt system. It can reduce the
forward movement of the driver’s lower
legs and provide increased overall body
protection in certain moderate-to-
severe frontal collisions.
The SRS side airbags (if so equipped)
are designed to supplement properly
worn seat belts and provide the driver
and front passenger with protectionagainst chest injuries in certain
moderate-to-severe side impact
collisions.
The SRS curtain airbags (if so
equipped) are designed to supplement
properly worn seat belts and provide
the driver and passenger with
protection against head injuries in
certain moderate-to-severe side impact
collisions.
The SRS is NOT a substitute for the
seat belts. To ensure the maximum
protection during all types of collisions
and accidents, all occupants, including
the passengers as well as the driver,
must wear their seat belts.
How the supplemental restraint
system works
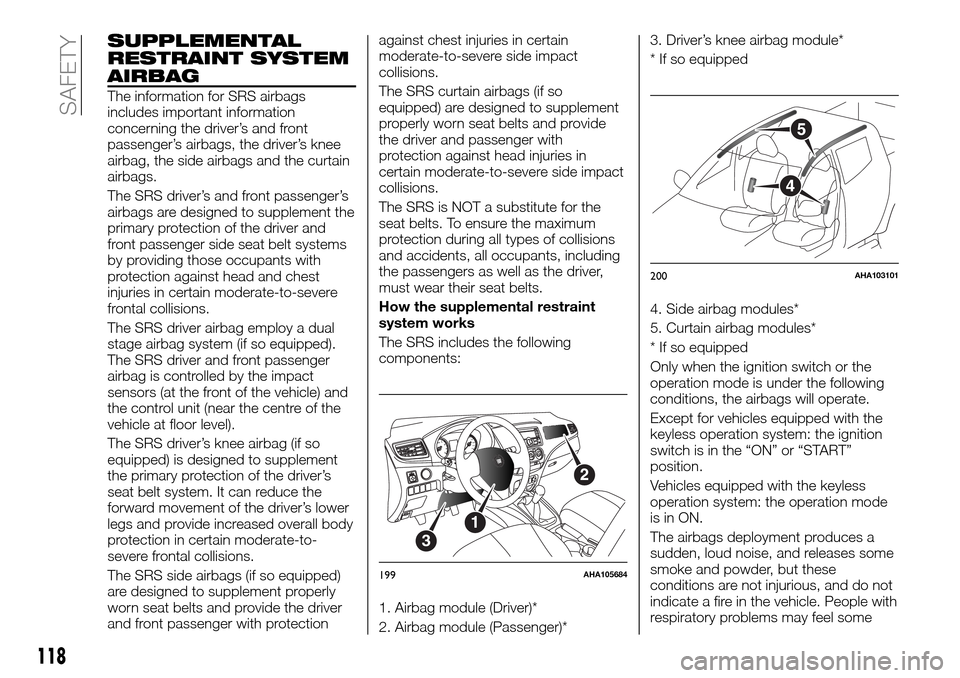
The SRS includes the following
components:
1. Airbag module (Driver)*
2. Airbag module (Passenger)*3. Driver’s knee airbag module*
* If so equipped
4. Side airbag modules*
5. Curtain airbag modules*
* If so equipped
Only when the ignition switch or the
operation mode is under the following
conditions, the airbags will operate.
Except for vehicles equipped with the
keyless operation system: the ignition
switch is in the “ON” or “START”
position.
Vehicles equipped with the keyless
operation system: the operation mode
is in ON.
The airbags deployment produces a
sudden, loud noise, and releases some
smoke and powder, but these
conditions are not injurious, and do not
indicate a fire in the vehicle. People with
respiratory problems may feel some
56
7
8120
140
160
180
200
LROFF3 2 14
3
2
1
199AHA105684
5
4
200AHA103101
118
SAFETY
Page 129 of 312
An operation noise is emitted from the
engine compartment or feel a shock
from the brake pedal when start driving
immediately after starting the engine.
These are normal sound or operation
that the ABS makes when performing a
self-check. It does not indicate a
malfunction.
The ABS can be used after the vehicle
has reached a speed over
approximately 10 km/h. It stops
working when the vehicle slows below
7 km/h.
181) 182) 183) 184) 185) 186) 187) 188) 189)
After driving on icy roads
After driving on snow or icy roads,
remove any snow and ice which may
have be left around the wheels. On
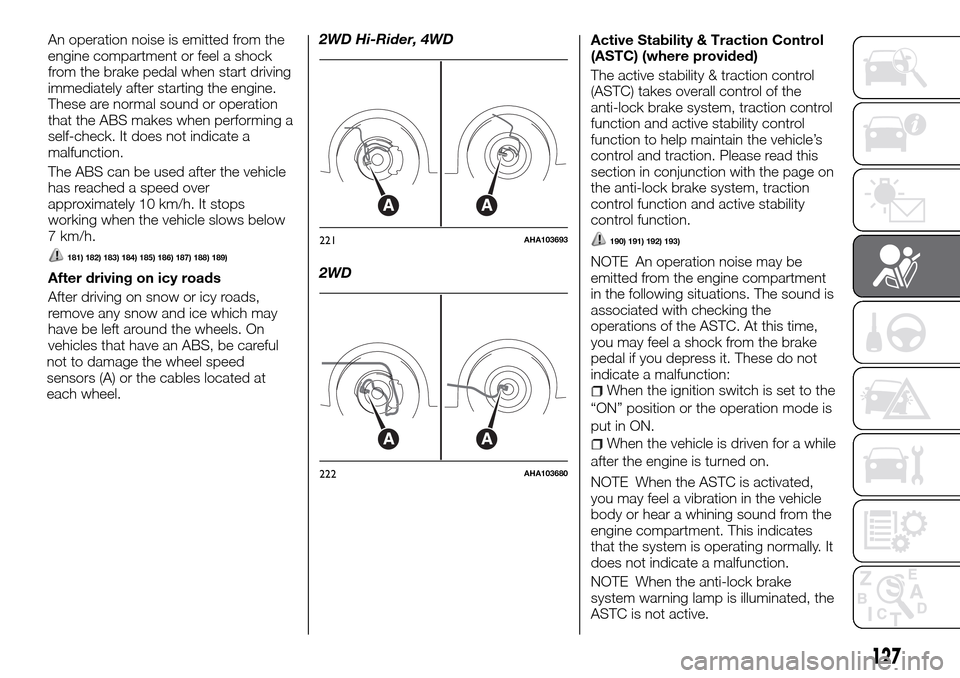
vehicles that have an ABS, be careful
not to damage the wheel speed
sensors (A) or the cables located at
each wheel.2WD Hi-Rider, 4WD
2WDActive Stability & Traction Control
(ASTC) (where provided)
The active stability & traction control
(ASTC) takes overall control of the
anti-lock brake system, traction control
function and active stability control
function to help maintain the vehicle’s
control and traction. Please read this
section in conjunction with the page on
the anti-lock brake system, traction
control function and active stability
control function.
190) 191) 192) 193)
NOTE An operation noise may be
emitted from the engine compartment
in the following situations. The sound is
associated with checking the
operations of the ASTC. At this time,
you may feel a shock from the brake
pedal if you depress it. These do not
indicate a malfunction:
When the ignition switch is set to the
“ON” position or the operation mode is
put in ON.
When the vehicle is driven for a while
after the engine is turned on.
NOTE When the ASTC is activated,
you may feel a vibration in the vehicle
body or hear a whining sound from the
engine compartment. This indicates
that the system is operating normally. It
does not indicate a malfunction.
NOTE When the anti-lock brake
system warning lamp is illuminated, the
ASTC is not active.
AA
221AHA103693
AA
222AHA103680
127