tow FIAT FULLBACK 2018 Owner handbook (in English)
[x] Cancel search | Manufacturer: FIAT, Model Year: 2018, Model line: FULLBACK, Model: FIAT FULLBACK 2018Pages: 316, PDF Size: 10.52 MB
Page 81 of 316
TRAILER TOWING
In order to tow a trailer with your
vehicle, when having a trailer towing
device mounted that meets all relevant
regulations in your area, consult a Fiat
Dealership.
Check that your towbar coupling ball
does not obscure your vehicle’s licence
plate when the trailer or caravan is
disconnected. If it obscures the licence
plate, please remove the towbar
coupling ball. And if the towbar
coupling ball is lockable by using a key
or any kind of tools, please remove the
coupling ball and use a towbar coupling
ball which can be removed or
repositioned without the use of a key or
any kind of tools instead.
The regulations concerning the towing
of a trailer may differ from country to
country. You are advised to obey the
regulations in each area.
NOTE If you are going to tow a trailer,
pay careful attention to the following
points.
89)
Maximum towable weight with brake
and maximum trailernose weight
Never exceed the maximum towable
weight with brake and the maximum
trailer-nose weight as listed in the
specifications. (Refer to “Vehicle
weight”.If you tow a trailer at an altitude
of more than 1,000 m above sea-level,reduce your weight by 10 % of the
gross combination weight for every
increase of 1,000 m above sea-level, as
the engine output is lowered owing to
decrease in atmospheric pressure.
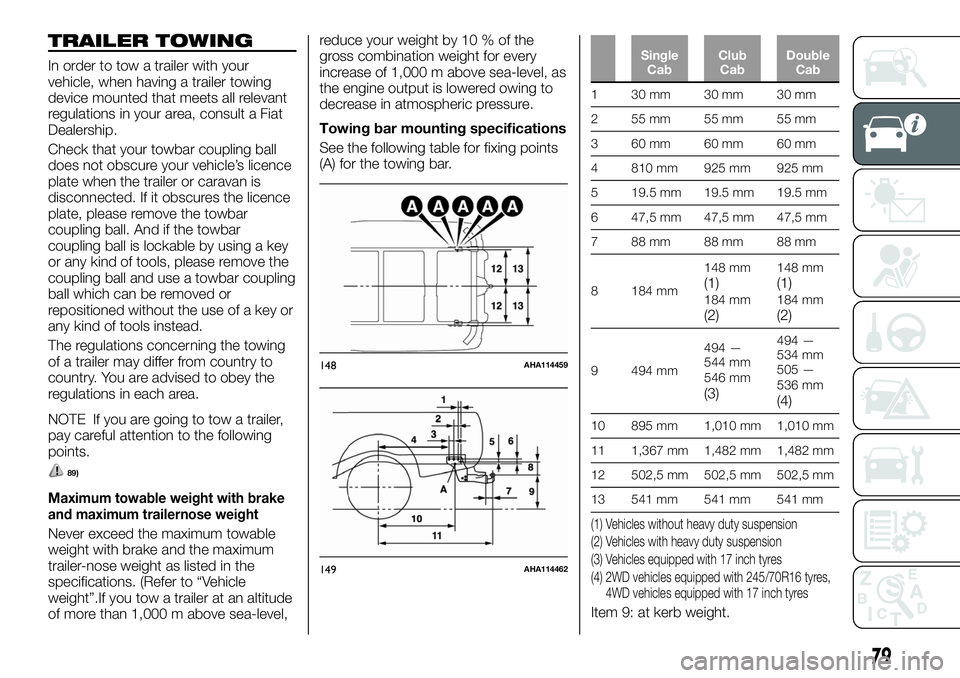
Towing bar mounting specifications
See the following table for fixing points
(A) for the towing bar.
Single
CabClub
CabDouble
Cab
1 30mm 30mm 30mm
2 55mm 55mm 55mm
3 60mm 60mm 60mm
4 810 mm 925 mm 925 mm
5 19.5 mm 19.5 mm 19.5 mm
6 47,5 mm 47,5 mm 47,5 mm
7 88mm 88mm 88mm
8 184 mm148 mm
(1)184 mm(2)
148 mm(1)184 mm(2)
9 494 mm494 —
544 mm
546 mm
(3)
494 —
534 mm
505 —
536 mm
(4)
10 895 mm 1,010 mm 1,010 mm
11 1,367 mm 1,482 mm 1,482 mm
12 502,5 mm 502,5 mm 502,5 mm
13 541 mm 541 mm 541 mm
(1) Vehicles without heavy duty suspension
(2) Vehicles with heavy duty suspension
(3) Vehicles equipped with 17 inch tyres
(4) 2WD vehicles equipped with 245/70R16 tyres,
4WD vehicles equipped with 17 inch tyres
Item 9: at kerb weight.
148AHA114459
149AHA114462
79
Page 82 of 316
NOTE The values under item 9 are
applicable to unladen vehicles. The
value can also be varied depending on
the tyre size, optional equipment and
suspension conditions.
Operating hints
Have your vehicle serviced prior to
towing a heavy trailer, taking particular
care of the state of engine tune, the
condition of brakes, steering and tyres.
Adjust tyre pressures to those
specifications at trailer towing (refer to
“tyre inflation pressure”). Check the
tyres, wiring and brakes (if fitted) on the
trailer.
Leave plenty of room between the
front of your vehicle and the preceding
vehicle. If the trailer begins to sway or
becomes difficult to handle, gently slow
down or apply the independent trailer
brakes (if fitted) NOT the vehicle brakes.
Stop the vehicle and trailer in a safe
location. One cause of swaying is poor
trailer balance and until this has been
overcome the swaying will recur.
Relocated the load in your trailer and
re-assess the problem.
Be sure that the driving speed does
not exceed 100 km/h for trailer
operation.
It is also recommended that you
obey the local regulations in case
driving speed with a trailer is limited to
less than 100 km/h.
To prevent the clutch from slipping
(vehicle with a M/T only), do not rev the
engine more than is required when
starting off.
To prevent shocks from the overrun
brake, depress the brake pedal lightly at
first and then more strongly.
To make full use of engine braking,
change to a lower gear before
descending a slope.
The body, brakes, clutch, and
chassis will be under additional strain
when towing a trailer.
The heavier weight and higher rolling
and air resistance will increase fuel
consumption.
Additional precautions for vehicles
equipped with an automatic
transmission
It is recommended a lower gear in
sports mode on slopes or at low speed,
taking care to keep the engine speed
below the red zone.
WARNING
89)Danger of Accident! A towing bar
should be fitted according to Fiat
Dealership guidelines.
INTERIOR FEATURES
SUN VISORS
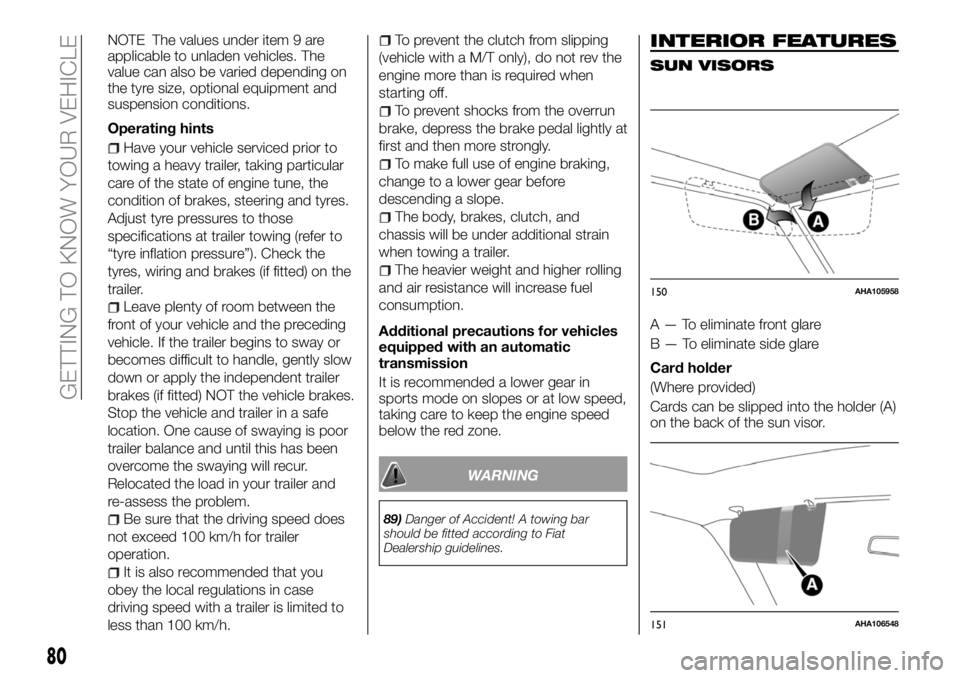
A — To eliminate front glare
B — To eliminate side glare
Card holder
(Where provided)
Cards can be slipped into the holder (A)
on the back of the sun visor.
150AHA105958
151AHA106548
80
GETTING TO KNOW YOUR VEHICLE
Page 106 of 316
Warning lamps
Warning lamps What it means
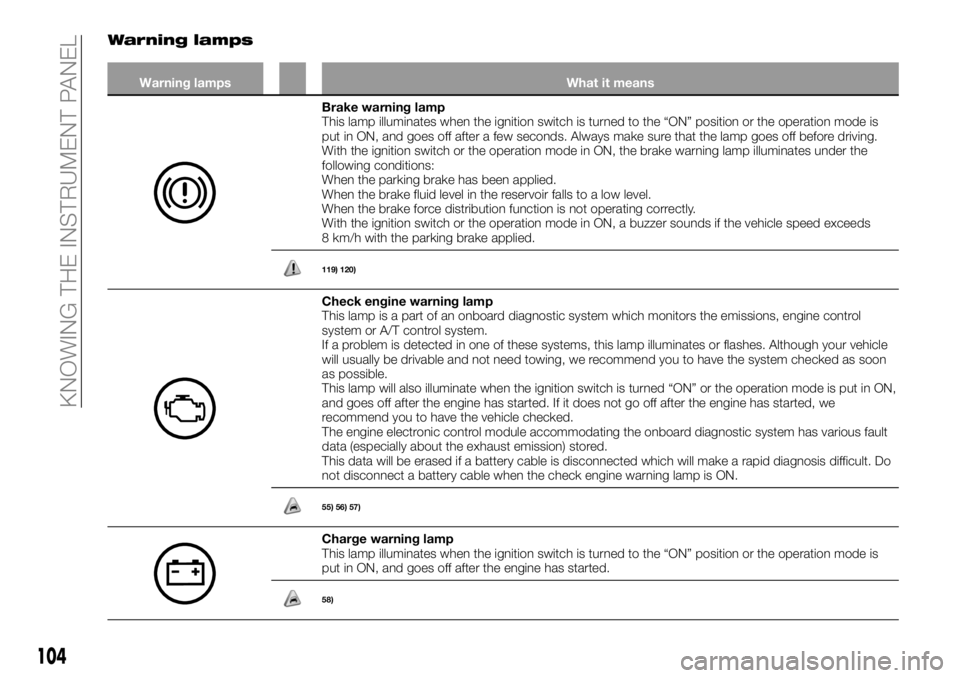
Brake warning lamp
This lamp illuminates when the ignition switch is turned to the “ON” position or the operation mode is
put in ON, and goes off after a few seconds. Always make sure that the lamp goes off before driving.
With the ignition switch or the operation mode in ON, the brake warning lamp illuminates under the
following conditions:
When the parking brake has been applied.
When the brake fluid level in the reservoir falls to a low level.
When the brake force distribution function is not operating correctly.
With the ignition switch or the operation mode in ON, a buzzer sounds if the vehicle speed exceeds
8 km/h with the parking brake applied.
119) 120)
Check engine warning lamp
This lamp is a part of an onboard diagnostic system which monitors the emissions, engine control
system or A/T control system.
If a problem is detected in one of these systems, this lamp illuminates or flashes. Although your vehicle
will usually be drivable and not need towing, we recommend you to have the system checked as soon
as possible.
This lamp will also illuminate when the ignition switch is turned “ON” or the operation mode is put in ON,
and goes off after the engine has started. If it does not go off after the engine has started, we
recommend you to have the vehicle checked.
The engine electronic control module accommodating the onboard diagnostic system has various fault
data (especially about the exhaust emission) stored.
This data will be erased if a battery cable is disconnected which will make a rapid diagnosis difficult. Do
not disconnect a battery cable when the check engine warning lamp is ON.
55) 56) 57)
Charge warning lamp
This lamp illuminates when the ignition switch is turned to the “ON” position or the operation mode is
put in ON, and goes off after the engine has started.
58)
104
KNOWING THE INSTRUMENT PANEL
Page 112 of 316
SEAT BELTS
To protect you and your passengers in
the event of an accident, it is the most
important that the seat belts be worn
correctly while driving.
The front seat belts each have a
pre-tensioner system (Single cab and
Club cab). The front seat belts and the
rear outer seat belts each have a
pre-tensioner system (Double cab).
These belts are used the same way as
a conventional seat belt.
Refer to “Seat belt pre-tensioner
system and force limiter system”.
121) 122) 123) 124) 125) 126) 127) 128) 129) 130)
3-point type seat belt (with
emergency locking mechanism)
This type of belt requires no length
adjustment. Once worn, the belt
adjusts itself to the movement of
wearer, but in the event of a sudden or
strong shock, the belt automatically
locks to hold the wearer’s body.
NOTE You can check if the belt locks
by pulling it forward quickly.
For some markets (for example
Sweden) /where provided, vehicles are
equipped with roller seat belts with
double locking functions in the front
seat as well as the rear seat. You are
not allowed to tamper with the seat
belts or their mounting in any way. If
problems occur, we recommend you to
have the seat belts inspected by a Fiat
Dealership as soon as possible.To fasten
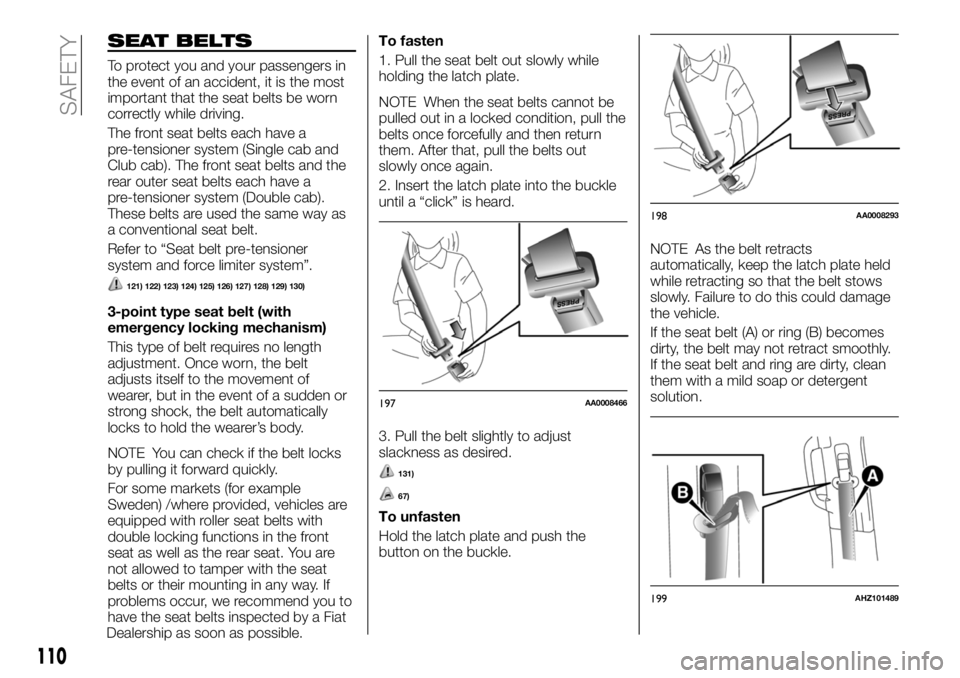
1. Pull the seat belt out slowly while
holding the latch plate.
NOTE When the seat belts cannot be
pulled out in a locked condition, pull the
belts once forcefully and then return
them. After that, pull the belts out
slowly once again.
2. Insert the latch plate into the buckle
until a “click” is heard.
3. Pull the belt slightly to adjust
slackness as desired.
131)
67)
To unfasten
Hold the latch plate and push the
button on the buckle.NOTE As the belt retracts
automatically, keep the latch plate held
while retracting so that the belt stows
slowly. Failure to do this could damage
the vehicle.
If the seat belt (A) or ring (B) becomes
dirty, the belt may not retract smoothly.
If the seat belt and ring are dirty, clean
them with a mild soap or detergent
solution.
197AA0008466
198AA0008293
199AHZ101489
110
SAFETY
Page 129 of 316
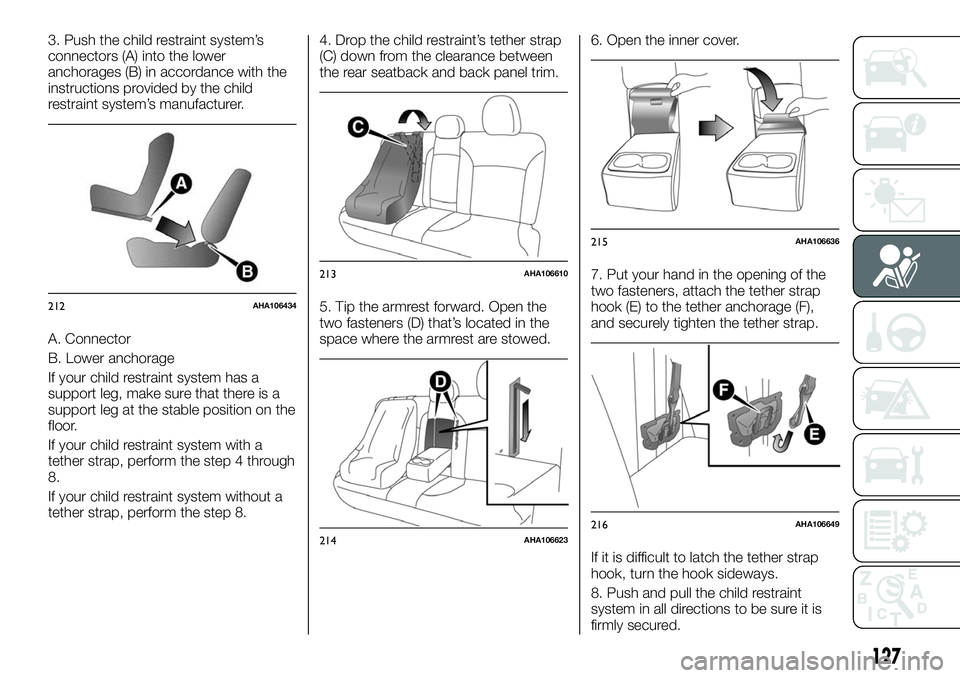
3. Push the child restraint system’s
connectors (A) into the lower
anchorages (B) in accordance with the
instructions provided by the child
restraint system’s manufacturer.
A. Connector
B. Lower anchorage
If your child restraint system has a
support leg, make sure that there is a
support leg at the stable position on the
floor.
If your child restraint system with a
tether strap, perform the step 4 through
8.
If your child restraint system without a
tether strap, perform the step 8.4. Drop the child restraint’s tether strap
(C) down from the clearance between
the rear seatback and back panel trim.
5. Tip the armrest forward. Open the
two fasteners (D) that’s located in the
space where the armrest are stowed.6. Open the inner cover.
7. Put your hand in the opening of the
two fasteners, attach the tether strap
hook (E) to the tether anchorage (F),
and securely tighten the tether strap.
If it is difficult to latch the tether strap
hook, turn the hook sideways.
8. Push and pull the child restraint
system in all directions to be sure it is
firmly secured.
212AHA106434
213AHA106610
214AHA106623
215AHA106636
216AHA106649
127
Page 145 of 316
NOTE The hill start assist is activated
when all of the following conditions are
met.
The engine is running (the hill start
assist will not be activated while the
engine is starting or immediately after
the engine is started).
On vehicles equipped with M/T, the
gearshift lever is in the following
position: When starting an uphill slope
forwards > The gearshift lever is in any
position other than “R” (the hill start
assist will operate, even if the gearshift
lever is in the “N” position). When
starting an uphill slope backwards >
The gearshift lever is in the “R” position
(the hill start assist will not operate
when the gearshift lever is in the “N”
position).
On vehicles equipped with A/T, the
selector lever is in any position other
than “P” or “N”.
The vehicle is completely stationary,
with the brake pedal depressed.
The parking brake is released.
NOTE The hill start assist will not
operate if the accelerator pedal is
depressed before the brake pedal is
released.
NOTE The hill start assist also operates
when reversing on an uphill slope.NOTE When the hill start assist is
activated, you may feel the operating
sound. This is a normal result of the hill
start assist operation, and does not
indicate a problem.
Warning indicator
If an abnormal condition occurs in the
system, the indicator lamp
will turn
on.
83) 84)
Power Steering System
The power steering system operates
while the engine is running. It helps
reduce the effort needed to turn the
steering wheel.
The power steering system has
mechanical steering capability in case
the power assist is lost. If the power
assist is lost for some reason, you will
still be able to steer your vehicle, but
you will notice it takes much more effort
to steer. If this happens, have your
vehicle inspected at a Fiat Dealership.
85) 86)
Trailer Stability Assist — TSA
(where provided)
The trailer stability assist system helps
safely running while towing a trailer by
controlling the braking force of each
wheel and engine power in order to
stabilize the motion when detecting the
continuous sway of the vehicle caused
by a trailer.When the trailer stability assist system
operates the brakes, the brake lamp
turns on. About the towing of the trailer,
refer to “Trailer towing”.
87) 88)
NOTE When TSA system operates, the
vehicle body may vibrate and the
operating sounds from the engine
compartment may be heard. These
motions indicate normal operation of
the system, not abnormal operation.
NOTE TSA system operates when the
vehicle speed is about 55 km/h or
higher.
NOTE When TSA system operates, the
ESC operation indicator lamp blinks on
and off.
NOTE When ESC does not work, TSA
system does not operate.
WARNING
224)When facing uphill, do not rely on
using the hill start assist to maintain a
stopped position as an alternative to
depressing the brake pedal. Doing so
could cause an accident.
225)Do not turn the ignition switch to the
“LOCK” or “ACC” position or the operation
mode in ACC or OFF while the hill start
assist is operating. The hill start assist
could stop operating, which could result in
an accident.
143
Page 146 of 316
IMPORTANT
81)Do not overly rely on the hill start assist
to prevent backwards movement of the
vehicle. Under certain circumstances, even
when hill start assist is activated, the
vehicle may move backwards if the brake
pedal is not sufficiently depressed, if the
vehicle is heavily loaded, if the road is very
steep or slippery or if the vehicle tows a
trailer, etc.
82)The hill start assist is not designed to
keep the vehicle stopped in place on uphill
slopes for more than 2 seconds.
83)If the warning is turn on, the hill start
assist will not operate. Start off carefully.
84)Park your vehicle in a safe place and
stop the engine. Restart the engine and
check whether the warning indicator went
out, in which case the hill start assist is
again working normally. If they warning
remains displayed or reappear frequently, it
is not necessary to stop the vehicle
immediately, but the vehicle should be
inspected by a Fiat Dealership.
85)Do not stop the engine while the
vehicle is moving. Stopping the engine
would make the steering wheel extremely
hard to turn, possibly resulting in an
accident.
86)Do not leave the steering wheel turned
all the way in one direction. This can cause
damage to the power steering system.87)Do not over-rely on TSA system. Due to
the slippery road surface, heavy side wind,
inappropriate weight and positioning of
luggage, and/or driving at high speed, TSA
system may fail to secure the stability.
Always drive appropriately in accordance
with the condition of traffic, road surface
condition, weather, and the weight and
positioning of luggage.
88)The trailer stability assist system does
not operate in case as follows: 1 – When
sudden braking and braking while driving
downhill cause an abrupt motion of the
vehicle which makes the vehicle and the
trailer form a dogleg shape. 2 – When a
sideslip occurs by sudden steering.
144
SAFETY
Page 150 of 316
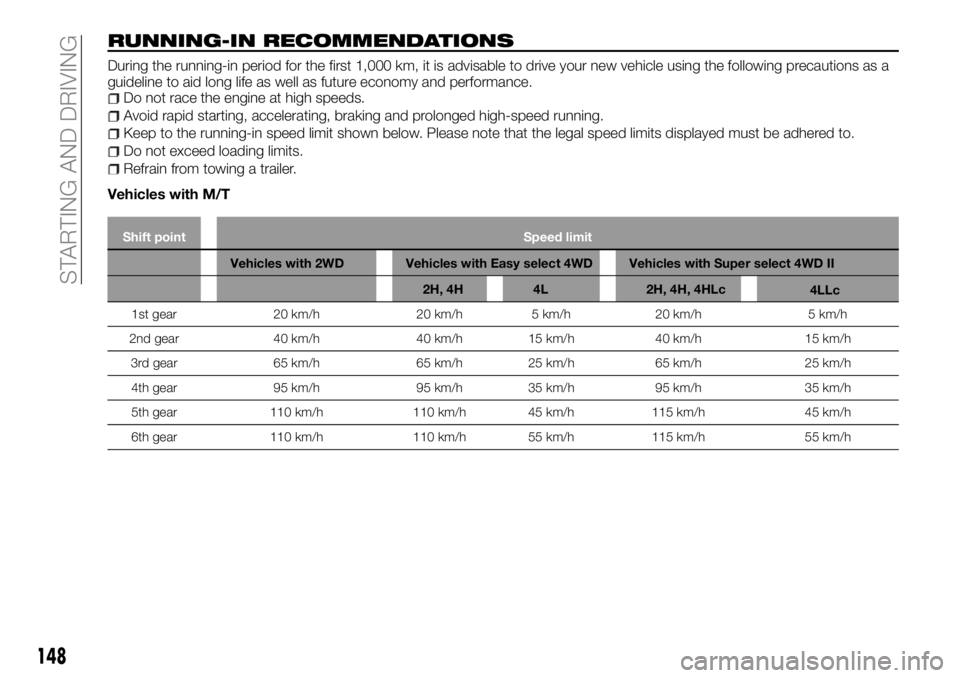
RUNNING-IN RECOMMENDATIONS
During the running-in period for the first 1,000 km, it is advisable to drive your new vehicle using the following precautions as a
guideline to aid long life as well as future economy and performance.
Do not race the engine at high speeds.
Avoid rapid starting, accelerating, braking and prolonged high-speed running.
Keep to the running-in speed limit shown below. Please note that the legal speed limits displayed must be adhered to.
Do not exceed loading limits.
Refrain from towing a trailer.
Vehicles with M/T
Shift point Speed limit
Vehicles with 2WD Vehicles with Easy select 4WD Vehicles with Super select 4WD II
2H, 4H 4L 2H, 4H, 4HLc
1st gear 20 km/h 20 km/h 5 km/h 20 km/h 5 km/h
2nd gear 40 km/h 40 km/h 15 km/h 40 km/h 15 km/h
3rd gear 65 km/h 65 km/h 25 km/h 65 km/h 25 km/h
4th gear 95 km/h 95 km/h 35 km/h 95 km/h 35 km/h
5th gear 110 km/h 110 km/h 45 km/h 115 km/h 45 km/h
6th gear 110 km/h 110 km/h 55 km/h 115 km/h 55 km/h
148
STARTING AND DRIVING4LLc
Page 153 of 316
PARKING
To park the vehicle, stop the engine,
fully engage the parking brake and then
move the gearshift lever to 1st or “R”
(Reverse) position for vehicles equipped
with M/T, or set the selector lever to “P”
(PARK) position for vehicles equipped
with A/T.
Parking on a hill
To prevent the vehicle from rolling,
follow these procedures:
Parking on a downhill slope
Turn the front wheels towards the kerb
and move the vehicle forward until the
kerb side wheel gently touches the
kerb.
On vehicles equipped with M/T, apply
the parking brake and place the
gearshift lever into the “R” (Reverse)
position.
On vehicles equipped with A/T, apply
the parking brake and place the
selector lever into the “P” (PARK)
position. If necessary, apply chocks to
wheels.
Parking on a uphill slope
Turn the front wheels away from the
kerb and move the vehicle back until
the kerb side wheel gently touches the
kerb.
On vehicles equipped with M/T, apply
the parking brake and place the
gearshift lever into the 1st position.
On vehicles equipped with A/T, applythe parking brake and place the
selector lever into the “P” (PARK)
position. If necessary, apply chocks to
wheels.
NOTE If your vehicle is equipped with
A/T, be sure to apply the parking brake
before moving selector lever to the “P”
(PARK) position. If you move selector
lever to the “P” (PARK) position before
applying the parking brake, it may be
difficult to disengage selector lever from
the “P” (PARK) position when next you
drive the vehicle, requiring application of
a strong force the selector lever to
move from the “P” (PARK) position.
NOTE IMPORTANT: NEVER leave the
car with the gearbox in neutral or, on
versions equipped with A/T, before
placing the gear lever in the “P” (PARK)
position.
Parking with the engine running
Never leave the engine running while
you take a short sleep/rest. Also, never
leave the engine running in a closed or
poorly ventilated place.
When leaving the vehicle
Always carry the key and lock all doors
when leaving the vehicle unattended.
Always try to park your vehicle in a well
lit area.
228) 229) 230)
WARNING
228)Leaving the engine running risks injury
or death from accidentally moving the
gearshift lever (with M/T) or the selector
lever (with A/T) or the accumulation of toxic
exhaust fumes on the passenger
compartment.
229)Never leave children unattended in
the vehicle. Always remove the ignition key
when leaving the vehicle and take it out
with you.
230)Do not park your vehicle in areas
where combustible materials such as dry
grass or leaves can come in contact with a
hot exhaust, since a fire could occur.
151
Page 156 of 316
Fuel injection amount learning
process
To keep exhaust emissions and engine
noise low, the engine very occasionally
performs a learning process for the fuel
injection amount.
The engine sounds slightly different
from usual while the learning process is
taking place. The change in the engine
sound does not indicate a fault.
If the keyless operation key is not
operating properly
Insert the keyless operation key into the
key slot. Starting the engine and
changing the operation mode should be
now possible.
Remove the keyless operation key from
the key slot after starting the engine or
changing the operation mode.NOTE Do not insert into the key slot
anything other than the keyless
operation key. This could cause
damage or a malfunction.
NOTE Remove the object or additional
key from the keyless operation key
before inserting the key into the key
slot. The vehicle may not be able to
receive the registered ID code from the
registered key. Therefore, the engine
may not start and the operation mode
may not change.
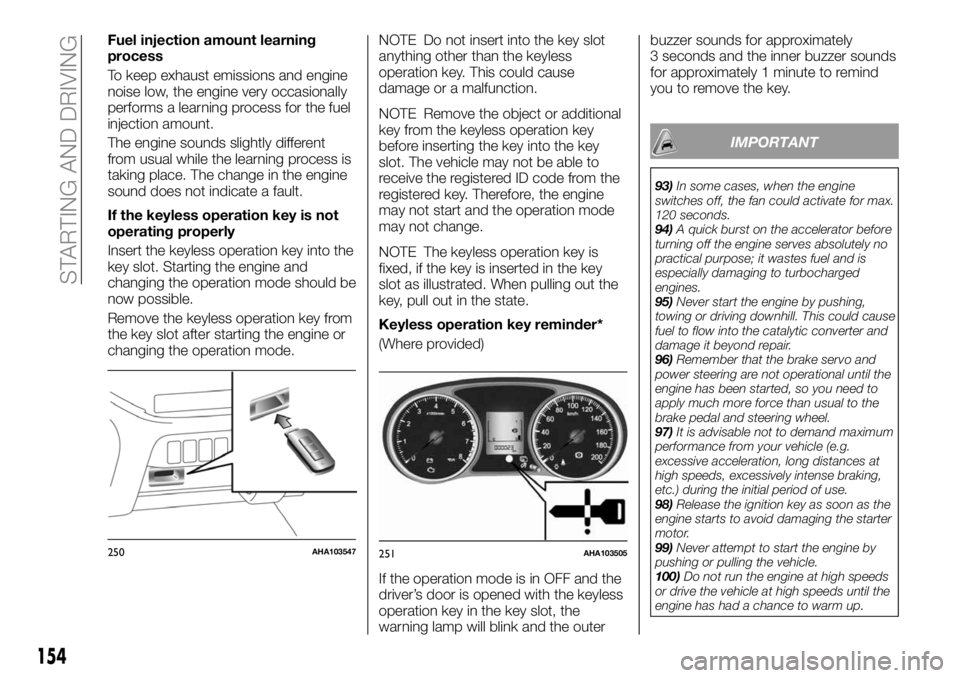
NOTE The keyless operation key is
fixed, if the key is inserted in the key
slot as illustrated. When pulling out the
key, pull out in the state.
Keyless operation key reminder*
(Where provided)
If the operation mode is in OFF and the
driver’s door is opened with the keyless
operation key in the key slot, the
warning lamp will blink and the outerbuzzer sounds for approximately
3 seconds and the inner buzzer sounds
for approximately 1 minute to remind
you to remove the key.
IMPORTANT
93)In some cases, when the engine
switches off, the fan could activate for max.
120 seconds.
94)A quick burst on the accelerator before
turning off the engine serves absolutely no
practical purpose; it wastes fuel and is
especially damaging to turbocharged
engines.
95)Never start the engine by pushing,
towing or driving downhill. This could cause
fuel to flow into the catalytic converter and
damage it beyond repair.
96)Remember that the brake servo and
power steering are not operational until the
engine has been started, so you need to
apply much more force than usual to the
brake pedal and steering wheel.
97)It is advisable not to demand maximum
performance from your vehicle (e.g.
excessive acceleration, long distances at
high speeds, excessively intense braking,
etc.) during the initial period of use.
98)Release the ignition key as soon as the
engine starts to avoid damaging the starter
motor.
99)Never attempt to start the engine by
pushing or pulling the vehicle.
100)Do not run the engine at high speeds
or drive the vehicle at high speeds until the
engine has had a chance to warm up.
250AHA103547251AHA103505
154
STARTING AND DRIVING