buttons FIAT GRANDE PUNTO 2009 199 / 1.G Owners Manual
[x] Cancel search | Manufacturer: FIAT, Model Year: 2009, Model line: GRANDE PUNTO, Model: FIAT GRANDE PUNTO 2009 199 / 1.GPages: 210, PDF Size: 3.28 MB
Page 17 of 210
16
SAFETY
STARTING
AND DRIVING
WARNING
LIGHTS AND
MESSAGES
IN AN
EMERGENCY
SERVICE
AND CARE
TECHNICAL
SPECIFICATIONS
INDEX
CONTROLS
AND DEVICES
DIGITAL DISPLAY
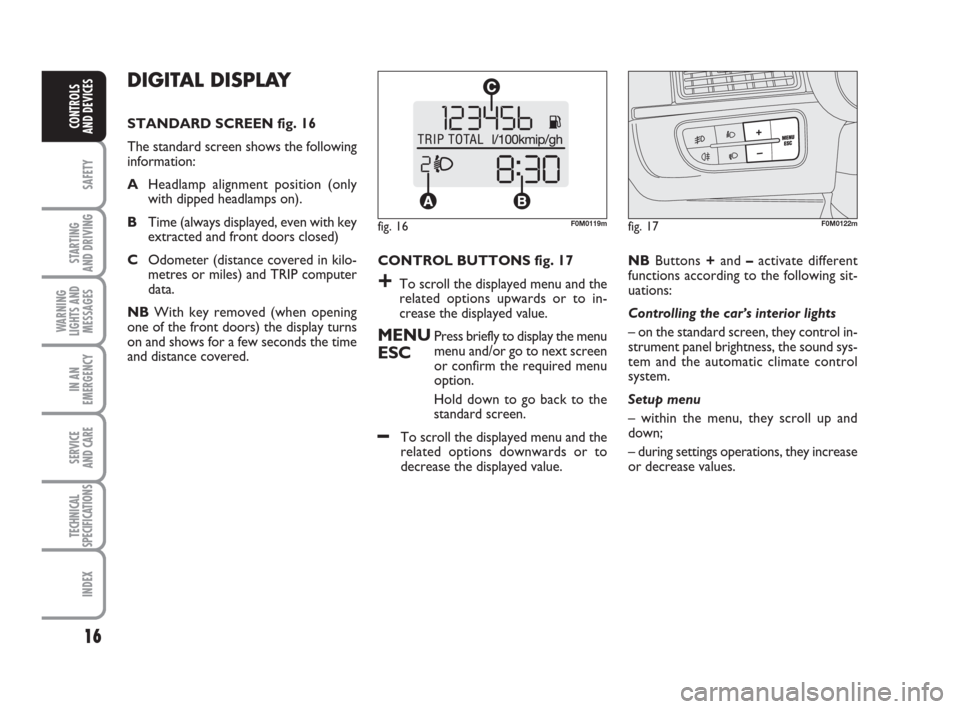
STANDARD SCREEN fig. 16
The standard screen shows the following
information:
AHeadlamp alignment position (only
with dipped headlamps on).
BTime (always displayed, even with key
extracted and front doors closed)
COdometer (distance covered in kilo-
metres or miles) and TRIP computer
data.
NBWith key removed (when opening
one of the front doors) the display turns
on and shows for a few seconds the time
and distance covered.CONTROL BUTTONS fig. 17
+To scroll the displayed menu and the
related options upwards or to in-
crease the displayed value.
MENUPress briefly to display the menu
ESCmenu and/or go to next screen
or confirm the required menu
option.
Hold down to go back to the
standard screen.
–To scroll the displayed menu and the
related options downwards or to
decrease the displayed value.NBButtons +and –activate different
functions according to the following sit-
uations:
Controlling the car’s interior lights
– on the standard screen, they control in-
strument panel brightness, the sound sys-
tem and the automatic climate control
system.
Setup menu
– within the menu, they scroll up and
down;
– during settings operations, they increase
or decrease values.
fig. 16F0M0119mfig. 17F0M0122m
001-032 ACTUAL 1ed EN.qxd 28-08-2009 13:41 Pagina 16
Page 18 of 210
17
SAFETY
STARTING
AND DRIVING
WARNING
LIGHTS AND
MESSAGES
IN AN
EMERGENCY
SERVICE
AND CARE
TECHNICAL
SPECIFICATIONS
INDEX
CONTROLS
AND DEVICES
SETUP MENU
The menu comprises a series of functions
arranged in a circle which can be select-
ed through the +and –buttons to access
the different operations and settings de-
scribed in the following paragraphs.
The setup menu can be activated by briefly
pressing the MENU ESCbutton.
Single presses on the +and –buttons will
scroll the setup menu options.
Management modes differ from each oth-
er according to the option selected.Selecting a menu option
– briefly press the MENU ESCbutton to
select the menu option to set;
– press the +and –buttons (with single
presses) to select the new setting;
– press briefly the MENU ESCbutton to
store the new setting and go back to the
previous menu option.
Selecting “Set Clock”
– briefly press the MENU ESCbutton to
select the first value to change (hours);
– press the +and –buttons (with single
presses) to select the new setting;
– briefly press the MENU ESCbutton to
store the new setting and go to the next
setup menu option (minutes);
– after setting the values with the same
procedure, go back to the previous menu
item.Hold down the MENU ESC button:
– to quit the setup menu if you are in the
menu;
– to quit to the menu if you are setting
an option;
– to save only the settings already stored
(and confirmed by pressing the MENU
ESCbutton).
The setup menu page is timed. Only the
changes stored by the user by briefly
pressing the MENU ESCbutton are
saved when the menu is automatically
closed.
001-032 ACTUAL 1ed EN.qxd 28-08-2009 13:41 Pagina 17
Page 20 of 210
19
SAFETY
STARTING
AND DRIVING
WARNING
LIGHTS AND
MESSAGES
IN AN
EMERGENCY
SERVICE
AND CARE
TECHNICAL
SPECIFICATIONS
INDEX
CONTROLS
AND DEVICES
Setting the speed limit (SPEEd)
With this function, it is possible to set the
car speed limit (km/h or mph). When this
limit is exceeded, the driver is immediately
alerted (see section “Warning lights and
messages”).
To set the desired speed limit, proceed as
follows:
– briefly press MENU ESC– the mes-
sage (SPEEd) and the previously set unit
(km/h) or (mph) will appear on the display;
– press+or –to activate (On) or deac-
tivate (Off) the speed limit;
– if the function is on, press +or –to se-
lect the required speed limit and then
press MENU ESCto confirm;
NBThe speed may be set in the range
from 30 to 200 km/h, or from 20 to
125 mph according to the previously cho-
sen unit (see “Setting the distance unit
(Unit)” below). The setting will in-
crease/decrease by five units each time
+/–is pressed. Hold down +/–to in-
crease/decrease the setting rapidly. When
you get close to the desired value, finish
the setting with single presses.– briefly press MENU ESCto return to
the menu screen or hold the button down
to return to the standard screen without
saving.
To cancel the setting, proceed as follows:
– briefly press MENU ESC: (On) will
flash on the display;
– press –: (Off) will flash on the display;
– briefly press MENU ESCto return to
the menu screen or hold the button down
to return to the standard screen without
saving.
Setting the clock (Hour)
With this function, it is possible to set the
time.
To do so, proceed as follows:
– briefly press MENU ESC– the “hours”
will flash on the display;
– press +or –to set the value;
– briefly press MENU ESC– the “min-
utes” will flash on the display;
– press +or –to set the value;
– briefly press MENU ESCto return to
the menu screen or hold the button down
to return to the standard screen without
saving.Adjusting the buzzer volume
(BUZZ)
This function is used to adjust the volume
of the buzzer that sounds in the event
of failure/warning indications and when
the MENU ESC,+and –buttons are
pressed.
To set the desired volume, proceed as
follows:
– briefly press MENU ESC– the display
will show the wording (bUZZ);
– press +or –to select the required vol-
ume (adjustable over 8 levels).
– briefly press MENU ESC
to return to
the menu screen or hold the button down
to return to the standard screen without
saving.
001-032 ACTUAL 1ed EN.qxd 28-08-2009 13:41 Pagina 19
Page 21 of 210
20
SAFETY
STARTING
AND DRIVING
WARNING
LIGHTS AND
MESSAGES
IN AN
EMERGENCY
SERVICE
AND CARE
TECHNICAL
SPECIFICATIONS
INDEX
CONTROLS
AND DEVICES
Passenger front and side airbag
activation/deactivation (BAG P)
(for versions/markets where available)
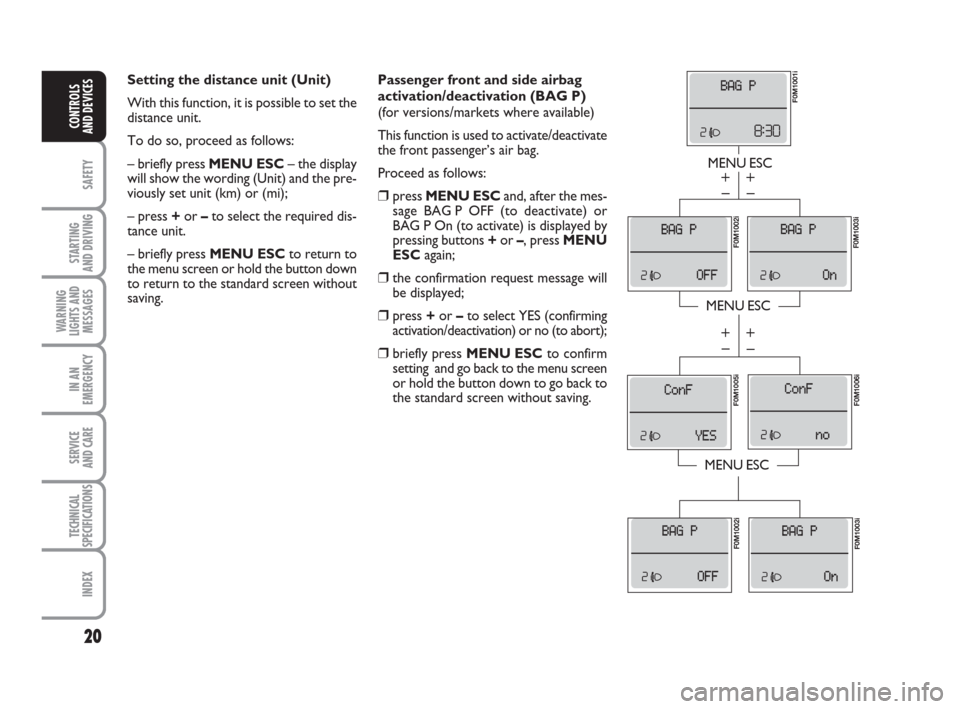
This function is used to activate/deactivate
the front passenger’s air bag.
Proceed as follows:
❒press MENU ESCand, after the mes-
sage BAG P OFF (to deactivate) or
BAG P On (to activate) is displayed by
pressing buttons +or –, press MENU
ESCagain;
❒the confirmation request message will
be displayed;
❒press +or –to select YES (confirming
activation/deactivation) or no (to abort);
❒briefly press MENU ESC to confirm
setting and go back to the menu screen
or hold the button down to go back to
the standard screen without saving.
MENU ESC
MENU ESC
MENU ESC
– +
– +
– +
– +
F0M1001i
F0M1003iF0M1002i F0M1005i
F0M1006i F0M1002i
F0M1003i
Setting the distance unit (Unit)
With this function, it is possible to set the
distance unit.
To do so, proceed as follows:
– briefly press MENU ESC– the display
will show the wording (Unit) and the pre-
viously set unit (km) or (mi);
– press +or –to select the required dis-
tance unit.
– briefly press MENU ESCto return to
the menu screen or hold the button down
to return to the standard screen without
saving.
001-032 ACTUAL 1ed EN.qxd 28-08-2009 13:41 Pagina 20
Page 22 of 210
21
SAFETY
STARTING
AND DRIVING
WARNING
LIGHTS AND
MESSAGES
IN AN
EMERGENCY
SERVICE
AND CARE
TECHNICAL
SPECIFICATIONS
INDEX
CONTROLS
AND DEVICES
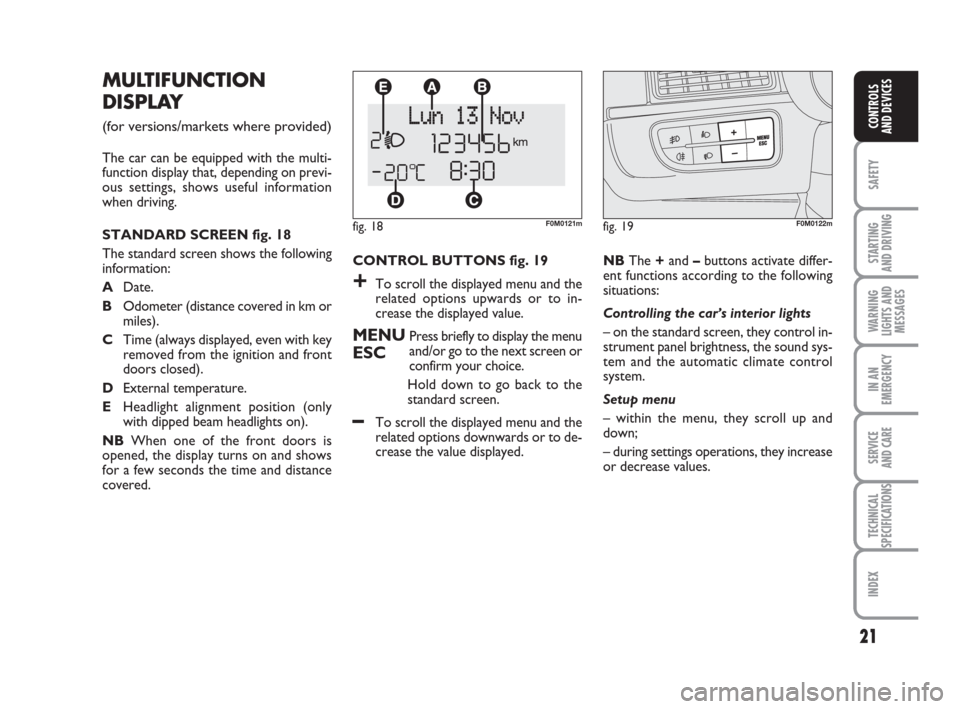
CONTROL BUTTONS fig. 19
+To scroll the displayed menu and the
related options upwards or to in-
crease the displayed value.
MENUPress briefly to display the menu
ESCand/or go to the next screen or
confirm your choice.
Hold down to go back to the
standard screen.
–To scroll the displayed menu and the
related options downwards or to de-
crease the value displayed.
MULTIFUNCTION
DISPLAY
(for versions/markets where provided)
The car can be equipped with the multi-
function display that, depending on previ-
ous settings, shows useful information
when driving.
STANDARD SCREEN fig. 18
The standard screen shows the following
information:
ADate.
BOdometer (distance covered in km or
miles).
CTime (always displayed, even with key
removed from the ignition and front
doors closed).
DExternal temperature.
EHeadlight alignment position (only
with dipped beam headlights on).
NBWhen one of the front doors is
opened, the display turns on and shows
for a few seconds the time and distance
covered.
fig. 18F0M0121m
NBThe +and –buttons activate differ-
ent functions according to the following
situations:
Controlling the car’s interior lights
– on the standard screen, they control in-
strument panel brightness, the sound sys-
tem and the automatic climate control
system.
Setup menu
– within the menu, they scroll up and
down;
– during settings operations, they increase
or decrease values.
fig. 19F0M0122m
001-032 ACTUAL 1ed EN.qxd 28-08-2009 13:41 Pagina 21
Page 23 of 210
22
SAFETY
STARTING
AND DRIVING
WARNING
LIGHTS AND
MESSAGES
IN AN
EMERGENCY
SERVICE
AND CARE
TECHNICAL
SPECIFICATIONS
INDEX
CONTROLS
AND DEVICES
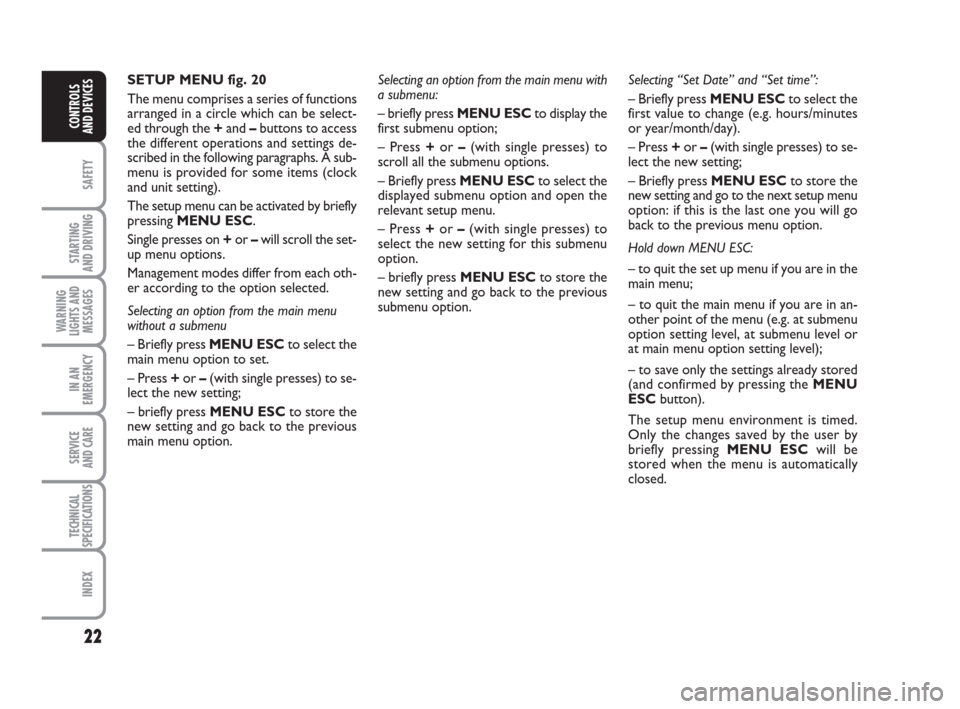
SETUP MENU fig. 20
The menu comprises a series of functions
arranged in a circle which can be select-
ed through the +and –buttons to access
the different operations and settings de-
scribed in the following paragraphs. A sub-
menu is provided for some items (clock
and unit setting).
The setup menu can be activated by briefly
pressing MENU ESC.
Single presses on +or –will scroll the set-
up menu options.
Management modes differ from each oth-
er according to the option selected.
Selecting an option from the main menu
without a submenu
– Briefly press MENU ESCto select the
main menu option to set.
– Press +or –(with single presses) to se-
lect the new setting;
– briefly press MENU ESCto store the
new setting and go back to the previous
main menu option.Selecting “Set Date” and “Set time”:
– Briefly press MENU ESCto select the
first value to change (e.g. hours/minutes
or year/month/day).
– Press +or –(with single presses) to se-
lect the new setting;
– Briefly press MENU ESCto store the
new setting and go to the next setup menu
option: if this is the last one you will go
back to the previous menu option.
Hold down MENU ESC:
– to quit the set up menu if you are in the
main menu;
– to quit the main menu if you are in an-
other point of the menu (e.g. at submenu
option setting level, at submenu level or
at main menu option setting level);
– to save only the settings already stored
(and confirmed by pressing the MENU
ESCbutton).
The setup menu environment is timed.
Only the changes saved by the user by
briefly pressing MENU ESC will be
stored when the menu is automatically
closed. Selecting an option from the main menu with
a submenu:
– briefly press MENU ESCto display the
first submenu option;
– Press +or –(with single presses) to
scroll all the submenu options.
– Briefly press MENU ESCto select the
displayed submenu option and open the
relevant setup menu.
– Press +or –(with single presses) to
select the new setting for this submenu
option.
– briefly press MENU ESC to store the
new setting and go back to the previous
submenu option.
001-032 ACTUAL 1ed EN.qxd 28-08-2009 13:41 Pagina 22
Page 29 of 210
28
SAFETY
STARTING
AND DRIVING
WARNING
LIGHTS AND
MESSAGES
IN AN
EMERGENCY
SERVICE
AND CARE
TECHNICAL
SPECIFICATIONS
INDEX
CONTROLS
AND DEVICES
Adjusting the button volume
(Button Vol.)
This function may be used to adjust (over
8 levels) the volume of the noise made
when the MENU ESC, +and –buttons
are pressed.
To set the desired volume, proceed as fol-
lows:
– briefly press MENU ESC– the previ-
ously set volume level will flash on the dis-
play;
– press +or –to set the value;
– briefly press MENU ESCto return to
the menu screen or hold the button down
to return to the standard screen without
saving.Scheduled Servicing (Service)
Through this function it is possible to dis-
play information related to regular sched-
uling intervals.
This information can be consulted as
follows:
– briefly press MENU ESC– service in-
tervals in km or mi, depending on the
previous setting, will be displayed (see
“Measurement units” section);
– briefly press MENU ESCto go back to
the menu screen or hold the button down
to go back to the standard screen.NBThe “Scheduled Service Plan” re-
quires the vehicle to be serviced every
30,000 km (or 18,000 mi). This indication
will appear automatically, with the key at
MAR, starting from 2,000 km (or
1,240 mi) and will be displayed every
200 km (or 124 mi). Below 200 km the sig-
nals become more frequent. The indica-
tion will appear in kilometres or miles de-
pending on the unit of measurement
settings. When the next scheduled service
is approaching, and when the key is turned
to MAR, the message “Service” will ap-
pear on the display followed by the num-
ber of kilometres or miles left. Go to a Fi-
at Dealership, where the “Scheduled
Service Plan” operations will be performed
and the message will be reset.
001-032 ACTUAL 1ed EN.qxd 28-08-2009 13:41 Pagina 28
Page 30 of 210
29
SAFETY
STARTING
AND DRIVING
WARNING
LIGHTS AND
MESSAGES
IN AN
EMERGENCY
SERVICE
AND CARE
TECHNICAL
SPECIFICATIONS
INDEX
CONTROLS
AND DEVICES
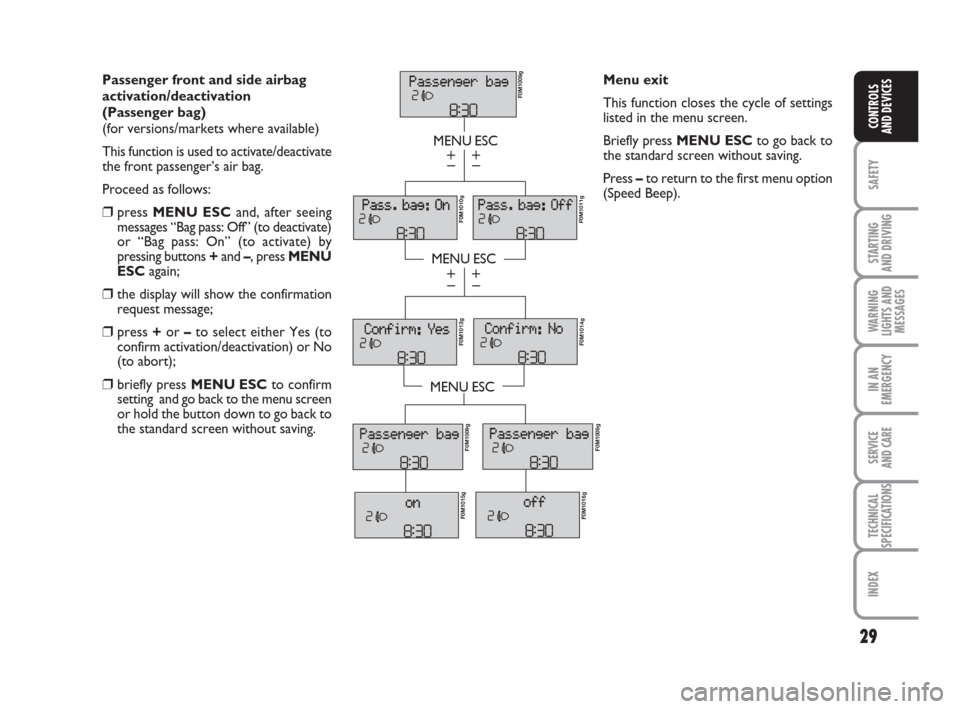
Passenger front and side airbag
activation/deactivation
(Passenger bag)
(for versions/markets where available)
This function is used to activate/deactivate
the front passenger’s air bag.
Proceed as follows:
❒press MENU ESCand, after seeing
messages “Bag pass: Off” (to deactivate)
or “Bag pass: On” (to activate) by
pressing buttons +and –, press MENU
ESCagain;
❒the display will show the confirmation
request message;
❒press +or –to select either Yes (to
confirm activation/deactivation) or No
(to abort);
❒briefly press MENU ESC to confirm
setting and go back to the menu screen
or hold the button down to go back to
the standard screen without saving.
MENU ESC
MENU ESC
MENU ESC
– +
– +
– +
– +
F0M1009g
F0M1011gF0M1010g F0M1013g
F0M1014g
F0M1009g
F0M1015g
F0M1016gF0M1009g
Menu exit
This function closes the cycle of settings
listed in the menu screen.
Briefly press MENU ESCto go back to
the standard screen without saving.
Press –to return to the first menu option
(Speed Beep).
001-032 ACTUAL 1ed EN.qxd 28-08-2009 13:41 Pagina 29
Page 35 of 210
34
SAFETY
STARTING
AND DRIVING
WARNING
LIGHTS AND
MESSAGES
IN AN
EMERGENCY
SERVICE
AND CARE
TECHNICAL
SPECIFICATIONS
INDEX
CONTROLS
AND DEVICES
HEAD RESTRAINTS
FRONT HEAD RESTRAINTS
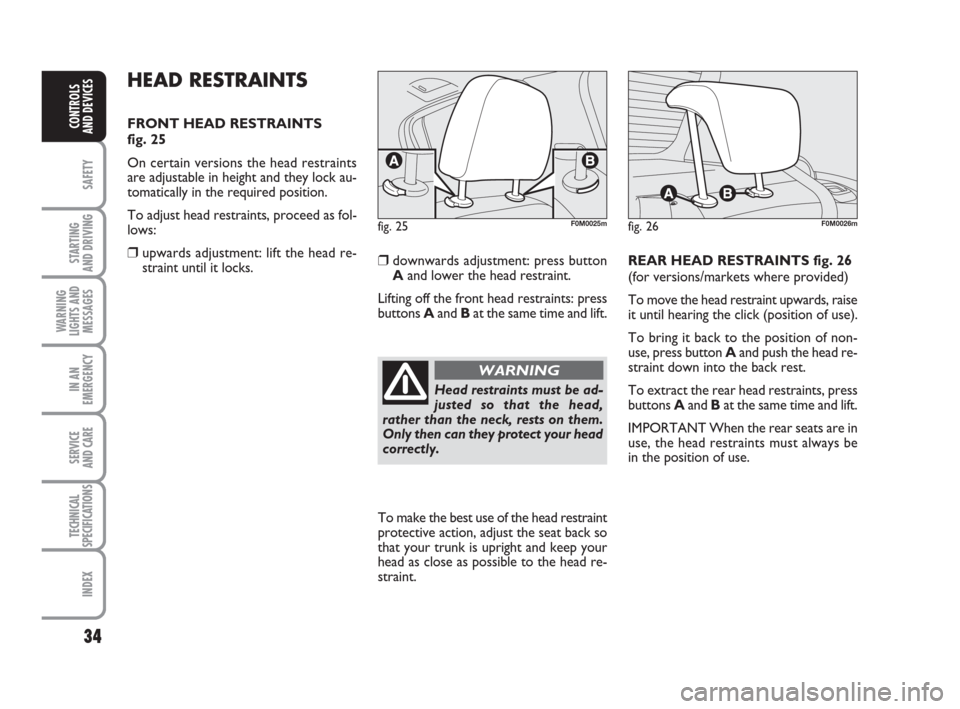
fig. 25
On certain versions the head restraints
are adjustable in height and they lock au-
tomatically in the required position.
To adjust head restraints, proceed as fol-
lows:
❒upwards adjustment: lift the head re-
straint until it locks.❒downwards adjustment: press button
Aand lower the head restraint.
Lifting off the front head restraints: press
buttons Aand Bat the same time and lift.REAR HEAD RESTRAINTS fig. 26
(for versions/markets where provided)
To move the head restraint upwards, raise
it until hearing the click (position of use).
To bring it back to the position of non-
use, press button Aand push the head re-
straint down into the back rest.
To extract the rear head restraints, press
buttons Aand Bat the same time and lift.
IMPORTANT When the rear seats are in
use, the head restraints must always be
in the position of use.
fig. 25F0M0025mfig. 26F0M0026m
Head restraints must be ad-
justed so that the head,
rather than the neck, rests on them.
Only then can they protect your head
correctly.
WARNING
To make the best use of the head restraint
protective action, adjust the seat back so
that your trunk is upright and keep your
head as close as possible to the head re-
straint.
033-071 ACTUAL 1ed EN 28-08-2009 13:43 Pagina 34
Page 66 of 210
65
SAFETY
STARTING
AND DRIVING
WARNING
LIGHTS AND
MESSAGES
IN AN
EMERGENCY
SERVICE
AND CARE
TECHNICAL
SPECIFICATIONS
INDEX
CONTROLS
AND DEVICES
WINDOWS
ELECTRIC
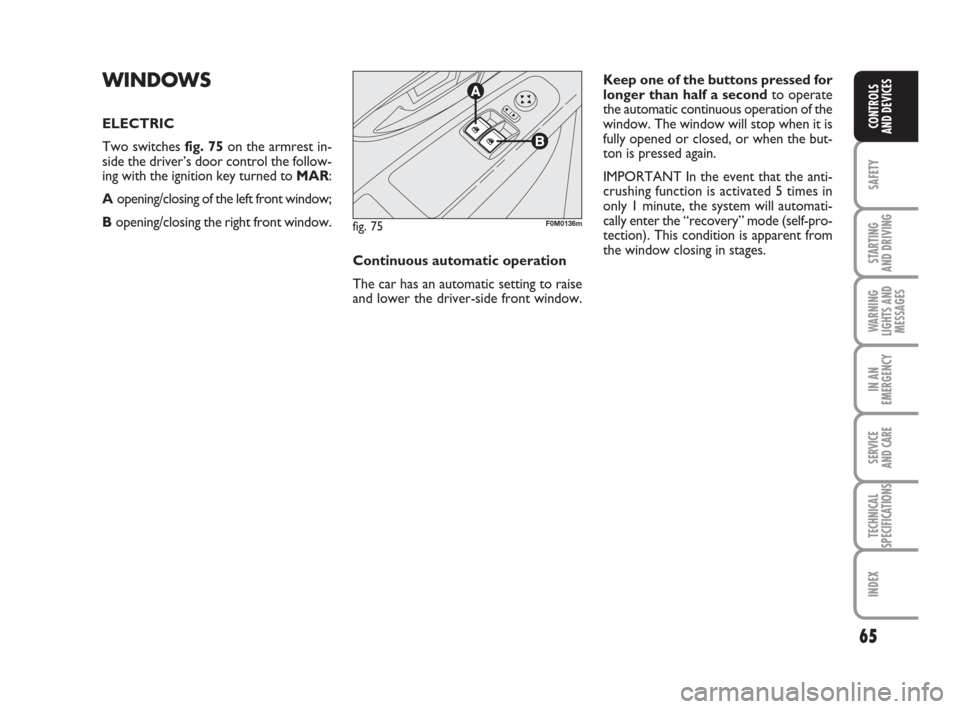
Two switches fig. 75on the armrest in-
side the driver’s door control the follow-
ing with the ignition key turned to MAR:
Aopening/closing of the left front window;
B opening/closing the right front window.Keep one of the buttons pressed for
longer than half a secondto operate
the automatic continuous operation of the
window. The window will stop when it is
fully opened or closed, or when the but-
ton is pressed again.
IMPORTANT In the event that the anti-
crushing function is activated 5 times in
only 1 minute, the system will automati-
cally enter the “recovery” mode (self-pro-
tection). This condition is apparent from
the window closing in stages.
fig. 75F0M0136m
Continuous automatic operation
The car has an automatic setting to raise
and lower the driver-side front window.
033-071 ACTUAL 1ed EN 28-08-2009 13:44 Pagina 65