technical specifications FIAT GRANDE PUNTO 2010 199 / 1.G Owners Manual
[x] Cancel search | Manufacturer: FIAT, Model Year: 2010, Model line: GRANDE PUNTO, Model: FIAT GRANDE PUNTO 2010 199 / 1.GPages: 216, PDF Size: 3.5 MB
Page 155 of 216
154
SAFETY
STARTING
AND DRIVING
WARNING
LIGHTS AND
MESSAGES
SERVICE
AND CARE
TECHNICAL
SPECIFICATIONS
INDEX
CONTROLS
AND DEVICES
IN AN
EMERGENCY
CHANGING
AN INTERIOR BULB
For the type of bulb and relevant power
rating, see “Changing a bulb”.
FRONT CEILING LIGHT
(for versions/markets, where provided)
Proceed as follows to replace the bulbs:
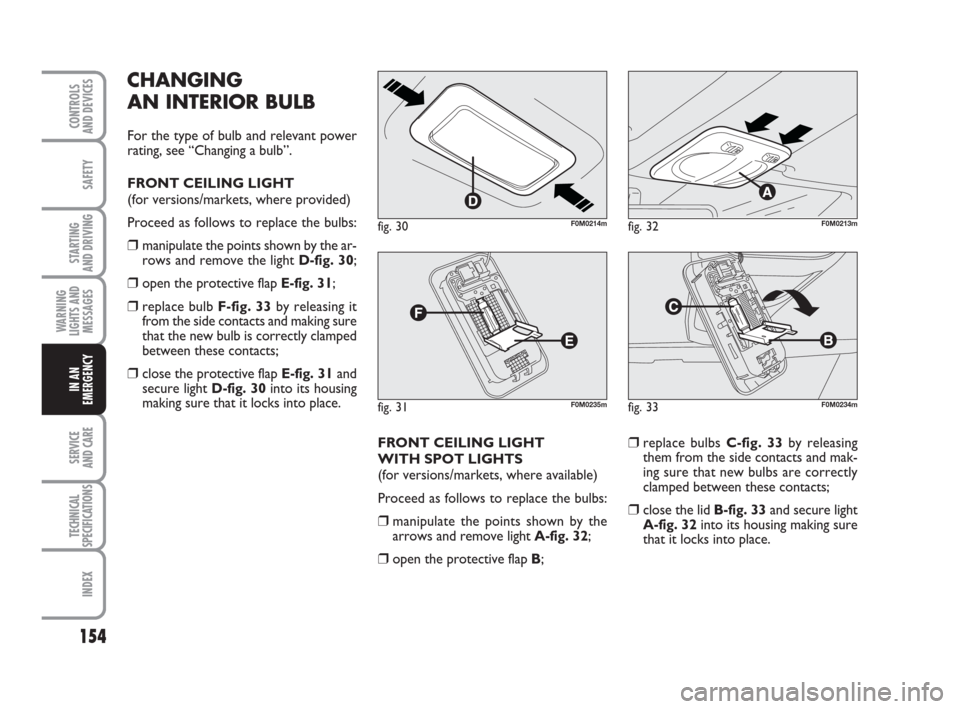
❒manipulate the points shown by the ar-
rows and remove the light D-fig. 30;
❒open the protective flap E-fig. 31;
❒replace bulb F-fig. 33by releasing it
from the side contacts and making sure
that the new bulb is correctly clamped
between these contacts;
❒close the protective flap E-fig. 31and
secure light D-fig. 30into its housing
making sure that it locks into place.
FRONT CEILING LIGHT
WITH SPOT LIGHTS
(for versions/markets, where available)
Proceed as follows to replace the bulbs:
❒manipulate the points shown by the
arrows and remove light A-fig. 32;
❒open the protective flap B;
❒replace bulbs C-fig. 33by releasing
them from the side contacts and mak-
ing sure that new bulbs are correctly
clamped between these contacts;
❒close the lid B-fig. 33and secure light
A-fig. 32into its housing making sure
that it locks into place.
fig. 32F0M0213m
fig. 33F0M0234m
fig. 30F0M0214m
fig. 31F0M0235m
135-166 ACTUAL 1ed EN 26-07-2010 16:00 Pagina 154
Page 156 of 216
155
SAFETY
STARTING
AND DRIVING
WARNING
LIGHTS AND
MESSAGES
SERVICE
AND CARE
TECHNICAL
SPECIFICATIONS
INDEX
CONTROLS
AND DEVICES
IN AN
EMERGENCY
CHANGING A FUSE
GENERAL INFORMATION
The fuse is a protective device for the
electric system: it comes into action if
there is a fault or improper action on the
system.
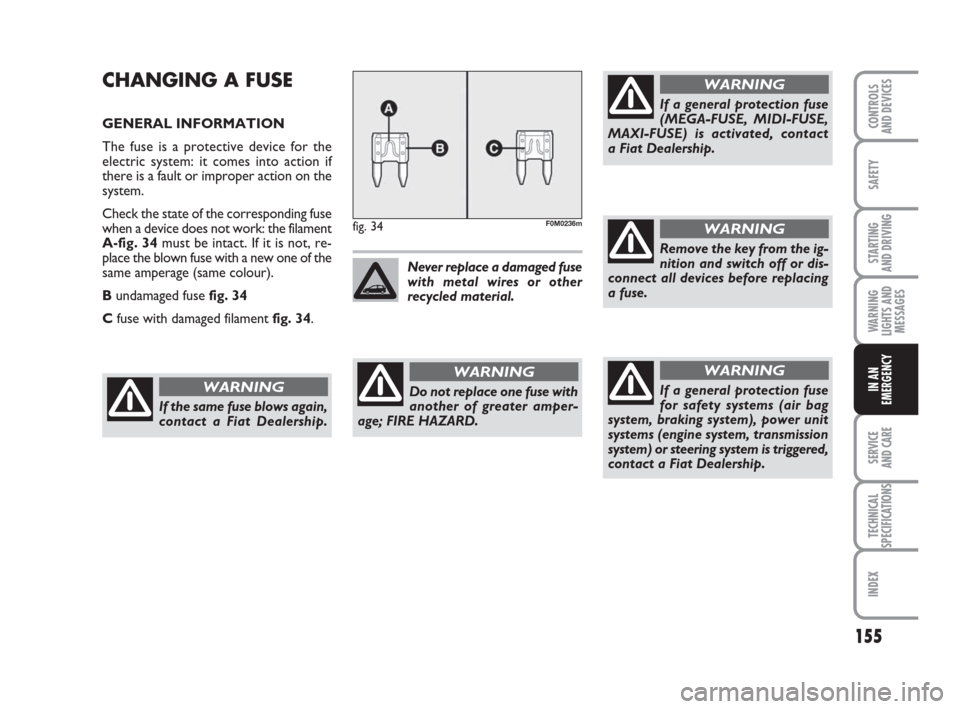
Check the state of the corresponding fuse
when a device does not work: the filament
A-fig. 34must be intact. If it is not, re-
place the blown fuse with a new one of the
same amperage (same colour).
B undamaged fuse fig. 34
Cfuse with damaged filament fig. 34.
fig. 34F0M0236m
Do not replace one fuse with
another of greater amper-
age; FIRE HAZARD.
WARNING
Never replace a damaged fuse
with metal wires or other
recycled material.
If a general protection fuse
(MEGA-FUSE, MIDI-FUSE,
MAXI-FUSE) is activated, contact
a Fiat Dealership.
WARNING
If the same fuse blows again,
contact a Fiat Dealership.
WARNING
Remove the key from the ig-
nition and switch off or dis-
connect all devices before replacing
a fuse.
WARNING
If a general protection fuse
for safety systems (air bag
system, braking system), power unit
systems (engine system, transmission
system) or steering system is triggered,
contact a Fiat Dealership.
WARNING
135-166 ACTUAL 1ed EN 26-07-2010 16:00 Pagina 155
Page 157 of 216
156
SAFETY
STARTING
AND DRIVING
WARNING
LIGHTS AND
MESSAGES
SERVICE
AND CARE
TECHNICAL
SPECIFICATIONS
INDEX
CONTROLS
AND DEVICES
IN AN
EMERGENCY
ACCESSING THE FUSES
The fuses are grouped in three control
units: on the dashboard, in the engine
compartment and in the left-hand side of
the boot.
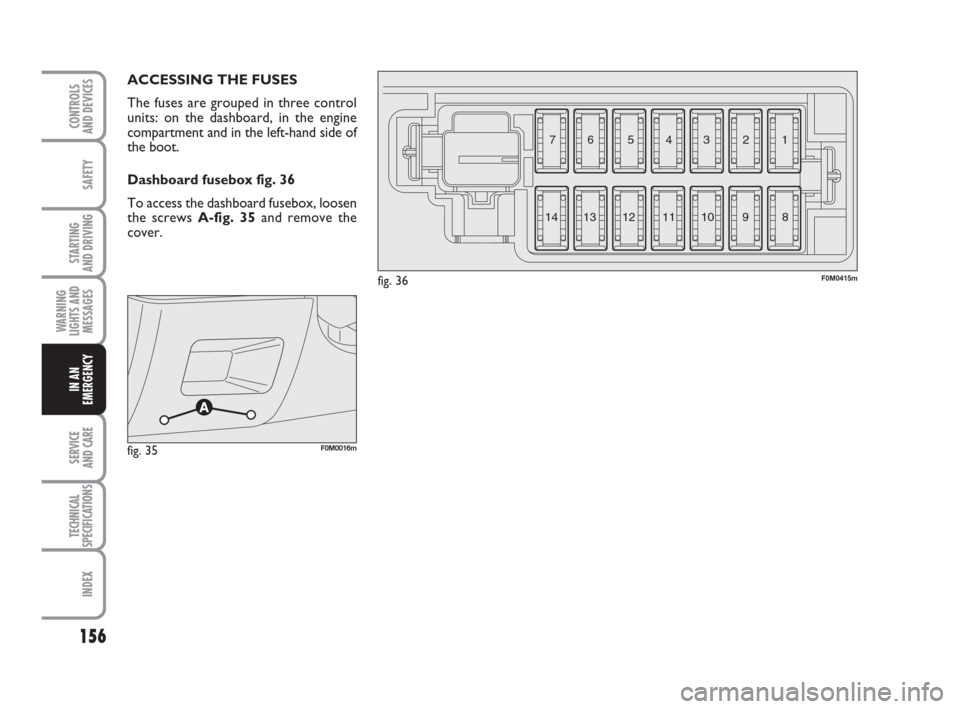
Dashboard fusebox fig. 36
To access the dashboard fusebox, loosen
the screws A-fig. 35and remove the
cover.
fig. 36F0M0415m
3 4 5 6 7
8 9 10 11 12
13 141 2
fig. 35F0M0016m
135-166 ACTUAL 1ed EN 26-07-2010 16:00 Pagina 156
Page 158 of 216
157
SAFETY
STARTING
AND DRIVING
WARNING
LIGHTS AND
MESSAGES
SERVICE
AND CARE
TECHNICAL
SPECIFICATIONS
INDEX
CONTROLS
AND DEVICES
IN AN
EMERGENCY
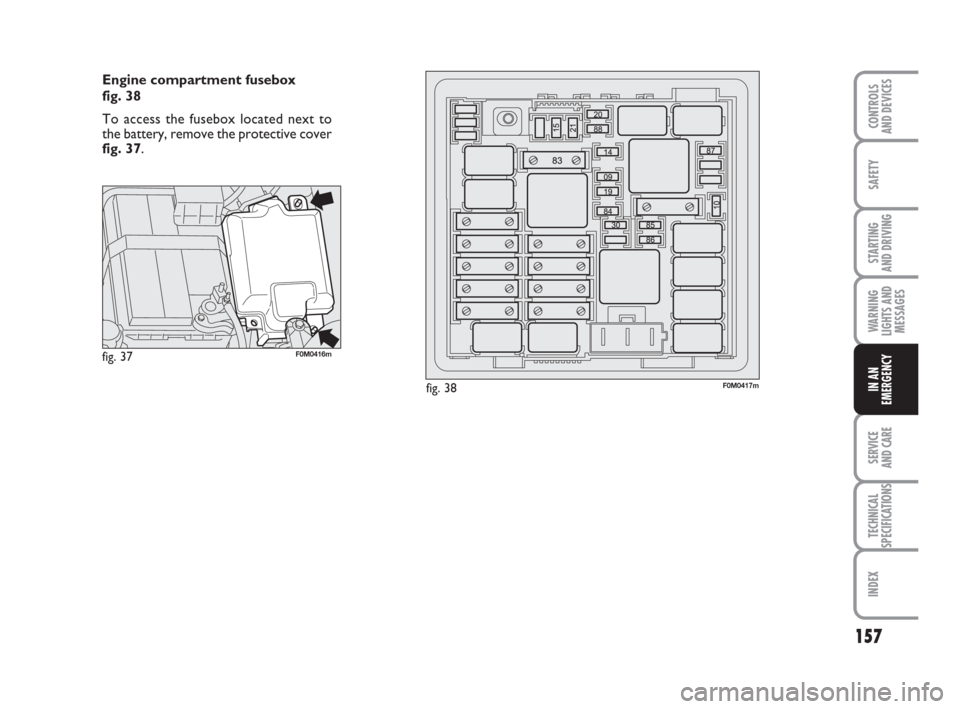
Engine compartment fusebox
fig. 38
To access the fusebox located next to
the battery, remove the protective cover
fig. 37.
fig. 38F0M0417m
fig. 37F0M0416m
135-166 ACTUAL 1ed EN 26-07-2010 16:00 Pagina 157
Page 159 of 216
158
SAFETY
STARTING
AND DRIVING
WARNING
LIGHTS AND
MESSAGES
SERVICE
AND CARE
TECHNICAL
SPECIFICATIONS
INDEX
CONTROLS
AND DEVICES
IN AN
EMERGENCY
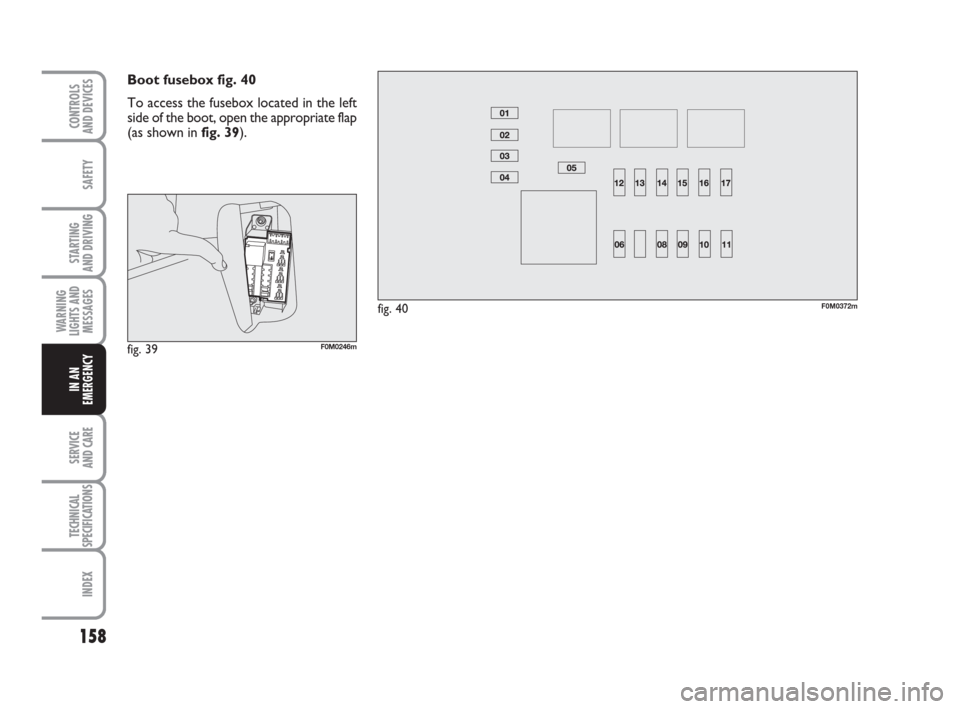
Boot fusebox fig. 40
To access the fusebox located in the left
side of the boot, open the appropriate flap
(as shown infig. 39).
fig. 40F0M0372m
fig. 39F0M0246m
135-166 ACTUAL 1ed EN 26-07-2010 16:00 Pagina 158
Page 160 of 216
159
SAFETY
STARTING
AND DRIVING
WARNING
LIGHTS AND
MESSAGES
SERVICE
AND CARE
TECHNICAL
SPECIFICATIONS
INDEX
CONTROLS
AND DEVICES
IN AN
EMERGENCY
1
8
13
2
5
11
4
6
14
7
12
3
107,5
7,5
5
5
10
5
20
20
20
20
5
5
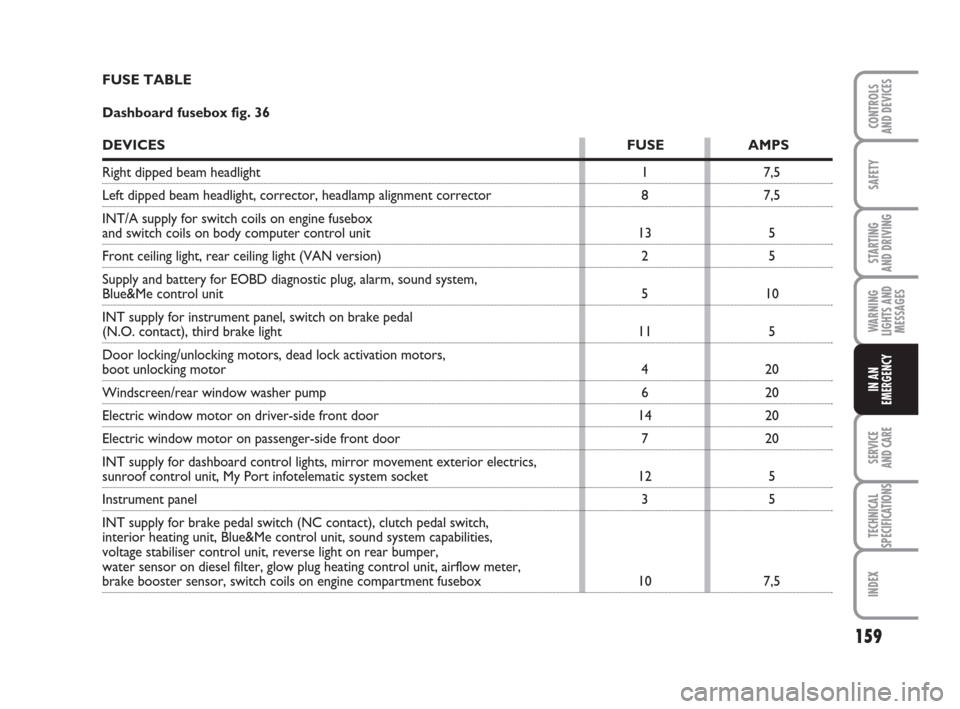
7,5 FUSE TABLE
Dashboard fusebox fig. 36
DEVICESFUSE AMPS
Right dipped beam headlight
Left dipped beam headlight, corrector, headlamp alignment corrector
INT/A supply for switch coils on engine fusebox
and switch coils on body computer control unit
Front ceiling light, rear ceiling light (VAN version)
Supply and battery for EOBD diagnostic plug, alarm, sound system,
Blue&Me control unit
INT supply for instrument panel, switch on brake pedal
(N.O. contact), third brake light
Door locking/unlocking motors, dead lock activation motors,
boot unlocking motor
Windscreen/rear window washer pump
Electric window motor on driver-side front door
Electric window motor on passenger-side front door
INT supply for dashboard control lights, mirror movement exterior electrics,
sunroof control unit, My Port infotelematic system socket
Instrument panel
INT supply for brake pedal switch (NC contact), clutch pedal switch,
interior heating unit, Blue&Me control unit, sound system capabilities,
voltage stabiliser control unit, reverse light on rear bumper,
water sensor on diesel filter, glow plug heating control unit, airflow meter,
brake booster sensor, switch coils on engine compartment fusebox
135-166 ACTUAL 1ed EN 26-07-2010 16:00 Pagina 159
Page 161 of 216
160
SAFETY
STARTING
AND DRIVING
WARNING
LIGHTS AND
MESSAGES
SERVICE
AND CARE
TECHNICAL
SPECIFICATIONS
INDEX
CONTROLS
AND DEVICES
IN AN
EMERGENCY
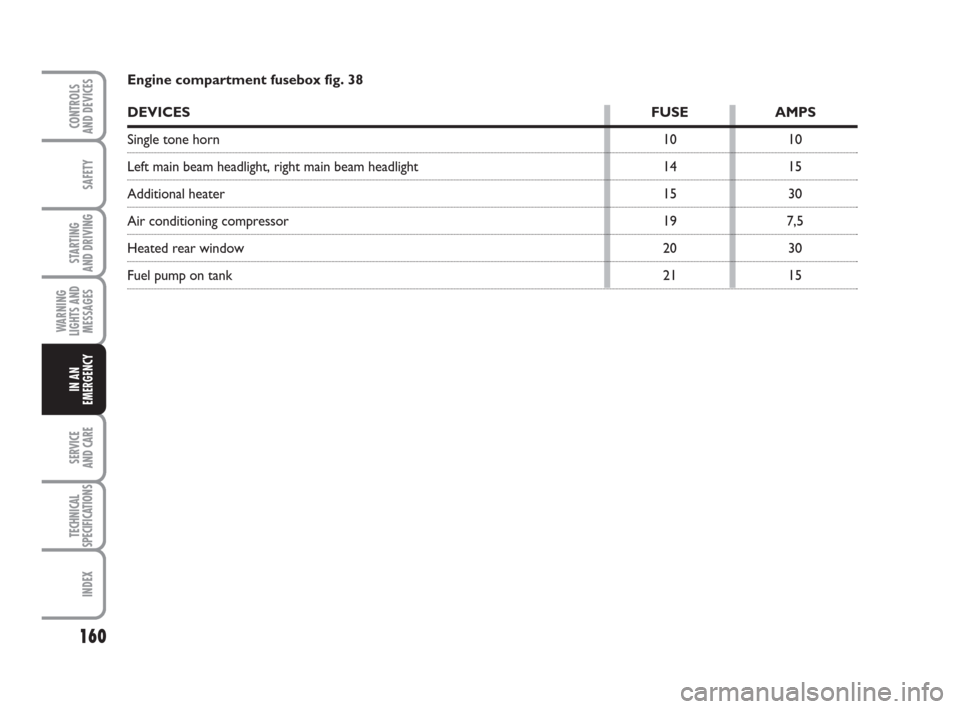
Engine compartment fusebox fig. 38
DEVICESFUSE AMPS
Single tone horn
Left main beam headlight, right main beam headlight
Additional heater
Air conditioning compressor
Heated rear window
Fuel pump on tank10
14
15
19
20
2110
15
30
7,5
30
15
135-166 ACTUAL 1ed EN 26-07-2010 16:00 Pagina 160
Page 162 of 216
161
SAFETY
STARTING
AND DRIVING
WARNING
LIGHTS AND
MESSAGES
SERVICE
AND CARE
TECHNICAL
SPECIFICATIONS
INDEX
CONTROLS
AND DEVICES
IN AN
EMERGENCY
15
7,5
–
15
5
7,5 30
84
85
86
87
88
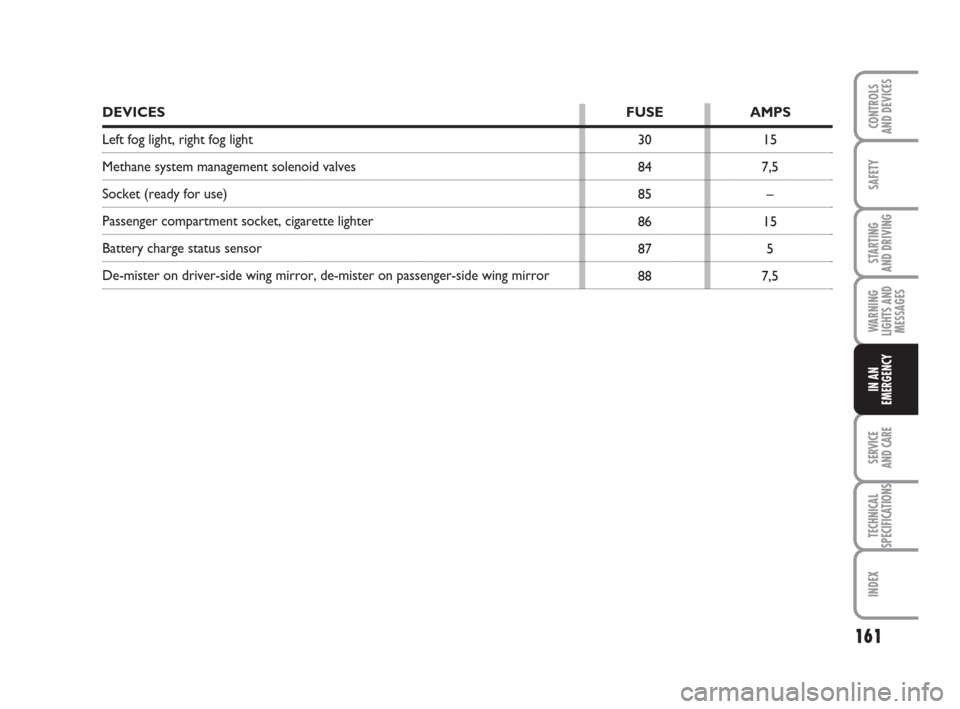
DEVICESFUSE AMPS
Left fog light, right fog light
Methane system management solenoid valves
Socket (ready for use)
Passenger compartment socket, cigarette lighter
Battery charge status sensor
De-mister on driver-side wing mirror, de-mister on passenger-side wing mirror
135-166 ACTUAL 1ed EN 26-07-2010 16:00 Pagina 161
Page 163 of 216
162
SAFETY
STARTING
AND DRIVING
WARNING
LIGHTS AND
MESSAGES
SERVICE
AND CARE
TECHNICAL
SPECIFICATIONS
INDEX
CONTROLS
AND DEVICES
IN AN
EMERGENCY
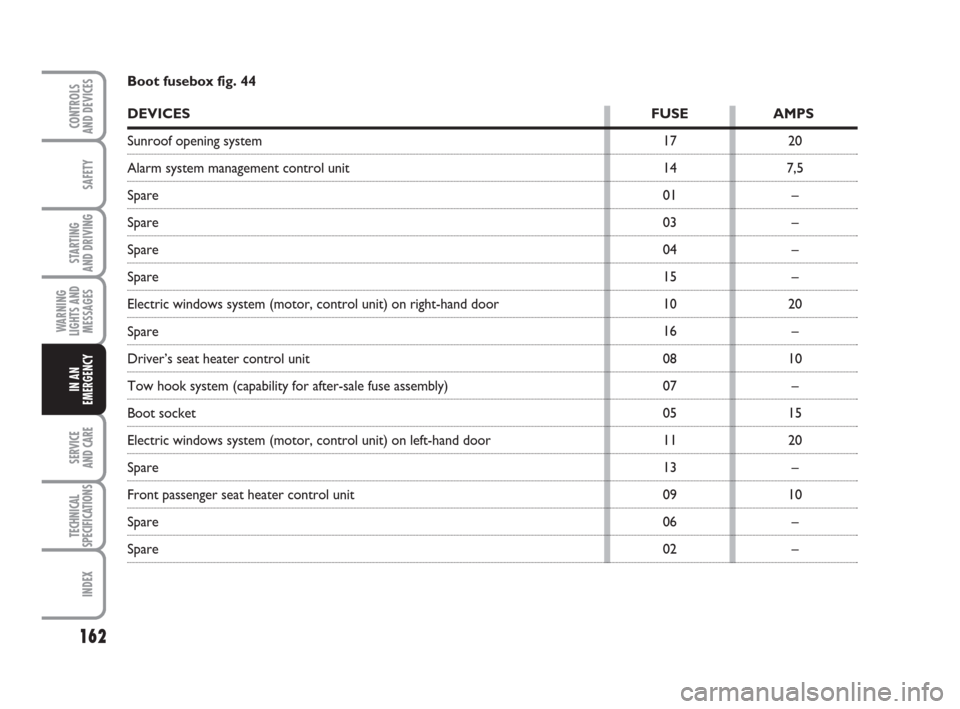
17
14
01
03
04
15
10
16
08
07
05
11
13
09
06
0220
7,5
–
–
–
–
20
–
10
–
15
20
–
10
–
– Boot fusebox fig. 44
DEVICESFUSE AMPS
Sunroof opening system
Alarm system management control unit
Spare
Spare
Spare
Spare
Electric windows system (motor, control unit) on right-hand door
Spare
Driver’s seat heater control unit
Tow hook system (capability for after-sale fuse assembly)
Boot socket
Electric windows system (motor, control unit) on left-hand door
Spare
Front passenger seat heater control unit
Spare
Spare
135-166 ACTUAL 1ed EN 26-07-2010 16:00 Pagina 162
Page 164 of 216
163
SAFETY
STARTING
AND DRIVING
WARNING
LIGHTS AND
MESSAGES
SERVICE
AND CARE
TECHNICAL
SPECIFICATIONS
INDEX
CONTROLS
AND DEVICES
IN AN
EMERGENCY
RECHARGING
THE BATTERY
IMPORTANT The battery recharging pro-
cedure is provided for information pur-
poses only. You are recommended to go
to a Fiat Dealership to have this operation
performed.
We recommend recharging the battery
slowly for approximately 24 hours at low
amperage. Rapid charging with high cur-
rents could damage the battery.
VERSIONS WITHOUT
Start&Stop SYSTEM
Charge the battery as follows:
❒disconnect battery negative terminal;
❒connect the charger cables to the bat-
tery terminals, observing the polarity;
❒turn on the charger;
❒when you have finished, turn the charg-
er off before disconnecting it from the
battery;
❒reconnect battery negative terminal.
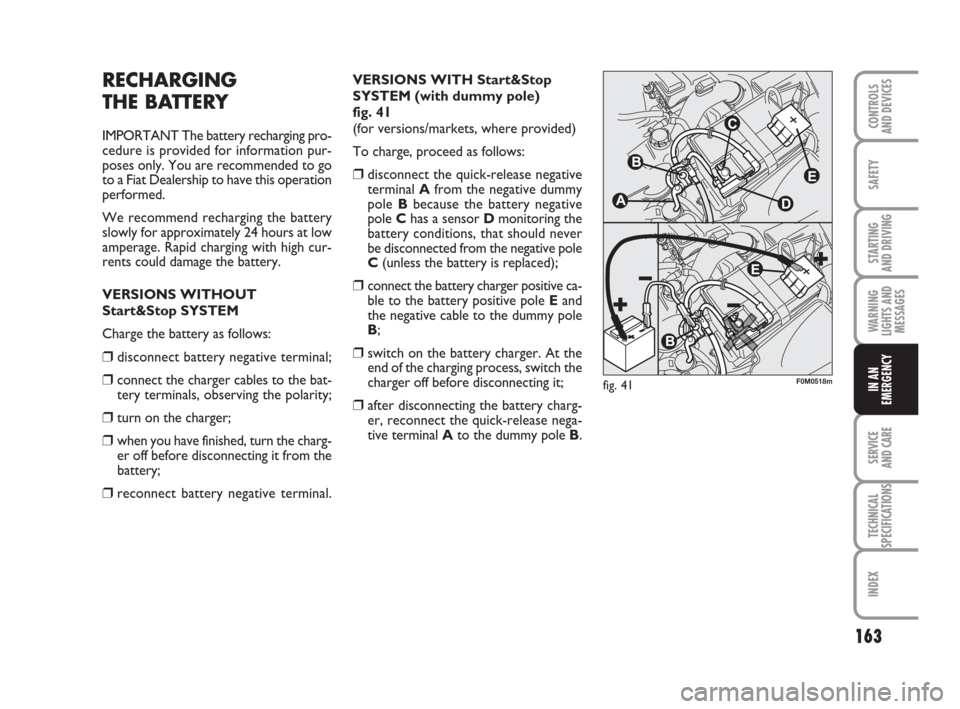
fig. 41F0M0518m
VERSIONS WITH Start&Stop
SYSTEM (with dummy pole)
fig. 41
(for versions/markets, where provided)
To charge, proceed as follows:
❒disconnect the quick-release negative
terminal Afrom the negative dummy
pole Bbecause the battery negative
pole Chas a sensor Dmonitoring the
battery conditions, that should never
be disconnected from the negative pole
C(unless the battery is replaced);
❒connect the battery charger positive ca-
ble to the battery positive pole Eand
the negative cable to the dummy pole
B;
❒switch on the battery charger. At the
end of the charging process, switch the
charger off before disconnecting it;
❒after disconnecting the battery charg-
er, reconnect the quick-release nega-
tive terminal Ato the dummy pole B.
135-166 ACTUAL 1ed EN 26-07-2010 16:00 Pagina 163