ECO mode FIAT IDEA 2006 1.G Connect NavPlus Manual
[x] Cancel search | Manufacturer: FIAT, Model Year: 2006, Model line: IDEA, Model: FIAT IDEA 2006 1.GPages: 166, PDF Size: 5.25 MB
Page 12 of 166
11
CONNECT NAV+
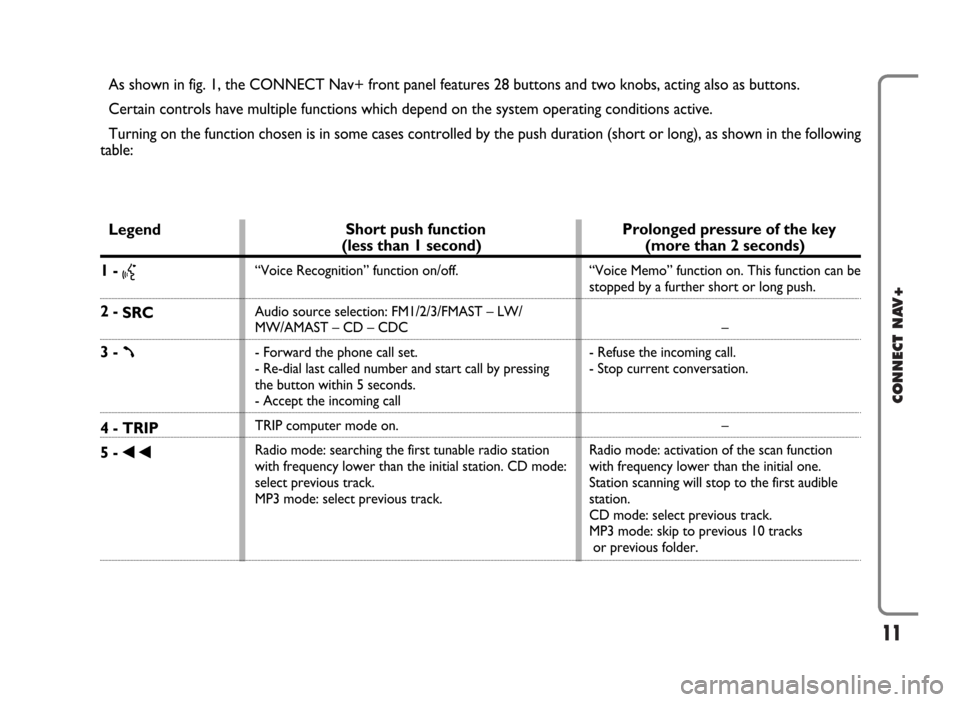
As shown in fig. 1, the CONNECT Nav+ front panel features 28 buttons and two knobs, acting also as buttons.
Certain controls have multiple functions which depend on the system operating conditions active.
Turning on the function chosen is in some cases controlled by the push duration (short or long), as shown in the following
table:
Legend
1 - }
2 -
SRC
3 - ß
4 - TRIP
5 -
÷
Prolonged pressure of the key
(more than 2 seconds)
“Voice Memo” function on. This function can be
stopped by a further short or long push.
–
- Refuse the incoming call.
- Stop current conversation.
–
Radio mode: activation of the scan function
with frequency lower than the initial one.
Station scanning will stop to the first audible
station.
CD mode: select previous track.
MP3 mode: skip to previous 10 tracks
or previous folder.
Short push function
(less than 1 second)
“Voice Recognition” function on/off.
Audio source selection: FM1/2/3/FMAST – LW/
MW/AMAST – CD – CDC
- Forward the phone call set.
- Re-dial last called number and start call by pressing
the button within 5 seconds.
- Accept the incoming call
TRIP computer mode on.
Radio mode: searching the first tunable radio station
with frequency lower than the initial station. CD mode:
select previous track.
MP3 mode: select previous track.
Page 13 of 166
12
CONNECT NAV+
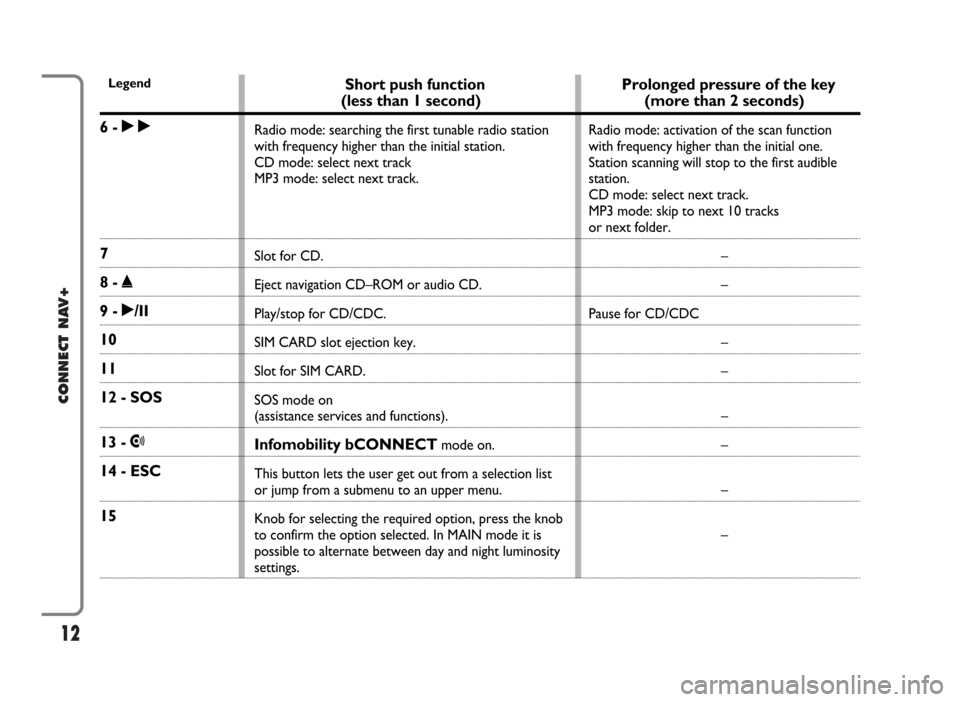
Prolonged pressure of the key
(more than 2 seconds)
Radio mode: activation of the scan function
with frequency higher than the initial one.
Station scanning will stop to the first audible
station.
CD mode: select next track.
MP3 mode: skip to next 10 tracks
or next folder.
–
–
Pause for CD/CDC
–
–
–
–
–
–
Short push function
(less than 1 second)
Radio mode: searching the first tunable radio station
with frequency higher than the initial station.
CD mode: select next track
MP3 mode: select next track.
Slot for CD.
Eject navigation CD–ROM or audio CD.
Play/stop for CD/CDC.
SIM CARD slot ejection key.
Slot for SIM CARD.
SOS mode on
(assistance services and functions).
Infomobility bCONNECTmode on.
This button lets the user get out from a selection list
or jump from a submenu to an upper menu.
Knob for selecting the required option, press the knob
to confirm the option selected. In MAIN mode it is
possible to alternate between day and night luminosity
settings.
Legend
6 - ˜
7
8 - ˚
9 - ˙/II
10
11
12 - SOS
13 - •
14 - ESC
15
Page 14 of 166
13
CONNECT NAV+
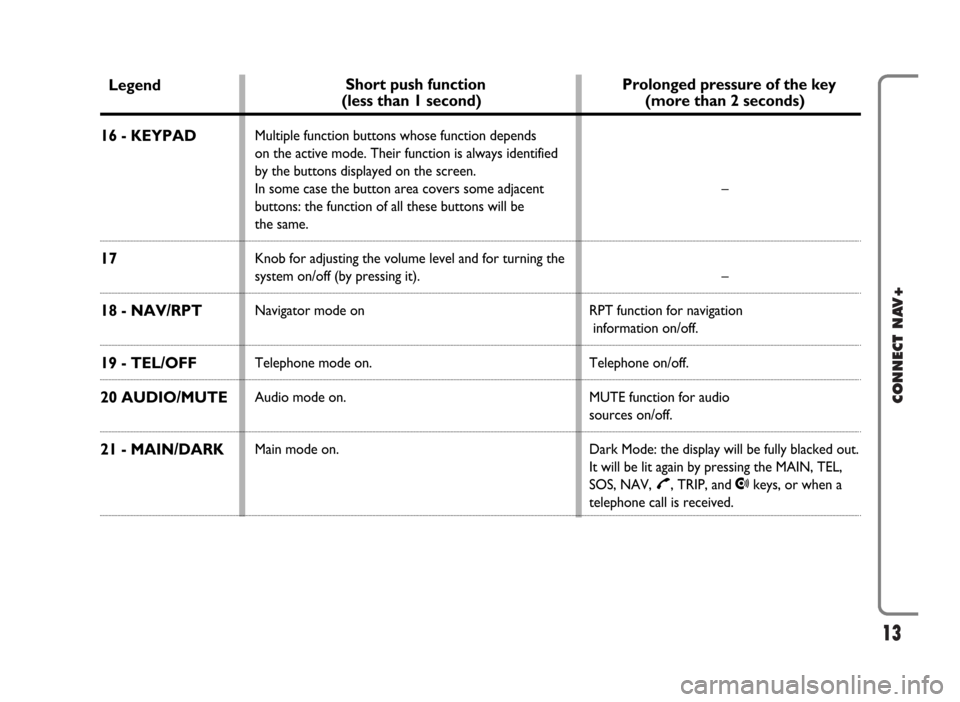
Legend
16 - KEYPAD
17
18 - NAV/RPT
19 - TEL/OFF
20 AUDIO/MUTE
21 - MAIN/DARK
Short push function
(less than 1 second)
Multiple function buttons whose function depends
on the active mode. Their function is always identified
by the buttons displayed on the screen.
In some case the button area covers some adjacent
buttons: the function of all these buttons will be
the same.
Knob for adjusting the volume level and for turning the
system on/off (by pressing it).
Navigator mode on
Telephone mode on.
Audio mode on.
Main mode on.
Prolonged pressure of the key
(more than 2 seconds)
–
–
RPT function for navigation
information on/off.
Telephone on/off.
MUTE function for audio
sources on/off.
Dark Mode: the display will be fully blacked out.
It will be lit again by pressing the MAIN, TEL,
SOS, NAV,
£, TRIP, and •keys, or when a
telephone call is received.
Page 15 of 166
14
CONNECT NAV+
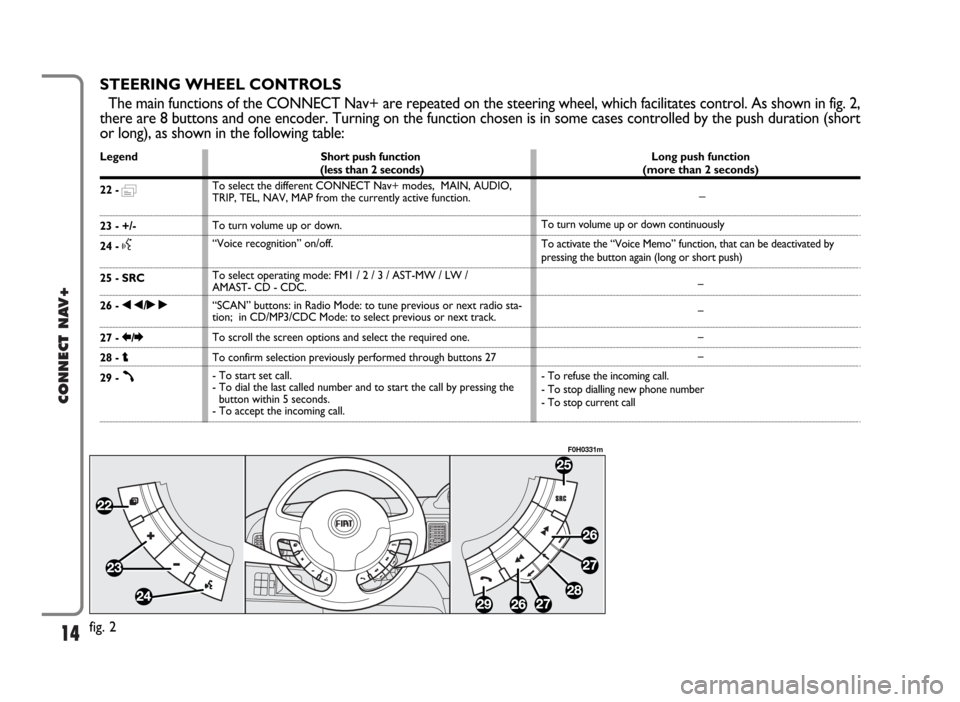
STEERING WHEEL CONTROLS
The main functions of the CONNECT Nav+ are repeated on the steering wheel, which facilitates control. As shown in fig. 2,
there are 8 buttons and one encoder. Turning on the function chosen is in some cases controlled by the push duration (short
or long), as shown in the following table:
Legend
22 - =
23 - +/-
24 -
}
25 - SRC
26 - ÷/˜
27 - R/E
28 - i
29 -
ß
Short push function
(less than 2 seconds)
To select the different CONNECT Nav+ modes, MAIN, AUDIO,
TRIP, TEL, NAV, MAP from the currently active function.
To turn volume up or down.
“Voice recognition” on/off.
To select operating mode: FM1 / 2 / 3 / AST-MW / LW /
AMAST- CD - CDC.
“SCAN” buttons: in Radio Mode: to tune previous or next radio sta-
tion; in CD/MP3/CDC Mode: to select previous or next track.
To scroll the screen options and select the required one.
To confirm selection previously performed through buttons 27
- To start set call.
- To dial the last called number and to start the call by pressing the
button within 5 seconds.
- To accept the incoming call. Long push function
(more than 2 seconds)
_
To turn volume up or down continuously
To activate the “Voice Memo” function, that can be deactivated by
pressing the button again (long or short push)
–
–
–
–
- To refuse the incoming call.
- To stop dialling new phone number
- To stop current call
fig. 2
F0H0331m
Page 22 of 166
21
CONNECT NAV+
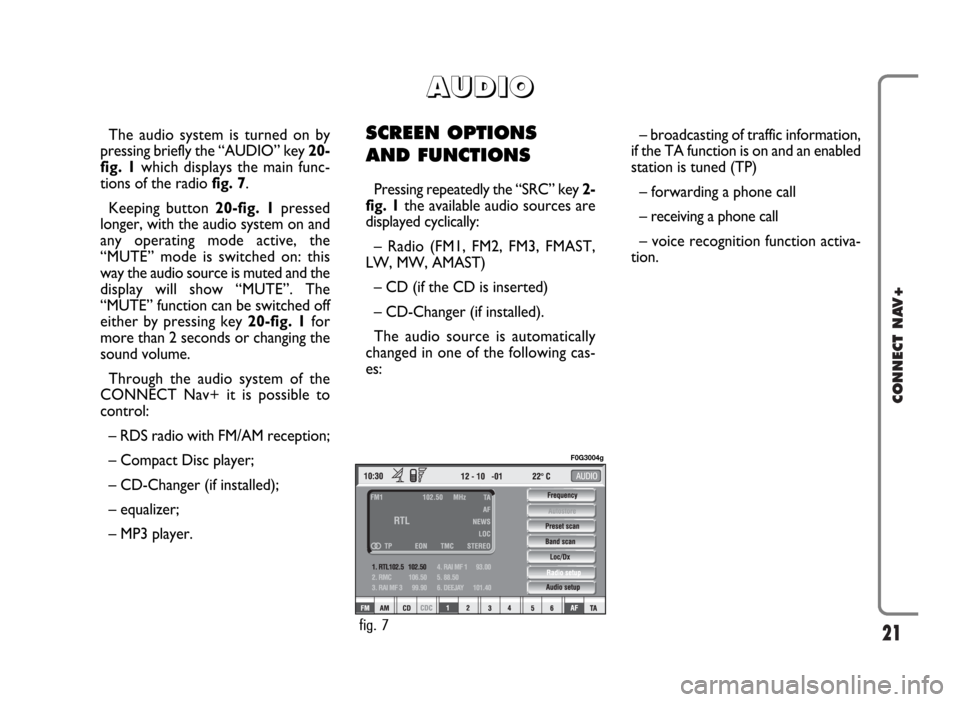
The audio system is turned on by
pressing briefly the “AUDIO” key 20-
fig. 1which displays the main func-
tions of the radio fig. 7.
Keeping button 20-fig. 1pressed
longer, with the audio system on and
any operating mode active, the
“MUTE” mode is switched on: this
way the audio source is muted and the
display will show “MUTE”. The
“MUTE” function can be switched off
either by pressing key 20-fig. 1for
more than 2 seconds or changing the
sound volume.
Through the audio system of the
CONNECT Nav+ it is possible to
control:
– RDS radio with FM/AM reception;
– Compact Disc player;
– CD-Changer (if installed);
– equalizer;
– MP3 player.SCREEN OPTIONS
AND FUNCTIONS
Pressing repeatedly the “SRC” key 2-
fig. 1the available audio sources are
displayed cyclically:
– Radio (FM1, FM2, FM3, FMAST,
LW, MW, AMAST)
– CD (if the CD is inserted)
– CD-Changer (if installed).
The audio source is automatically
changed in one of the following cas-
es:– broadcasting of traffic information,
if the TA function is on and an enabled
station is tuned (TP)
– forwarding a phone call
– receiving a phone call
– voice recognition function activa-
tion.
A A
U U
D D
I I
O O
fig. 7
F0G3004g
Page 40 of 166
39
CONNECT NAV+
This function enables or disables
playback of the previously user pro-
grammed track list (see “CD setup”
functions).
“Prog” icon key is disabled if no pro-
grammed list has been entered.
When list has been programmed and
programmed list playing has been cho-
sen, symbol “✓” is shown near the
corresponding icon.
“Scan” FUNCTION
(BRIEF PLAYBACK)
The “Scan” function is turned on/off
selecting the relevant icon key with
the knob 15-fig. 1and pressing it.
When this function is on, all the CD
tracks are played for about 10 seconds
in the actual sequence on the CD.
Press the knob 15-fig. 1again to
turn the function off. “Compression” FUNCTION
This function activates dynamic
sound compression when playing a
CD in the car.
To turn this function on/off, select
the “Compression” icon with the
knob 15-fig. 1and press it.
When the “Compression” function
is on, symbol “✓” is shown near the
corresponding icon.
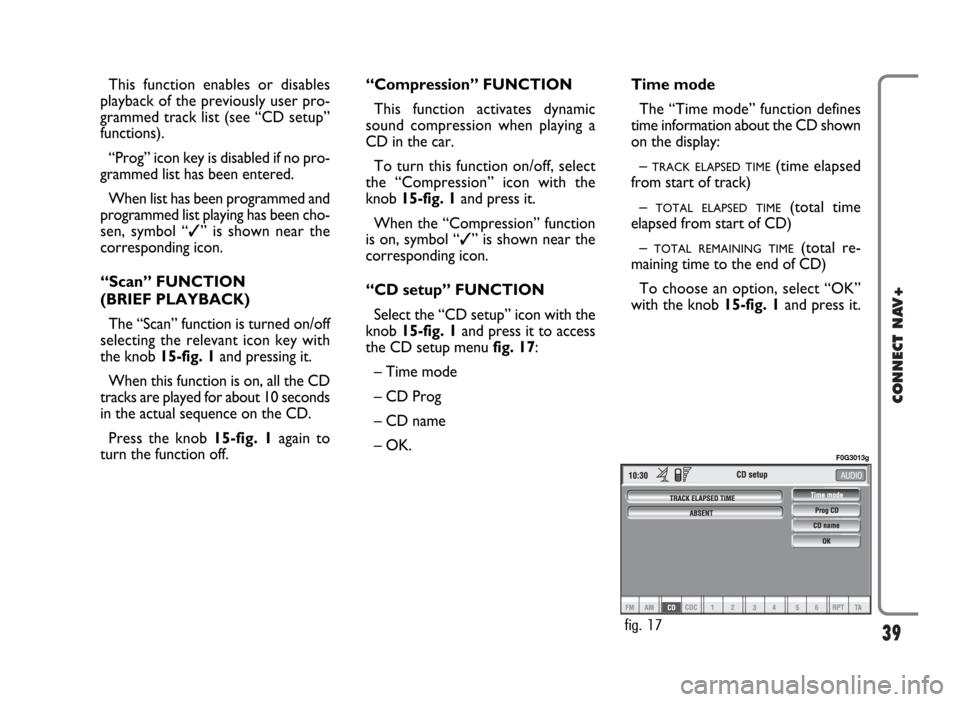
“CD setup” FUNCTION
Select the “CD setup” icon with the
knob 15-fig. 1and press it to access
the CD setup menu fig. 17:
– Time mode
– CD Prog
– CD name
– OK.Time mode
The “Time mode” function defines
time information about the CD shown
on the display:
–
TRACK ELAPSED TIME(time elapsed
from start of track)
–
TOTAL ELAPSED TIME(total time
elapsed from start of CD)
–
TOTAL REMAINING TIME(total re-
maining time to the end of CD)
To choose an option, select “OK”
with the knob 15-fig. 1and press it.
fig. 17
F0G3013g
Page 48 of 166
OK
To confirm the chosen option, select
“OK” with the knob 15-fig. 1and
press it.
During the operations available in the
“CDC Prog” function, buttons 5, 6
and 9-fig. 1are disabled.
When removing the Compact Disc
from the multiple player or changing
the CD sequence, a new playback se-
quence shall be programmed.
CD name
This function can be selected only if
a Compact Disc is inserted in the mul-
tiple player.
If the CD already has a name, this will
be shown on the display.
“CD name” function allows to name
max. 10 CDs with 20 characters max.
For the description of the different
functions, refer to “CD Mode”.
47
CONNECT NAV+
“AUDIO SETUP” FUNCTION
(AUDIO ADJUSTMENTS)
To access the audio setup menu
while listening to a CD, select the “Au-
dio setup” icon rotating the knob 15-
fig. 1and press it to confirm.
For the description of the different
functions available in the menu, see the
corresponding paragraph of the “RA-
DIO MODE” chapter.MP3 MODE
CONNECT Nav+ can recognize the
type of Compact Disc inserted.Dur-
ing the reading procedure to recog-
nize the disk the display shows “Read-
ing CD...”. If the inserted CD is a MP3
one, a specific control is activated.
IMPORTANTNever use 8 cm au-
dio or MP3 CDs, even with the spe-
cial adapter, since this format damages
the system.
IMPORTANTCONNECT Nav+
builds MP3 CD folder-organized struc-
ture of files; folders are organized in
sequence with their own MP3 tracks
(up to max. four levels of folders/sub-
directories). Folder and file name
length shall not exceed 31 characters.
Characters: blank, ’(apostrophe), (
and )(open and closed brackets) are
not admitted in MP3 track names.
When creating MP3 CD you must not
use these characters to name files oth-
erwise CONNECT Nav+ will not be
able to play it.
Page 63 of 166
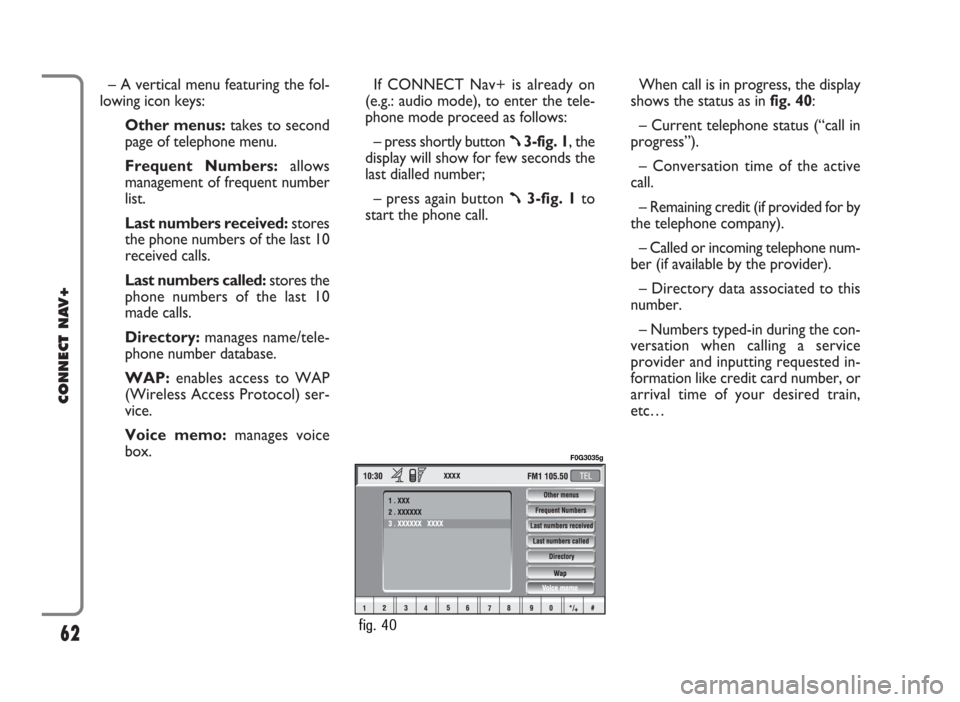
– A vertical menu featuring the fol-
lowing icon keys:
Other menus:takes to second
page of telephone menu.
Frequent Numbers: allows
management of frequent number
list.
Last numbers received:stores
the phone numbers of the last 10
received calls.
Last numbers called: stores the
phone numbers of the last 10
made calls.
Directory:manages name/tele-
phone number database.
WAP:enables access to WAP
(Wireless Access Protocol) ser-
vice.
Voice memo:manages voice
box.If CONNECT Nav+ is already on
(e.g.: audio mode), to enter the tele-
phone mode proceed as follows:
– press shortly button
ß3-fig. 1, the
display will show for few seconds the
last dialled number;
– press again button
ß3-fig. 1to
start the phone call.When call is in progress, the display
shows the status as in fig. 40:
– Current telephone status (“call in
progress”).
– Conversation time of the active
call.
– Remaining credit (if provided for by
the telephone company).
– Called or incoming telephone num-
ber (if available by the provider).
– Directory data associated to this
number.
– Numbers typed-in during the con-
versation when calling a service
provider and inputting requested in-
formation like credit card number, or
arrival time of your desired train,
etc…
62
CONNECT NAV+
fig. 40
F0G3035g
Page 76 of 166
“Location”: this icon is used to store
the new entry on the SIM card or di-
rectory according to the chosen op-
tion. SIM card numbers are automat-
ically copied to the directory after PIN
validation and cleared at SIM card ex-
traction.
“Voice recognizer”: allows to man-
age a voice sample associated to
stored names/numbers.
“OK”: confirms the insertion of the
new entry, proceed as follows:
– rotate the knob 15-fig. 1, select
the icon key and then press the knob
to confirm; the display shows “Please
wait…” and the system will store the
new entry in the directory.IMPORTANTIf the same name is
already existing, the display will show
“Name already in directory”.
Voice recognition
(active only when Directory has
been selected as stored phone
number location)
To enter this mode proceed as fol-
lows:
– rotate the knob 15-fig. 1, select
“Voice recognizer” and then press the
knob to confirm; the display shows the
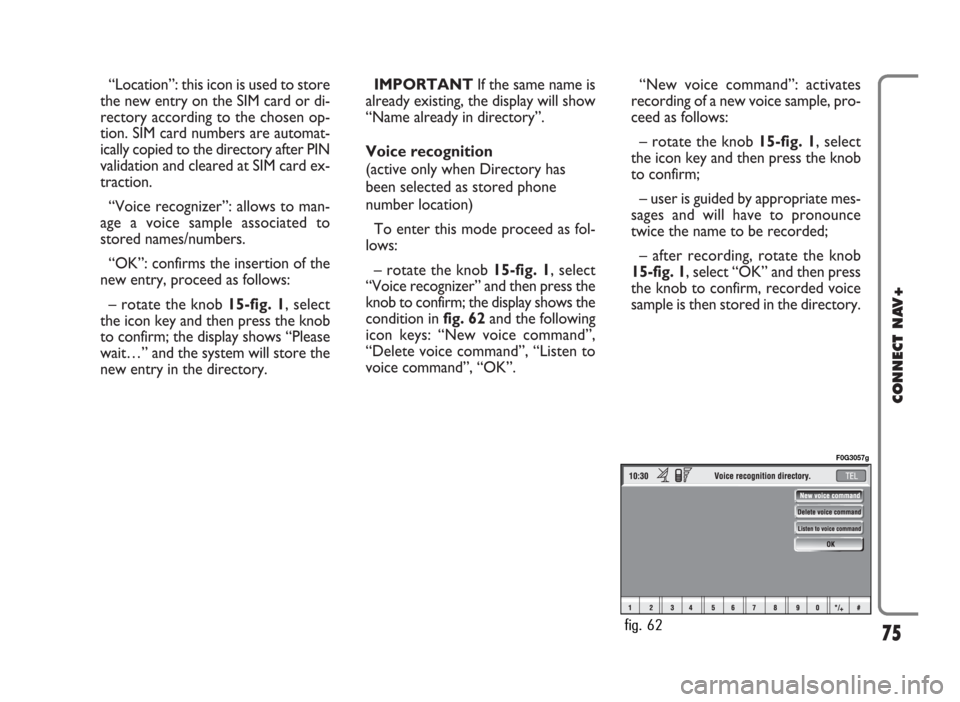
condition infig. 62and the following
icon keys: “New voice command”,
“Delete voice command”, “Listen to
voice command”, “OK”.“New voice command”: activates
recording of a new voice sample, pro-
ceed as follows:
– rotate the knob 15-fig. 1, select
the icon key and then press the knob
to confirm;
– user is guided by appropriate mes-
sages and will have to pronounce
twice the name to be recorded;
– after recording, rotate the knob
15-fig. 1, select “OK” and then press
the knob to confirm, recorded voice
sample is then stored in the directory.
75
CONNECT NAV+
fig. 62
F0G3057g
Page 90 of 166
Network operator
When selected and confirmed, “Net-
work operator” icon allows manage-
ment of network Providers; the dis-
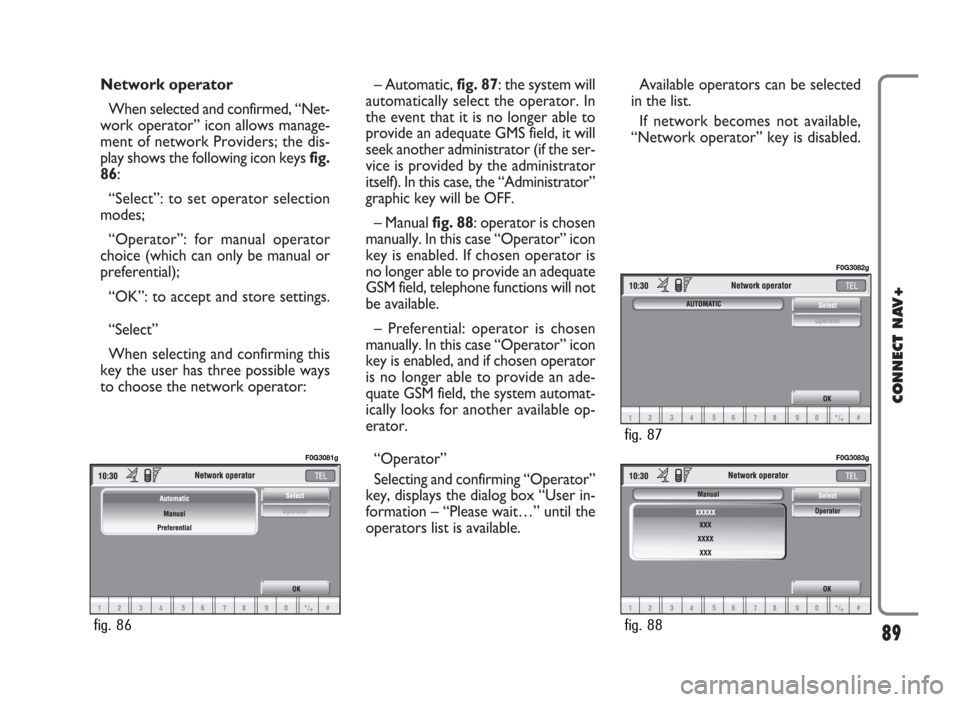
play shows the following icon keys fig.
86:
“Select”: to set operator selection
modes;
“Operator”: for manual operator
choice (which can only be manual or
preferential);
“OK”: to accept and store settings.
“Select”
When selecting and confirming this
key the user has three possible ways
to choose the network operator:– Automatic, fig. 87: the system will
automatically select the operator. In
the event that it is no longer able to
provide an adequate GMS field, it will
seek another administrator (if the ser-
vice is provided by the administrator
itself). In this case, the “Administrator”
graphic key will be OFF.
– Manual fig. 88: operator is chosen
manually. In this case “Operator” icon
key is enabled. If chosen operator is
no longer able to provide an adequate
GSM field, telephone functions will not
be available.
– Preferential: operator is chosen
manually. In this case “Operator” icon
key is enabled, and if chosen operator
is no longer able to provide an ade-
quate GSM field, the system automat-
ically looks for another available op-
erator.
“Operator”
Selecting and confirming “Operator”
key, displays the dialog box “User in-
formation – “Please wait…” until the
operators list is available. Available operators can be selected
in the list.
If network becomes not available,
“Network operator” key is disabled.
89
CONNECT NAV+
fig. 86
F0G3081g
fig. 88
F0G3083g
fig. 87
F0G3082g