clock FIAT IDEA 2010 1.G Owners Manual
[x] Cancel search | Manufacturer: FIAT, Model Year: 2010, Model line: IDEA, Model: FIAT IDEA 2010 1.GPages: 210, PDF Size: 4.4 MB
Page 17 of 210
16
SAFETY
STARTING
AND DRIVING
WARNING
LIGHTS AND
MESSAGES
IN AN
EMERGENCY
MAINTENANCE
AND CARE
TECHNICAL
SPECIFICATIONS
ALPHABETICAL
INDEX
DASHBOARD
AND CONTROLS
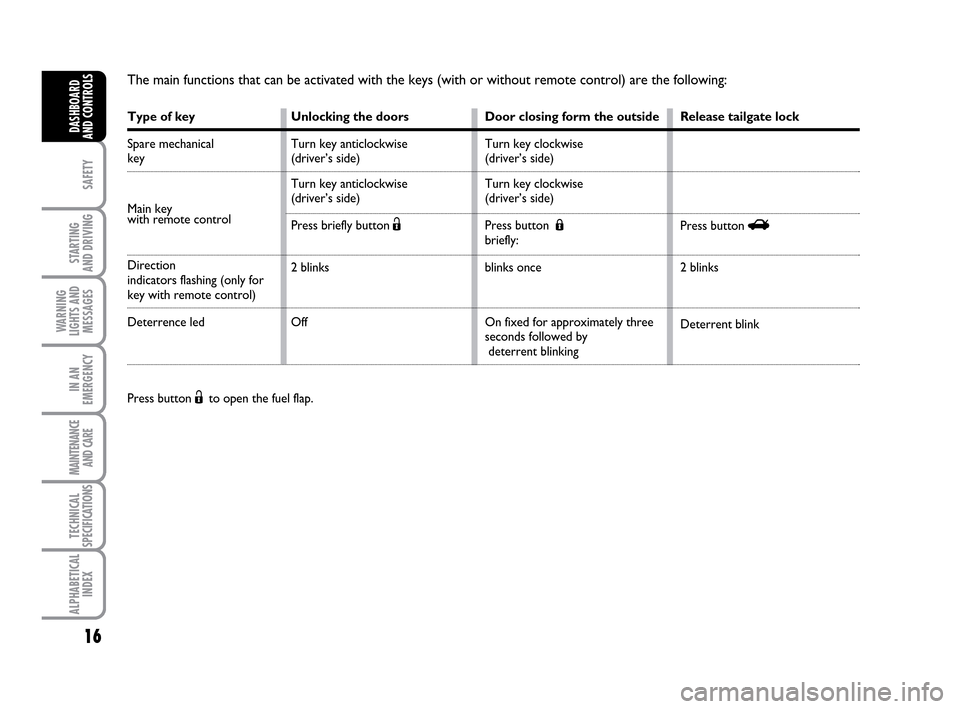
The main functions that can be activated with the keys (with or without remote control) are the following:
Press button Ëto open the fuel flap.
Type of key
Spare mechanical
key
Main key
with remote control
Direction
indicators flashing (only for
key with remote control)
Deterrence led
Release tailgate lock
Press button R
2 blinks
Deterrent blink Unlocking the doors
Turn key anticlockwise
(driver’s side)
Turn key anticlockwise
(driver’s side)
Press briefly button Ë
2 blinks
OffDoor closing form the outside
Turn key clockwise
(driver’s side)
Turn key clockwise
(driver’s side)
Press button Á
briefly:
blinks once
On fixed for approximately three
seconds followed by
deterrent blinking
001-035 LUM IDEA GB 2 ed.qxd 19-01-2010 9:14 Pagina 16
Page 18 of 210
17
SAFETY
STARTING
AND DRIVING
WARNING
LIGHTS AND
MESSAGES
IN AN
EMERGENCY
MAINTENANCE
AND CARE
TECHNICAL
SPECIFICATIONS
ALPHABETICAL
INDEX
DASHBOARD
AND CONTROLS
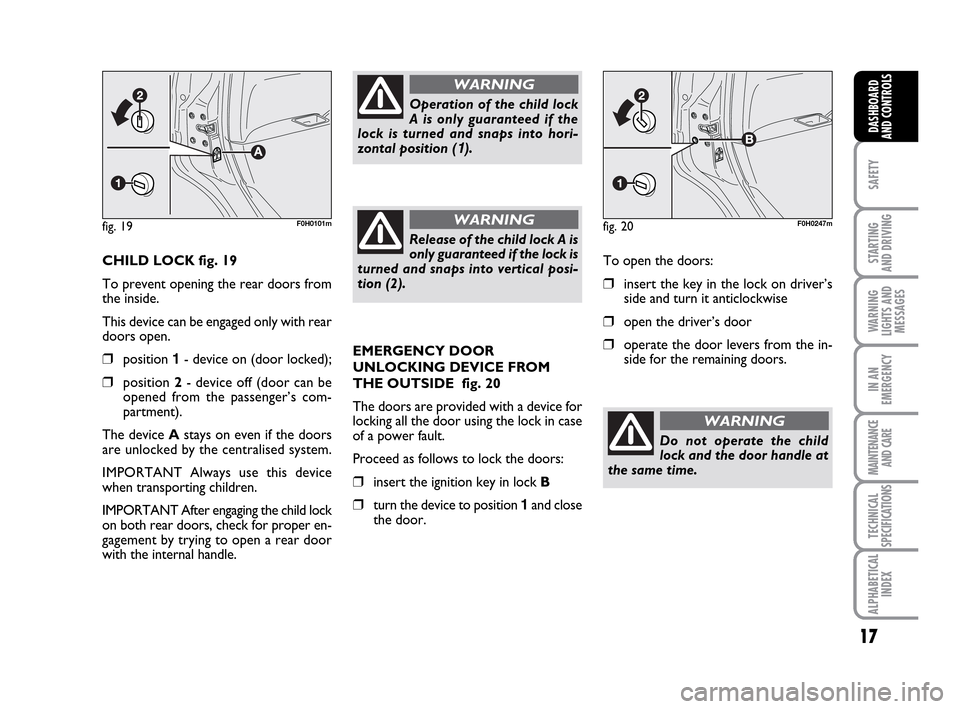
CHILD LOCK fig. 19
To prevent opening the rear doors from
the inside.
This device can be engaged only with rear
doors open.
❒position 1- device on (door locked);
❒position 2- device off (door can be
opened from the passenger’s com-
partment).
The device Astays on even if the doors
are unlocked by the centralised system.
IMPORTANT Always use this device
when transporting children.
IMPORTANT After engaging the child lock
on both rear doors, check for proper en-
gagement by trying to open a rear door
with the internal handle.
Operation of the child lock
A is only guaranteed if the
lock is turned and snaps into hori-
zontal position (
1).
WARNING
Release of the child lock A is
only guaranteed if the lock is
turned and snaps into vertical posi-
tion (2).
WARNINGfig. 19F0H0101m
EMERGENCY DOOR
UNLOCKING DEVICE FROM
THE OUTSIDE fig. 20
The doors are provided with a device for
locking all the door using the lock in case
of a power fault.
Proceed as follows to lock the doors:
❒insert the ignition key in lock B
❒turn the device to position 1and close
the door.To open the doors:
❒insert the key in the lock on driver’s
side and turn it anticlockwise
❒open the driver’s door
❒operate the door levers from the in-
side for the remaining doors.
fig. 20F0H0247m
Do not operate the child
lock and the door handle at
the same time.
WARNING
001-035 LUM IDEA GB 2 ed.qxd 19-01-2010 9:14 Pagina 17
Page 21 of 210
20
SAFETY
STARTING
AND DRIVING
WARNING
LIGHTS AND
MESSAGES
IN AN
EMERGENCY
MAINTENANCE
AND CARE
TECHNICAL
SPECIFICATIONS
ALPHABETICAL
INDEX
DASHBOARD
AND CONTROLS
This shows the temperature of the engine
coolant fluid and starts working when the
fluid temperature exceeds approx. 50°C
circa. In normal conditions, the needle may
point to different positions according to
use and the engine cooling system man-
agement.
IMPORTANT The needle will point to the
lowest value of the scale (low tempera-
ture) and warning light Awill light up to
indicate a fault in the system. Go to a Fi-
at Dealership to have the system checked.
If the needle reaches the red
area, stop the engine imme-
diately and contact a Fiat
Dealership.MULTIFUNCTIONAL
DISPLAY
(on two-line
modal panel)
The car can be equipped with the multi-
function display for showing useful infor-
mation necessary when driving according
to settings.
fig. 26F0H0782m
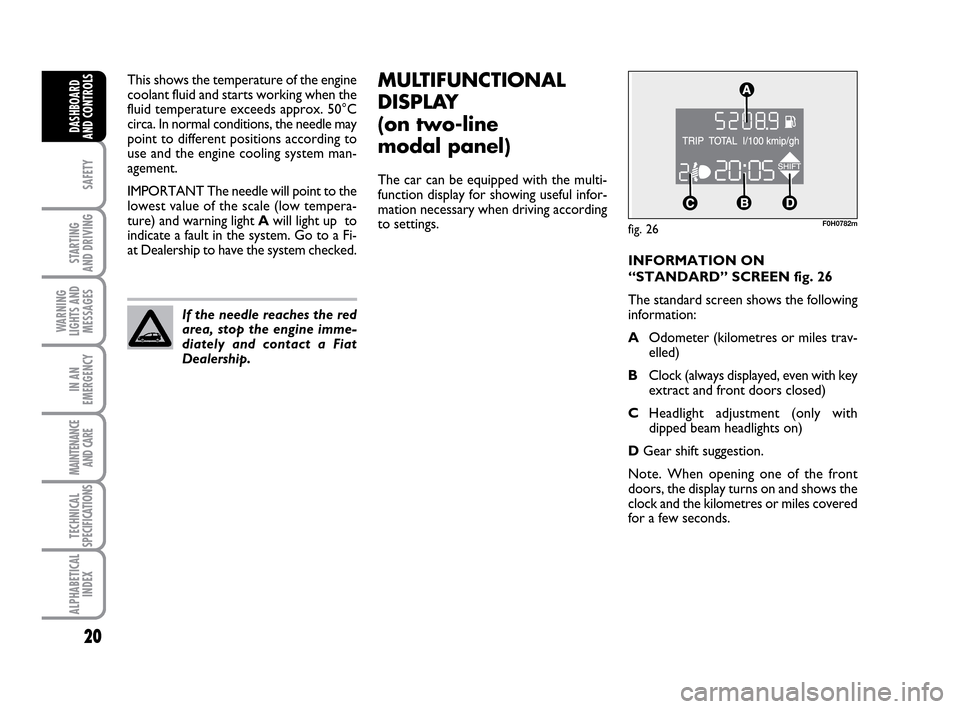
INFORMATION ON
“STANDARD” SCREEN fig. 26
The standard screen shows the following
information:
AOdometer (kilometres or miles trav-
elled)
BClock (always displayed, even with key
extract and front doors closed)
CHeadlight adjustment (only with
dipped beam headlights on)
DGear shift suggestion.
Note. When opening one of the front
doors, the display turns on and shows the
clock and the kilometres or miles covered
for a few seconds.
001-035 LUM IDEA GB 2 ed.qxd 19-01-2010 9:14 Pagina 20
Page 22 of 210
21
SAFETY
STARTING
AND DRIVING
WARNING
LIGHTS AND
MESSAGES
IN AN
EMERGENCY
MAINTENANCE
AND CARE
TECHNICAL
SPECIFICATIONS
ALPHABETICAL
INDEX
DASHBOARD
AND CONTROLS
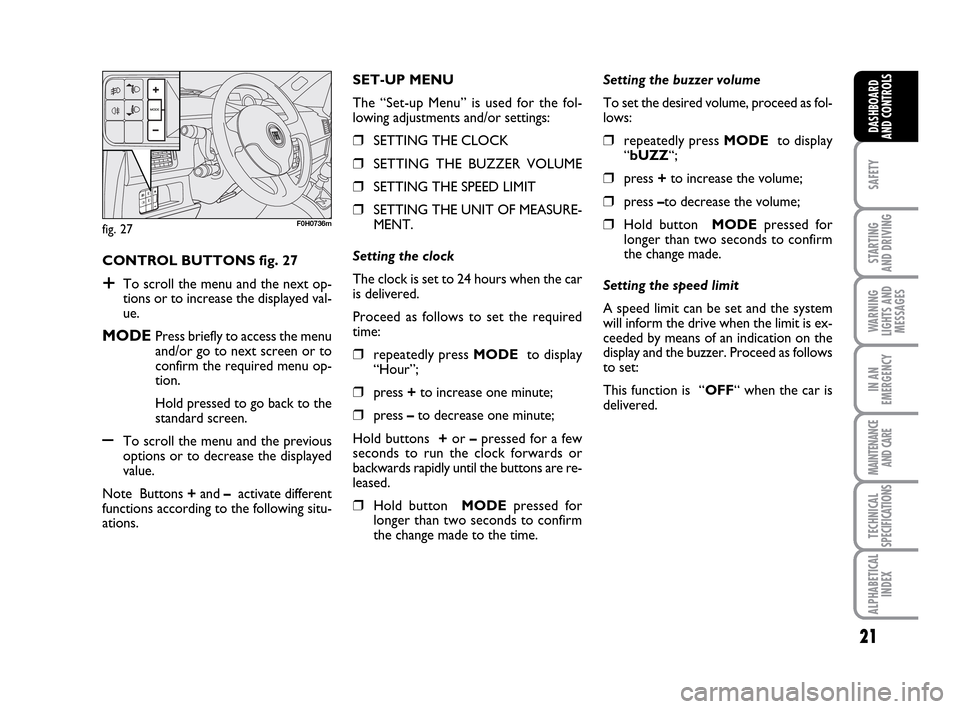
CONTROL BUTTONS fig. 27
+To scroll the menu and the next op-
tions or to increase the displayed val-
ue.
MODEPress briefly to access the menu
and/or go to next screen or to
confirm the required menu op-
tion.
Hold pressed to go back to the
standard screen.
–To scroll the menu and the previous
options or to decrease the displayed
value.
Note Buttons +and –activate different
functions according to the following situ-
ations.Setting the buzzer volume
To set the desired volume, proceed as fol-
lows:
❒repeatedly press MODE to display
“bUZZ“;
❒press +to increase the volume;
❒press –to decrease the volume;
❒Hold button MODEpressed for
longer than two seconds to confirm
the change made.
Setting the speed limit
A speed limit can be set and the system
will inform the drive when the limit is ex-
ceeded by means of an indication on the
display and the buzzer. Proceed as follows
to set:
This function is “OFF“ when the car is
delivered. SET-UP MENU
The “Set-up Menu” is used for the fol-
lowing adjustments and/or settings:
❒SETTING THE CLOCK
❒SETTING THE BUZZER VOLUME
❒SETTING THE SPEED LIMIT
❒SETTING THE UNIT OF MEASURE-
MENT.
Setting the clock
The clock is set to 24 hours when the car
is delivered.
Proceed as follows to set the required
time:
❒repeatedly press MODE to display
“Hour”;
❒press +to increase one minute;
❒press –to decrease one minute;
Hold buttons +or –pressed for a few
seconds to run the clock forwards or
backwards rapidly until the buttons are re-
leased.
❒Hold button MODEpressed for
longer than two seconds to confirm
the change made to the time.
fig. 27F0H0736m
001-035 LUM IDEA GB 2 ed.qxd 19-01-2010 9:14 Pagina 21
Page 24 of 210
23
SAFETY
STARTING
AND DRIVING
WARNING
LIGHTS AND
MESSAGES
IN AN
EMERGENCY
MAINTENANCE
AND CARE
TECHNICAL
SPECIFICATIONS
ALPHABETICAL
INDEX
DASHBOARD
AND CONTROLS
fig. 28F0H0781m
MULTIFUNCTIONAL
DISPLAY
(on three-line comfort
panel)
The car can be equipped with the multi-
function display for showing useful infor-
mation necessary when driving according
to settings.
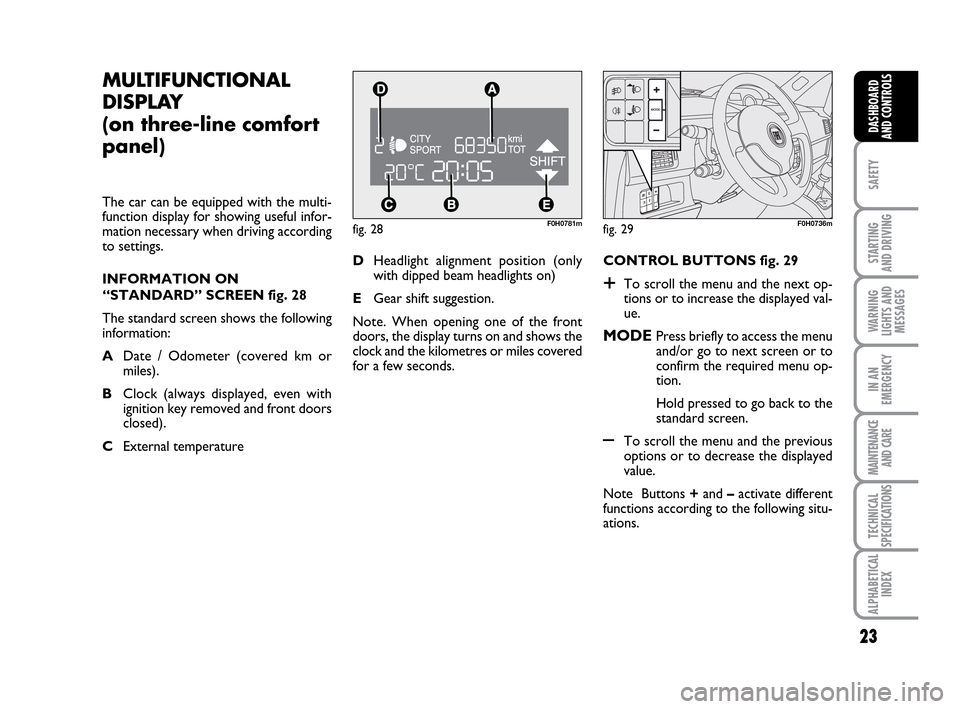
INFORMATION ON
“STANDARD” SCREEN fig. 28
The standard screen shows the following
information:
ADate / Odometer (covered km or
miles).
BClock (always displayed, even with
ignition key removed and front doors
closed).
CExternal temperature CONTROL BUTTONS fig. 29
+To scroll the menu and the next op-
tions or to increase the displayed val-
ue.
MODEPress briefly to access the menu
and/or go to next screen or to
confirm the required menu op-
tion.
Hold pressed to go back to the
standard screen.
–To scroll the menu and the previous
options or to decrease the displayed
value.
Note Buttons +and –activate different
functions according to the following situ-
ations. DHeadlight alignment position (only
with dipped beam headlights on)
EGear shift suggestion.
Note. When opening one of the front
doors, the display turns on and shows the
clock and the kilometres or miles covered
for a few seconds.
fig. 29F0H0736m
001-035 LUM IDEA GB 2 ed.qxd 19-01-2010 9:14 Pagina 23
Page 26 of 210
25
SAFETY
STARTING
AND DRIVING
WARNING
LIGHTS AND
MESSAGES
IN AN
EMERGENCY
MAINTENANCE
AND CARE
TECHNICAL
SPECIFICATIONS
ALPHABETICAL
INDEX
DASHBOARD
AND CONTROLS
Day
YearMonth Example:
CONSUMPTION QUIT MENUSPEED LIMITTRIP B
LIGHT SENS.
CLOCK MODE ECE CLOCK
SET DATE
KEY
UNIT DIST.
BUTTON VOL.
BUZZER VOLUME SERVICE
LANGUAGE TEMP. UNIT
Example:
– +
+– – –
+ +
–
–
+
+++
–––
+ +
–
MODE
button
pressed
briefly
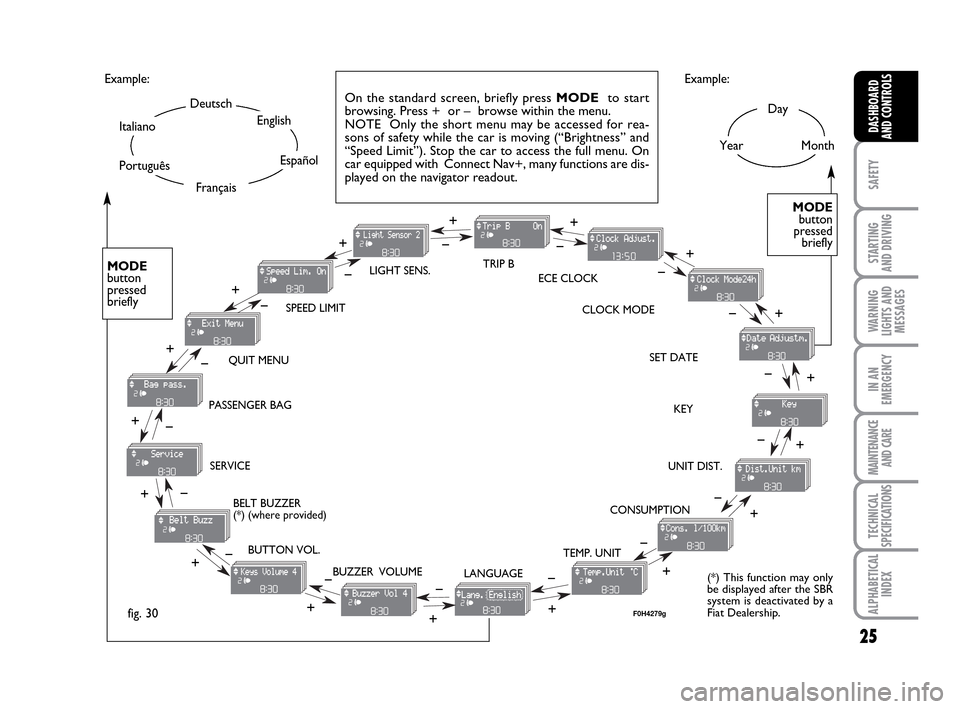
On the standard screen, briefly press MODEto start
browsing. Press + or – browse within the menu.
NOTE Only the short menu may be accessed for rea-
sons of safety while the car is moving (“Brightness” and
“Speed Limit”). Stop the car to access the full menu. On
car equipped with Connect Nav+, many functions are dis-
played on the navigator readout.
–
+ +
–
MODE
button
pressed
briefly
Deutsch
English
Español
Italiano
Português
Français
(*) This function may only
be displayed after the SBR
system is deactivated by a
Fiat Dealership.
fig. 30
+
– +
–+
–
+
–
+ –
BELT BUZZER
(*) (where provided) PASSENGER BAG
F0H4279g
001-035 LUM IDEA GB 2 ed.qxd 19-01-2010 9:14 Pagina 25
Page 28 of 210
27
SAFETY
STARTING
AND DRIVING
WARNING
LIGHTS AND
MESSAGES
IN AN
EMERGENCY
MAINTENANCE
AND CARE
TECHNICAL
SPECIFICATIONS
ALPHABETICAL
INDEX
DASHBOARD
AND CONTROLS
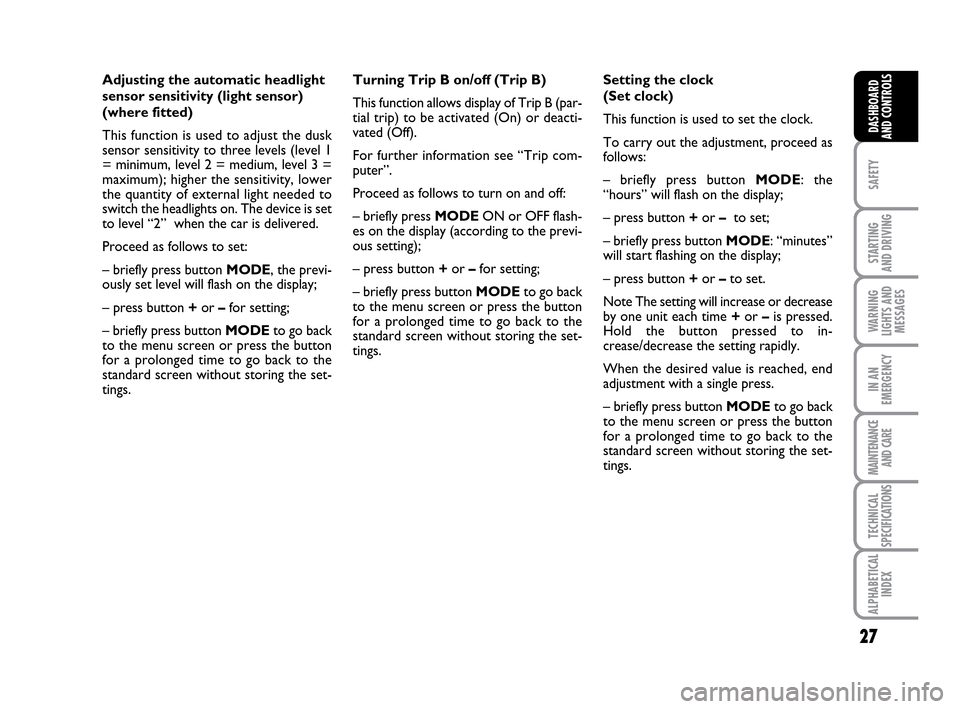
Adjusting the automatic headlight
sensor sensitivity (light sensor)
(where fitted)
This function is used to adjust the dusk
sensor sensitivity to three levels (level 1
= minimum, level 2 = medium, level 3 =
maximum); higher the sensitivity, lower
the quantity of external light needed to
switch the headlights on. The device is set
to level “2” when the car is delivered.
Proceed as follows to set:
– briefly press button MODE, the previ-
ously set level will flash on the display;
– press button +or –for setting;
– briefly press button MODEto go back
to the menu screen or press the button
for a prolonged time to go back to the
standard screen without storing the set-
tings.Turning Trip B on/off (Trip B)
This function allows display of Trip B (par-
tial trip) to be activated (On) or deacti-
vated (Off).
For further information see “Trip com-
puter”.
Proceed as follows to turn on and off:
– briefly press MODEON or OFF flash-
es on the display (according to the previ-
ous setting);
– press button +or –for setting;
– briefly press button MODEto go back
to the menu screen or press the button
for a prolonged time to go back to the
standard screen without storing the set-
tings.Setting the clock
(Set clock)
This function is used to set the clock.
To carry out the adjustment, proceed as
follows:
– briefly press button MODE: the
“hours” will flash on the display;
– press button +or – to set;
– briefly press button MODE: “minutes”
will start flashing on the display;
– press button +or –to set.
Note The setting will increase or decrease
by one unit each time +or –is pressed.
Hold the button pressed to in-
crease/decrease the setting rapidly.
When the desired value is reached, end
adjustment with a single press.
– briefly press button MODEto go back
to the menu screen or press the button
for a prolonged time to go back to the
standard screen without storing the set-
tings.
001-035 LUM IDEA GB 2 ed.qxd 19-01-2010 9:14 Pagina 27
Page 29 of 210
28
SAFETY
STARTING
AND DRIVING
WARNING
LIGHTS AND
MESSAGES
IN AN
EMERGENCY
MAINTENANCE
AND CARE
TECHNICAL
SPECIFICATIONS
ALPHABETICAL
INDEX
DASHBOARD
AND CONTROLS
Unlocking the doors and the
tailgate (key)
This function is used to: unlock the front
and rear doors, unlock the driver’s side
door or all the doors including the tailgate.
Proceed as follows to set:
– briefly press button MODE: “Open
doors”, “Open driver”, “Open all”;
– press button +or –to select. The se-
lected item will blink.
– briefly press button MODEto go back
to the menu screen or press the button
for a prolonged time to go back to the
standard screen without storing the set-
tings. – briefly press button MODE: “day” will
start flashing on the display;
– press button +or –to set;
– briefly press button MODE: “day” will
start flashing on the display;
– press button +or –to set.
Note The setting will increase or decrease
by one unit each time +or –is pressed.
Hold the button pressed to in-
crease/decrease the setting rapidly. When
the desired value is reached, end adjust-
ment with a single press.
– briefly press button MODEto go back
to the menu screen or press the button
for a prolonged time to go back to the
standard screen without storing the set-
tings. 12h/24h clock mode
This function is used to select 12h or 24
h display.
To carry out the adjustment, proceed as
follows:
– briefly press MODE: either 12h or 24h
will start flashing on the display (accord-
ing to the previous setting);
– press button +or –for setting;
– briefly press button MODEto go back
to the menu screen or press the button
for a prolonged time to go back to the
standard screen without storing the set-
tings.
Set date
This function is used to set the date (year
– month – day).
Proceed as follows to update:
– briefly press button MODE: “year” will
start flashing on the display;
– press button +or –to set;
001-035 LUM IDEA GB 2 ed.qxd 19-01-2010 9:14 Pagina 28
Page 38 of 210
37
SAFETY
STARTING
AND DRIVING
WARNING
LIGHTS AND
MESSAGES
IN AN
EMERGENCY
MAINTENANCE
AND CARE
TECHNICAL
SPECIFICATIONS
ALPHABETICAL
INDEX
DASHBOARD
AND CONTROLS
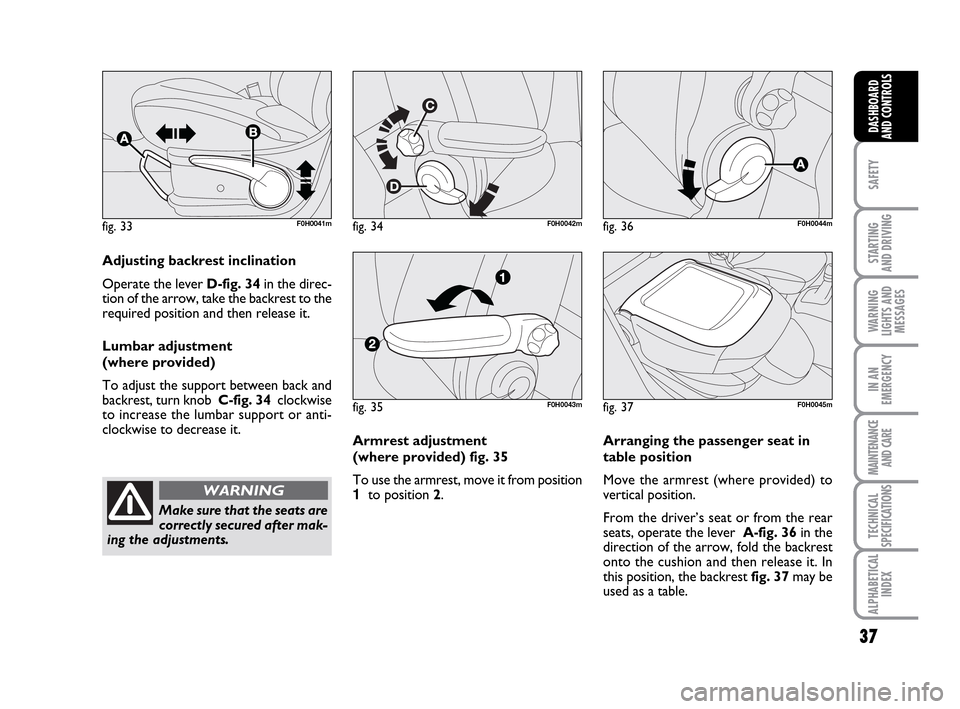
fig. 33F0H0041mfig. 34F0H0042m
Adjusting backrest inclination
Operate the lever D-fig. 34in the direc-
tion of the arrow, take the backrest to the
required position and then release it.
Lumbar adjustment
(where provided)
To adjust the support between back and
backrest, turn knob C-fig. 34clockwise
to increase the lumbar support or anti-
clockwise to decrease it.
Make sure that the seats are
correctly secured after mak-
ing the adjustments.
WARNING
fig. 35F0H0043m
fig. 36F0H0044m
Arranging the passenger seat in
table position
Move the armrest (where provided) to
vertical position.
From the driver’s seat or from the rear
seats, operate the lever A-fig. 36in the
direction of the arrow, fold the backrest
onto the cushion and then release it. In
this position, the backrest fig. 37 may be
used as a table. Armrest adjustment
(where provided) fig. 35
To use the armrest, move it from position
1to position 2.
fig. 37F0H0045m
036-092 LUM IDEA GB 2 ed.qxd 14-01-2010 12:14 Pagina 37
Page 51 of 210
50
SAFETY
STARTING
AND DRIVING
WARNING
LIGHTS AND
MESSAGES
IN AN
EMERGENCY
MAINTENANCE
AND CARE
TECHNICAL
SPECIFICATIONS
ALPHABETICAL
INDEX
DASHBOARD
AND CONTROLS
❒turn ring Eto -or to position ƒif the windows are not demisted.
IMPORTANT The climate control system
is very useful for demisting the windows:
simply pressDto operate the system and
demist the windows.
HEATED REAR WINDOW AND
DOOR MIRROR
DEMISTING/DEFROSTING
(where provided)
Press button C-fig. 61to activate the
function. The LED in the button will light
up when the function is on.
The function is timed and automatically
deactivated by the system after a given
time. Press Cagain to switch it off before.
IMPORTANT Do not apply stickers on
the inside of the rear window over the
heating filaments to avoid damage that
might cause it to stop working properly.AIR CONDITIONING
(cooling and dehumidifying)
Proceed as follows:
❒turn the ring B-fig. 61to the blue
sector to select the temperature;
❒turn knob Ato the required speed;
❒turn the ring Eto «;
❒turn the knob Fto …
❒press button D√(the LED on the but-
ton will light up).
Cooling
Proceed as follows:
❒stop internal air recirculation by turn-
ing knob F-fig. 61to Ú.
❒turn ring Bclockwise to increase the
temperature;
❒turn knob Aanticlockwise to reduce
the fan speed.
LOOKING AFTER THE SYSTEM
Run the climate control system for at least
10 minutes every month during the win-
ter. Have the system inspected at a Fiat
Dealership before the summer.
036-092 LUM IDEA GB 2 ed.qxd 14-01-2010 12:14 Pagina 50