tailgate FIAT IDEA 2010 1.G Owners Manual
[x] Cancel search | Manufacturer: FIAT, Model Year: 2010, Model line: IDEA, Model: FIAT IDEA 2010 1.GPages: 210, PDF Size: 4.4 MB
Page 12 of 210
11
SAFETY
STARTING
AND DRIVING
WARNING
LIGHTS AND
MESSAGES
IN AN
EMERGENCY
MAINTENANCE
AND CARE
TECHNICAL
SPECIFICATIONS
ALPHABETICAL
INDEX
DASHBOARD
AND CONTROLS
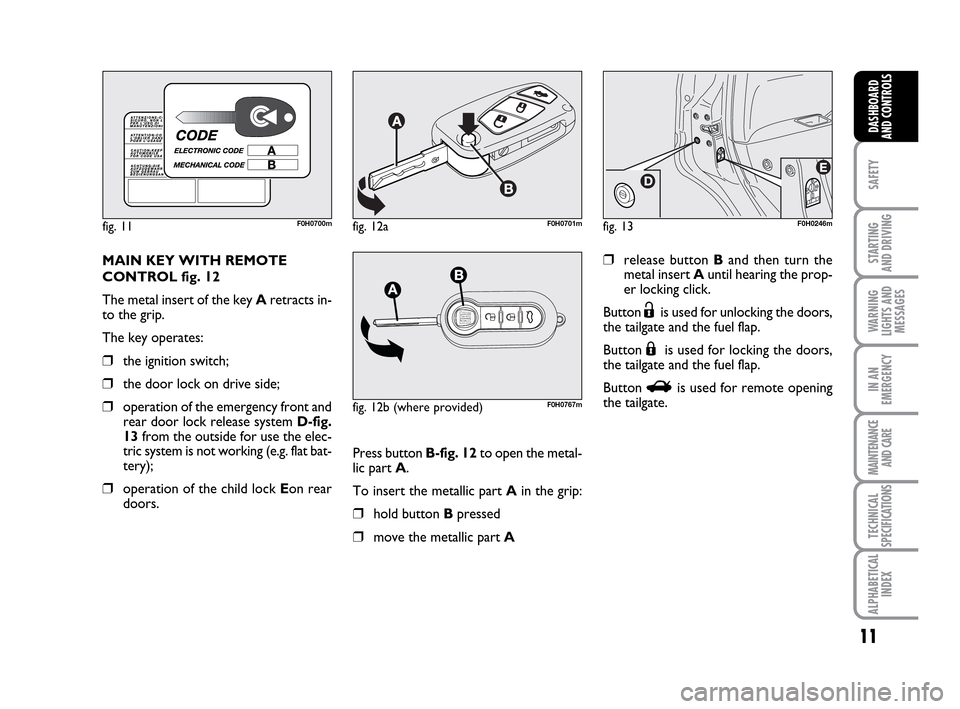
MAIN KEY WITH REMOTE
CONTROL fig. 12
The metal insert of the key Aretracts in-
to the grip.
The key operates:
❒the ignition switch;
❒the door lock on drive side;
❒operation of the emergency front and
rear door lock release system D-fig.
13from the outside for use the elec-
tric system is not working (e.g. flat bat-
tery);
❒operation of the child lock Eon rear
doors.
fig. 11F0H0700m
fig. 12b (where provided)F0H0767m
fig. 13F0H0246m
❒release button Band then turn the
metal insert Auntil hearing the prop-
er locking click.
Button
Ëis used for unlocking the doors,
the tailgate and the fuel flap.
Button
Áis used for locking the doors,
the tailgate and the fuel flap.
Button
Ris used for remote opening
the tailgate.
fig. 12aF0H0701m
Press button B-fig. 12to open the metal-
lic part A.
To insert the metallic part Ain the grip:
❒hold button B pressed
❒move the metallic part A
001-035 LUM IDEA GB 2 ed.qxd 19-01-2010 9:14 Pagina 11
Page 13 of 210
12
SAFETY
STARTING
AND DRIVING
WARNING
LIGHTS AND
MESSAGES
IN AN
EMERGENCY
MAINTENANCE
AND CARE
TECHNICAL
SPECIFICATIONS
ALPHABETICAL
INDEX
DASHBOARD
AND CONTROLS
Unlocking the doors and the
tailgate
Press button
Ëbriefly: this will release the
doors, the tailgate, the fuel flap; the inter-
nal ceiling light will come on and the di-
rection indicators will blink twice.
The doors are automatically unlocked
when the fuel inertia switch trips.
IMPORTANT Powerful radio transmis-
sions not related to the car (e.g. mobile
phones, amateur radios, etc.) may inter-
fere with the frequency of the remote
control. Remote control operation may
be impaired.
Locking the doors and the tailgate
Press button
Ábriefly: this will release the
doors, the tailgate, the fuel flap; the inter-
nal ceiling light will come on and the di-
rection indicators will blink twice.Deterrent LED indications
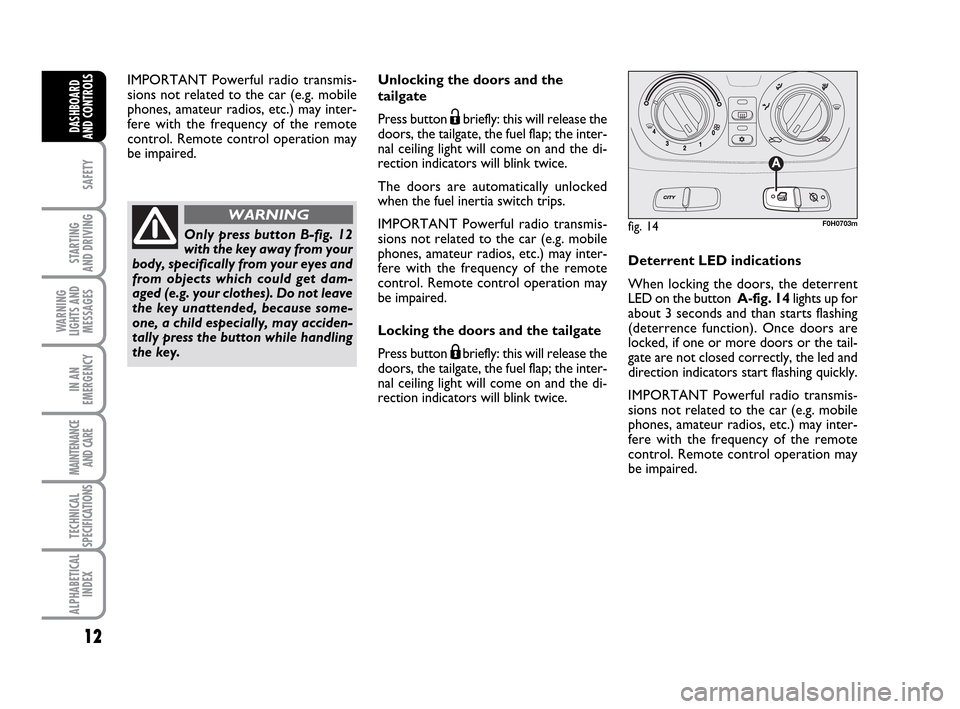
When locking the doors, the deterrent
LED on the button A-fig. 14lights up for
about 3 seconds and than starts flashing
(deterrence function). Once doors are
locked, if one or more doors or the tail-
gate are not closed correctly, the led and
direction indicators start flashing quickly.
IMPORTANT Powerful radio transmis-
sions not related to the car (e.g. mobile
phones, amateur radios, etc.) may inter-
fere with the frequency of the remote
control. Remote control operation may
be impaired.
fig. 14F0H0703m
IMPORTANT Powerful radio transmis-
sions not related to the car (e.g. mobile
phones, amateur radios, etc.) may inter-
fere with the frequency of the remote
control. Remote control operation may
be impaired.
Only press button B-fig. 12
with the key away from your
body, specifically from your eyes and
from objects which could get dam-
aged (e.g. your clothes). Do not leave
the key unattended, because some-
one, a child especially, may acciden-
tally press the button while handling
the key.
WARNING
001-035 LUM IDEA GB 2 ed.qxd 19-01-2010 9:14 Pagina 12
Page 14 of 210
13
SAFETY
STARTING
AND DRIVING
WARNING
LIGHTS AND
MESSAGES
IN AN
EMERGENCY
MAINTENANCE
AND CARE
TECHNICAL
SPECIFICATIONS
ALPHABETICAL
INDEX
DASHBOARD
AND CONTROLS
Opening the tailgate with the
remote control
Hold button
Rpressed to unlock
(open) the tailgate. The direction indica-
tors will blink twice when the tailgate is
opened.
IMPORTANT Powerful radio transmis-
sions not related to the car (e.g. mobile
phones, amateur radios, etc.) may inter-
fere with the frequency of the remote
control. Remote control operation may
be impaired.
Electrical closure from inside
fig. 14
With the doors closed, press button Aon
the central dashboard to lock (LED on) or
unlock (LED off) the doors.
IMPORTANT If the door is not correct-
ly closed or if a fault is present in the sys-
tem, the door locking device from inside
the car will not work.
The device will resume normal operation
after removing the cause of the fault.Only the doors used to get
out of the car will be un-
locked if the door lock button
inside the car is pressed by
mistake. The tailgate will remain
locked. Press the lock/unlock buttons
to realign the system.
fig. 15aF0H0704m
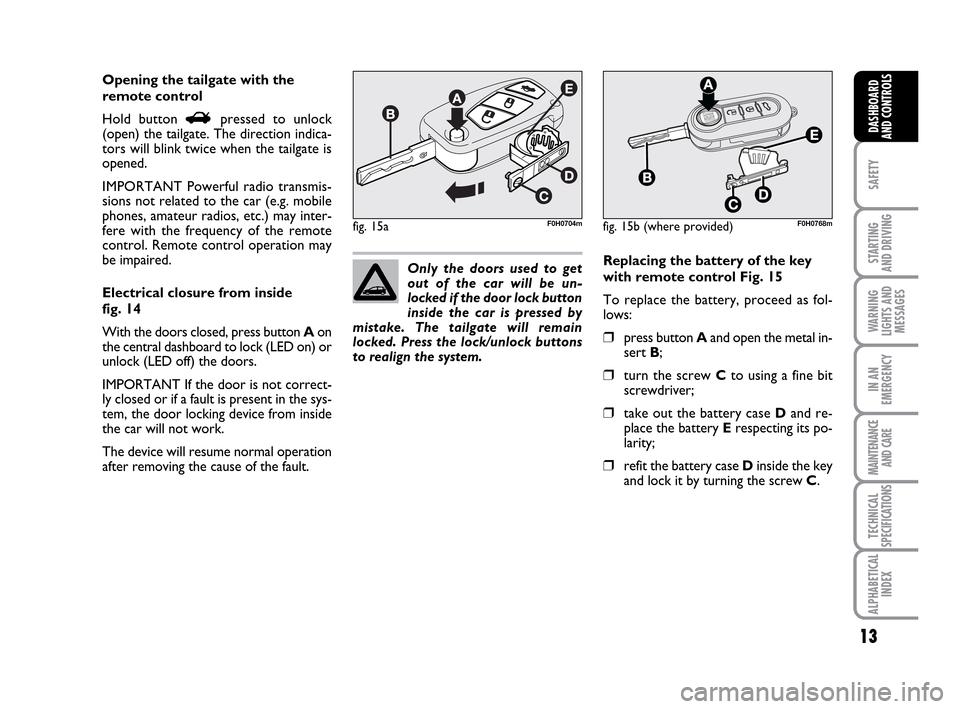
Replacing the battery of the key
with remote control Fig. 15
To replace the battery, proceed as fol-
lows:
❒press button Aand open the metal in-
sert B;
❒turn the screw Cto using a fine bit
screwdriver;
❒take out the battery case Dand re-
place the battery Erespecting its po-
larity;
❒refit the battery case Dinside the key
and lock it by turning the screw C.
fig. 15b (where provided)F0H0768m
001-035 LUM IDEA GB 2 ed.qxd 19-01-2010 9:14 Pagina 13
Page 17 of 210
16
SAFETY
STARTING
AND DRIVING
WARNING
LIGHTS AND
MESSAGES
IN AN
EMERGENCY
MAINTENANCE
AND CARE
TECHNICAL
SPECIFICATIONS
ALPHABETICAL
INDEX
DASHBOARD
AND CONTROLS
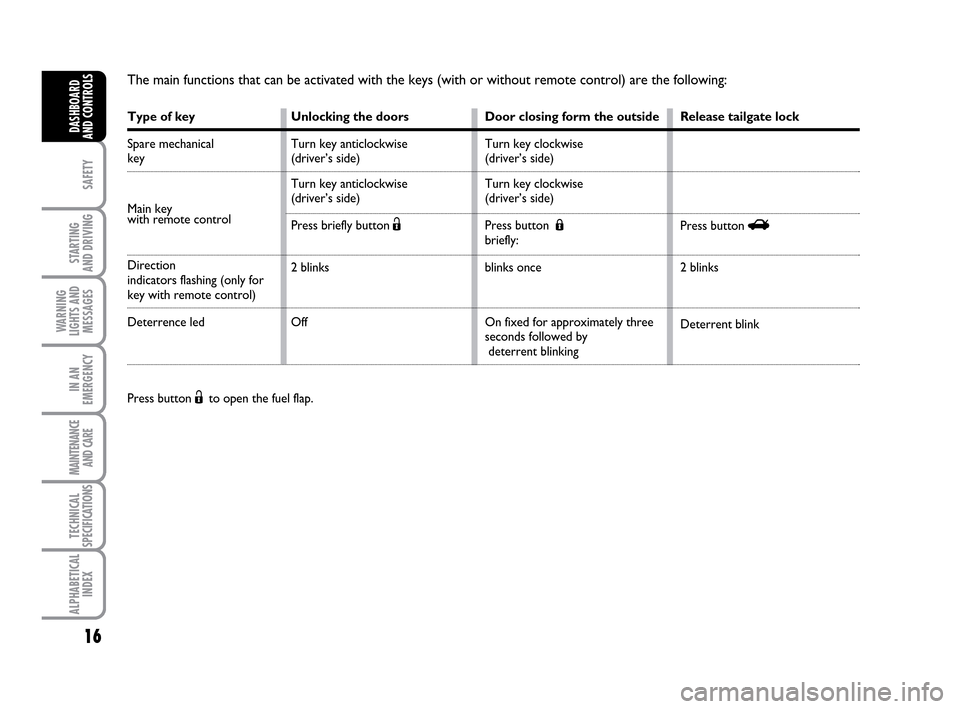
The main functions that can be activated with the keys (with or without remote control) are the following:
Press button Ëto open the fuel flap.
Type of key
Spare mechanical
key
Main key
with remote control
Direction
indicators flashing (only for
key with remote control)
Deterrence led
Release tailgate lock
Press button R
2 blinks
Deterrent blink Unlocking the doors
Turn key anticlockwise
(driver’s side)
Turn key anticlockwise
(driver’s side)
Press briefly button Ë
2 blinks
OffDoor closing form the outside
Turn key clockwise
(driver’s side)
Turn key clockwise
(driver’s side)
Press button Á
briefly:
blinks once
On fixed for approximately three
seconds followed by
deterrent blinking
001-035 LUM IDEA GB 2 ed.qxd 19-01-2010 9:14 Pagina 16
Page 29 of 210
28
SAFETY
STARTING
AND DRIVING
WARNING
LIGHTS AND
MESSAGES
IN AN
EMERGENCY
MAINTENANCE
AND CARE
TECHNICAL
SPECIFICATIONS
ALPHABETICAL
INDEX
DASHBOARD
AND CONTROLS
Unlocking the doors and the
tailgate (key)
This function is used to: unlock the front
and rear doors, unlock the driver’s side
door or all the doors including the tailgate.
Proceed as follows to set:
– briefly press button MODE: “Open
doors”, “Open driver”, “Open all”;
– press button +or –to select. The se-
lected item will blink.
– briefly press button MODEto go back
to the menu screen or press the button
for a prolonged time to go back to the
standard screen without storing the set-
tings. – briefly press button MODE: “day” will
start flashing on the display;
– press button +or –to set;
– briefly press button MODE: “day” will
start flashing on the display;
– press button +or –to set.
Note The setting will increase or decrease
by one unit each time +or –is pressed.
Hold the button pressed to in-
crease/decrease the setting rapidly. When
the desired value is reached, end adjust-
ment with a single press.
– briefly press button MODEto go back
to the menu screen or press the button
for a prolonged time to go back to the
standard screen without storing the set-
tings. 12h/24h clock mode
This function is used to select 12h or 24
h display.
To carry out the adjustment, proceed as
follows:
– briefly press MODE: either 12h or 24h
will start flashing on the display (accord-
ing to the previous setting);
– press button +or –for setting;
– briefly press button MODEto go back
to the menu screen or press the button
for a prolonged time to go back to the
standard screen without storing the set-
tings.
Set date
This function is used to set the date (year
– month – day).
Proceed as follows to update:
– briefly press button MODE: “year” will
start flashing on the display;
– press button +or –to set;
001-035 LUM IDEA GB 2 ed.qxd 19-01-2010 9:14 Pagina 28
Page 77 of 210
76
SAFETY
STARTING
AND DRIVING
WARNING
LIGHTS AND
MESSAGES
IN AN
EMERGENCY
MAINTENANCE
AND CARE
TECHNICAL
SPECIFICATIONS
ALPHABETICAL
INDEX
DASHBOARD
AND CONTROLS
BOOT
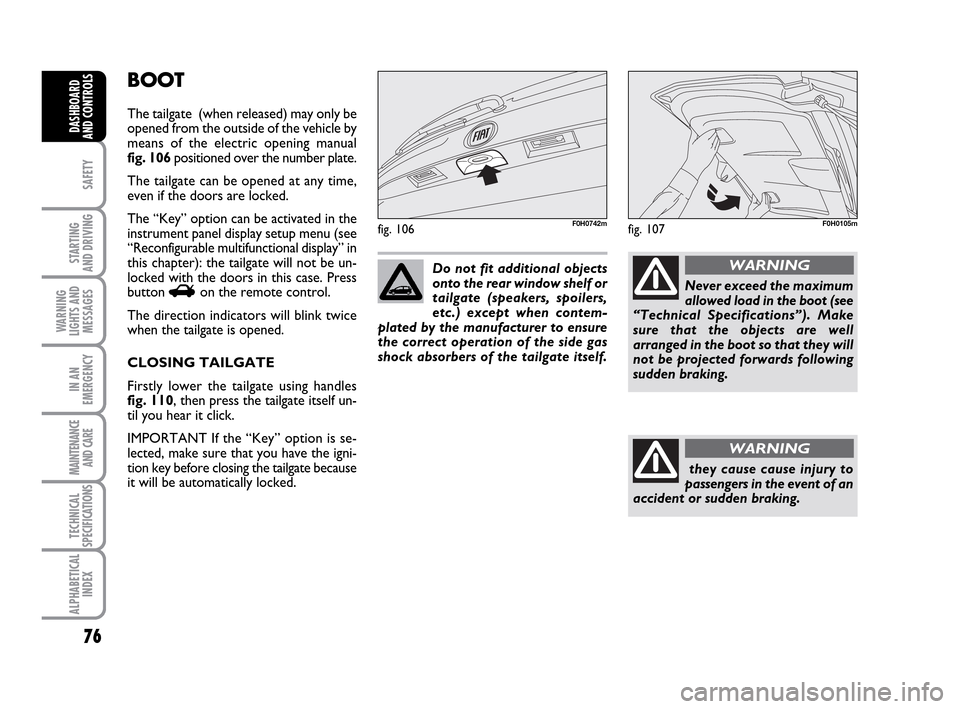
The tailgate (when released) may only be
opened from the outside of the vehicle by
means of the electric opening manual
fig. 106 positioned over the number plate.
The tailgate can be opened at any time,
even if the doors are locked.
The “Key” option can be activated in the
instrument panel display setup menu (see
“Reconfigurable multifunctional display” in
this chapter): the tailgate will not be un-
locked with the doors in this case. Press
button
Ron the remote control.
The direction indicators will blink twice
when the tailgate is opened.
CLOSING TAILGATE
Firstly lower the tailgate using handles
fig. 110, then press the tailgate itself un-
til you hear it click.
IMPORTANT If the “Key” option is se-
lected, make sure that you have the igni-
tion key before closing the tailgate because
it will be automatically locked.
fig. 106F0H0742m
Do not fit additional objects
onto the rear window shelf or
tailgate (speakers, spoilers,
etc.) except when contem-
plated by the manufacturer to ensure
the correct operation of the side gas
shock absorbers of the tailgate itself.
Never exceed the maximum
allowed load in the boot (see
“Technical Specifications”). Make
sure that the objects are well
arranged in the boot so that they will
not be projected forwards following
sudden braking.
WARNING
they cause cause injury to
passengers in the event of an
accident or sudden braking.
WARNING
fig. 107F0H0105m
036-092 LUM IDEA GB 2 ed.qxd 14-01-2010 12:15 Pagina 76
Page 78 of 210
77
SAFETY
STARTING
AND DRIVING
WARNING
LIGHTS AND
MESSAGES
IN AN
EMERGENCY
MAINTENANCE
AND CARE
TECHNICAL
SPECIFICATIONS
ALPHABETICAL
INDEX
DASHBOARD
AND CONTROLS
EMERGENCY TAILGATE
OPENING
To open the tailgate from the inside, if the
battery is run down or after a problem in
the actual tailgate electric lock, proceed
as follows:
❒remove the protective caps;
❒fold the backrests to table position;
❒fold the rear seat cushion/backrest
completely;
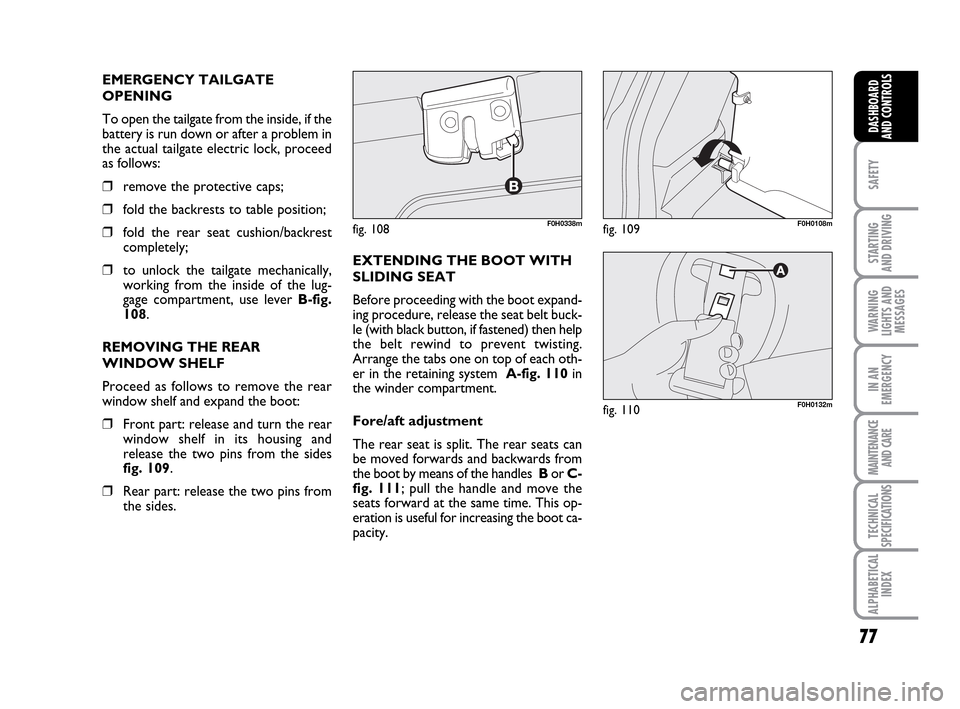
❒to unlock the tailgate mechanically,
working from the inside of the lug-
gage compartment, use lever B-fig.
108.
REMOVING THE REAR
WINDOW SHELF
Proceed as follows to remove the rear
window shelf and expand the boot:
❒Front part: release and turn the rear
window shelf in its housing and
release the two pins from the sides
fig. 109.
❒Rear part: release the two pins from
the sides.EXTENDING THE BOOT WITH
SLIDING SEAT
Before proceeding with the boot expand-
ing procedure, release the seat belt buck-
le (with black button, if fastened) then help
the belt rewind to prevent twisting.
Arrange the tabs one on top of each oth-
er in the retaining system A-fig. 110in
the winder compartment.
Fore/aft adjustment
The rear seat is split. The rear seats can
be moved forwards and backwards from
the boot by means of the handles Bor C-
fig. 111; pull the handle and move the
seats forward at the same time. This op-
eration is useful for increasing the boot ca-
pacity.
fig. 108F0H0338mfig. 109F0H0108m
fig. 110F0H0132m
036-092 LUM IDEA GB 2 ed.qxd 14-01-2010 12:15 Pagina 77
Page 128 of 210
127
STARTING
AND DRIVING
IN AN
EMERGENCY
MAINTENANCE
AND CARE
TECHNICAL
SPECIFICATIONS
ALPHABETICAL
INDEX
DASHBOARD
AND
CONTROLS
SAFETY
WARNING
LIGHTS AND
MESSAGES
“DUALDRIVE”
ELECTRIC POWER
STEERING SYSTEM
(red)
This warning light comes on when the ig-
nition key is turned to MAR, but it should
go off after a few seconds.
The electric power steering system will
not work when the warning light is on and
considerably more effort is needed on the
steering wheel. The car can still be
steered: Go to a Fiat Dealership.
The display will show the dedicated mes-
sage.
g
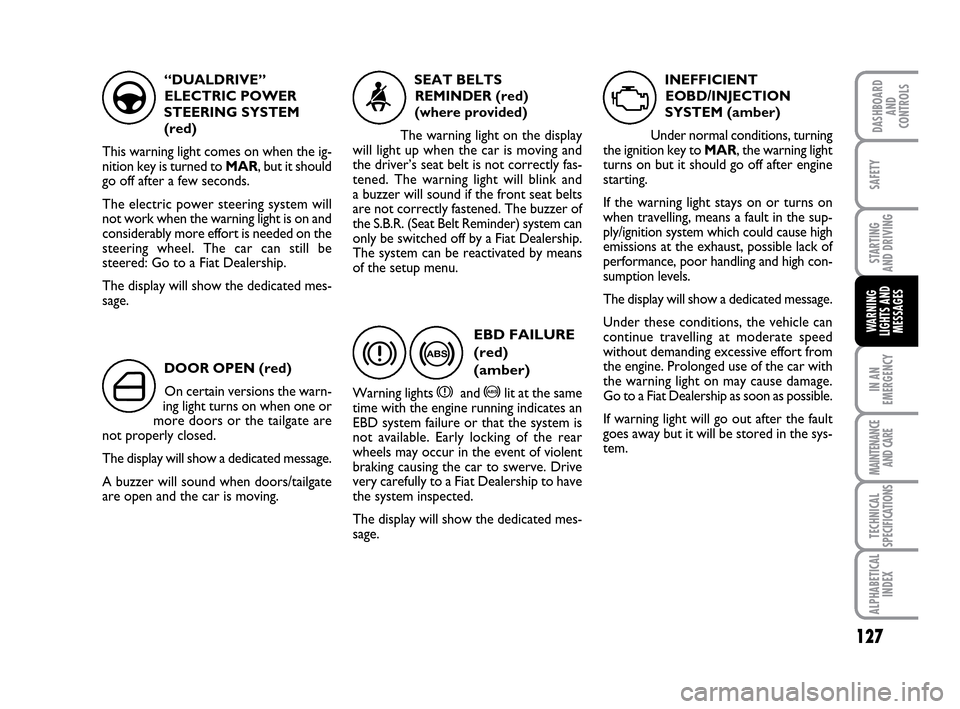
DOOR OPEN (red)
On certain versions the warn-
ing light turns on when one or
more doors or the tailgate are
not properly closed.
The display will show a dedicated message.
A buzzer will sound when doors/tailgate
are open and the car is moving.
´
SEAT BELTS
REMINDER (red)
(where provided)
The warning light on the display
will light up when the car is moving and
the driver’s seat belt is not correctly fas-
tened. The warning light will blink and
a buzzer will sound if the front seat belts
are not correctly fastened. The buzzer of
the S.B.R. (Seat Belt Reminder) system can
only be switched off by a Fiat Dealership.
The system can be reactivated by means
of the setup menu.
<
>
EBD FAILURE
(red)
(amber)
Warning lights xand >lit at the same
time with the engine running indicates an
EBD system failure or that the system is
not available. Early locking of the rear
wheels may occur in the event of violent
braking causing the car to swerve. Drive
very carefully to a Fiat Dealership to have
the system inspected.
The display will show the dedicated mes-
sage.
x
INEFFICIENT
EOBD/INJECTION
SYSTEM (amber)
Under normal conditions, turning
the ignition key to MAR, the warning light
turns on but it should go off after engine
starting.
If the warning light stays on or turns on
when travelling, means a fault in the sup-
ply/ignition system which could cause high
emissions at the exhaust, possible lack of
performance, poor handling and high con-
sumption levels.
The display will show a dedicated message.
Under these conditions, the vehicle can
continue travelling at moderate speed
without demanding excessive effort from
the engine. Prolonged use of the car with
the warning light on may cause damage.
Go to a Fiat Dealership as soon as possible.
If warning light will go out after the fault
goes away but it will be stored in the sys-
tem.
U
123-132 LUM IDEA GB 2 ed.qxd 14-01-2010 13:47 Pagina 127
Page 151 of 210
150
STARTING
AND DRIVING
MAINTENANCE
AND CARE
TECHNICAL
SPECIFICATIONS
ALPHABETICAL
INDEX
DASHBOARD
AND
CONTROLS
SAFETY
WARNING
LIGHTS AND
MESSAGES
IN AN
EMERGENCY
fig. 27F0H0187mfig. 28F0H0188m
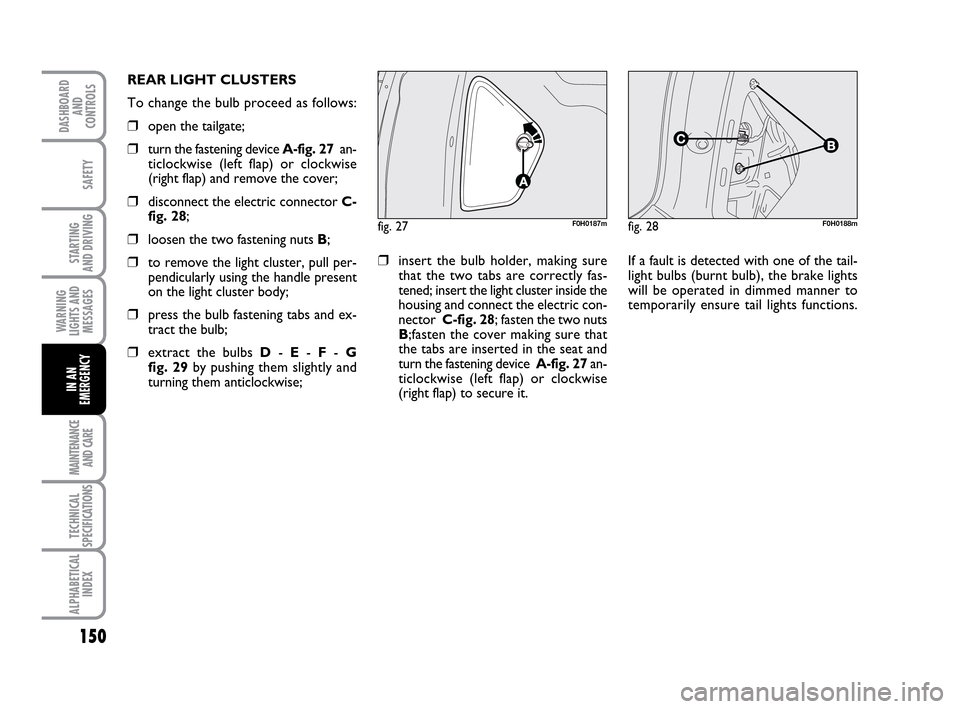
REAR LIGHT CLUSTERS
To change the bulb proceed as follows:
❒open the tailgate;
❒turn the fastening device A-fig. 27an-
ticlockwise (left flap) or clockwise
(right flap) and remove the cover;
❒disconnect the electric connector C-
fig. 28;
❒loosen the two fastening nuts B;
❒to remove the light cluster, pull per-
pendicularly using the handle present
on the light cluster body;
❒press the bulb fastening tabs and ex-
tract the bulb;
❒extract the bulbs D- E- F- G
fig. 29by pushing them slightly and
turning them anticlockwise;
❒insert the bulb holder, making sure
that the two tabs are correctly fas-
tened; insert the light cluster inside the
housing and connect the electric con-
nector C-fig. 28; fasten the two nuts
B;fasten the cover making sure that
the tabs are inserted in the seat and
turn the fastening device A-fig. 27an-
ticlockwise (left flap) or clockwise
(right flap) to secure it. If a fault is detected with one of the tail-
light bulbs (burnt bulb), the brake lights
will be operated in dimmed manner to
temporarily ensure tail lights functions.
133-160 LUM IDEA GB 2 ed.qxd 14-01-2010 13:50 Pagina 150
Page 152 of 210
151
STARTING
AND DRIVING
MAINTENANCE
AND CARE
TECHNICAL
SPECIFICATIONS
ALPHABETICAL
INDEX
DASHBOARD
AND
CONTROLS
SAFETY
WARNING
LIGHTS AND
MESSAGES
IN AN
EMERGENCY
The tail lights will resume normal opera-
tion when the burnt bulb is replaced.
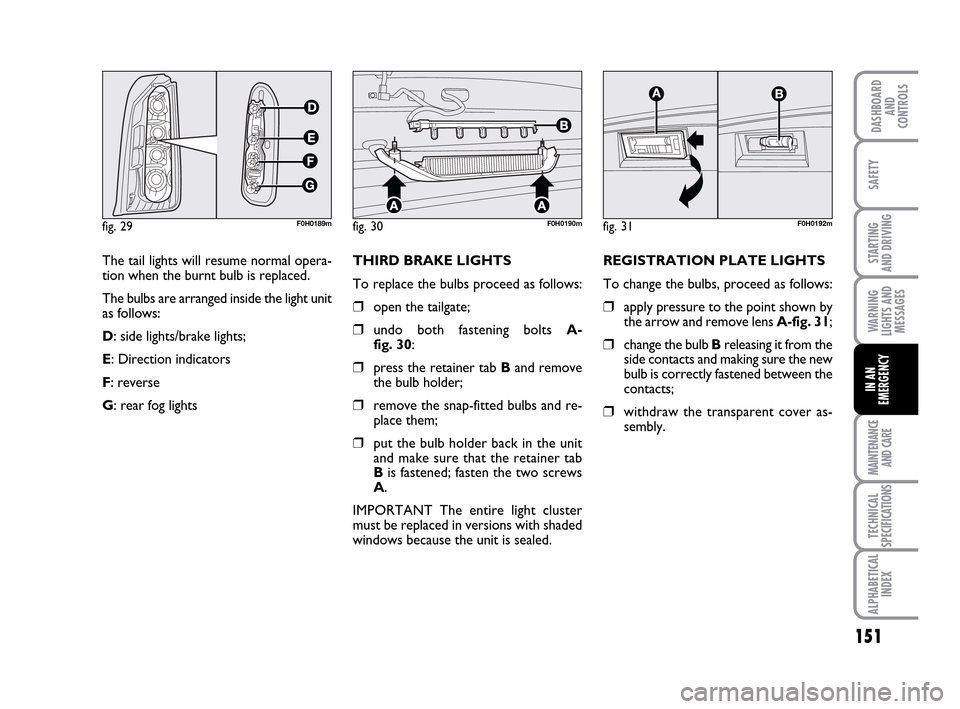
The bulbs are arranged inside the light unit
as follows:
D: side lights/brake lights;
E: Direction indicators
F: reverse
G: rear fog lights
fig. 29F0H0189mfig. 30F0H0190m
THIRD BRAKE LIGHTS
To replace the bulbs proceed as follows:
❒open the tailgate;
❒undo both fastening bolts A-
fig. 30:
❒press the retainer tab Band remove
the bulb holder;
❒remove the snap-fitted bulbs and re-
place them;
❒put the bulb holder back in the unit
and make sure that the retainer tab
Bis fastened; fasten the two screws
A.
IMPORTANT The entire light cluster
must be replaced in versions with shaded
windows because the unit is sealed.REGISTRATION PLATE LIGHTS
To change the bulbs, proceed as follows:
❒apply pressure to the point shown by
the arrow and remove lens A-fig. 31;
❒change the bulb B releasing it from the
side contacts and making sure the new
bulb is correctly fastened between the
contacts;
❒withdraw the transparent cover as-
sembly.
fig. 31F0H0192m
133-160 LUM IDEA GB 2 ed.qxd 14-01-2010 13:50 Pagina 151