set clock FIAT LINEA 2007 1.G Owners Manual
[x] Cancel search | Manufacturer: FIAT, Model Year: 2007, Model line: LINEA, Model: FIAT LINEA 2007 1.GPages: 230, PDF Size: 3.31 MB
Page 19 of 230
18
SAFETY
DEVICES
CORRECT USE
OF THE
CAR
WARNING
LIGHTS AND
MESSAGES
IN AN
EMERGENCY
CAR
MAINTENANCE
TECHNICAL
SPECIFICATIONS
INDEX
DASHBOARD
AND CONTROLS
DIGITAL DISPLAY
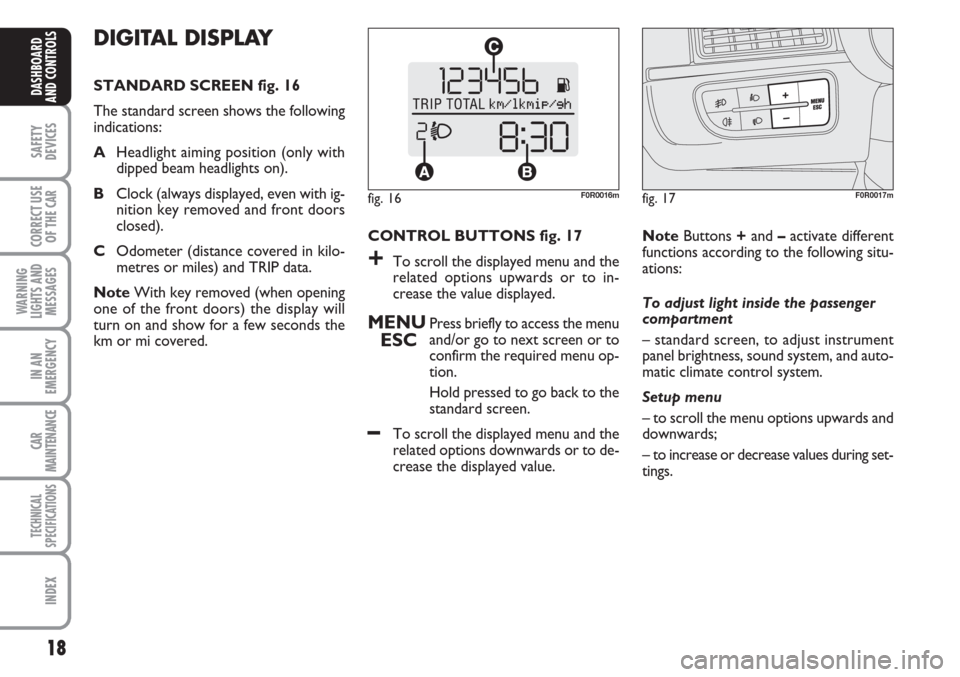
STANDARD SCREEN fig. 16
The standard screen shows the following
indications:
AHeadlight aiming position (only with
dipped beam headlights on).
BClock (always displayed, even with ig-
nition key removed and front doors
closed).
COdometer (distance covered in kilo-
metres or miles) and TRIP data.
NoteWith key removed (when opening
one of the front doors) the display will
turn on and show for a few seconds the
km or mi covered.CONTROL BUTTONS fig. 17
+To scroll the displayed menu and the
related options upwards or to in-
crease the value displayed.
MENU
ESCPress briefly to access the menu
and/or go to next screen or to
confirm the required menu op-
tion.
Hold pressed to go back to the
standard screen.
–To scroll the displayed menu and the
related options downwards or to de-
crease the displayed value. NoteButtons +and –activate different
functions according to the following situ-
ations:
To adjust light inside the passenger
compartment
– standard screen, to adjust instrument
panel brightness, sound system, and auto-
matic climate control system.
Setup menu
– to scroll the menu options upwards and
downwards;
– to increase or decrease values during set-
tings.
fig. 16F0R0016mfig. 17F0R0017m
Page 20 of 230
19
SAFETY
DEVICES
CORRECT USE
OF THE
CAR
WARNING
LIGHTS AND
MESSAGES
IN AN
EMERGENCY
CAR
MAINTENANCE
TECHNICAL
SPECIFICATIONS
INDEX
DASHBOARD
AND CONTROLS
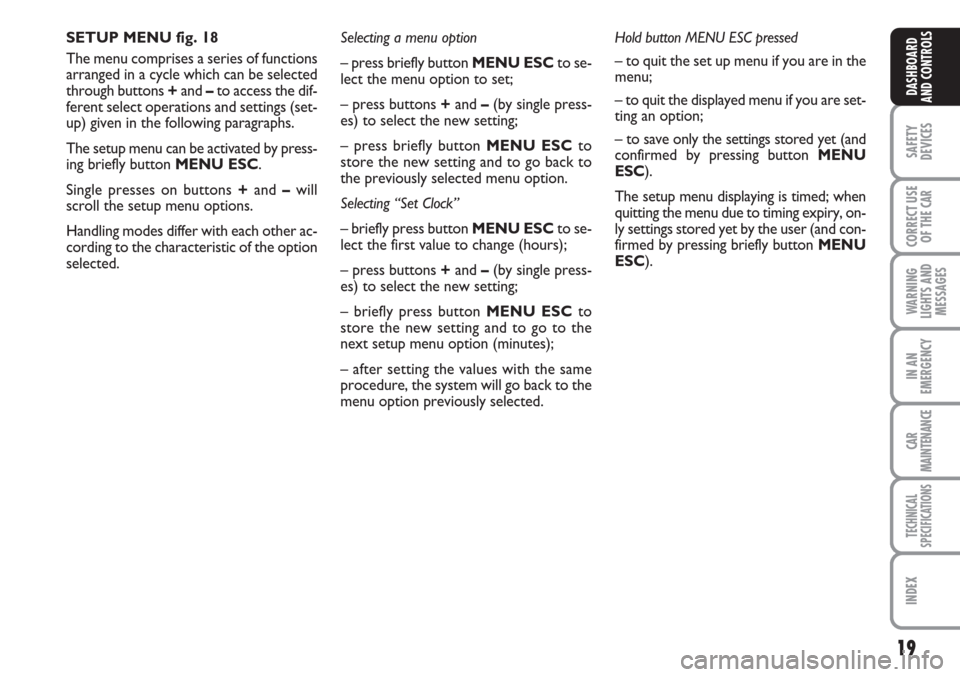
SETUP MENU fig. 18
The menu comprises a series of functions
arranged in a cycle which can be selected
through buttons +and –to access the dif-
ferent select operations and settings (set-
up) given in the following paragraphs.
The setup menu can be activated by press-
ing briefly button MENU ESC.
Single presses on buttons +and –will
scroll the setup menu options.
Handling modes differ with each other ac-
cording to the characteristic of the option
selected.Selecting a menu option
– press briefly button MENU ESCto se-
lect the menu option to set;
– press buttons +and –(by single press-
es) to select the new setting;
– press briefly button MENU ESCto
store the new setting and to go back to
the previously selected menu option.
Selecting “Set Clock”
– briefly press button MENU ESCto se-
lect the first value to change (hours);
– press buttons +and –(by single press-
es) to select the new setting;
– briefly press button MENU ESCto
store the new setting and to go to the
next setup menu option (minutes);
– after setting the values with the same
procedure, the system will go back to the
menu option previously selected.Hold button MENU ESC pressed
– to quit the set up menu if you are in the
menu;
– to quit the displayed menu if you are set-
ting an option;
– to save only the settings stored yet (and
confirmed by pressing button MENU
ESC).
The setup menu displaying is timed; when
quitting the menu due to timing expiry, on-
ly settings stored yet by the user (and con-
firmed by pressing briefly button MENU
ESC).
Page 22 of 230
21
SAFETY
DEVICES
CORRECT USE
OF THE
CAR
WARNING
LIGHTS AND
MESSAGES
IN AN
EMERGENCY
CAR
MAINTENANCE
TECHNICAL
SPECIFICATIONS
INDEX
DASHBOARD
AND CONTROLS
Setting the speed limit (SPEEd)
This function may be used to set the car
speed limit (km/h or mph), when this lim-
it is exceeded the driver is immediately
alerted (see section “Warning lights and
messages”).
To set the speed limit, proceed as follows:
– briefly press button MENU ESC, the
message (SPEEd) and the previously set
unit (km/h) or (mph) will appear on the
display;
– press button+or –to activate (on) or
deactivate (OFF) the speed limit function;
– if the function is on, press buttons +or
–to select the required speed limit and
then press MENU ESCto confirm;
NoteThe speed may be set in the range
from 30 to 200 km/h, or from 20 to 125
mph according to the previously chosen
unit (see “Setting the distance unit”) de-
scribed below. The setting will in-
crease/decrease by five units each time
button +/–is pressed. Hold button +/–
pressed to increase/decrease the setting
rapidly. Complete the setting by briefly
pressing the button when you approach
the required setting.– briefly press button MENU ESCto go
back to the menu screen or press the but-
ton for long to go back to the standard
screen without storing settings.To cancel
the setting, proceed as follows:
– briefly press button MENU ESC: (On)
will blink on the display;
– press button –: (Off) will blink on the
display;
– briefly press button MENU ESCto go
back to the menu screen or press the but-
ton for long to go back to the standard
screen without storing settings.
Setting the clock (Hour)
This function is used to set the clock.
Proceed as follows:
– briefly press button MENU ESC,
“hours” will flash on the display;
– press button +or –for setting;
– briefly press button MENU ESC, “min-
utes” will flash on the display;
– press button +or –for setting;
– briefly press button MENU ESCto go
back to the menu screen or press the but-
ton for long to go back to the standard
screen without storing settings.Adjusting the buzzer volume
(bUZZ)
This function is used to adjust the buzzer
volume used for failure/warning indica-
tions and when MENU ESC,+and –
buttons are pressed.
To adjust the volume proceed as follows:
– briefly press button MENU ESC, the
display will show the wording (bUZZ);
– press button +or –to select the re-
quired volume (volume can be adjusted ac-
cording to 8 levels).
– briefly press button MENU ESCto go
back to the menu screen or press the but-
ton for long to go back to the standard
screen without storing settings.
Page 24 of 230
23
SAFETY
DEVICES
CORRECT USE
OF THE
CAR
WARNING
LIGHTS AND
MESSAGES
IN AN
EMERGENCY
CAR
MAINTENANCE
TECHNICAL
SPECIFICATIONS
INDEX
DASHBOARD
AND CONTROLS
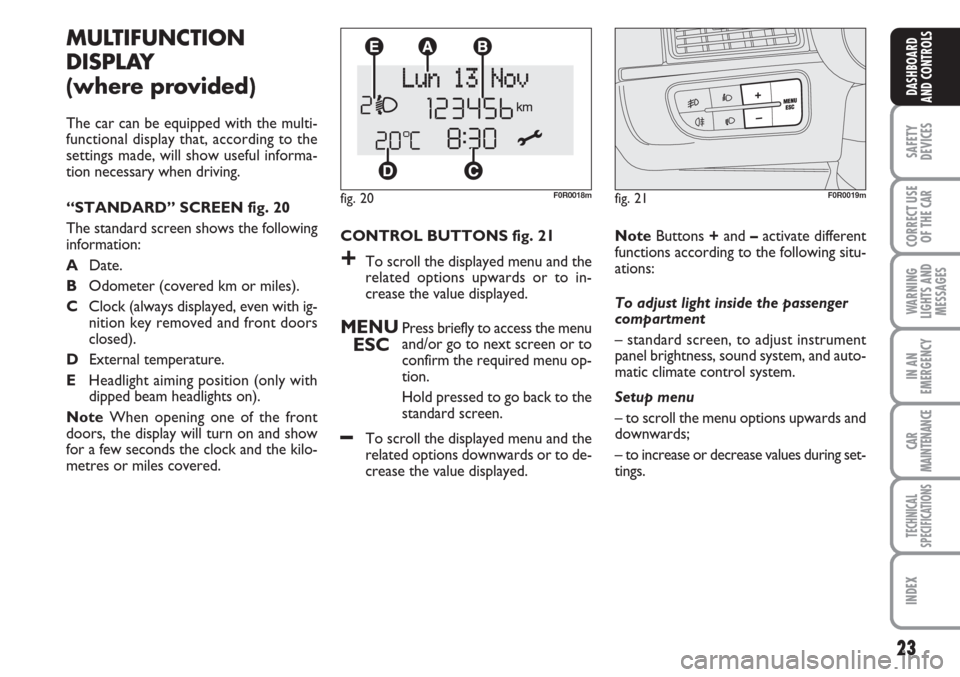
CONTROL BUTTONS fig. 21
+To scroll the displayed menu and the
related options upwards or to in-
crease the value displayed.
MENU
ESCPress briefly to access the menu
and/or go to next screen or to
confirm the required menu op-
tion.
Hold pressed to go back to the
standard screen.
–To scroll the displayed menu and the
related options downwards or to de-
crease the value displayed.
MULTIFUNCTION
DISPLAY
(where provided)
The car can be equipped with the multi-
functional display that, according to the
settings made, will show useful informa-
tion necessary when driving.
“STANDARD” SCREEN fig. 20
The standard screen shows the following
information:
ADate.
BOdometer (covered km or miles).
CClock (always displayed, even with ig-
nition key removed and front doors
closed).
DExternal temperature.
EHeadlight aiming position (only with
dipped beam headlights on).
NoteWhen opening one of the front
doors, the display will turn on and show
for a few seconds the clock and the kilo-
metres or miles covered.
fig. 20F0R0018m
NoteButtons +and –activate different
functions according to the following situ-
ations:
To adjust light inside the passenger
compartment
– standard screen, to adjust instrument
panel brightness, sound system, and auto-
matic climate control system.
Setup menu
– to scroll the menu options upwards and
downwards;
– to increase or decrease values during set-
tings.
fig. 21F0R0019m
Page 25 of 230
24
SAFETY
DEVICES
CORRECT USE
OF THE
CAR
WARNING
LIGHTS AND
MESSAGES
IN AN
EMERGENCY
CAR
MAINTENANCE
TECHNICAL
SPECIFICATIONS
INDEX
DASHBOARD
AND CONTROLS
SETUP MENU fig. 22
The menu comprises a series of functions
arranged in a cycle which can be selected
through buttons +and –to access the dif-
ferent select operations and settings (set-
up) given in the following paragraphs. A
submenu is provided for some items
(Clock and Unit setting).
The setup menu can be activated by press-
ing briefly button MENU ESC.
Single presses on buttons +or –will scroll
the setup menu options.
Handling modes differ with each other ac-
cording to the characteristic of the option
selected.
Selecting an option of the main menu with-
out submenu
– press briefly button MENU ESCto se-
lect the main menu option to set;
– press buttons +or –(by single press-
es) to select the new setting;
– press briefly button MENU ESCto
store the new setting and to go back to
the main menu option previously select-
ed.Selecting “Set Date” and
“Set time”:
– briefly press button MENU ESCto se-
lect the first value to change (e.g. hours
/minutes or year / month / day);
– press buttons +or –(by single press-
es) to select the new setting;
– briefly press button MENU ESCto store
the new setting and to go to the next set-
up menu option, if this is the last one you
will go back to the previously selected op-
tion of the main menu.
Hold button MENU ESC pressed:
– to quit the set-up menu if you are in the
main menu;
– to quit the main menu if you are at an-
other point of the menu (e.g.: at submenu
option setting level, at submenu level or
at main menu option setting level);
– to save only the settings stored yet (and
confirmed by pressing button MENU
ESC).
The setup menu environment is timed.
Only the changes saved by the user b
briefly pressing MENU ESC will be saved
when the menu is automatically closed. Selecting an option of the main menu with
submenu:
– briefly press button MENU ESCto dis-
play the first submenu option;
– press buttons +or –(by single press-
es) to scroll all the submenu options;
– press briefly button MENU ESCto se-
lect the displayed submenu option and to
open the relevant setup menu;
– press buttons +or –(by single press-
es) to select the new setting for this sub-
menu option;
– briefly press button MENU ESC to
store the new setting and to go back to
the previously selected submenu option.
Page 28 of 230
27
SAFETY
DEVICES
CORRECT USE
OF THE
CAR
WARNING
LIGHTS AND
MESSAGES
IN AN
EMERGENCY
CAR
MAINTENANCE
TECHNICAL
SPECIFICATIONS
INDEX
DASHBOARD
AND CONTROLS
Trip B On/Off (tripB data)
Through this option it is possible to acti-
vate (On) or deactivate (Off) the Trip B
(partial trip).
For further information see “Trip com-
puter”.
Proceed as follows to switch the function
on and off:
– briefly press button MENU ESC: (On)
or (Off) will flash on the display (accord-
ing to previous setting);
– press button +or –for setting;
– briefly press button MENU ESCto go
back to the menu screen or press the but-
ton for long to go back to the standard
screen without storing settings.Setting the clock (Set time)
This function allows to set the clock through
two sub-menus: “Time” and “Mode”.
Proceed as follows:
– briefly press button MENU ESC, the
display will show the two sub-menus
“Time” and “Mode”;
– press button +or –to surf the two sub-
menus;
– select the required option and then
press button MENU ESCbriefly;
– when accessing the “Hour” submenu: –
briefly press button MENU ESC,
“hours” will flash on the display;
– press button +or –for setting;
– briefly press button MENU ESC, “min-
utes” will flash on the display;
– press button +or –for setting;
– when accessing the “Format” submenu:
briefly press button MENU ESC : the
previously set display format will flash on
the display;
– press button +or –to select “24h” or
“12h”.
When you have made the required set-
tings, briefly press button MENU ESC
to go back to the menu screen or press
the button for long to go back to the stan-
dard screen without storing settings.
– hold MENU ESCpressed to go back
to the standard screen or main menu ac-
cording to the points of the menu where
you are at.Set date (Set Date)
This function may be used to update the
date (year - month - day).
To correct the date proceed as follows:
– briefly press button MENU ESC: “day”
will flash on the display;
– press button +or –for setting;
– briefly press button MENU ESC:
“month” will flash on the display;
– press button +or –for setting;
– briefly press button MENU ESC
:
“year” will flash on the display;
– press button +or –for setting.
NoteThe setting will increase or de-
crease by one unit each time +or – is
pressed. Hold the button pressed to in-
crease/decrease the setting rapidly. Com-
plete the setting by briefly pressing the
button when you approach the required
setting.
– briefly press button MENU ESCto go
back to the menu screen or press the but-
ton for long to go back to the standard
screen without storing settings.
Page 33 of 230
32
SAFETY
DEVICES
CORRECT USE
OF THE
CAR
WARNING
LIGHTS AND
MESSAGES
IN AN
EMERGENCY
CAR
MAINTENANCE
TECHNICAL
SPECIFICATIONS
INDEX
DASHBOARD
AND CONTROLS
RECONFIGURABLE
MULTIFUNCTION
DISPLAY
(where provided)
The car may be equipped with reconfig-
urable a multifunctional display that, ac-
cording to the settings made, will show
useful driving information.
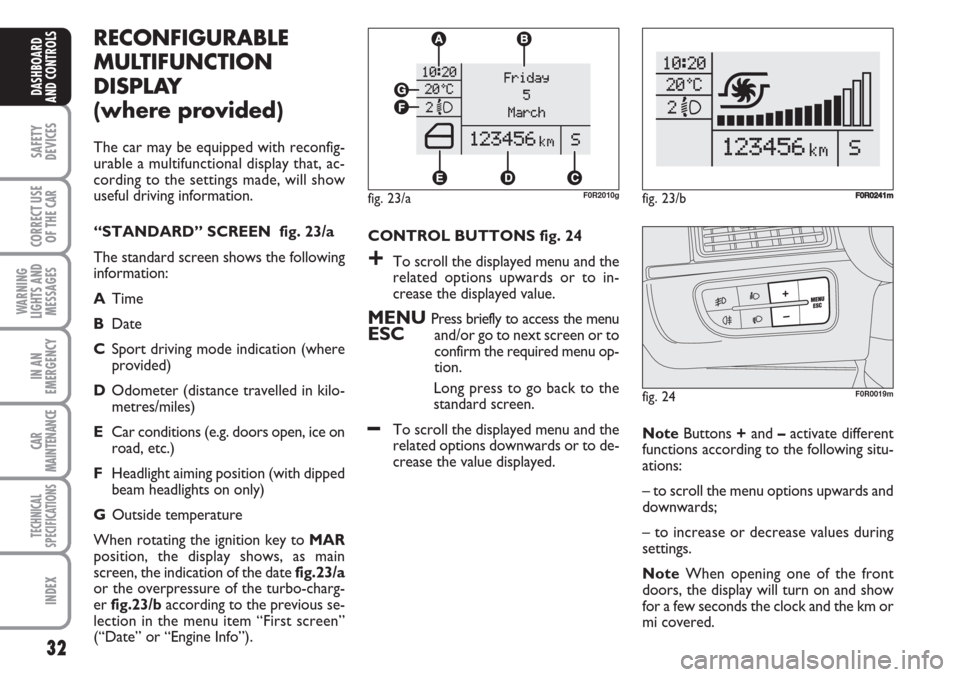
“STANDARD” SCREEN fig. 23/a
The standard screen shows the following
information:
ATime
BDate
CSport driving mode indication (where
provided)
DOdometer (distance travelled in kilo-
metres/miles)
ECar conditions (e.g. doors open, ice on
road, etc.)
FHeadlight aiming position (with dipped
beam headlights on only)
GOutside temperature
When rotating the ignition key to MAR
position, the display shows, as main
screen, the indication of the date fig.23/a
or the overpressure of the turbo-charg-
er fig.23/baccording to the previous se-
lection in the menu item “First screen”
(“Date” or “Engine Info”).CONTROL BUTTONS fig. 24
+To scroll the displayed menu and the
related options upwards or to in-
crease the displayed value.
MENU Press briefly to access the menuESCand/or go to next screen or to
confirm the required menu op-
tion.
Long press to go back to the
standard screen.
–To scroll the displayed menu and the
related options downwards or to de-
crease the value displayed. NoteButtons +and –activate different
functions according to the following situ-
ations:
– to scroll the menu options upwards and
downwards;
– to increase or decrease values during
settings.
NoteWhen opening one of the front
doors, the display will turn on and show
for a few seconds the clock and the km or
mi covered.
fig. 24F0R0019m
fig. 23/aF0R2010gfig. 23/bF0R0241m
Page 34 of 230
33
SAFETY
DEVICES
CORRECT USE
OF THE
CAR
WARNING
LIGHTS AND
MESSAGES
IN AN
EMERGENCY
CAR
MAINTENANCE
TECHNICAL
SPECIFICATIONS
INDEX
DASHBOARD
AND CONTROLS
SETUP MENU fig. 25
The menu comprises a series of functions
arranged in a “circular fashion” which can
be selected through buttons +and –to
access the different select operations and
settings (setup) given in the following para-
graphs. A submenu is provided for some
items (Clock and Unit setting).
The setup menu can be activated by press-
ing briefly button MENU ESC.
Single presses on buttons +or –will scroll
the setup menu options. Management
modes differ with each other according to
the characteristic of the option selected.Selecting an option of the main menu
without submenu
– press briefly button MENU ESCto se-
lect the main menu option to set;
– press buttons +or –(by single press-
es) to select the new setting;
– press briefly button MENU ESCto
store the new setting and to go back to
the main menu option previously select-
ed.Selecting an option of the main menu with
submenu:
– press briefly button MENU ESCto dis-
play the first submenu option;
– press buttons +or –(by single press-
es) to scroll all the submenu options;
– press briefly button MENU ESCto se-
lect the displayed submenu option and to
open the relevant setup menu;
– press buttons +or –(by single press-
es) to select the new setting for this sub-
menu option;
– press briefly button MENU ESC to
store the new setting and to go back to
the previously selected submenu option.
Page 37 of 230
36
SAFETY
DEVICES
CORRECT USE
OF THE
CAR
WARNING
LIGHTS AND
MESSAGES
IN AN
EMERGENCY
CAR
MAINTENANCE
TECHNICAL
SPECIFICATIONS
INDEX
DASHBOARD
AND CONTROLS
Rain sensor sensitivity adjustment
(Rain sensor) (where provided)
With this function it is possible to adjust
the rain sensor sensitivity according to 4
levels.
To set the required sensitivity level pro-
ceed as follows:
– briefly press button MENU ESC, the
previously set sensitivity “level” will flash
on the display;
– press button +or –for setting;
– briefly press button MENU ESCto go
back to the menu screen or press the but-
ton for long to go back to the standard
screen without storing settings.
Headlight sensor
(Automatic headlight sensor
sensitivity adjustment)
(where provided)
This function is used to adjust the dusk
sensor sensitivity to three levels (level 1
= minimum, level 2 = medium, level 3 =
maximum); higher the sensitivity, lower
the quantity of external light needed to
switch the headlights on.
Proceed as follows to set:
– briefly press button MENU ESC, the
previously set level will flash on the dis-
play;
– press button +or –for setting;– briefly press button MENU ESCto go
back to the menu screen or press the but-
ton for long to go back to the standard
screen without storing settings.
Trip B data (Trip B on)
This function may be used to activate (On)
or deactivate (Off) the Trip B (partial trip).
For further information see “Trip com-
puter”.
Proceed as follows to switch the function
on and off:
– briefly press button MENU ESC: (On)
or (Off) will flash on the display (accord-
ing to previous setting);
– press button +or –for setting;
– briefly press button MENU ESCto go
back to the menu screen or press the but-
ton for long to go back to the standard
screen without storing settings.Setting the time (Clock)
This function allows to set the clock
through two sub-menus: “Time” and
“Mode”.
Proceed as follows:
– briefly press button MENU ESC, the
display will show the two submenus
“Time” and “Mode”;
– press button +or –to switch between
the two submenus;
– select the required option and then
press button MENU ESCbriefly;
- when accessing the “Time” submenu: –
briefly press button MENU ESC,
“hours” will flash on the display;
– press button +or –for setting;
– briefly press button MENU ESC, “min-
utes” will flash on the display;
– press button +or –for setting.
Page 62 of 230
61
SAFETY
DEVICES
CORRECT USE
OF THE
CAR
WARNING
LIGHTS AND
MESSAGES
IN AN
EMERGENCY
CAR
MAINTENANCE
TECHNICAL
SPECIFICATIONS
INDEX
DASHBOARD
AND CONTROLS
USING THE CLIMATE
CONTROL SYSTEM
The system can be started in different
ways, but it is advisable to start by press-
ing the AUTObutton and then turning
the knobs to set the temperature required
on the display.
The system will start running automatically
in this way and the set comfortable tem-
perature will be reached as quickly as pos-
sible. The system will adjust the temper-
ature, the quantity and the distribution of
the air introduced into the passenger com-
partment and will manage the recircula-
tion function and the compressor.
Manual intervention is only required for
the following functions during fully auto-
matic operation.
❒Tair recirculation, to keep the
function always either on or off;
❒Zto speed up demisting/defrosting of
windscreen, rear window and exter-
nal rearview mirrors;During completely automatic system op-
eration, you can vary the set temperature,
the air distribution and the fan speed us-
ing the corresponding buttons or knobs
at any time: the system will automatically
change settings to adapt to the new re-
quest.
During fully automatic operation (FULL
AUTO), the word FULLwill disappear
if the air distribution, air speed, compres-
sor and/or recirculation settings are
changed. In this way, the functions will
switch from automatic to manual control
until AUTOis pressed again. With on or
more manually set functions, the intro-
duced air temperature is still managed au-
tomatically by the system, except for when
the compressor is off: in the case, the air
introduced into the passenger compart-
ment cannot be cooler than the outside
air.Air temperature adjustment
knob (I)
Turn the knob either clockwise or anti-
clockwise to increase or lower the re-
quested temperature in the passenger
compartment. The set temperature is
shown on the display.
Turn the knob either all to the right or
all to the left to the extreme HIor LO
position to use the maximum heating or
maximum cooling functions:
❒HI function (maximum heating):
select by turning the temperature knob
clockwise over the maximum value
(32 °C).
This function may be used to heat up the
passenger compartment exploiting the
system potential to the maximum. In this
condition, the system stop controlling
temperature automatically and sets air
mixing to maximum heating. The air speed
and distribution are fixed.
Specifically, if the heating fluid is not suffi-
ciently warm, the fan will not start up at
the maximum speed immediately to limit
introducing excessively cool air into the
passenger compartment.
All manual settings will be allowed when
this function is on.