seat FIAT LINEA 2008 1.G Owner's Guide
[x] Cancel search | Manufacturer: FIAT, Model Year: 2008, Model line: LINEA, Model: FIAT LINEA 2008 1.GPages: 234, PDF Size: 3.41 MB
Page 126 of 234
125
WARNING
LIGHTS AND
MESSAGES
IN AN
EMERGENCY
CAR
MAINTENANCE
TECHNICAL
SPECIFICATIONS
INDEX
DASHBOARD
AND CONTROLS
SAFETY
DEVICES
CORRECT USE
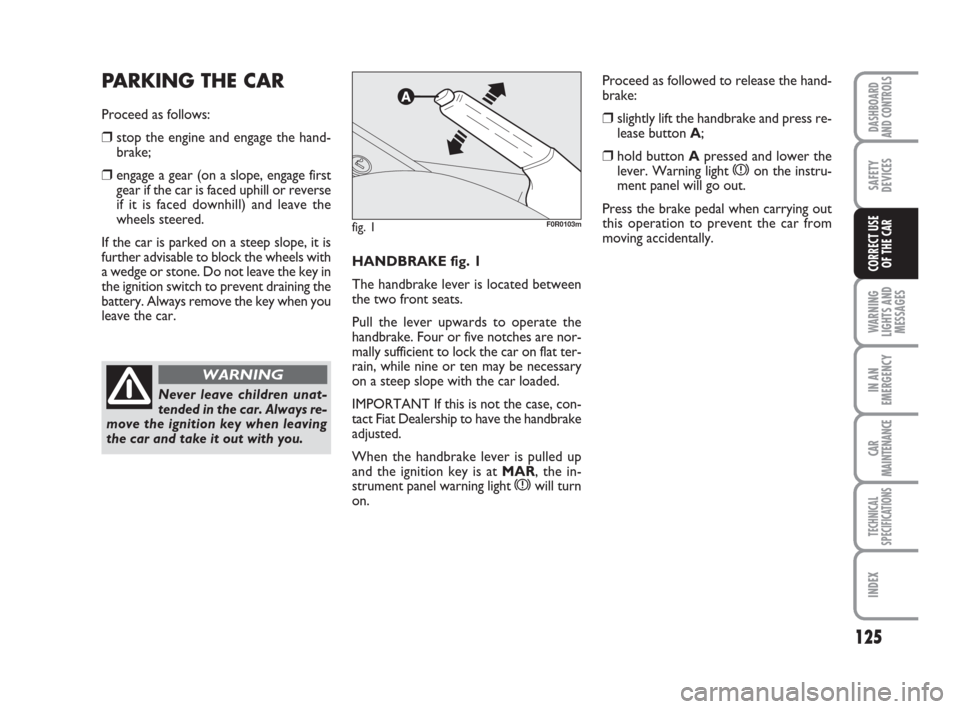
OF THE CARHANDBRAKE fig. 1
The handbrake lever is located between
the two front seats.
Pull the lever upwards to operate the
handbrake. Four or five notches are nor-
mally sufficient to lock the car on flat ter-
rain, while nine or ten may be necessary
on a steep slope with the car loaded.
IMPORTANT If this is not the case, con-
tact Fiat Dealership to have the handbrake
adjusted.
When the handbrake lever is pulled up
and the ignition key is atMAR, the in-
strument panel warning light
xwill turn
on.
PARKING THE CAR
Proceed as follows:
❒stop the engine and engage the hand-
brake;
❒engage a gear (on a slope, engage first
gear if the car is faced uphill or reverse
if it is faced downhill) and leave the
wheels steered.
If the car is parked on a steep slope, it is
further advisable to block the wheels with
a wedge or stone. Do not leave the key in
the ignition switch to prevent draining the
battery. Always remove the key when you
leave the car.
Never leave children unat-
tended in the car. Always re-
move the ignition key when leaving
the car and take it out with you.
WARNING
fig. 1F0R0103m
Proceed as followed to release the hand-
brake:
❒slightly lift the handbrake and press re-
lease button A;
❒hold button Apressed and lower the
lever. Warning light xon the instru-
ment panel will go out.
Press the brake pedal when carrying out
this operation to prevent the car from
moving accidentally.
121-132 LINEA 1ed GB 3-09-2008 17:30 Pagina 125
Page 134 of 234
133
IN AN
EMERGENCY
CAR
MAINTENANCE
TECHNICAL
SPECIFICATIONS
INDEX
DASHBOARD
AND CONTROLS
SAFETY
DEVICES
CORRECT USE
OF THE
CAR
WARNING
LIGHTS AND
MESSAGES
GENERAL WARNINGS ..................................................... 134
LOW BRAKE FLUID............................................................ 134
HANDBRAKE ON................................................................ 134
AIR BAG FAILURE................................................................ 135
HOT
ENGINE COOLANT........................................................... 135
LOW BATTERY CHARGE................................................. 136
LOW ENGINE OIL PRESSURE.......................................... 136
INCOMPLETE DOOR LOCKING.................................... 137
SEAT BELTS NOT FASTENED.......................................... 137
EBD SYSTEM FAILURE........................................................ 137
INJECTION SYSTEM FAILURE
(DIESEL VERSIONS) ............................................................ 138
EOBD SYSTEM FAILURE (PETROL VERSIONS) .........138
FRONT PASSENGER AIRBAG DEACTIVATED........... 139
ABS SYSTEM FAILURE......................................................... 139
FUEL RESERVE....................................................................... 139
GLOW PLUG WARMING ................................................ 140
GLOW PLUG WARMING FAILURE............................... 140
WATER IN DIESEL FUEL FILTER..................................... 140FIAT CODE PROTECTION
SYSTEM FAILURE.................................................................. 140
EXTERNAL LIGHTS FAILURE........................................... 141
REAR FOG LIGHTS.............................................................. 141
GENERIC FAILURE INDICATION ................................. 141
ESP SYSTEM FAILURE ........................................................ 142
BRAKE PAD WEAR ............................................................ 142
PARKING SENSOR FAILURE............................................ 143
SIDELIGHTS AND LOW BEAMS..................................... 143
FOLLOW ME HOME........................................................... 143
FRONT FOG LIGHTS ........................................................ 143
LEFT-HAND DIRECTION INDICATOR........................ 143
RIGHT-HAND DIRECTION INDICATOR.................... 143
CRUISE CONTROL ............................................................ 143
MAIN BEAM HEADLIGHTS............................................... 143
POSSIBLE PRESENCE OF ICE ON THE ROAD ........... 144
LIMITED RANGE ................................................................. 144
ASR SYSTEM ......................................................................... 144
WW W
A A
R R
N N
I I
N N
G G
L L
I I
G G
H H
T T
S S
A A
N N
D D
M M
E E
S S
S S
A A
G G
E E
S S
133-144 LINEA 1ed GB 3-09-2008 17:31 Pagina 133
Page 138 of 234
137
IN AN
EMERGENCY
CAR
MAINTENANCE
TECHNICAL
SPECIFICATIONS
INDEX
DASHBOARD
AND CONTROLS
SAFETY
DEVICES
CORRECT USE
OF THE
CAR
WARNING
LIGHTS AND
MESSAGES
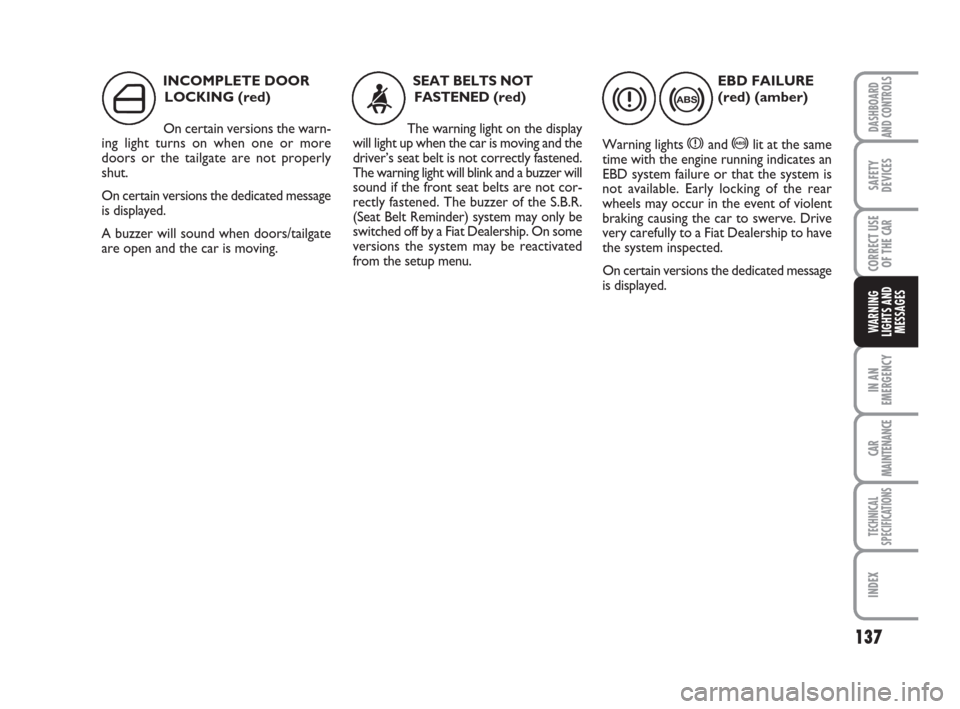
INCOMPLETE DOOR
LOCKING (red)
On certain versions the warn-
ing light turns on when one or more
doors or the tailgate are not properly
shut.
On certain versions the dedicated message
is displayed.
A buzzer will sound when doors/tailgate
are open and the car is moving.
´
EBD FAILURE
(red) (amber)
Warning lights
xand >lit at the same
time with the engine running indicates an
EBD system failure or that the system is
not available. Early locking of the rear
wheels may occur in the event of violent
braking causing the car to swerve. Drive
very carefully to a Fiat Dealership to have
the system inspected.
On certain versions the dedicated message
is displayed.
x>
SEAT BELTS NOT
FASTENED
(red)
The warning light on the display
will light up when the car is moving and the
driver’s seat belt is not correctly fastened.
The warning light will blink and a buzzer will
sound if the front seat belts are not cor-
rectly fastened. The buzzer of the S.B.R.
(Seat Belt Reminder) system may only be
switched off by a Fiat Dealership. On some
versions the system may be reactivated
from the setup menu.<
133-144 LINEA 1ed GB 3-09-2008 17:31 Pagina 137
Page 159 of 234
158
WARNING
LIGHTS AND
MESSAGES
CAR
MAINTENANCE
TECHNICAL
SPECIFICATIONS
IINDEX
DASHBOARD
AND CONTROLS
SAFETY
DEVICES
CORRECT USE
OF THE
CAR
IN AN
EMERGENCY
WHEN NEEDING TO
CHANGE A BULB
GENERAL INSTRUCTIONS
❒When a bulb is not working, check that
the corresponding fuse is intact before
replacing it: refer to the “If a fuse
blows” paragraph in this chapter for
fuse location.
❒before changing a bulb check the con-
tacts for oxidation;
❒burnt bulbs must be replaced by others
of the same type and power;
❒always check the height of the headlight
beam after changing a bulb, for reasons
of safety.
IMPORTANT A slight misting may appear
on the internal surface of the headlight:
this does not indicate a fault and is caused
by low temperature and the degree of hu-
midity in the air. Misting will rapidly dis-
appear when the headlights are switched
on. The presence of drop inside the head-
lights indicates infiltration of water. Go to
a Fiat Dealership.
TYPES OF BULBS
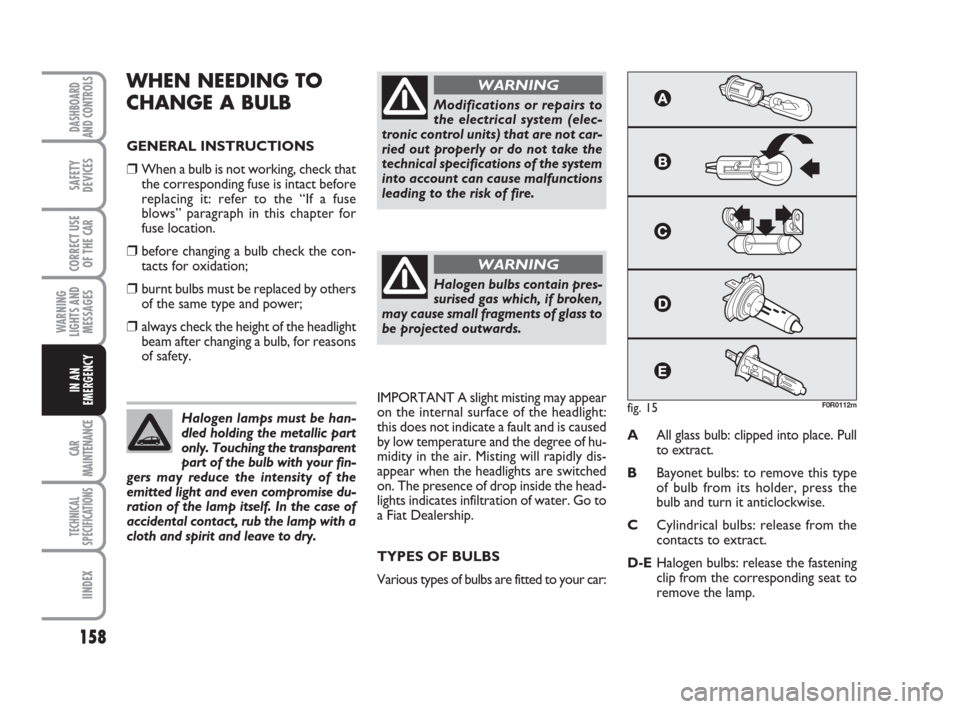
Various types of bulbs are fitted to your car:AAll glass bulb: clipped into place. Pull
to extract.
BBayonet bulbs: to remove this type
of bulb from its holder, press the
bulb and turn it anticlockwise.
CCylindrical bulbs: release from the
contacts to extract.
D-EHalogen bulbs: release the fastening
clip from the corresponding seat to
remove the lamp. Halogen lamps must be han-
dled holding the metallic part
only. Touching the transparent
part of the bulb with your fin-
gers may reduce the intensity of the
emitted light and even compromise du-
ration of the lamp itself. In the case of
accidental contact, rub the lamp with a
cloth and spirit and leave to dry.
Modifications or repairs to
the electrical system (elec-
tronic control units) that are not car-
ried out properly or do not take the
technical specifications of the system
into account can cause malfunctions
leading to the risk of fire.
WARNING
Halogen bulbs contain pres-
surised gas which, if broken,
may cause small fragments of glass to
be projected outwards.
WARNING
fig. 15F0R0112m
145-176 LINEA 1ed GB 5-09-2008 9:22 Pagina 158
Page 167 of 234
166
WARNING
LIGHTS AND
MESSAGES
CAR
MAINTENANCE
TECHNICAL
SPECIFICATIONS
IINDEX
DASHBOARD
AND CONTROLS
SAFETY
DEVICES
CORRECT USE
OF THE
CAR
IN AN
EMERGENCY
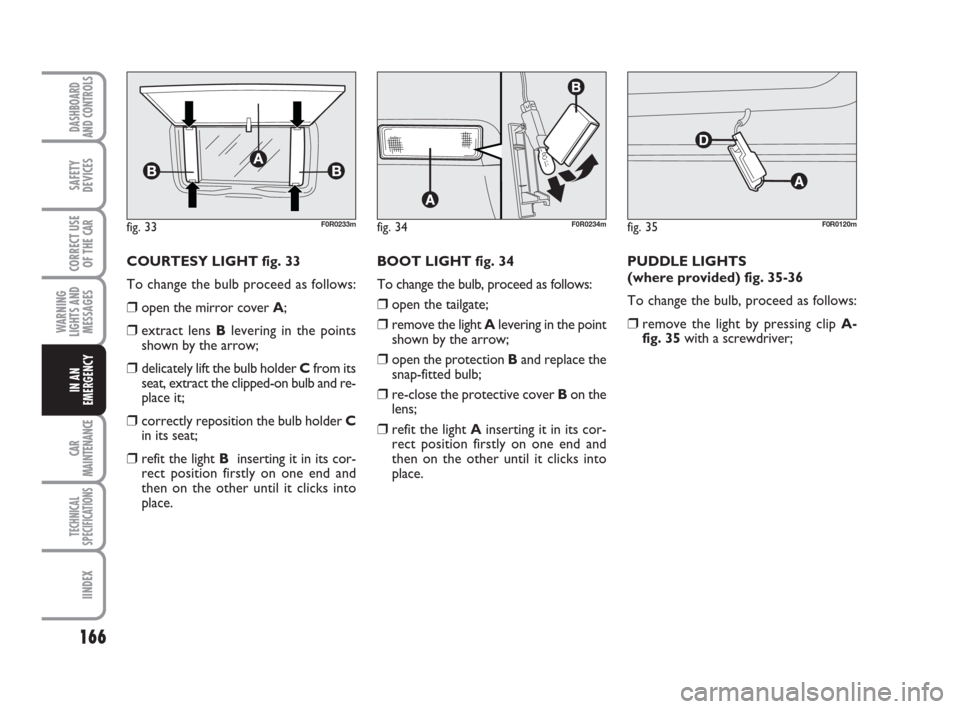
COURTESY LIGHT fig. 33
To change the bulb proceed as follows:
❒open the mirror cover A;
❒extract lens Blevering in the points
shown by the arrow;
❒delicately lift the bulb holder Cfrom its
seat, extract the clipped-on bulb and re-
place it;
❒correctly reposition the bulb holder C
in its seat;
❒refit the light Binserting it in its cor-
rect position firstly on one end and
then on the other until it clicks into
place.BOOT LIGHT fig. 34
To change the bulb, proceed as follows:
❒open the tailgate;
❒remove the light Alevering in the point
shown by the arrow;
❒open the protection Band replace the
snap-fitted bulb;
❒re-close the protective cover Bon the
lens;
❒refit the light Ainserting it in its cor-
rect position firstly on one end and
then on the other until it clicks into
place.
fig. 33F0R0233mfig. 34F0R0234mfig. 35F0R0120m
PUDDLE LIGHTS
(where provided) fig. 35-36
To change the bulb, proceed as follows:
❒remove the light by pressing clip A-
fig. 35with a screwdriver;
145-176 LINEA 1ed GB 5-09-2008 9:22 Pagina 166
Page 172 of 234
171
WARNING
LIGHTS AND
MESSAGES
CAR
MAINTENANCE
TECHNICAL
SPECIFICATIONS
INDEX
DASHBOARD
AND CONTROLS
SAFETY
DEVICES
CORRECT USE
OF THE
CAR
IN AN
EMERGENCY
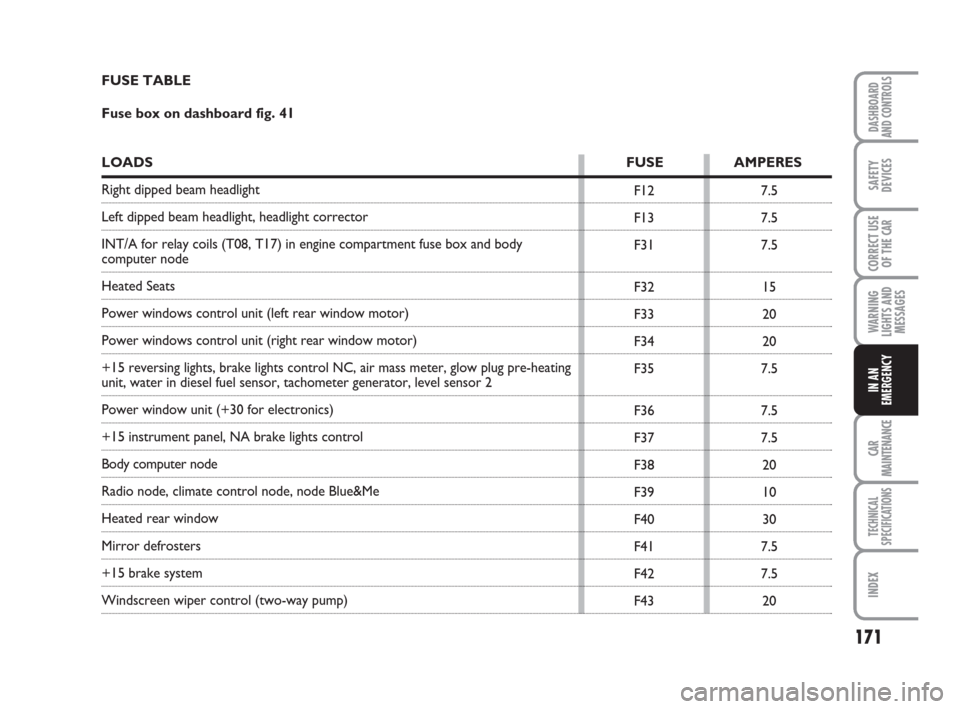
7.5
7.5
7.5
15
20
20
7.5
7.5
7.5
20
10
30
7.5
7.5
20 F12
F13
F31
F32
F33
F34
F35
F36
F37
F38
F39
F40
F41
F42
F43
FUSE TABLE
Fuse box on dashboard fig. 41
LOADS FUSE AMPERES
Right dipped beam headlight
Left dipped beam headlight, headlight corrector
INT/A for relay coils (T08, T17) in engine compartment fuse box and body
computer node
Heated Seats
Power windows control unit (left rear window motor)
Power windows control unit (right rear window motor)
+15 reversing lights, brake lights control NC, air mass meter, glow plug pre-heating
unit, water in diesel fuel sensor, tachometer generator, level sensor 2
Power window unit (+30 for electronics)
+15 instrument panel, NA brake lights control
Body computer node
Radio node, climate control node, node Blue&Me
Heated rear window
Mirror defrosters
+15 brake system
Windscreen wiper control (two-way pump)
145-176 LINEA 1ed GB 5-09-2008 9:22 Pagina 171
Page 173 of 234
172
WARNING
LIGHTS AND
MESSAGES
CAR
MAINTENANCE
TECHNICAL
SPECIFICATIONS
IINDEX
DASHBOARD
AND CONTROLS
SAFETY
DEVICES
CORRECT USE
OF THE
CAR
IN AN
EMERGENCY
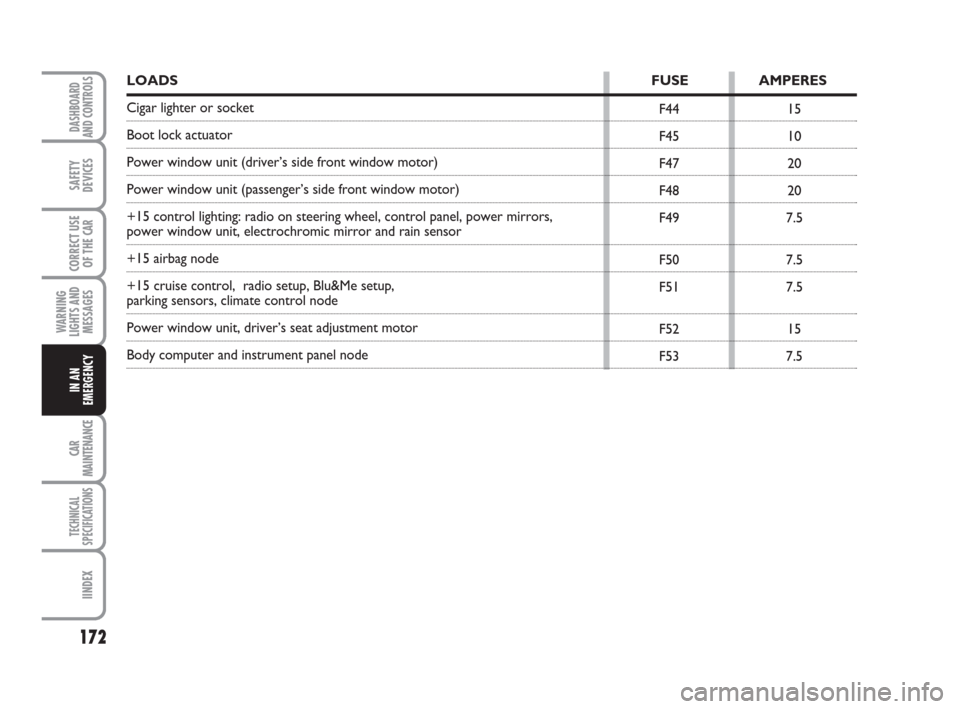
LOADS FUSE AMPERES
Cigar lighter or socket
Boot lock actuator
Power window unit (driver’s side front window motor)
Power window unit (passenger’s side front window motor)
+15 control lighting: radio on steering wheel, control panel, power mirrors,
power window unit, electrochromic mirror and rain sensor
+15 airbag node
+15 cruise control, radio setup, Blu&Me setup,
parking sensors, climate control node
Power window unit, driver’s seat adjustment motor
Body computer and instrument panel node F44
F45
F47
F48
F49
F50
F51
F52
F5315
10
20
20
7.5
7.5
7.5
15
7.5
145-176 LINEA 1ed GB 5-09-2008 9:22 Pagina 172
Page 177 of 234
176
WARNING
LIGHTS AND
MESSAGES
CAR
MAINTENANCE
TECHNICAL
SPECIFICATIONS
IINDEX
DASHBOARD
AND CONTROLS
SAFETY
DEVICES
CORRECT USE
OF THE
CAR
IN AN
EMERGENCY
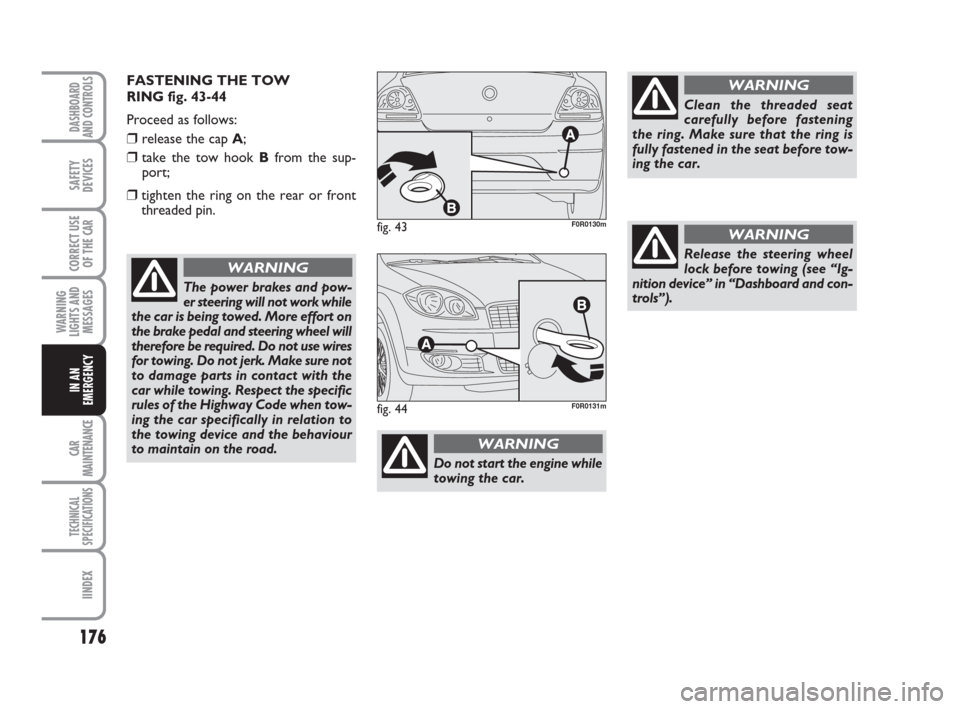
FASTENING THE TOW
RING fig. 43-44
Proceed as follows:
❒release the cap A;
❒take the tow hook Bfrom the sup-
port;
❒tighten the ring on the rear or front
threaded pin.
The power brakes and pow-
er steering will not work while
the car is being towed. More effort on
the brake pedal and steering wheel will
therefore be required. Do not use wires
for towing. Do not jerk. Make sure not
to damage parts in contact with the
car while towing. Respect the specific
rules of the Highway Code when tow-
ing the car specifically in relation to
the towing device and the behaviour
to maintain on the road.
WARNING
fig. 43F0R0130m
fig. 44F0R0131m
Do not start the engine while
towing the car.
WARNING
Clean the threaded seat
carefully before fastening
the ring. Make sure that the ring is
fully fastened in the seat before tow-
ing the car.
WARNING
Release the steering wheel
lock before towing (see “Ig-
nition device” in “Dashboard and con-
trols”).
WARNING
145-176 LINEA 1ed GB 5-09-2008 9:22 Pagina 176
Page 200 of 234
199
WARNING
LIGHTS AND
MESSAGES
TECHNICAL
SPECIFICATIONS
INDEX
DASHBOARD
AND CONTROLS
SAFETY
DEVICES
CORRECT USE
OF THE CAR
IN AN
EMERGENCY
CAR
MAINTENANCE
The fabric upholstery of your
car is designed to withstand
the normal wear and tear of
your car for a long time. Some
precautions are however needed. Avoid
prolonged rubbing against clothing ac-
cessories, such as metal buckles, Velcro
strips and the like, which by applying a
high pressure on the fabric in a small
area could cause the breakage of some
threads and damage the upholstery.
CLEANING SEATS AND FABRIC
PARTS
Remove dust with a soft brush or a vacu-
um cleaner. It is advisable to use a moist
brush on velvet upholstery.
Rub the seats with a sponge moistened
with a solution of water and neutral de-
tergent.
Do not keep aerosol cans in
the car: risk of explosion.
Aerosol cans must not be exposed to
temperatures higher than 50°C. The
temperature may raise well beyond
that figure when the car is left in the
sun.
WARNINGINTERIOR PLASTIC PARTS
It is advisable to clean interior parts with a
moist cloth and a solution of water and mild
soap. Use specific products for cleaning plas-
tic, without solvents and specifically de-
signed to prevent damage to the appearance
and colour of the treated parts to remove
grease and tough stains.
IMPORTANT Never use spirit or petro-
leum to clean the instrument panel.
177-200 LINEA 1ed GB 3-09-2008 17:31 Pagina 199
Page 204 of 234
203
WARNING
LIGHTS AND
MESSAGES
INDEX
DASHBOARD
AND CONTROLS
SAFETY
DEVICES
CORRECT USE
OF THE
CAR
IN AN
EMERGENCY
CAR
MAINTENANCE
TECHNICAL
SPECIFICATIONS
CHASSIS MARKING fig. 3
This is printed on the passegner com-
partment floor bed near the front right
seat.
❒car model (ZFA 323000);
❒chassis number.ENGINE MARKING
Engine marking is stamped on the cylinder
block and includes the model and the
chassis number.
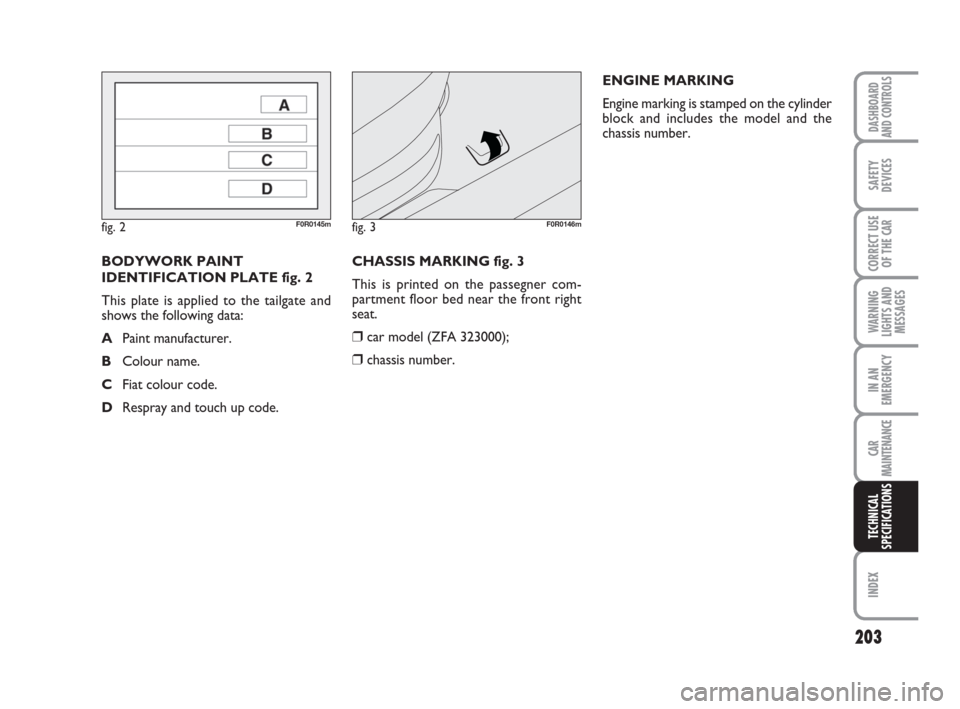
BODYWORK PAINT
IDENTIFICATION PLATE fig. 2
This plate is applied to the tailgate and
shows the following data:
APaint manufacturer.
BColour name.
CFiat colour code.
DRespray and touch up code.
fig. 2F0R0145mfig. 3F0R0146m
201-221 LINEA 1ed GB 5-09-2008 9:24 Pagina 203