torque FIAT MAREA 2000 1.G User Guide
[x] Cancel search | Manufacturer: FIAT, Model Year: 2000, Model line: MAREA, Model: FIAT MAREA 2000 1.GPages: 330
Page 92 of 330
Fuel feed system
Engine Marea- Marea Weekend © ™
2000 range @
10.
The control unit autodiagnostic system checks the signals coming from the sensors and compares them
with the figures allowed:
- signalling faults during starting
- warning light on for 4 seconds indicates test stage
- warning light off after 4 seconds indicates no fault with components that could alter the pollution con
trol standard figures
- warning light on after 4 seconds indicates fault.
- signalling faults during operation
- warning light on indicates fault
- warning light off indicates no fault with components that could alter the pollution control standard fig
ures.
- recovery
- from time to time, the control unit defines the type of recovery according to the components which are
faulty
- the recovery parameters are managed by components which are not faulty.
Control of cylinder balancing during idling
According to the signals coming from the sensors, the injection control unit controls the idle speed torque,
altering the injector operating times.
Control of irregular operation
Depending on the signals coming from the sensors, the injection control unit corrects the amount of fuel
to be injected in order to improve driveability and reduce jerking whilst driving.
The correction is achieved through the fuel pressure regulator and by varying the injector operating times.
Control of electrical balance
According to the battery voltage, the injection control unit alters the idle speed, to guarantee a sufficient
current supply from the alternator in situations where the consumers are absorbing a great deal of power.
The variation in the idle speed is achived by regulating the fuel pressure and altering the injector operat
ing times.
VGT variable geometry turbocharger control (1910 JTD 110 CV)
The injection control unit processes the signal coming from the supercharging sensor, at the various en
gine operating speeds, and determines the quantity of fuel to be injected, acting on the fuel pressure
regulator and the injector opening times.
In addition, through the solenoid valve, the control unit regulates the geometry of the turbine in order to
ensure optimum performance in all operating conditions.
Turbocharger waste gate valve control (1910 JTD 100 CV)
At the various engine operating speeds, the injection control unit processes the signal coming from the
supercharging sensor and determines the amount of fuel to inject, acting on the fuel pressure regulator
and the injector opening times.
In addition, the control unit controls the opening of the turbocharger waste gate valve, via the solenoid
valve, in order to ensure excellent performance in all operating conditions.
Control of throttle closing when engine is switched off
When the engine is switched off (ignition key in OFF position) the injection control unit closes the throt
tle valve located on the air intake duct via the special solenoid valve.
This action makes it possible to limit the tiresome shuddering of the engine whilst it is switching off.
6 .i. V!-01-.Cancelftand replaces Print n° 506.763/25
Page 109 of 330
Marea-Marea Weekend 9 Engine
2000 range ©) Fuel feed system
10.
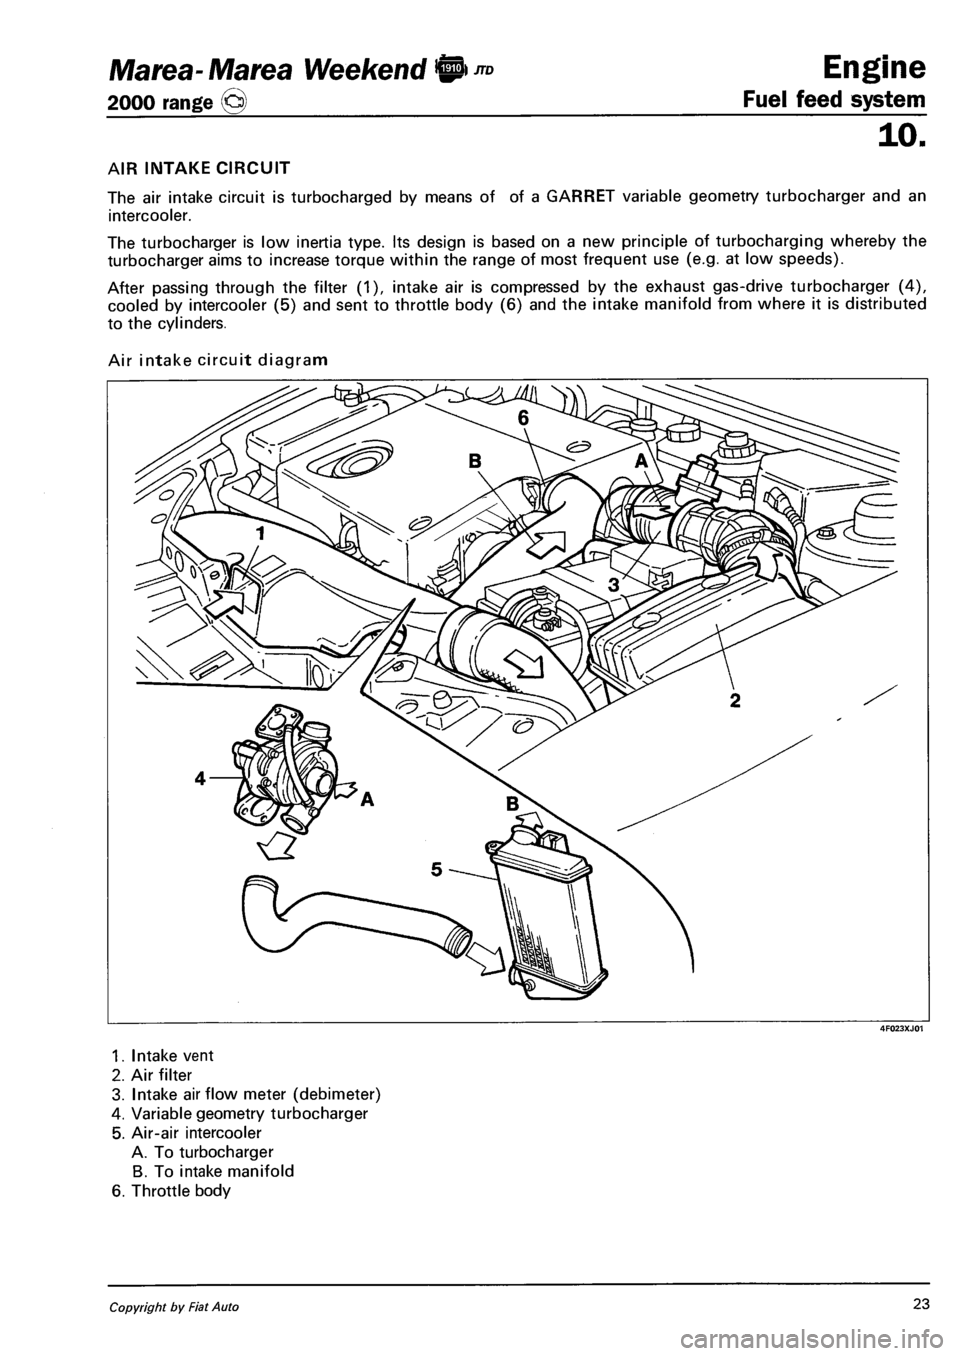
AIR INTAKE CIRCUIT
The air intake circuit is turbocharged by means of of a GARRET variable geometry turbocharger and an
intercooler.
The turbocharger is low inertia type. Its design is based on a new principle of turbocharging whereby the
turbocharger aims to increase torque within the range of most frequent use (e.g. at low speeds).
After passing through the filter (1), intake air is compressed by the exhaust gas-drive turbocharger (4),
cooled by intercooler (5) and sent to throttle body (6) and the intake manifold from where it is distributed
to the cylinders.
Air intake circuit diagram
4F023XJ01
1. Intake vent
2. Air filter
3. Intake airflow meter (debimeter)
4. Variable geometry turbocharger
5. Air-air intercooler
A. To turbocharger
B. To intake manifold
6. Throttle body
Copyright by Fiat Auto 23
Page 111 of 330
Marea- Marea Weekend 9
2000 range ©
Engine
Fuel feed system
10.
TURBOCHARGER (1910 JTD 110 CV)
The turbocharger used in the application of the
EURO 3 standards in the variable geometry
type connected to the exhaust manifold.
The turbocharger is controlled by the engine
management control unit via a duty-cycle so
lenoid valve.
The increased volumetric output for the engine
is achieved, in the case of variable geometry
compressors, through the use of:
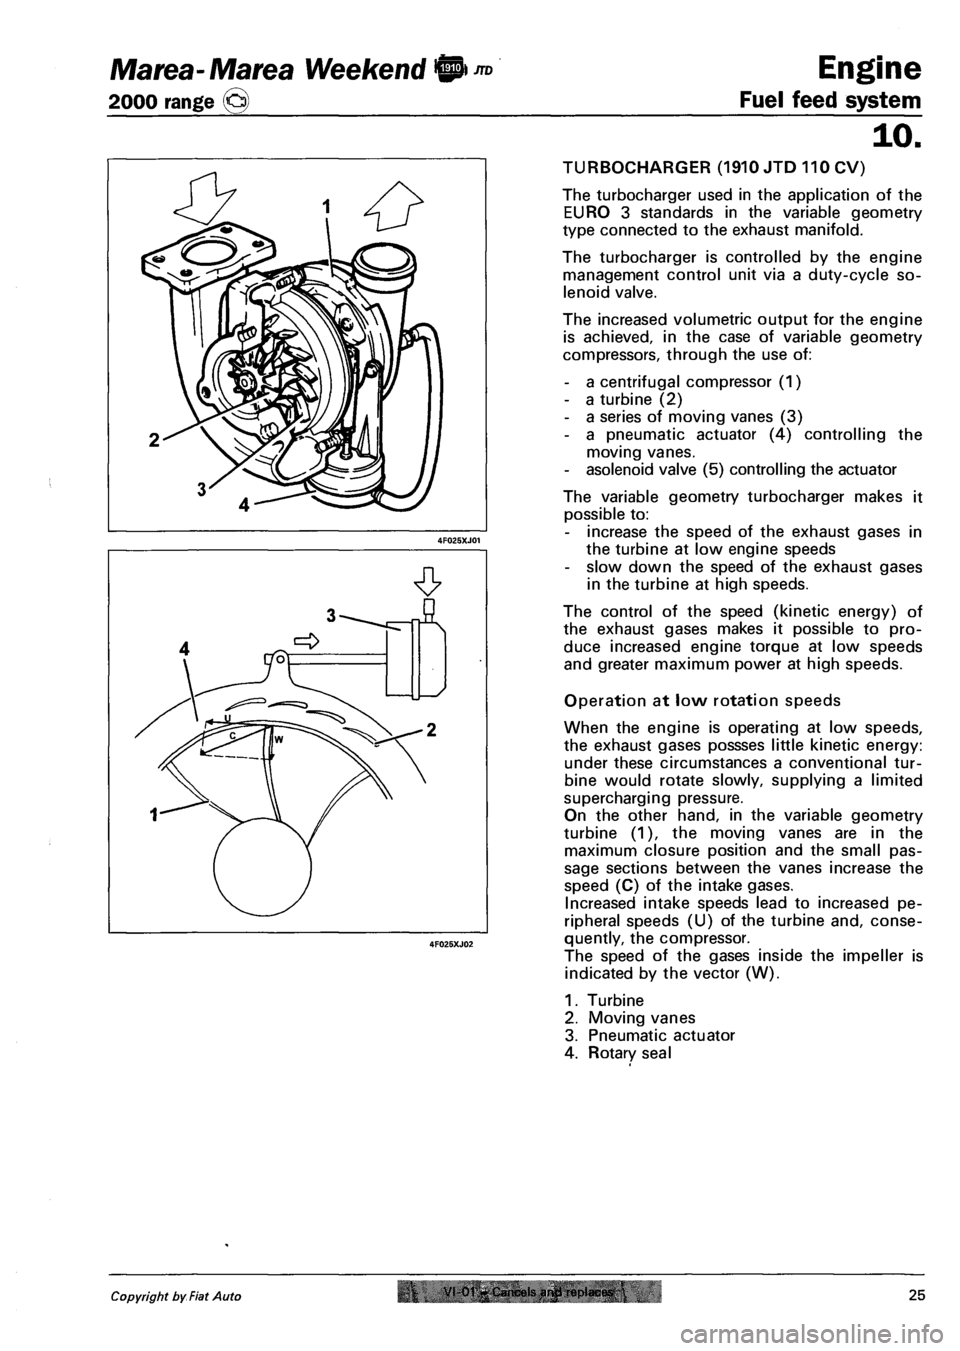
- a centrifugal compressor (1)
- a turbine (2)
- a series of moving vanes (3)
- a pneumatic actuator (4) controlling the
moving vanes.
- asolenoid valve (5) controlling the actuator
The variable geometry turbocharger makes it
possible to:
- increase the speed of the exhaust gases in
the turbine at low engine speeds
- slow down the speed of the exhaust gases
in the turbine at high speeds.
The control of the speed (kinetic energy) of
the exhaust gases makes it possible to pro
duce increased engine torque at low speeds
and greater maximum power at high speeds.
Operation at low rotation speeds
When the engine is operating at low speeds,
the exhaust gases possses little kinetic energy:
under these circumstances a conventional tur
bine would rotate slowly, supplying a limited
supercharging pressure.
On the other hand, in the variable geometry
turbine (1), the moving vanes are in the
maximum closure position and the small pas
sage sections between the vanes increase the
speed (C) of the intake gases.
Increased intake speeds lead to increased pe
ripheral speeds (U) of the turbine and, conse
quently, the compressor.
The speed of the gases inside the impeller is
indicated by the vector (W).
1. Turbine
2. Moving vanes
3. Pneumatic actuator
4. Rotary seal
Copyright by Fiat Auto r VI-01-Cancels arwl replaces.25
Page 112 of 330
Engine
Fuel feed system
JTD Marea- Marea Weekend 9
2000 range @
10.
Operation at high rotation speeds
When the engine speed is increased, the ki
netic energy of the exhaust gases increases
gradually.
As a result, the speed of the turbine (5) in
creases and consequently the supercharging
pressure.
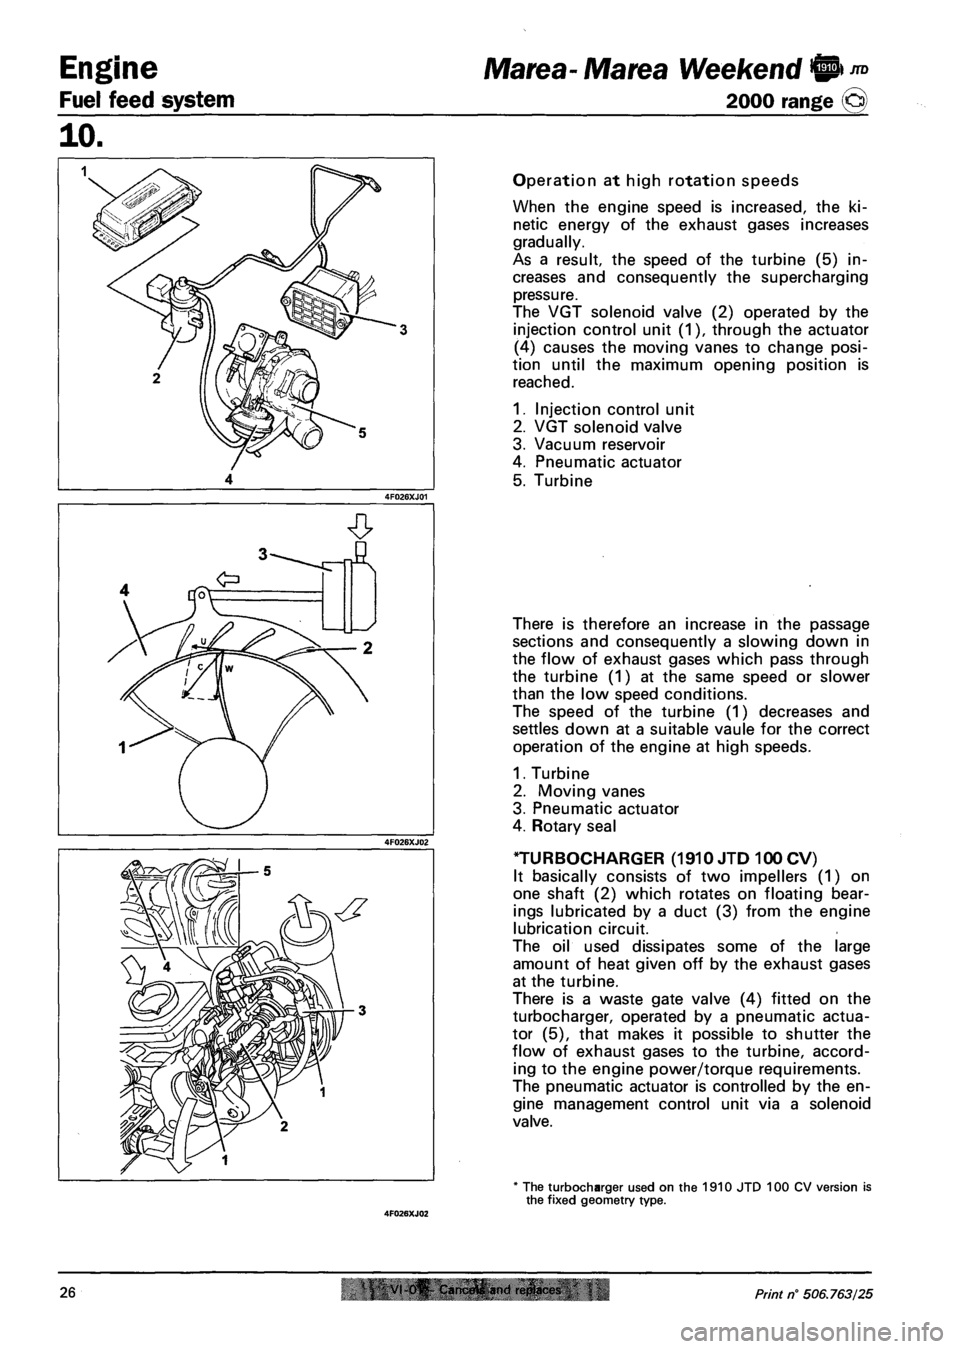
The VGT solenoid valve (2) operated by the
injection control unit (1), through the actuator
(4) causes the moving vanes to change posi
tion until the maximum opening position is
reached.
1. Injection control unit
2. VGT solenoid valve
3. Vacuum reservoir
4. Pneumatic actuator
5. Turbine
There is therefore an increase in the passage
sections and consequently a slowing down in
the flow of exhaust gases which pass through
the turbine (1) at the same speed or slower
than the low speed conditions.
The speed of the turbine (1) decreases and
settles down at a suitable vaule for the correct
operation of the engine at high speeds.
1. Turbine
2. Moving vanes
3. Pneumatic actuator
4. Rotary seal
TURBOCHARGER (1910 JTD 100 CV)
It basically consists of two impellers (1) on
one shaft (2) which rotates on floating bear
ings lubricated by a duct (3) from the engine
lubrication circuit.
The oil used dissipates some of the large
amount of heat given off by the exhaust gases
at the turbine.
There is a waste gate valve (4) fitted on the
turbocharger, operated by a pneumatic actua
tor (5), that makes it possible to shutter the
flow of exhaust gases to the turbine, accord
ing to the engine power/torque requirements.
The pneumatic actuator is controlled by the en
gine management control unit via a solenoid
valve.
* The turbocharger used on the 1910 JTD 100 CV version is the fixed geometry type.
26 VI 0^ Cam.frtfi and ri!plact<& Print n° 506.763/25
Page 123 of 330
Marea-Marea Weekend H nD Engine
2000 range (Q) Fuel feed system
10.
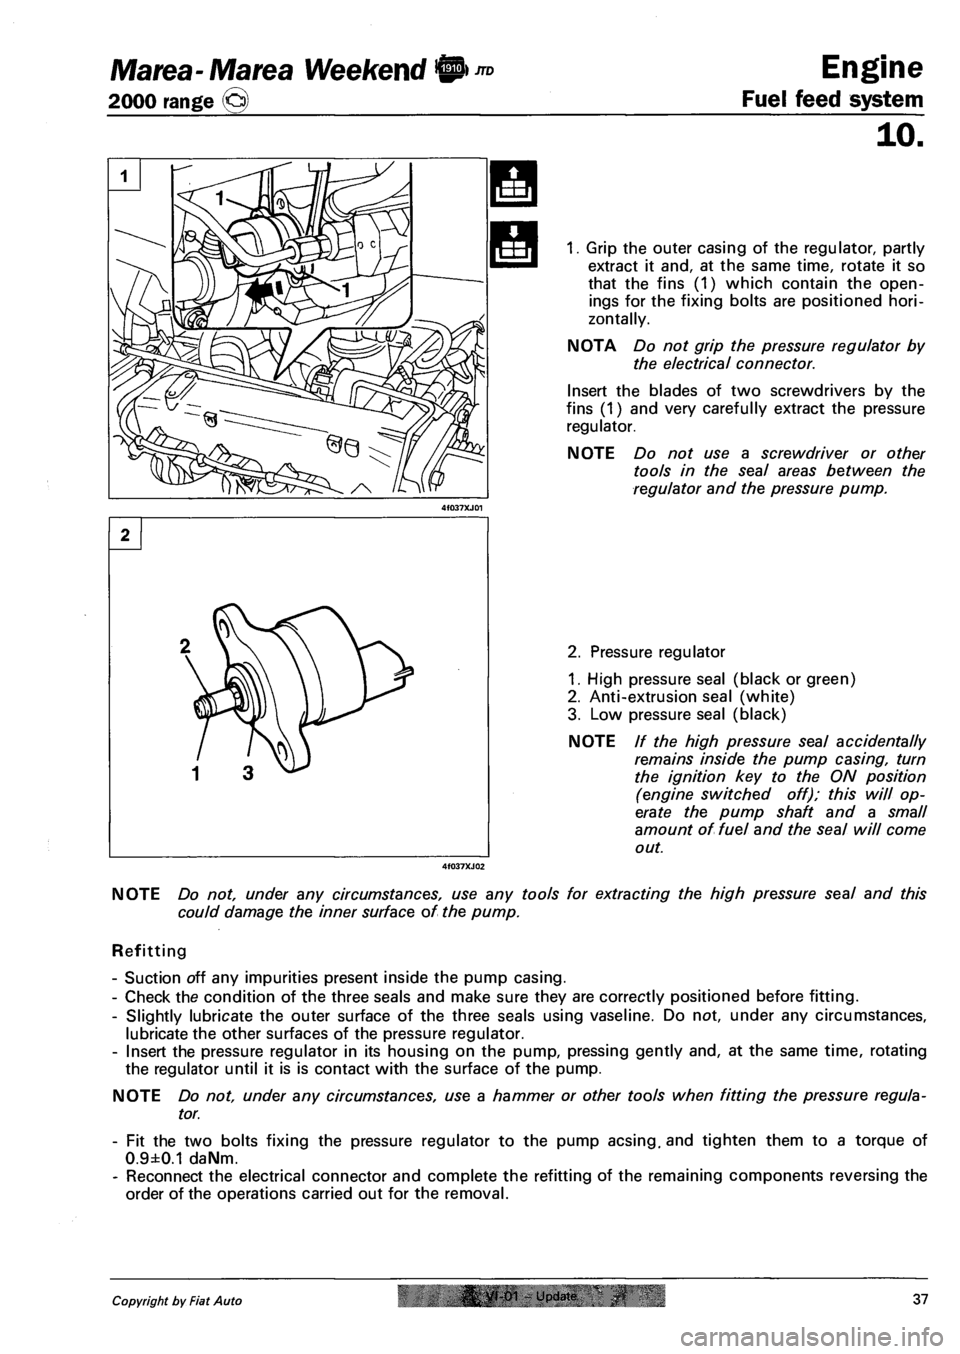
1. Grip the outer casing of the regulator, partly
extract it and, at the same time, rotate it so
that the fins (1) which contain the open
ings for the fixing bolts are positioned hori
zontally.
NOTA Do not grip the pressure regulator by
the electrical connector.
Insert the blades of two screwdrivers by the
fins (1) and very carefully extract the pressure
regulator.
NOTE Do not use a screwdriver or other
tools in the seal areas between the
regulator and the pressure pump.
2. Pressure regulator
1. High pressure seal (black or green)
2. Anti-extrusion seal (white)
3. Low pressure seal (black)
NOTE // the high pressure seal accidentally
remains inside the pump casing, turn
the ignition key to the ON position
(engine switched off); this will op
erate the pump shaft and a small
amount of fuel and the seal will come
out.
NOTE Do not, under any circumstances, use any tools for extracting the high pressure seal and this
could damage the inner surface of the pump.
Refitting
- Suction off any impurities present inside the pump casing.
- Check the condition of the three seals and make sure they are correctly positioned before fitting.
- Slightly lubricate the outer surface of the three seals using vaseline. Do not, under any circumstances,
lubricate the other surfaces of the pressure regulator.
- Insert the pressure regulator in its housing on the pump, pressing gently and, at the same time, rotating
the regulator until it is is contact with the surface of the pump.
NOTE Do not, under any circumstances, use a hammer or other tools when fitting the pressure regula
tor.
- Fit the two bolts fixing the pressure regulator to the pump acsing. and tighten them to a torque of
0.9±0.1 daNm.
- Reconnect the electrical connector and complete the refitting of the remaining components reversing the
order of the operations carried out for the removal.
Copyright by Fiat Auto |& yt-01 - Update 37