clock FIAT PALIO 2003 178 / 1.G India Version Owners Manual
[x] Cancel search | Manufacturer: FIAT, Model Year: 2003, Model line: PALIO, Model: FIAT PALIO 2003 178 / 1.GPages: 156, PDF Size: 6.27 MB
Page 10 of 156
9
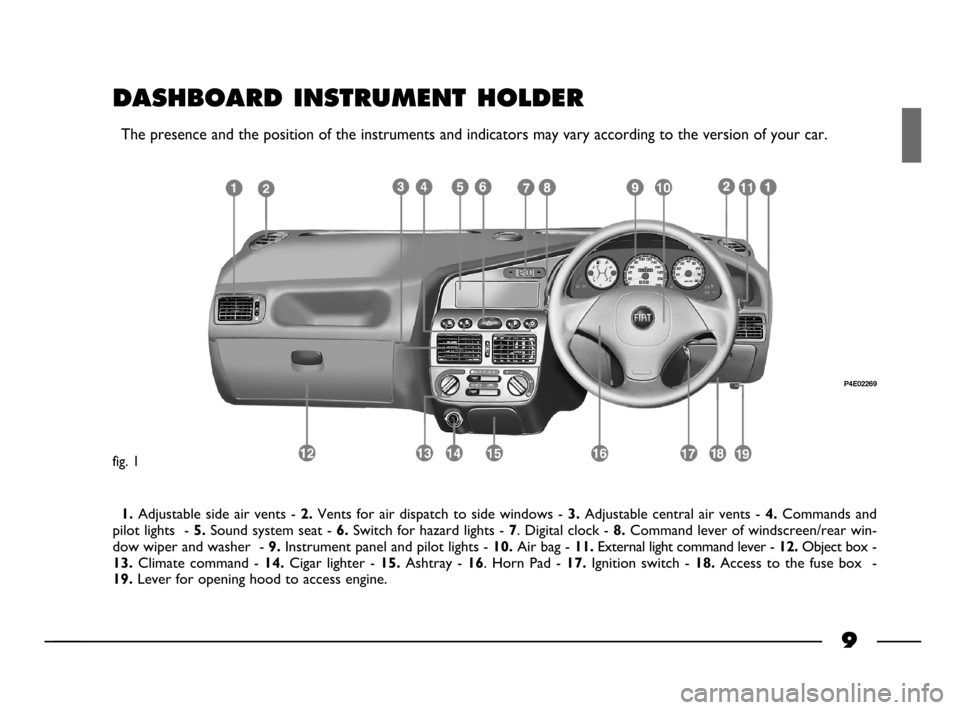
1.Adjustable side air vents - 2.Vents for air dispatch to side windows - 3.Adjustable central air vents - 4.Commands and
pilot lights -
5.Sound system seat - 6.Switch for hazard lights - 7. Digital clock - 8.Command lever of windscreen/rear win-
dow wiper and washer -
9.Instrument panel and pilot lights - 10.Air bag - 11.External light command lever - 12.Object box -
13.Climate command - 14.Cigar lighter - 15.Ashtray - 16. Horn Pad - 17.Ignition switch - 18.Access to the fuse box -
19.Lever for opening hood to access engine.
P4E02269
DASHBOARD INSTRUMENT HOLDER
The presence and the position of the instruments and indicators may vary according to the version of your car.
fig. 1
1-19 03/03/2003 05:44 PM Page 9
Page 35 of 156
34
If the gauge reaches the
red section, stop the en-
gine immediately and go
to a Fiat Dealership.Do not travel with the fuel tank al-
most empty: as gaps in fuel delivery
could damage the catalyser.
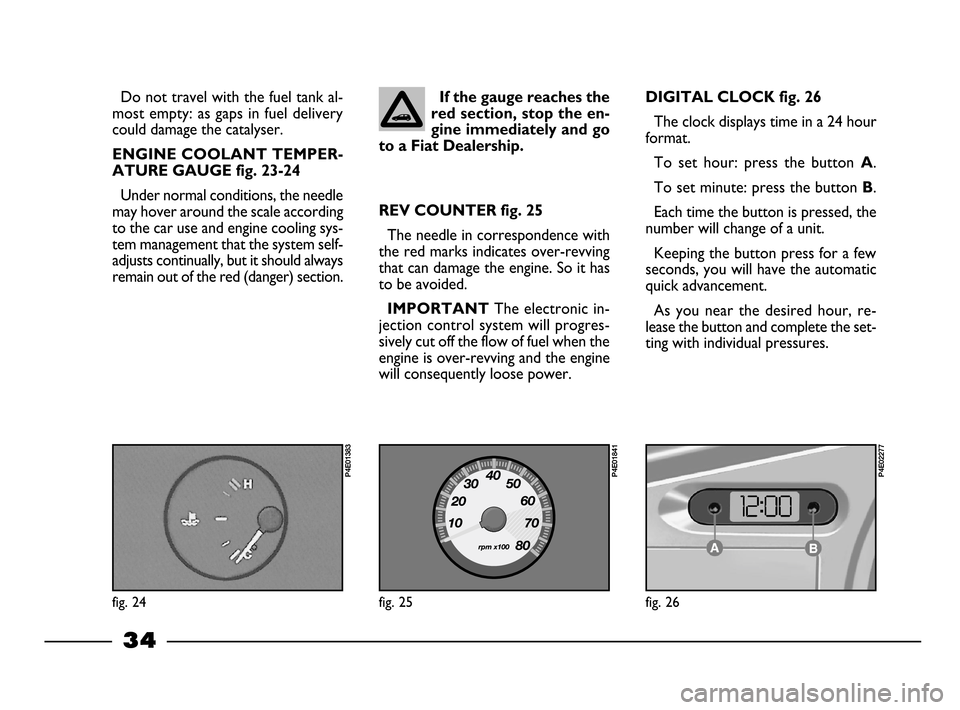
ENGINE COOLANT TEMPER-
ATURE GAUGE fig. 23-24
Under normal conditions, the needle
may hover around the scale according
to the car use and engine cooling sys-
tem management that the system self-
adjusts continually, but it should always
remain out of the red (danger) section.
REV COUNTER fig. 25
The needle in correspondence with
the red marks indicates over-revving
that can damage the engine. So it has
to be avoided.
IMPORTANT The electronic in-
jection control system will progres-
sively cut off the flow of fuel when the
engine is over-revving and the engine
will consequently loose power.
fig. 24
P4E01383
fig. 25
P4E01841
DIGITAL CLOCK fig. 26
The clock displays time in a 24 hour
format.
To set hour: press the button
A.
To set minute: press the button
B.
Each time the button is pressed, the
number will change of a unit.
Keeping the button press for a few
seconds, you will have the automatic
quick advancement.
As you near the desired hour, re-
lease the button and complete the set-
ting with individual pressures.
fig. 26
P4E02277
20-63 03/03/2003 06:02 PM Page 34
Page 87 of 156
86
IF A BULB BURNS OUT
Modifications or repairs
to the electrical system
carried out incorrectly
and without bearing the features
of the system in mind can cause
malfunctions with the risk of fire.
You should have the
bulbs replaced at a Fiat
Dealership. The correct
operation and direction of the
headlights is essential for safety
and is governed by the highway
code.Only touch the metal
part when handling halo-
gen bulbs. If the transpar-
ent bulb is touched it reduces the
intensity of the light emitted and
can also reduce the life of the
bulb. If you touch the bulb acci-
dentally, rub it with a cloth moist-
ened with alcohol and leave it to
dry.
GENERAL INSTRUCTIONS
When a light is not working, check
that it has not fused before changing the
bulb.
For the location of the fuses, refer to
“If a fuse blows” in this chapter.
Before replacing a bulb that does not
work, check that the contacts are not
oxidised.
Halogen bulbs contain
pressurised gas which, if
broken, may cause small
fragments of glass to be project-
ed outwards.
Burnt-out bulbs must be replaced
with ones of the same type. Bulbs with
low power offer low illumination,
bulbs with too much power absorb
too much energy.
Always check the height of the head-
light beam after changing a bulb.
TYPES OF BULBS
Several types of bulbs are installed in
the car
fig. 12:
A. Glass bulbs
Clipped into position. Pull to remove.
B. Bayonet connection bulbs
Remove from the bulb holder by
pressing the bulb and rotating it anti-
clockwise.
C. Cylindrical bulbs
Remove by pulling away from termi-
nals.
D-E. Halogen bulbs
To remove bulb, loosen the fixing
spring from the relevant seat.
80-103 03/03/2003 06:49 PM Page 86
Page 90 of 156
89
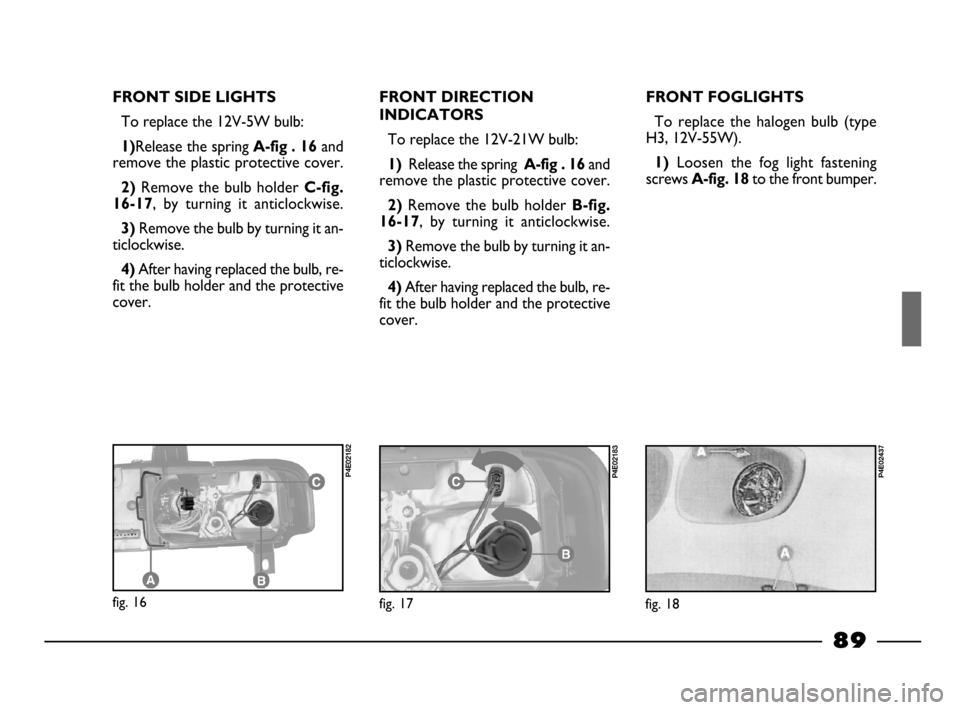
FRONT SIDE LIGHTS
To replace the 12V-5W bulb:
1)Release the spring A-fig . 16and
remove the plastic protective cover.
2)Remove the bulb holder C-fig.
16-17
, by turning it anticlockwise.
3) Remove the bulb by turning it an-
ticlockwise.
4) After having replaced the bulb, re-
fit the bulb holder and the protective
cover.
FRONT DIRECTION
INDICATORS
To replace the 12V-21W bulb:
1) Release the spring A-fig . 16and
remove the plastic protective cover.
2)Remove the bulb holder B-fig.
16-17
, by turning it anticlockwise.
3) Remove the bulb by turning it an-
ticlockwise.
4) After having replaced the bulb, re-
fit the bulb holder and the protective
cover.
FRONT FOGLIGHTS
To replace the halogen bulb (type
H3, 12V-55W).
1) Loosen the fog light fastening
screws
A-fig. 18to the front bumper.
fig. 16
P4E02182
fig. 17
P4E02183P4E02437
fig. 18
80-103 03/03/2003 06:49 PM Page 89
Page 91 of 156
90
FRONT FOGLIGHTS
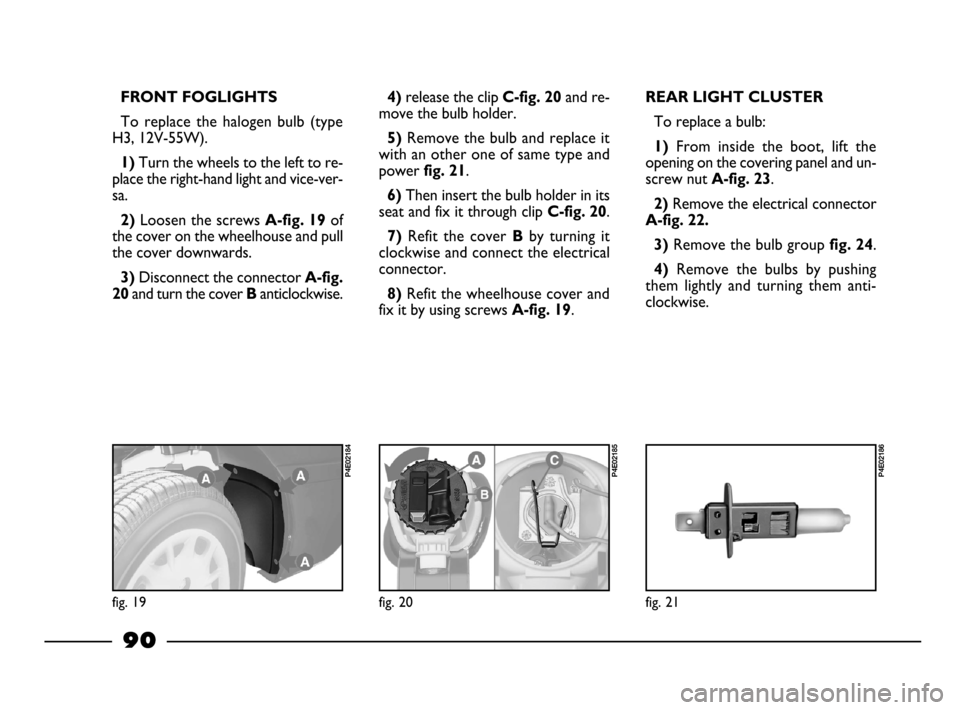
To replace the halogen bulb (type
H3, 12V-55W).
1) Turn the wheels to the left to re-
place the right-hand light and vice-ver-
sa.
2) Loosen the screws A-fig. 19of
the cover on the wheelhouse and pull
the cover downwards.
3) Disconnect the connectorA-fig.
20
and turn the cover B anticlockwise.
4)release the clip C-fig. 20and re-
move the bulb holder.
5)Remove the bulb and replace it
with an other one of same type and
power
fig. 21.
6)Then insert the bulb holder in its
seat and fix it through clip
C-fig. 20.
7)Refit the cover Bby turning it
clockwise and connect the electrical
connector.
8)Refit the wheelhouse cover and
fix it by using screws
A-fig. 19.
REAR LIGHT CLUSTER
To replace a bulb:
1) From inside the boot, lift the
opening on the covering panel and un-
screw nut
A-fig. 23.
2) Remove the electrical connector
A-fig. 22.
3)
Remove the bulb group fig. 24.
4)Remove the bulbs by pushing
them lightly and turning them anti-
clockwise.
fig. 20
P4E02185
fig. 21
P4E02186
fig. 19
P4E02184
80-103 03/03/2003 06:49 PM Page 90
Page 93 of 156
92
IF AN INTERIOR
LIGHT BURNS
OUT
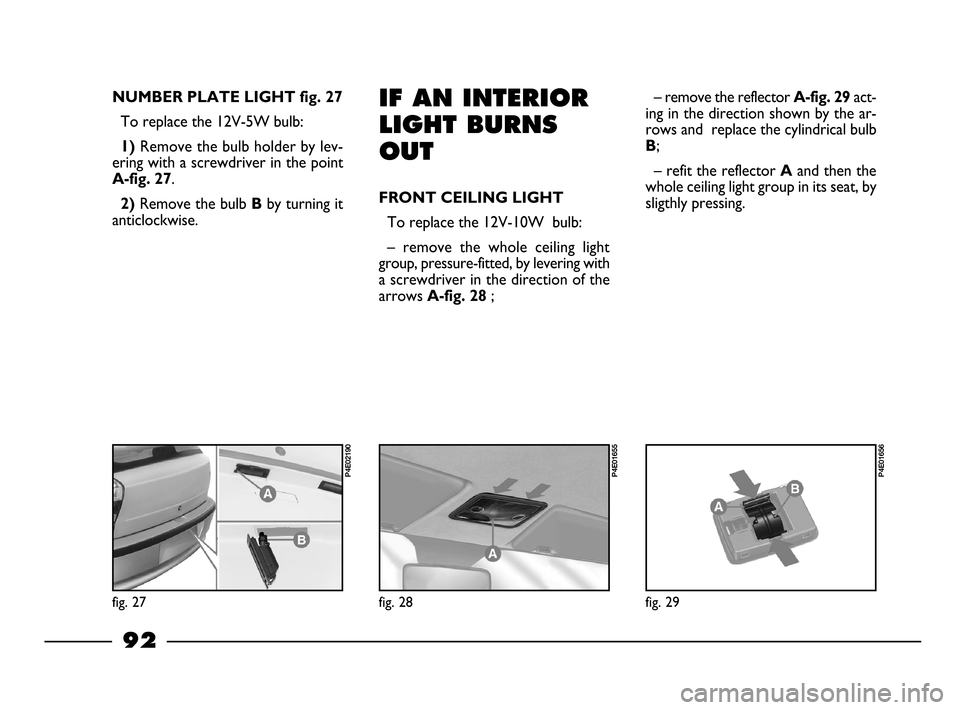
FRONT CEILING LIGHT
To replace the 12V-10W bulb:
– remove the whole ceiling light
group, pressure-fitted, by levering with
a screwdriver in the direction of the
arrows
A-fig. 28 ;– remove the reflector
A-fig. 29act-
ing in the direction shown by the ar-
rows and replace the cylindrical bulb
B;
– refit the reflector
Aand then the
whole ceiling light group in its seat, by
sligthly pressing.
fig. 29
P4E01656
NUMBER PLATE LIGHT fig. 27
To replace the 12V-5W bulb:
1) Remove the bulb holder by lev-
ering with a screwdriver in the point
A-fig. 27.
2)Remove the bulb Bby turning it
anticlockwise.
fig. 28
P4E01655
fig. 27
P4E02190
80-103 03/03/2003 06:49 PM Page 92
Page 98 of 156
6
7
15
20
8
15
7
1
1
1
2
2
2
3
3
3
3
4
4
5
5
6
7
21
24
25
26
27
28
2960A
60A
15A
10A
10A
15A
10A
30A
30A
30A
40A
40A
40A
50A
50A
50A
60A
60A
60A
40A
40A
40A
15A
-
-
-
10A
15A
20A
30A
Componentfuse N. Ampere Location
Fig. 34 (b)
Fig. 34 (c)
Fig. 33
Fig. 33
Fig. 33
Fig. 33
Fig. 33
Fig. 34 (a)
Fig. 34 (b)
Fig. 34 (c)
Fig. 34 (a)
Fig. 34 (b)
Fig. 34 (c)
Fig. 34 (a)
Fig. 34 (b)
Fig. 34 (c)
Fig. 34 (a)
Fig. 34 (b)
Fig. 34 (c)
Fig. 34 (a)
Fig. 34 (b)
Fig. 34 (c)
Fig 35
Fig 33
Fig 33
Fig 33
Fig 33
Fig 33
Fig 33
Fig 33
97
C
ABS (1,6 16V version)
ABS (1,9 D version)
Clock (power supply under key)
Clock (power supply not under key)
Clock (illumination)
Instrument panel power supply
Control illumination
Fuel pump/injection system (1.2 version)
Fuel pump/injection system (1.6 16v version)
Fuel pump/injection system (1.9 D version)
Ignition switch (1.2 version)
Ignition switch (1.6 16v version)
Ignition switch (1.9 D version)
General power supply of the servicces (1.2 version)
General power supply of the servicces (1.6 16v version)
General power supply of the servicces (1.9 D version)
General power supply of the servicces (1.2 version)
General power supply of the servicces (1.6 16v version)
General power supply of the servicces (1.9 D version)
Engine cooling fan (1.2 version)
Engine cooling fan (1.6 16v version)
Engine cooling fan (1.9 D version)
Lambda Sensor
Available
Available
Available
Spare fuse
Spare fuse
Spare fuse
Spare fuse
80-103 03/03/2003 06:49 PM Page 97
Page 145 of 156
Abord instrument ................... 33
ABS ................................................. 56
Accessories Purchased
Air cleaner (replacement) ....... 116
Air bag ........................................... 58
Air re-circulation.......................... 40
Air vents......................................... 38
Alternator (specifications) ........ 137
Ashtray ........................................... 47
Battery
- jump starting ......................... 81
- specifications........................... 137
- with optical hydrometer .... 119
- useful advices .......................... 118
- maintenance ............................ 118
- recharging ................................ 98
Bodywork
- bodywork type code ........... 130
- maintenance .......................... 125Boot
- extending ................................. 52
- tailgate opening/closing ........ 16-51
Brake lights
(bulb replacement) ................. 90
Brake-clutch fluid level ............... 115
Brakes
- service and emergency ....... 134
- fluid level ................................ 115
Bulb (replacement) ..................... 86
- bulb types ............................... 86
By the Owner ............................... 79Car dimensions ......................... 139
Car maintenance ......................... 104
Ceiling lights
- control ..................................... 46
- bulb replacement ................... 92
Centralized locking .................... 17-49
Chassis(marking) ......................... 129
Cheap running that respects
the environment ..................... 73
Checking the levels .................... 111
Children safety ............................ 18-49
Climate control system- climate ..................................... 39
- controls.................................... 14-39
- fast demisting ........................ 40
- maintenance .......................... 125
- air re-circulation .................... 40
- heating ...................................... 39
Climate/heating control
system ........................................ 37
Clutch ............................................. 133
Containing running costs and
pollution .................................... 75
Control switches ........................ 15-44
Correct use of your car ............ 64
Dashboard ................................ 9
Demisting ....................................... 40
- rear window .......................... 40
- windscreen and side
window ...................................... 40
Differential ..................................... 133
Digital clock ................................. 34
INDEX
144
144-152 03/03/2003 07:30 PM Page 144