gas type FIAT PALIO 2003 178 / 1.G India Version Owners Manual
[x] Cancel search | Manufacturer: FIAT, Model Year: 2003, Model line: PALIO, Model: FIAT PALIO 2003 178 / 1.GPages: 156, PDF Size: 6.27 MB
Page 87 of 156

86
IF A BULB BURNS OUT
Modifications or repairs
to the electrical system
carried out incorrectly
and without bearing the features
of the system in mind can cause
malfunctions with the risk of fire.
You should have the
bulbs replaced at a Fiat
Dealership. The correct
operation and direction of the
headlights is essential for safety
and is governed by the highway
code.Only touch the metal
part when handling halo-
gen bulbs. If the transpar-
ent bulb is touched it reduces the
intensity of the light emitted and
can also reduce the life of the
bulb. If you touch the bulb acci-
dentally, rub it with a cloth moist-
ened with alcohol and leave it to
dry.
GENERAL INSTRUCTIONS
When a light is not working, check
that it has not fused before changing the
bulb.
For the location of the fuses, refer to
“If a fuse blows” in this chapter.
Before replacing a bulb that does not
work, check that the contacts are not
oxidised.
Halogen bulbs contain
pressurised gas which, if
broken, may cause small
fragments of glass to be project-
ed outwards.
Burnt-out bulbs must be replaced
with ones of the same type. Bulbs with
low power offer low illumination,
bulbs with too much power absorb
too much energy.
Always check the height of the head-
light beam after changing a bulb.
TYPES OF BULBS
Several types of bulbs are installed in
the car
fig. 12:
A. Glass bulbs
Clipped into position. Pull to remove.
B. Bayonet connection bulbs
Remove from the bulb holder by
pressing the bulb and rotating it anti-
clockwise.
C. Cylindrical bulbs
Remove by pulling away from termi-
nals.
D-E. Halogen bulbs
To remove bulb, loosen the fixing
spring from the relevant seat.
80-103 03/03/2003 06:49 PM Page 86
Page 111 of 156

The jack, with which the
car is equipped, is pre-
scribed only when the
wheel must be replaced. For ex-
igencies different from this latter,
the lifting of the car must re-
spect particular modalities.
Therefore, we recommend you
to perform the operation at Fiat
Dealership.
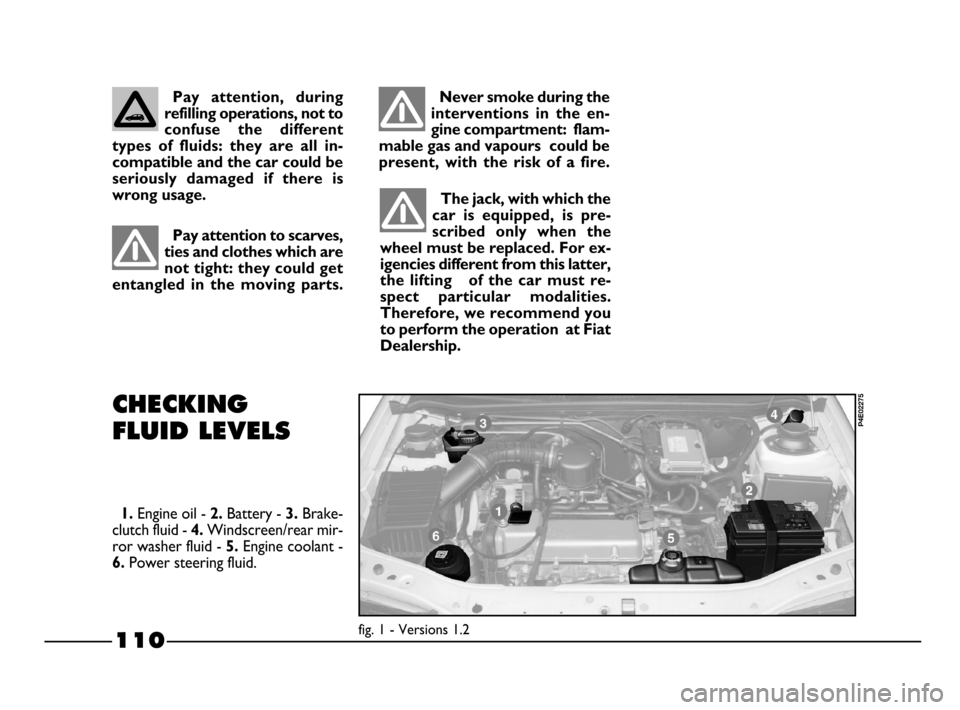
110fig. 1 - Versions 1.2
P4E02275CHECKING
FLUID LEVELS
1.Engine oil - 2.Battery -3. Brake-
clutch fluid -
4.Windscreen/rear mir-
ror washer fluid -
5. Engine coolant -
6.Power steering fluid.
Pay attention, during
refilling operations, not to
confuse the different
types of fluids: they are all in-
compatible and the car could be
seriously damaged if there is
wrong usage.
Pay attention to scarves,
ties and clothes which are
not tight: they could get
entangled in the moving parts.Never smoke during the
interventions in the en-
gine compartment: flam-
mable gas and vapours could be
present, with the risk of a fire.
104-127 03/03/2003 06:53 PM Page 110
Page 117 of 156

116
AIR CLEANER
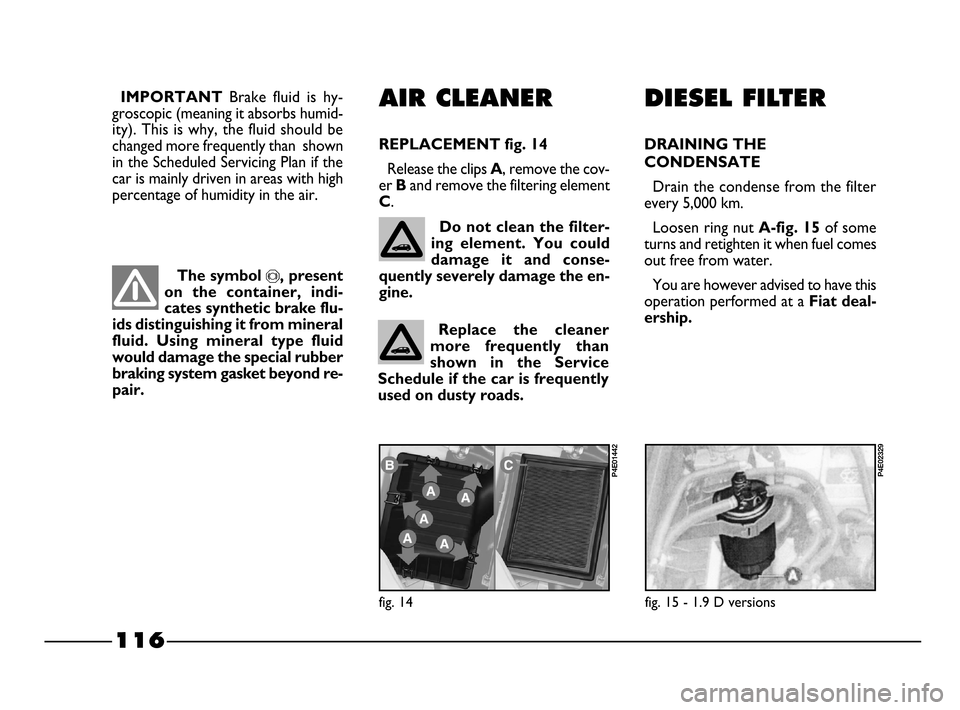
REPLACEMENT fig. 14
Release the clips A, remove the cov-
er
Band remove the filtering element
C.
fig. 14
P4E01442
The symbol π, present
on the container, indi-
cates synthetic brake flu-
ids distinguishing it from mineral
fluid. Using mineral type fluid
would damage the special rubber
braking system gasket beyond re-
pair.
Do not clean the filter-
ing element. You could
damage it and conse-
quently severely damage the en-
gine.
Replace the cleaner
more frequently than
shown in the Service
Schedule if the car is frequently
used on dusty roads. IMPORTANT
Brake fluid is hy-
groscopic (meaning it absorbs humid-
ity). This is why, the fluid should be
changed more frequently than shown
in the Scheduled Servicing Plan if the
car is mainly driven in areas with high
percentage of humidity in the air.
fig. 15 - 1.9 D versions
P4E02329
DIESEL FILTER
DRAINING THE
CONDENSATE
Drain the condense from the filter
every 5,000 km.
Loosen ring nut
A-fig. 15of some
turns and retighten it when fuel comes
out free from water.
You are however advised to have this
operation performed at a
Fiat deal-
ership.
104-127 03/03/2003 06:53 PM Page 116