change time FIAT PANDA 2013 319 / 3.G Owners Manual
[x] Cancel search | Manufacturer: FIAT, Model Year: 2013, Model line: PANDA, Model: FIAT PANDA 2013 319 / 3.GPages: 284, PDF Size: 11.33 MB
Page 2 of 284
We really know your car because we invented, designed and built it: we really know every single detail.
At Fiat Service authorised workshopsyou can find technicians directly trained by us,
offering quality and professionalism for all service operations.
Fiat workshops are always close to you for the regular servicing operations, season checks
and practical recommendations by our experts.
With Fiat Genuine Parts you keep the reliability, comfort and performance features
of your new car unchanged in time: that's why you bought it for.
Always ask for Genuine Parts for the components used on our cars; we recommend them because
they come from our steady commitment in research and development of highly innovative technologies.
For all these reasons: rely on Genuine Parts, because they are the only ones designed
by Fiat for your car.
SAFETY:
BRAKING SYSTEM
ENVIRONMENT: PARTICULATE FILTERS,
CLIMATE CONTROL MAINTENANCE
COMFORT: SUSPENSION
AND WINDSCREEN WIPERS
PERFORMANCE: SPARK PLUGS,
INJECTORS AND BATTERIES
LINEACCESSORI
ROOF RACK BARS, WHEEL RIMS
WHY CHOOSING
GENUINE PARTS
Page 11 of 284
DISPLAYWith the ignition key removed, the display shows
three values for a few seconds when a front door is
opened: time, temperature and total milometer
reading (in km or miles).
"STANDARD" SCREEN
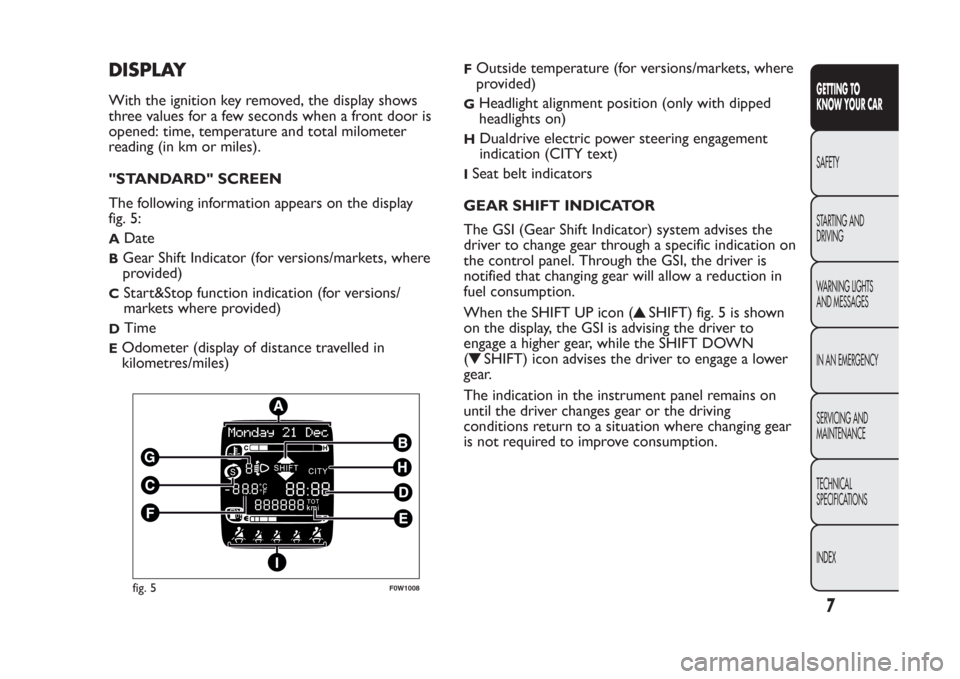
The following information appears on the display
fig. 5:A
Date
B
Gear Shift Indicator (for versions/markets, where
provided)
C
Start&Stop function indication (for versions/
markets where provided)
D
Time
E
Odometer (display of distance travelled in
kilometres/miles)
F
Outside temperature (for versions/markets, where
provided)
G
Headlight alignment position (only with dipped
headlights on)
H
Dualdrive electric power steering engagement
indication (CITY text)
ISeat belt indicators
GEAR SHIFT INDICATOR
The GSI (Gear Shift Indicator) system advises the
driver to change gear through a specific indication on
the control panel. Through the GSI, the driver is
notified that changing gear will allow a reduction in
fuel consumption.
When the SHIFT UP icon (
SHIFT) fig. 5 is shown
on the display, the GSI is advising the driver to
engage a higher gear, while the SHIFT DOWN
(
SHIFT) icon advises the driver to engage a lower
gear.
The indication in the instrument panel remains on
until the driver changes gear or the driving
conditions return to a situation where changing gear
is not required to improve consumption.
fig. 5
F0W1008
7GETTING TO
KNOW YOUR CARSAFETY
STARTING AND
DRIVING
WARNING LIGHTS
AND MESSAGES
IN AN EMERGENCY
SERVICING AND
MAINTENANCE
TECHNICAL
SPECIFICATIONS
INDEX
Page 15 of 284
❒press the
button: "Off" will flash on the
display;
❒press the
button briefly to return to the menu
screen or hold the button down to return to the
standard screen without storing.
Activation/Trip B data (Activating Trip B)
With this function it is possible to activate ("On") or
deactivate ("Off") the Trip B display (partial trip).
For more information see the "Trip computer"
paragraph.
For activation/deactivation, proceed as follows:
❒press thebutton briefly to make the display flash
"On" or "Off" according to the previous setting;
❒press the
or
button to make the
adjustment;
❒press the
button briefly to return to the menu
screen or hold the button down to return to the
standard screen without storing.
Time adjustment (Clock adjustment)
This function allows the clock to be set through two
submenus: "Time" and "Format".
To carry out the adjustment, proceed as follows:
❒press thebutton briefly: the display will show
the two submenus "Time" and "Format";
❒press the
or
button to switch between
the two submenus;❒once you have selected the submenu to be
changed, press the
button briefly;
❒when you select "Time", pressing
briefly makes
the "hours" flash on the display. press the
or
button to make the adjustment;
❒press the
button briefly: the "minutes" flash on
the display. Press the
or
button to make
the adjustment;
❒if you select the "Format" submenu, pressing the
button briefly makes the display mode flash on
the display. Press the
or
button to select
"12h" or "24h" mode. When you have carried
out the desired adjustment, press the
button
briefly to return to the submenu screen or hold
the button down to return to the main menu
screen without storing.
Hold down the
button again to return to the
standard screen or to the main menu according to
where you are in the menu.
IMPORTANT The setting will increase or decrease
by one unit each time the
or
button is
pressed. Holding the button down causes an
automatic rapid increase/decrease. Complete the
adjustment with single presses of the button when
you approach the desired value.
11GETTING TO
KNOW YOUR CARSAFETY
STARTING AND
DRIVING
WARNING LIGHTS
AND MESSAGES
IN AN EMERGENCY
SERVICING AND
MAINTENANCE
TECHNICAL
SPECIFICATIONS
INDEX
Page 16 of 284
Set date (Setting the date)
This function can be used to set the date (year -
month - day).
To carry out the adjustment, proceed as follows:
❒briefly press the
button: the "year" will flash on
the display;
❒press the
or
button to make the
adjustment;
❒press the
button briefly: the "month" will flash
on the display;
❒press the
or
button to make the
adjustment;
❒briefly press the
button: the "day" will flash on
the display;
❒press the
or
button to make the
adjustment;
❒press the
button briefly to return to the menu
screen or hold the button down to return to the
standard screen without storing.
IMPORTANT The setting will increase or decrease
by one unit each time the
or
button is
pressed. Holding the button down causes an
automatic rapid increase/decrease. Complete the
adjustment with single presses of the button when
you approach the desired value.
See radio (audio information display)
With this function the display shows information
about the sound system.❒Radio: selected radio station frequency or RDS
message, automatic tuning activation or
AutoSTore;
❒Audio CD, MP3 CDs: track number;
❒CD Changer: CD number and track number.
To show the sound system information on the
display (On) or clear it (Off ), proceed as follows:
❒briefly press
button, ON or OFF flashes on the
display according to the previous setting;
❒press theor
button to select;
❒press the
button briefly to return to the menu
screen or hold the button down to return to the
standard screen without storing.
Autoclose (Automatic central locking with car
in motion)
When activated (On), this function locks the doors
automatically when the vehicle speed exceeds 20
km/h.
To activate or deactivate this function, proceed as
follows:
❒press thebutton briefly to make the display flash
"On" or "Off" according to the previous setting;
❒press the
or
button to select;
12GETTING TO
KNOW YOUR CAR
SAFETY
STARTING AND
DRIVING
WARNING LIGHTS
AND MESSAGES
IN AN EMERGENCY
SERVICING AND
MAINTENANCE
TECHNICAL
SPECIFICATIONS
INDEX
Page 50 of 284
PARKING LIGHTS
These lights can only be turned on with ignition key
in STOP position or removed, by moving the ring nut
A first to positionOand then to position
.
The warning light
switches on on the instrument
panel.
MAIN BEAM HEADLIGHTS
To activate the main beam headlights, with ring nut at
, pull the stalk towards the steering wheel. The
warning light
switches on in the instrument panel.
When the stalk is pulled towards the steering wheel
again, the lights deactivate, the dipped headlights
reactivate and the
warning light switches off.
FLASHING
You can flash the headlights by pulling the stalk
towards the wheel (unstable position). The
warning light will come on in the instrument
panel.
DIRECTION INDICATORS
Bring the stalk to the (stable) position:
upwards:right direction indicator activation;
downwards:left direction indicator activation.
Warning light
or
will flash in the instrument
panel. The indicators switch off automatically when
the steering wheel is straightened.Lane change function
If you wish to signal a lane change, place the left stalk
in the unstable position for less than half a second.
The direction indicator on the side selected will flash
five times and then switch off automatically.
“FOLLOW ME HOME” DEVICE
This allows the space in front of the car to be lit up
for a certain period of time.
Activation:with the ignition key on STOP or
removed, pull the stalk towards the steering wheel
within 2 minutes from when the engine is turned off.
At each single movement of the stalk, the lights
will remain on for an extra 30 seconds up to a
maximum of 210 seconds; then the lights are
switched off automatically.
Each time the stalk is operated, the
warning light
on the instrument panel switches on and the display
also shows a message and how long the function
will remain active.
The
warning light switches on when the stalk is
first moved and stays on until the function is
automatically deactivated. Each time the stalk is
activated it increases the time that the lights remain
on.
Deactivation:keep the stalk pulled towards the
steering wheel for more than two seconds.
46GETTING TO
KNOW YOUR CAR
SAFETY
STARTING AND
DRIVING
WARNING LIGHTS
AND MESSAGES
IN AN EMERGENCY
SERVICING AND
MAINTENANCE
TECHNICAL
SPECIFICATIONS
INDEX
Page 75 of 284
WARNING
Evenly distribute the load and take into
account , when driving, the increased
responsiveness of the car to side wind.Fully comply with the regulations in force
concerning maximum clearance.
HEADLIGHTSLIGHT BEAM DIRECTION
The correct alignment of the headlights is important
for the comfort and safety of not only the driver
but all other road users. This is also covered by
a specific rule of the highway code.
The headlights must be correctly aimed to guarantee
the best visibility conditions for all drivers while
travelling with headlights on.
Contact a Fiat Dealership to have the lights checked
and adjusted, if necessary.
Check beam alignment every time the load or its
distribution changes.
HEADLIGHT ALIGNMENT CORRECTOR
This device works with the ignition key in the MAR
position and the dipped headlights on.
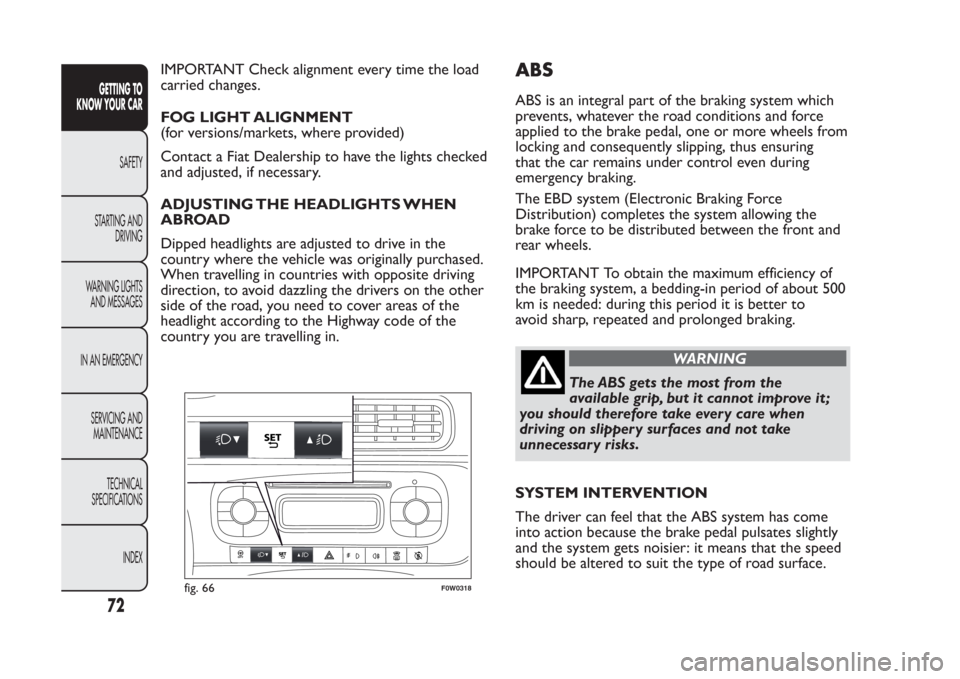
Headlight alignment adjustment
To adjust press buttons
or
fig. 66. The
instrument panel display shows the position in
relation to the adjustment set.
Position 0 - one or two persons on the front seats
Position 1 - 4/5 persons
Position 2 - 4/5 persons + load in the luggage
compartment
Position 3 - driver + maximum permitted load all
stowed in the luggage compartment.
71GETTING TO
KNOW YOUR CARSAFETY
STARTING AND
DRIVING
WARNING LIGHTS
AND MESSAGES
IN AN EMERGENCY
SERVICING AND
MAINTENANCE
TECHNICAL
SPECIFICATIONS
INDEX
Page 76 of 284
IMPORTANT Check alignment every time the load
carried changes.
FOG LIGHT ALIGNMENT
(for versions/markets, where provided)
Contact a Fiat Dealership to have the lights checked
and adjusted, if necessary.
ADJUSTING THE HEADLIGHTS WHEN
ABROAD
Dipped headlights are adjusted to drive in the
country where the vehicle was originally purchased.
When travelling in countries with opposite driving
direction, to avoid dazzling the drivers on the other
side of the road, you need to cover areas of the
headlight according to the Highway code of the
country you are travelling in.
ABSABS is an integral part of the braking system which
prevents, whatever the road conditions and force
applied to the brake pedal, one or more wheels from
locking and consequently slipping, thus ensuring
that the car remains under control even during
emergency braking.
The EBD system (Electronic Braking Force
Distribution) completes the system allowing the
brake force to be distributed between the front and
rear wheels.
IMPORTANT To obtain the maximum efficiency of
the braking system, a bedding-in period of about 500
km is needed: during this period it is better to
avoid sharp, repeated and prolonged braking.
WARNING
The ABS gets the most from the
available grip, but it cannot improve it ;
you should therefore take every care when
driving on slippery surfaces and not take
unnecessary risks.
SYSTEM INTERVENTION
The driver can feel that the ABS system has come
into action because the brake pedal pulsates slightly
and the system gets noisier: it means that the speed
should be altered to suit the type of road surface.
fig. 66
F0W0318
72GETTING TO
KNOW YOUR CAR
SAFETY
STARTING AND
DRIVING
WARNING LIGHTS
AND MESSAGES
IN AN EMERGENCY
SERVICING AND
MAINTENANCE
TECHNICAL
SPECIFICATIONS
INDEX
Page 107 of 284
Rear seats (warning light no. 2, no. 3 and no. 4)
For the rear seats, the reminder cycle is only
activated when any seat belt is unfastened together
with an acoustic signal (three beeps) (icon A
fig. 92). If the condition of any (front or rear) seat
belt changes, also the condition of the other
(front/rear) seat belts is reported.
The visual indication (icon A
fig. 92) will start and
stop independently for each warning light if several
seat belts are unfastened. The visual signal will
change condition (icon B
fig. 92) after the
corresponding seat has been fastened again.
IMPORTANT When the ignition key is turned to
MAR, if all the front and rear belts are already
fastened the warning lights will remain in position B
fig. 92 for 30 seconds.
IMPORTANT When the ignition key is turned to
MAR, the belts fastened icons will remain in position
B
fig. 92, whilst the belts unfastened icons will
be displayed as in position A
of fig. 92. If the last
belt is also fastened, the icons will remain in position
B
fig. 92 for 30 seconds then they will switch off.
PRETENSIONERSThe car is equipped with front seat belt
pretensioners, which draw back the seat belts by
several centimetres in the event of a strong frontal
impact. This guarantees the perfect adherence of the
seat belts to the occupants' bodies before the
restraining action begins. It is evident that
the pretensioners have operated when the belt
withdraws towards the reel. This car is also equipped
with a second pretensioner (in the kick plate area).
Its activation is signalled by the shortening of the
metal cable. A slight discharge of smoke may be
produced during the activation of the pretensioner
which is not harmful and does not involve any fire
hazard.
IMPORTANT To obtain the highest degree of
protection from the action of the pretensioning
device, wear the seat belt tight to the chest and
pelvis.
The pretensioner does not require any maintenance
or lubrication: any changes to its original conditions
will invalidate its efficiency. If, due to unusual natural
events (floods, sea storms, etc.), the device has
been affected by water and mud, it must be replaced.
103GETTING TO KNOW
YOUR CARSAFETYSTARTING AND
DRIVING
WARNING LIGHTS
AND MESSAGES
IN AN EMERGENCY
SERVICING AND
MAINTENANCE
TECHNICAL
SPECIFICATIONS
INDEX
Page 129 of 284
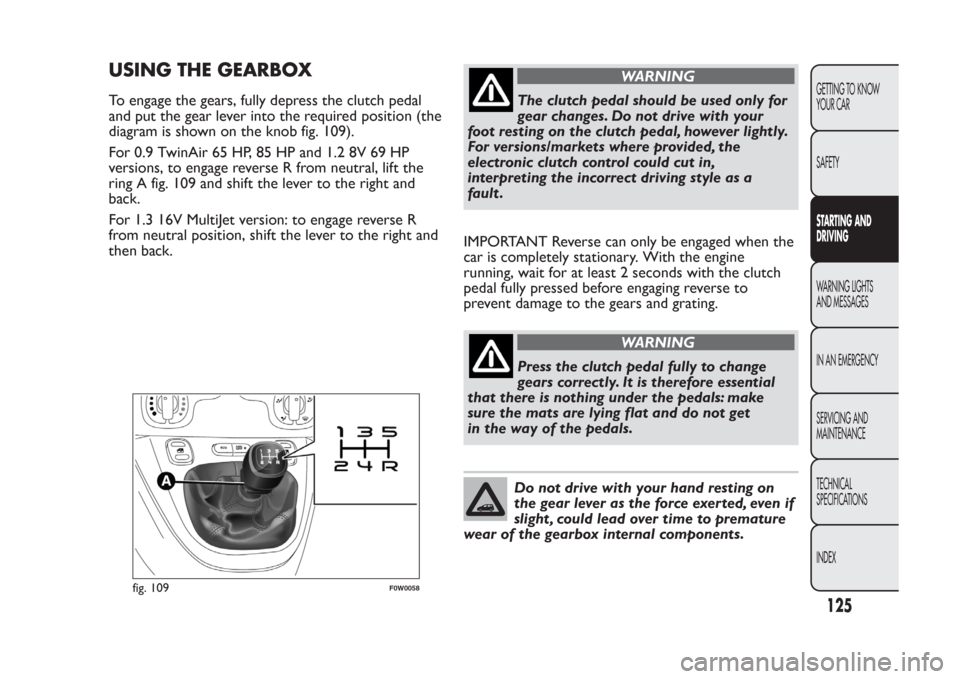
USING THE GEARBOXTo engage the gears, fully depress the clutch pedal
and put the gear lever into the required position (the
diagram is shown on the knob fig. 109).
For 0.9 TwinAir 65 HP, 85 HP and 1.2 8V 69 HP
versions, to engage reverse R from neutral, lift the
ring A fig. 109 and shift the lever to the right and
back.
For 1.3 16V MultiJet version: to engage reverse R
from neutral position, shift the lever to the right and
then back.
WARNING
The clutch pedal should be used only for
gear changes. Do not drive with your
foot resting on the clutch pedal, however lightly.
For versions/markets where provided, the
electronic clutch control could cut in,
interpreting the incorrect driving style as a
fault .
IMPORTANT Reverse can only be engaged when the
car is completely stationary. With the engine
running, wait for at least 2 seconds with the clutch
pedal fully pressed before engaging reverse to
prevent damage to the gears and grating.
WARNING
Press the clutch pedal fully to change
gears correctly. It is therefore essential
that there is nothing under the pedals: make
sure the mats are lying flat and do not get
in the way of the pedals.Do not drive with your hand resting on
the gear lever as the force exerted, even if
slight , could lead over time to premature
wear of the gearbox internal components.
fig. 109
F0W0058
125GETTING TO KNOW
YOUR CAR
SAFETYSTARTING AND
DRIVINGWARNING LIGHTS
AND MESSAGES
IN AN EMERGENCY
SERVICING AND
MAINTENANCE
TECHNICAL
SPECIFICATIONS
INDEX
Page 140 of 284
❒use of the car for short drives, in which the engine
does not have time to reach its regular operating
temperature;
❒repeated interruption of the regeneration process,
signalled by the DPF warning light switching on.
WARNING
If the warning light switches on, the
deteriorated engine oil must be changed
as soon as possible, and never more than 500
km from the first time that the warning light
switches on. Failure to observe the above may
result in severe damage to the engine and
invalidate the warranty. Remember that the
operation of this warning light is not related to
the amount of oil in the engine.Therefore,
never top up with oil when the light starts
flashing.EXCESSIVE ENGINE COOLANT
TEMPERATURE (red)
Turning the key to MAR switches on the warning
light, but it should switch off after a few seconds.
The warning light switches on (on some versions,
with a message on the display and a symbol on
the display) when the engine is overheated.If the warning light comes on when driving, proceed
as follows:
❒when driving normally:stop the car, stop the
engine and check that the water level in the
reservoir is not below the MIN mark. If it is, wait
for a few minutes for the engine to cool down
then slowly and carefully open the cap, top up with
coolant and check that the level is between the
MIN and MAX marks. Also check visually for any
fluid leaks. If, when restarting, the warning light
should switch on again, contact a Fiat Dealership;
❒if the car is used under demanding
conditions(e.g. towing trailers uphill or fully
loaded): slow down and, if the light stays on, stop
the car. Wait for 2 or 3 minutes with the engine
running and slightly accelerated to further favour
the coolant circulation. Then stop the engine.
Check the correct liquid level as described above.
IMPORTANT On demanding routes, it is advisable to
keep the engine on and slightly accelerated for a
few minutes before stopping it.
FUEL RESERVE - LIMITED RANGE
(amber)
This warning light comes on when about 5 to 7 litres
of fuel are left in the tank. When the remaining
range is lower than approx. 50 km (or equivalent
value in miles), on some versions, the display will
show a warning message.
136
GETTING TO KNOW
YOUR CAR
SAFETY
STARTING AND
DRIVINGWARNING LIGHTS
AND MESSAGESIN AN EMERGENCY
SERVICING AND
MAINTENANCE
TECHNICAL
SPECIFICATIONS
INDEX