technical specifications FIAT PANDA 2014 319 / 3.G Owners Manual
[x] Cancel search | Manufacturer: FIAT, Model Year: 2014, Model line: PANDA, Model: FIAT PANDA 2014 319 / 3.GPages: 284, PDF Size: 11.54 MB
Page 96 of 284
WARNING
If you wish to have a sound system
installed after purchasing the car, first
contact a Fiat Dealership whose qualified
personnel will give you advise about a sound
system that does not damage the batter y
charge. Excessive nonrunning consumption
damages the batter y and may cause your
batter y warranty to be terminated.
SETUP
(for versions/markets, where provided)
The system consists of:
❒radio supply leads;
❒radio housing;
❒aerial (on car roof );
❒according to the option requested, the setup
consists of four or six speakers.
Setup for four speakers
(for versions/markets, where provided)
The system consists of:
❒two 165-mm diameter full-range speakers in the
front door panels;
❒two 130-mm diameter full-range speakers in rear
front door panels.Setup for six speakers
(if requested as an optional, as an alternative to the
basic audio level)
The system consists of:
❒two 38-mm diameter tweeters in the front pillar at
the sides of the windscreen;
❒two 165-mm diameter mid-woofer speakers in the
front door panels;
❒two 130-mm diameter full-range speakers in rear
front door panels.
92GETTING TO
KNOW YOUR CAR
SAFETY
STARTING AND
DRIVING
WARNING LIGHTS
AND MESSAGES
IN AN EMERGENCY
SERVICING AND
MAINTENANCE
TECHNICAL
SPECIFICATIONS
INDEX
Page 97 of 284
PREPARATION TO INSTALL A
PORTABLE NAVIGATION SYSTEMOn cars equipped with the Blue&Me
TM
system, there
may be (on request) the preparation for installing
the Blue&Me
TM
TomTom
®
portable navigation
system, available from Lineaccessori Fiat.
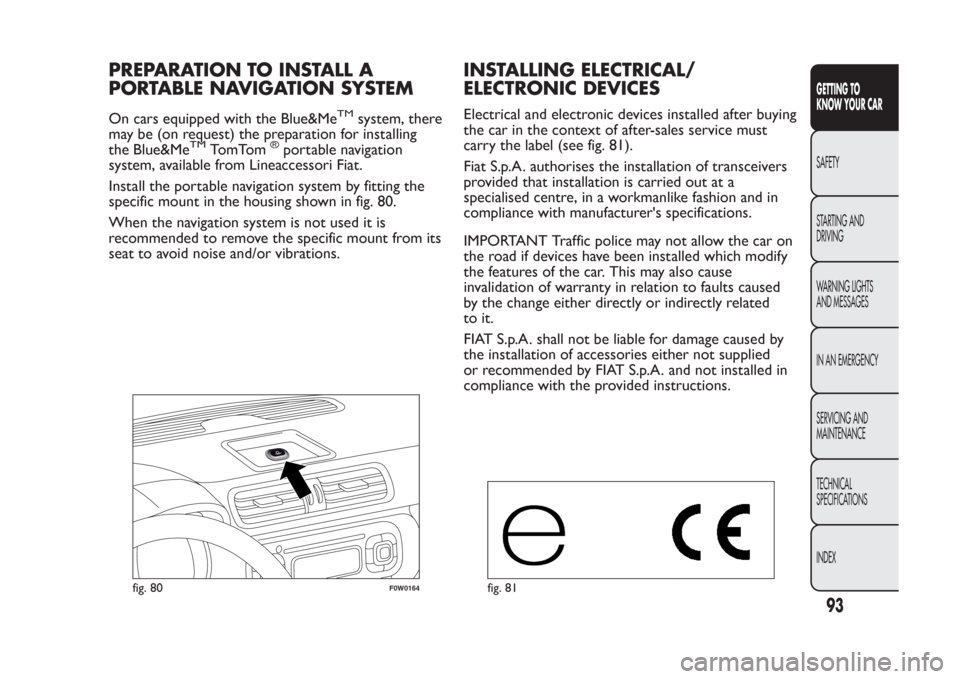
Install the portable navigation system by fitting the
specific mount in the housing shown in fig. 80.
When the navigation system is not used it is
recommended to remove the specific mount from its
seat to avoid noise and/or vibrations.
INSTALLING ELECTRICAL/
ELECTRONIC DEVICESElectrical and electronic devices installed after buying
the car in the context of after-sales service must
carry the label (see fig. 81).
Fiat S.p.A. authorises the installation of transceivers
provided that installation is carried out at a
specialised centre, in a workmanlike fashion and in
compliance with manufacturer's specifications.
IMPORTANT Traffic police may not allow the car on
the road if devices have been installed which modify
the features of the car. This may also cause
invalidation of warranty in relation to faults caused
by the change either directly or indirectly related
to it.
FIAT S.p.A. shall not be liable for damage caused by
the installation of accessories either not supplied
or recommended by FIAT S.p.A. and not installed in
compliance with the provided instructions.
fig. 80
F0W0164
fig. 81
93GETTING TO
KNOW YOUR CARSAFETY
STARTING AND
DRIVING
WARNING LIGHTS
AND MESSAGES
IN AN EMERGENCY
SERVICING AND
MAINTENANCE
TECHNICAL
SPECIFICATIONS
INDEX
Page 98 of 284
RADIO TRANSMITTERS AND MOBILE
PHONES
Radio transmitter equipment (vehicle mobile phones,
CB radios, amateur radio, etc.) cannot be used
inside the car unless a separate aerial is mounted
externally.
IMPORTANT The use of these devices inside the
passenger compartment (without an external aerial)
may cause the electrical systems to malfunction.
This could compromise the safety of the car in
addition to constituting a potential hazard for
passengers' health.
In addition, transmission and reception of these
devices may be negatively affected by the shielding
effect of the car body. As far as the use of
EC-approved mobile phones is concerned (GSM,
GPRS, UMTS), follow the usage instructions provided
by the mobile phone manufacturer.
REFUELLING THE CARVersions equipped with "Smart Fuel" system are
provided with an inhibiter which prevents refuelling
with incorrect fuel.
Accidental refuelling with non-compliant fuels (e.g.
petrol in Diesel engines) can only occur in the case
of versions equipped with fuel tank cap. Before
refuelling, make sure that the fuel type is correct.
Stop the engine before refuelling.
PETROL ENGINES
Use unleaded petrol only, with an octane number
(R.O.N.) no lower than 95. In order to prevent
damage to the catalytic converter never introduce
even the smallest amount of leaded petrol, even
in the event of an emergency.
IMPORTANT An inefficient catalytic converter leads
to harmful exhaust emissions, thus contributing to
air pollution.
IMPORTANT Never use leaded petrol, even in small
amounts or in an emergency, as this would damage
the catalytic converter beyond repair.
DIESEL ENGINES
Operation at low temperatures
If the outside temperature is very low, the diesel
thickens due to the formation of paraffin clots with
consequent defective operation of the fuel supply
system.
94GETTING TO
KNOW YOUR CAR
SAFETY
STARTING AND
DRIVING
WARNING LIGHTS
AND MESSAGES
IN AN EMERGENCY
SERVICING AND
MAINTENANCE
TECHNICAL
SPECIFICATIONS
INDEX
Page 99 of 284
In order to avoid these problems, different types of
diesel fuel are distributed according to the season:
summer type, winter type and arctic type
(cold/mountain areas). If refuelling with diesel fuel
whose specifications are not suitable for the current
temperature, it is advisable to mix TUTELA DIESEL
ART additive in the proportions shown on the
container with the fuel. Pour the additive into the
tank before the diesel fuel.
When using or parking the car for a long time in the
mountains or cold areas, it is advisable to refuel
using locally available diesel. In this case, it is also
advisable to keep the tank over 50% full.
For diesel engines, only use diesel fuel for
motor vehicles in accordance with EN590
European specifications.The use of other
products or mixtures may damage the engine
beyond repair and consequently invalidate the
warranty, due to the damage caused. If you
accidentally refuel with another type of fuel, do
not start the engine, and drain the tank. If the
engine has been run, even for only a very short
time, you will need to have the entire fuel system
emptied in addition to the tank.
FILLING THE TANK
To fill the tank completely, top up twice after the
first click of the fuel delivery gun. Further top-ups
could cause faults in the fuel supply system.REFUELLING PROCEDURE FOR VERSIONS
EQUIPPED WITH "SMART FUEL" SYSTEM
"Smart Fuel" is a device integrated with the end of
the fuel filler pipe which opens and recloses
automatically when the fuel delivery gun is
introduced/removed. "Smart Fuel" is provided with
an inhibiter which prevents refuelling with incorrect
fuel.
The refuelling procedure described below is
illustrated on label B fig. 82, which is applied inside
the fuel flap. The label also indicates the fuel type
(UNLEADED FUEL=petrol, DIESEL=diesel fuel).
To refuel proceed as follows:
❒open the flap A fig. 82 pulling it outwards;
❒introduce the dispenser in the filler and refuel;
❒at the end of refuelling, before removing the
dispenser, wait for at least 10 seconds in order for
the fuel to flow inside the tank;
❒then remove the dispenser from the filler and
close flap A.
Flap A fig. 82 is provided with a dust cowl C which
prevents deposits of impurities and dust at the
end of the filler when the flap is closed.
Emergency refuelling (only for versions
equipped with "Smart Fuel")
If there is no fuel in the car or the supply circuit is
completely empty, proceed as follows to reintroduce
fuel to the tank:
95GETTING TO
KNOW YOUR CARSAFETY
STARTING AND
DRIVING
WARNING LIGHTS
AND MESSAGES
IN AN EMERGENCY
SERVICING AND
MAINTENANCE
TECHNICAL
SPECIFICATIONS
INDEX
Page 100 of 284
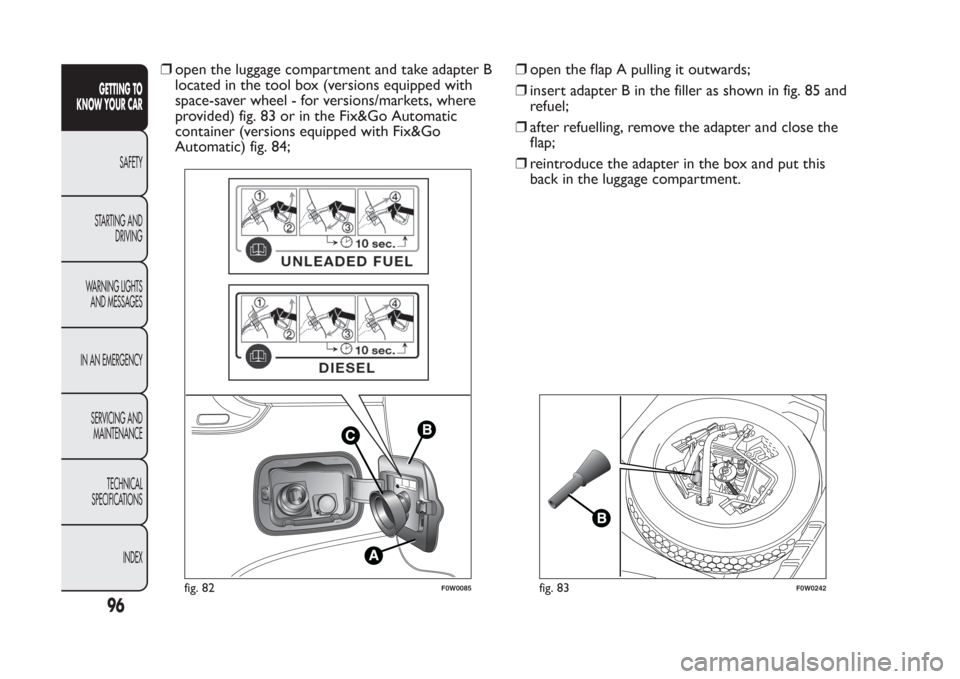
❒open the luggage compartment and take adapter B
located in the tool box (versions equipped with
space-saver wheel - for versions/markets, where
provided) fig. 83 or in the Fix&Go Automatic
container (versions equipped with Fix&Go
Automatic) fig. 84;❒open the flap A pulling it outwards;
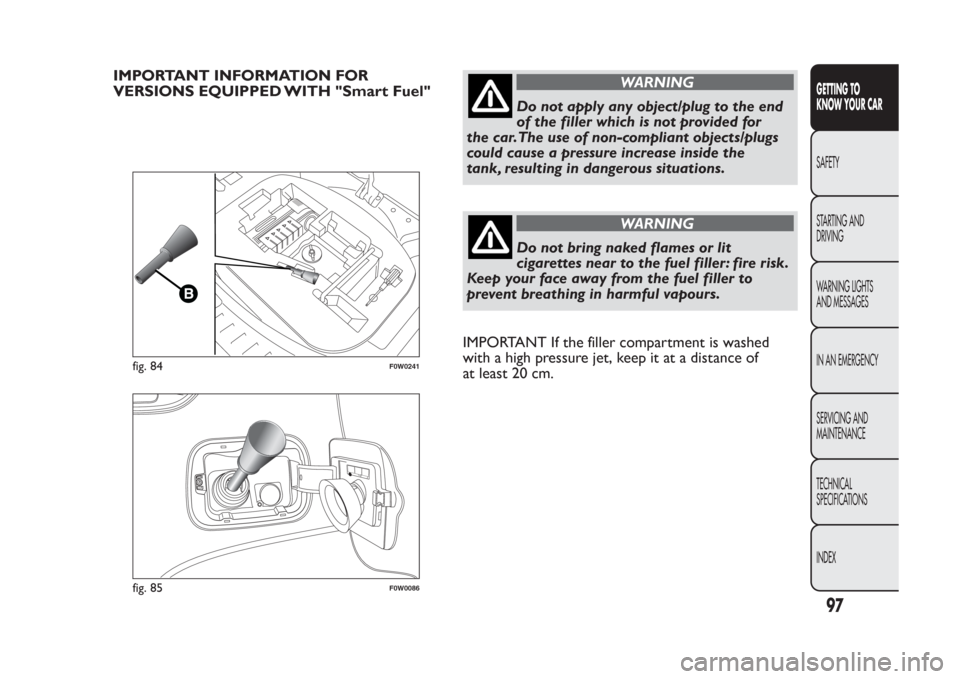
❒insert adapter B in the filler as shown in fig. 85 and
refuel;
❒after refuelling, remove the adapter and close the
flap;
❒reintroduce the adapter in the box and put this
back in the luggage compartment.
fig. 82
F0W0085
fig. 83
F0W0242
96GETTING TO
KNOW YOUR CAR
SAFETY
STARTING AND
DRIVING
WARNING LIGHTS
AND MESSAGES
IN AN EMERGENCY
SERVICING AND
MAINTENANCE
TECHNICAL
SPECIFICATIONS
INDEX
Page 101 of 284
IMPORTANT INFORMATION FOR
VERSIONS EQUIPPED WITH "Smart Fuel"
WARNING
Do not apply any object/plug to the end
of the filler which is not provided for
the car.The use of non-compliant objects/plugs
could cause a pressure increase inside the
tank, resulting in dangerous situations.
WARNING
Do not bring naked flames or lit
cigarettes near to the fuel filler: fire risk.
Keep your face away from the fuel filler to
prevent breathing in harmful vapours.
IMPORTANT If the filler compartment is washed
with a high pressure jet, keep it at a distance of
at least 20 cm.
fig. 84
F0W0241
fig. 85
F0W0086
97GETTING TO
KNOW YOUR CARSAFETY
STARTING AND
DRIVING
WARNING LIGHTS
AND MESSAGES
IN AN EMERGENCY
SERVICING AND
MAINTENANCE
TECHNICAL
SPECIFICATIONS
INDEX
Page 102 of 284
PROTECTING THE ENVIRONMENTThe following devices are used for reducing petrol
fuel engine emissions: catalytic converter, oxygen
sensors and evaporation control system
Do not let the engine run, even for a test, with one
or more spark plugs disconnected.
The following devices are used for reducing diesel
fuel engine emissions: oxidising catalytic converter,
exhaust gas recirculation system (EGR) and
particulate filter (DPF).
DIESEL PARTICULATE FILTER (DPF)
(for versions/markets, where provided)
This is a mechanical filter, fitted in the exhaust
system, which almost completely eliminates carbon
particle emissions.
WARNING
During normal service, the catalytic
converter and the diesel particulate
filter (DPF) reach high temperatures. Do not
therefore park the car over inflammable
materials (grass, dry leaves, pine needles, etc .):
fire hazard.
98GETTING TO
KNOW YOUR CAR
SAFETY
STARTING AND
DRIVING
WARNING LIGHTS
AND MESSAGES
IN AN EMERGENCY
SERVICING AND
MAINTENANCE
TECHNICAL
SPECIFICATIONS
INDEX
Page 103 of 284
SAFETY
SEAT BELTSUSING THE SEAT BELTS
The belt should be worn keeping the torso straight
and rested against the backrest.
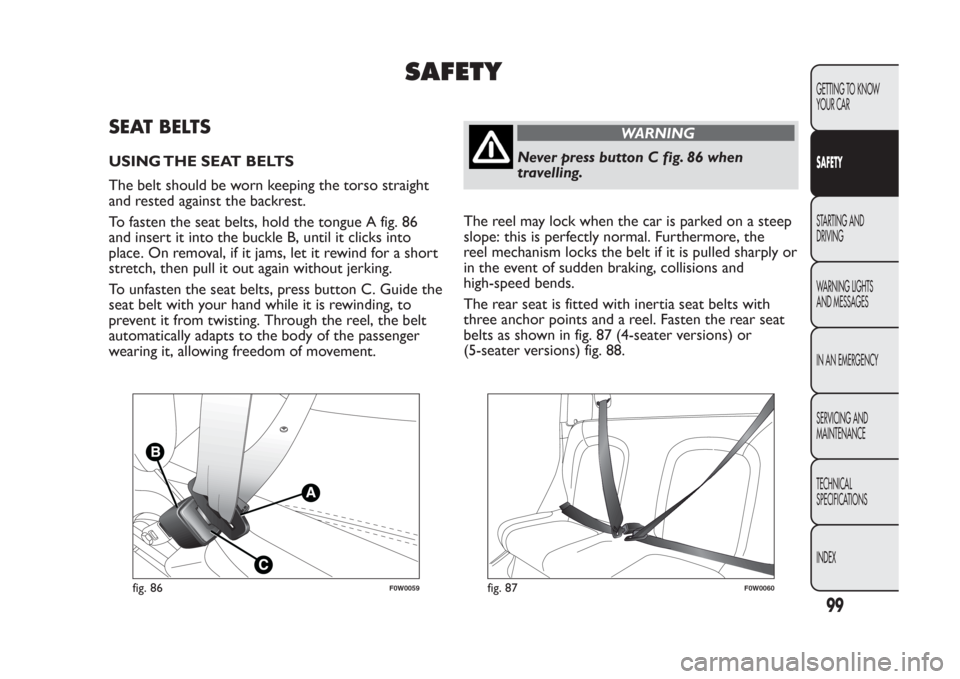
To fasten the seat belts, hold the tongue A fig. 86
and insert it into the buckle B, until it clicks into
place. On removal, if it jams, let it rewind for a short
stretch, then pull it out again without jerking.
To unfasten the seat belts, press button C. Guide the
seat belt with your hand while it is rewinding, to
prevent it from twisting. Through the reel, the belt
automatically adapts to the body of the passenger
wearing it, allowing freedom of movement.
WARNING
Never press button C fig. 86 when
travelling.
The reel may lock when the car is parked on a steep
slope: this is perfectly normal. Furthermore, the
reel mechanism locks the belt if it is pulled sharply or
in the event of sudden braking, collisions and
high-speed bends.
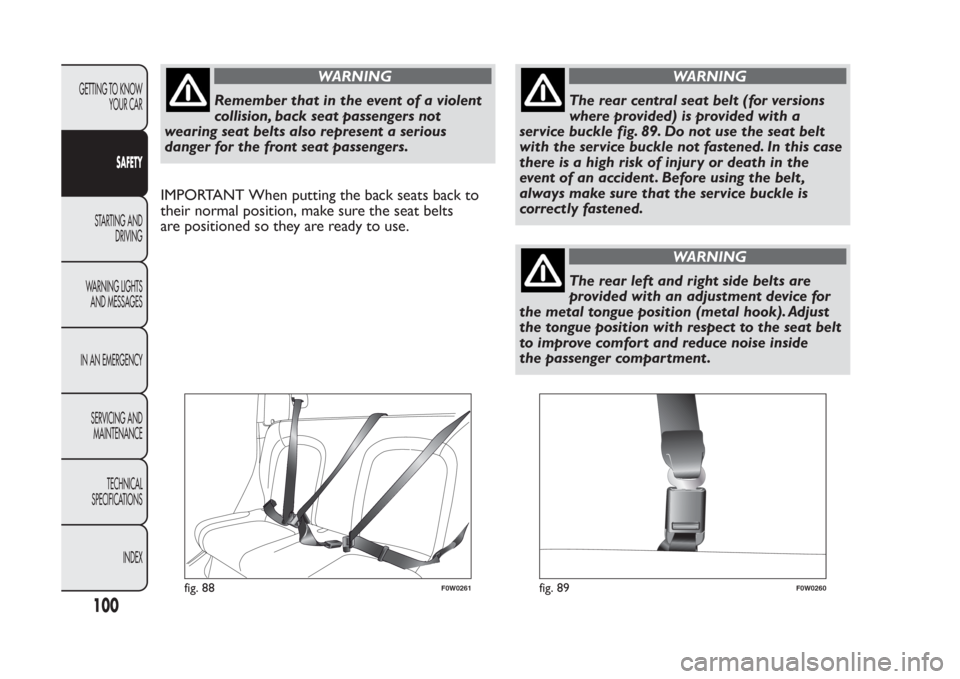
The rear seat is fitted with inertia seat belts with
three anchor points and a reel. Fasten the rear seat
belts as shown in fig. 87 (4-seater versions) or
(5-seater versions) fig. 88.
fig. 86
F0W0059
fig. 87
F0W0060
99GETTING TO KNOW
YOUR CARSAFETYSTARTING AND
DRIVING
WARNING LIGHTS
AND MESSAGES
IN AN EMERGENCY
SERVICING AND
MAINTENANCE
TECHNICAL
SPECIFICATIONS
INDEX
Page 104 of 284
WARNING
Remember that in the event of a violent
collision, back seat passengers not
wearing seat belts also represent a serious
danger for the front seat passengers.
IMPORTANT When putting the back seats back to
their normal position, make sure the seat belts
are positioned so they are ready to use.
WARNING
The rear central seat belt (for versions
where provided) is provided with a
service buckle fig. 89. Do not use the seat belt
with the service buckle not fastened. In this case
there is a high risk of injury or death in the
event of an accident . Before using the belt ,
always make sure that the service buckle is
correctly fastened.
WARNING
The rear left and right side belts are
provided with an adjustment device for
the metal tongue position (metal hook). Adjust
the tongue position with respect to the seat belt
to improve comfor t and reduce noise inside
the passenger compar tment .
fig. 88
F0W0261
fig. 89
F0W0260
100
GETTING TO KNOW
YOUR CAR
SAFETY
STARTING AND
DRIVING
WARNING LIGHTS
AND MESSAGES
IN AN EMERGENCY
SERVICING AND
MAINTENANCE
TECHNICAL
SPECIFICATIONS
INDEX
Page 105 of 284
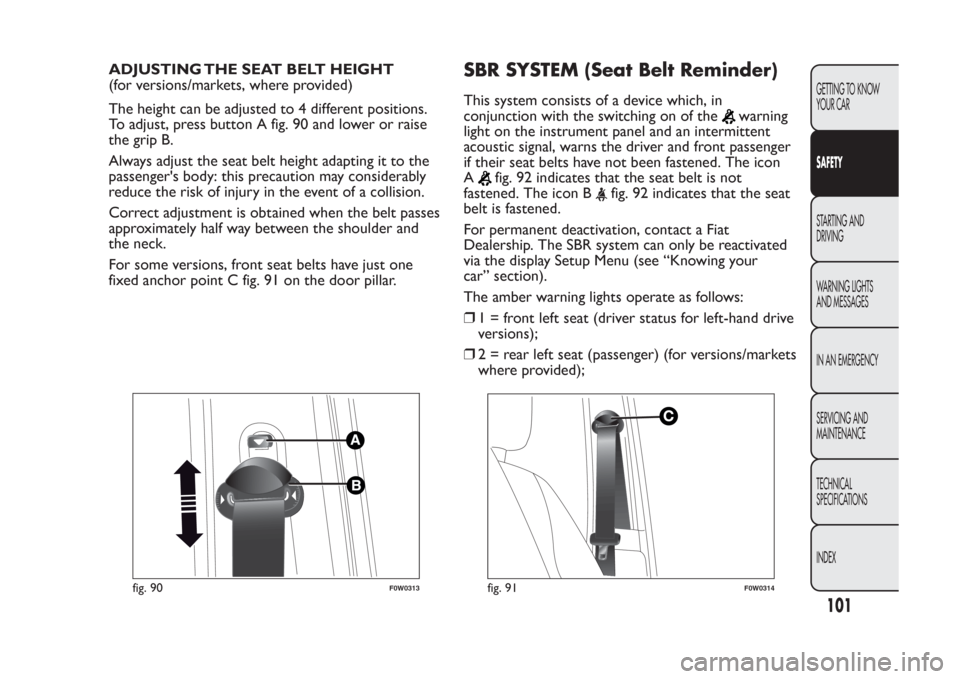
ADJUSTING THE SEAT BELT HEIGHT
(for versions/markets, where provided)
The height can be adjusted to 4 different positions.
To adjust, press button A fig. 90 and lower or raise
the grip B.
Always adjust the seat belt height adapting it to the
passenger's body: this precaution may considerably
reduce the risk of injury in the event of a collision.
Correct adjustment is obtained when the belt passes
approximately half way between the shoulder and
the neck.
For some versions, front seat belts have just one
fixed anchor point C fig. 91 on the door pillar.
SBR SYSTEM (Seat Belt Reminder)This system consists of a device which, in
conjunction with the switching on of the
warning
light on the instrument panel and an intermittent
acoustic signal, warns the driver and front passenger
if their seat belts have not been fastened. The icon
A
fig. 92 indicates that the seat belt is not
fastened. The icon B
fig. 92 indicates that the seat
belt is fastened.
For permanent deactivation, contact a Fiat
Dealership. The SBR system can only be reactivated
via the display Setup Menu (see “Knowing your
car” section).
The amber warning lights operate as follows:
❒1 = front left seat (driver status for left-hand drive
versions);
❒2 = rear left seat (passenger) (for versions/markets
where provided);
fig. 90
F0W0313
fig. 91
F0W0314
101GETTING TO KNOW
YOUR CARSAFETYSTARTING AND
DRIVING
WARNING LIGHTS
AND MESSAGES
IN AN EMERGENCY
SERVICING AND
MAINTENANCE
TECHNICAL
SPECIFICATIONS
INDEX