roof FIAT PANDA 2014 319 / 3.G Owners Manual
[x] Cancel search | Manufacturer: FIAT, Model Year: 2014, Model line: PANDA, Model: FIAT PANDA 2014 319 / 3.GPages: 284, PDF Size: 11.54 MB
Page 2 of 284
We really know your car because we invented, designed and built it: we really know every single detail.
At Fiat Service authorised workshopsyou can find technicians directly trained by us,
offering quality and professionalism for all service operations.
Fiat workshops are always close to you for the regular servicing operations, season checks
and practical recommendations by our experts.
With Fiat Genuine Parts you keep the reliability, comfort and performance features
of your new car unchanged in time: that's why you bought it for.
Always ask for Genuine Parts for the components used on our cars; we recommend them because
they come from our steady commitment in research and development of highly innovative technologies.
For all these reasons: rely on Genuine Parts, because they are the only ones designed
by Fiat for your car.
SAFETY:
BRAKING SYSTEM
ENVIRONMENT: PARTICULATE FILTERS,
CLIMATE CONTROL MAINTENANCE
COMFORT: SUSPENSION
AND WINDSCREEN WIPERS
PERFORMANCE: SPARK PLUGS,
INJECTORS AND BATTERIES
LINEACCESSORI
ROOF RACK BARS, WHEEL RIMS
WHY CHOOSING
GENUINE PARTS
Page 24 of 284
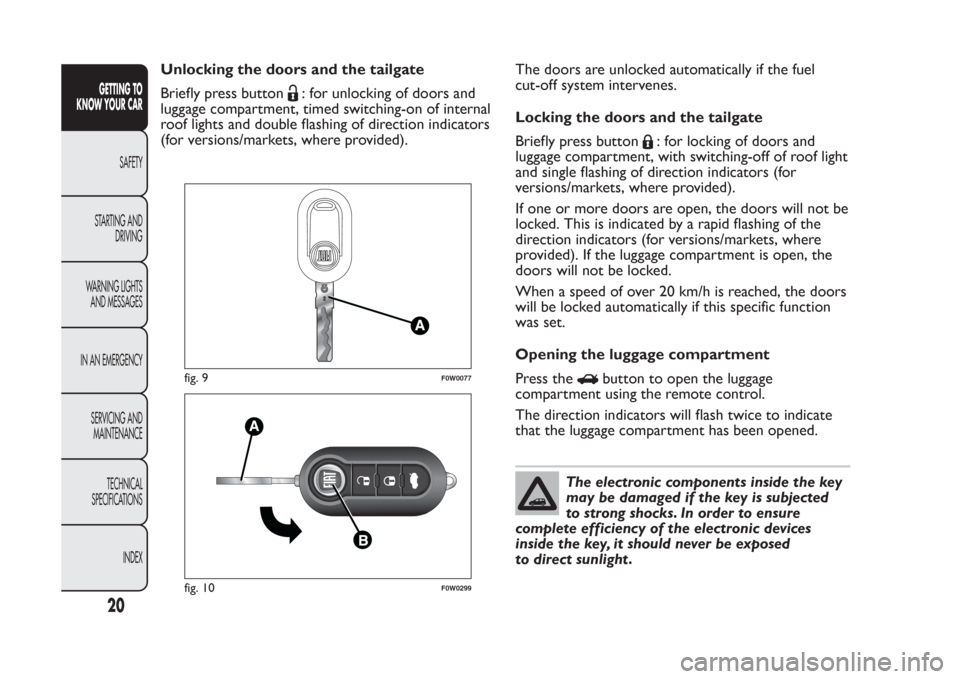
Unlocking the doors and the tailgate
Briefly press button
: for unlocking of doors and
luggage compartment, timed switching-on of internal
roof lights and double flashing of direction indicators
(for versions/markets, where provided).The doors are unlocked automatically if the fuel
cut-off system intervenes.
Locking the doors and the tailgate
Briefly press button
: for locking of doors and
luggage compartment, with switching-off of roof light
and single flashing of direction indicators (for
versions/markets, where provided).
If one or more doors are open, the doors will not be
locked. This is indicated by a rapid flashing of the
direction indicators (for versions/markets, where
provided). If the luggage compartment is open, the
doors will not be locked.
When a speed of over 20 km/h is reached, the doors
will be locked automatically if this specific function
was set.
Opening the luggage compartment
Press the
button to open the luggage
compartment using the remote control.
The direction indicators will flash twice to indicate
that the luggage compartment has been opened.
The electronic components inside the key
may be damaged if the key is subjected
to strong shocks. In order to ensure
complete efficiency of the electronic devices
inside the key, it should never be exposed
to direct sunlight .
fig. 9
F0W0077
fig. 10
F0W0299
20GETTING TO
KNOW YOUR CAR
SAFETY
STARTING AND
DRIVING
WARNING LIGHTS
AND MESSAGES
IN AN EMERGENCY
SERVICING AND
MAINTENANCE
TECHNICAL
SPECIFICATIONS
INDEX
Page 53 of 284
ROOF LIGHTSFRONT ROOF LIGHT
Single-bulb roof light
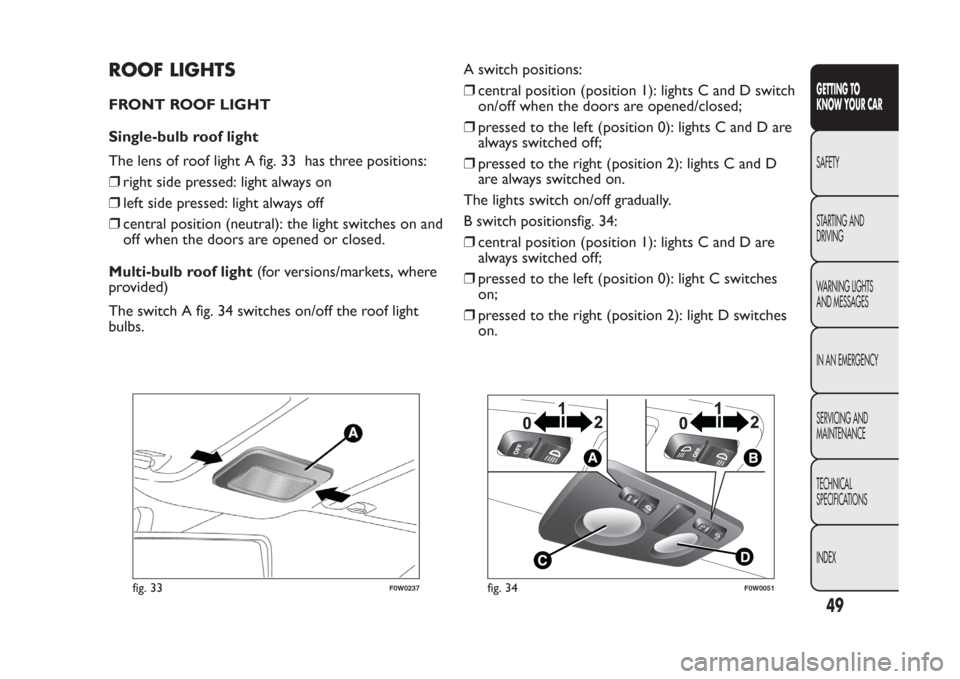
The lens of roof light A fig. 33 has three positions:
❒right side pressed: light always on
❒left side pressed: light always off
❒central position (neutral): the light switches on and
off when the doors are opened or closed.
Multi-bulb roof light(for versions/markets, where
provided)
The switch A fig. 34 switches on/off the roof light
bulbs.A switch positions:
❒central position (position 1): lights C and D switch
on/off when the doors are opened/closed;
❒pressed to the left (position 0): lights C and D are
always switched off;
❒pressed to the right (position 2): lights C and D
are always switched on.
The lights switch on/off gradually.
B switch positionsfig. 34:
❒central position (position 1): lights C and D are
always switched off;
❒pressed to the left (position 0): light C switches
on;
❒pressed to the right (position 2): light D switches
on.
fig. 33
F0W0237
fig. 34
F0W0051
49GETTING TO
KNOW YOUR CARSAFETY
STARTING AND
DRIVING
WARNING LIGHTS
AND MESSAGES
IN AN EMERGENCY
SERVICING AND
MAINTENANCE
TECHNICAL
SPECIFICATIONS
INDEX
Page 54 of 284
IMPORTANT Before getting out of the car, make
sure that both switches are in the central position:
when the doors are closed the lights will switch
off to avoid draining the battery. In any case, if the
switch is left in the on position, the roof light
switches off automatically about 15 minutes after the
engine has been switched off.
ROOF LIGHT TIMING
On certain versions, to facilitate getting into/out of
the car, especially at night or in poorly-lit areas,
two timed modes have been provided.
Timing when getting into the car
The roof lights switch on according to the following
modes:
❒for about 10 seconds when the doors are
unlocked;
❒for about 3 minutes when one of the doors is
opened;
❒for about 10 seconds when the doors are closed.
The timing is interrupted when the ignition key is
turned to MAR.
Three modes are provided for switching off:
❒when all doors are closed, the 3-minute timer will
stop and a 10-second one will start. This timer will
stop when the key is turned to MAR;❒when doors are locked (either with remote
control or with key on driver side door), the roof
light switches off.
❒the courtesy lights are switched off in any case
after 15 minutes to preserve battery charge
Timing when getting out of the car
After removing the key from the ignition switch, the
roof lights switch on as follows:
❒if the ignition key is removed within 3 minutes
from the engine stopping, the roof lights switch on
for 10 seconds;
❒for about 3 minutes when one of the doors is
opened;
❒for about 10 seconds when one of the doors is
closed.
The timing stops automatically when the doors are
locked.
LUGGAGE COMPARTMENT ROOF LIGHT
(for versions/markets, where provided)
The roof light is located on the left side of the
luggage compartment. This switches on automatically
when the luggage compartment is opened and
switches off when it is closed. The light switches
on/off regardless of the ignition key position.
50GETTING TO
KNOW YOUR CAR
SAFETY
STARTING AND
DRIVING
WARNING LIGHTS
AND MESSAGES
IN AN EMERGENCY
SERVICING AND
MAINTENANCE
TECHNICAL
SPECIFICATIONS
INDEX
Page 60 of 284
SUN ROOF(for versions/markets, where provided)
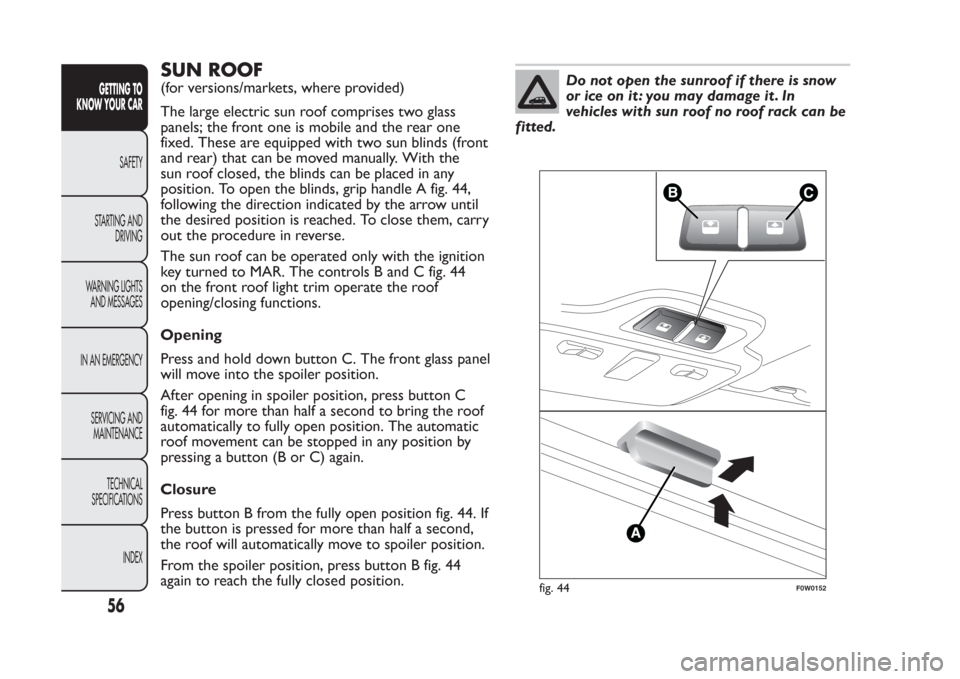
The large electric sun roof comprises two glass
panels; the front one is mobile and the rear one
fixed. These are equipped with two sun blinds (front
and rear) that can be moved manually. With the
sun roof closed, the blinds can be placed in any
position. To open the blinds, grip handle A fig. 44,
following the direction indicated by the arrow until
the desired position is reached. To close them, carry
out the procedure in reverse.
The sun roof can be operated only with the ignition
key turned to MAR. The controls B and C fig. 44
on the front roof light trim operate the roof
opening/closing functions.
Opening
Press and hold down button C. The front glass panel
will move into the spoiler position.
After opening in spoiler position, press button C
fig. 44 for more than half a second to bring the roof
automatically to fully open position. The automatic
roof movement can be stopped in any position by
pressing a button (B or C) again.
Closure
Press button B from the fully open position fig. 44. If
the button is pressed for more than half a second,
the roof will automatically move to spoiler position.
From the spoiler position, press button B fig. 44
again to reach the fully closed position.
Do not open the sunroof if there is snow
or ice on it : you may damage it . In
vehicles with sun roof no roof rack can be
fitted.
fig. 44
F0W0152
56GETTING TO
KNOW YOUR CAR
SAFETY
STARTING AND
DRIVING
WARNING LIGHTS
AND MESSAGES
IN AN EMERGENCY
SERVICING AND
MAINTENANCE
TECHNICAL
SPECIFICATIONS
INDEX
Page 61 of 284
WARNING
When leaving the car, always remove the
key from the ignition to avoid the risk
of injur y to those still inside the car due to
accidental operation of the sunroof. Improper
use of the roof may be dangerous. Before and
during operation, always check that no-one
is exposed to the risk of being injured by the
moving sunroof or by objects getting caught or
hitbyit.
ANTI-PINCH SAFETY DEVICE
For versions/markets where provided, the sun roof
has an anti-pinch safety system capable of detecting
the presence of an obstacle whilst the roof is closing;
if this happens, the system intervenes and the
movement of the glass is immediately reversed.
EMERGENCY OPERATION
If the electric device for moving the roof fails, the
sun roof can be moved manually proceeding as
described below:
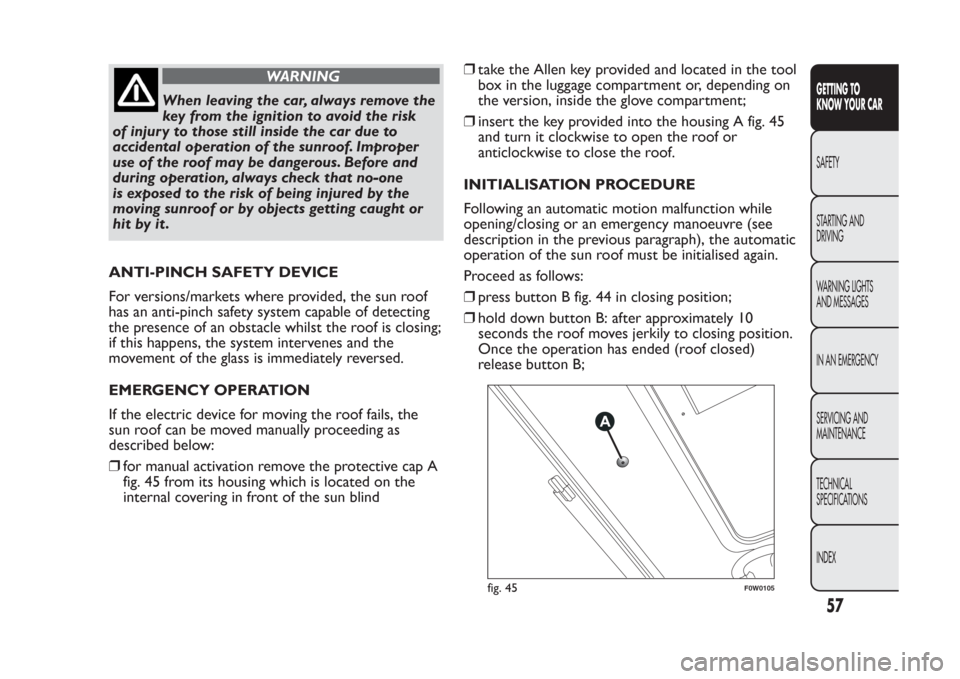
❒for manual activation remove the protective cap A
fig. 45 from its housing which is located on the
internal covering in front of the sun blind❒take the Allen key provided and located in the tool
box in the luggage compartment or, depending on
the version, inside the glove compartment;
❒insert the key provided into the housing A fig. 45
and turn it clockwise to open the roof or
anticlockwise to close the roof.
INITIALISATION PROCEDURE
Following an automatic motion malfunction while
opening/closing or an emergency manoeuvre (see
description in the previous paragraph), the automatic
operation of the sun roof must be initialised again.
Proceed as follows:
❒press button B fig. 44 in closing position;
❒hold down button B: after approximately 10
seconds the roof moves jerkily to closing position.
Once the operation has ended (roof closed)
release button B;
fig. 45
F0W0105
57GETTING TO
KNOW YOUR CARSAFETY
STARTING AND
DRIVING
WARNING LIGHTS
AND MESSAGES
IN AN EMERGENCY
SERVICING AND
MAINTENANCE
TECHNICAL
SPECIFICATIONS
INDEX
Page 62 of 284
❒turn the ignition key to STOP and keep it there for
10 seconds;
❒turn the ignition key to the MAR position;
❒Press button B in closed position;
❒hold down button B until the roof is completely
closed: the initialisation procedure has ended;
❒press button B again within 3 seconds from the
conclusion of the initialisation procedure;
❒hold down button B: the roof will perform an
automatic opening and closing cycle: should this
not occur, repeat the operation from the
beginning;
❒keeping button B held down, wait until the roof is
completely closed.
DOORSLOCKING/UNLOCKING FROM OUTSIDE
To unlock
Turn the key in the lock fig. 46 to position 1 and pull
the handle upwards.
With central door locking (for versions/markets
where provided), the doors are unlocked
simultaneously when the key is turned.
With remote control (for versions/markets where
provided) press the
button to open the doors.
IMPORTANT Before opening a door, ensure that you
can do it in conditions of safety. Open the doors
only when the car is stationary.
IMPORTANT Open the doors only when the car is
stationary.
To lock
Rotate the key in the lock fig. 46 to position 2 with
fully closed door.
With central door locking (for versions/markets
where provided) all doors must be shut properly.
With remote control (for versions/markets where
provided) press thebutton to close the doors.
If one of the doors is not shut properly, simultaneous
locking is disabled.
58GETTING TO
KNOW YOUR CAR
SAFETY
STARTING AND
DRIVING
WARNING LIGHTS
AND MESSAGES
IN AN EMERGENCY
SERVICING AND
MAINTENANCE
TECHNICAL
SPECIFICATIONS
INDEX
Page 69 of 284
EXTENDING THE LUGGAGE
COMPARTMENT
Removing the parcel shelf
Proceed as follows:
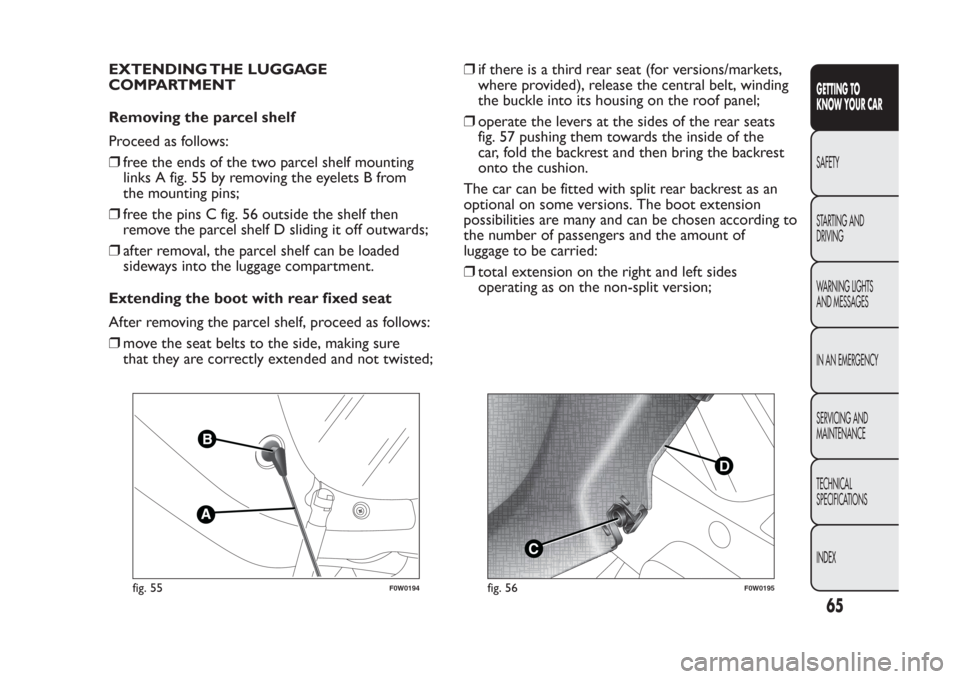
❒free the ends of the two parcel shelf mounting
links A fig. 55 by removing the eyelets B from
the mounting pins;
❒free the pins C fig. 56 outside the shelf then
remove the parcel shelf D sliding it off outwards;
❒after removal, the parcel shelf can be loaded
sideways into the luggage compartment.
Extending the boot with rear fixed seat
After removing the parcel shelf, proceed as follows:
❒move the seat belts to the side, making sure
that they are correctly extended and not twisted;❒if there is a third rear seat (for versions/markets,
where provided), release the central belt, winding
the buckle into its housing on the roof panel;
❒operate the levers at the sides of the rear seats
fig. 57 pushing them towards the inside of the
car, fold the backrest and then bring the backrest
onto the cushion.
The car can be fitted with split rear backrest as an
optional on some versions. The boot extension
possibilities are many and can be chosen according to
the number of passengers and the amount of
luggage to be carried:
❒total extension on the right and left sides
operating as on the non-split version;
fig. 55
F0W0194
C
D
fig. 56
F0W0195
65GETTING TO
KNOW YOUR CARSAFETY
STARTING AND
DRIVING
WARNING LIGHTS
AND MESSAGES
IN AN EMERGENCY
SERVICING AND
MAINTENANCE
TECHNICAL
SPECIFICATIONS
INDEX
Page 74 of 284
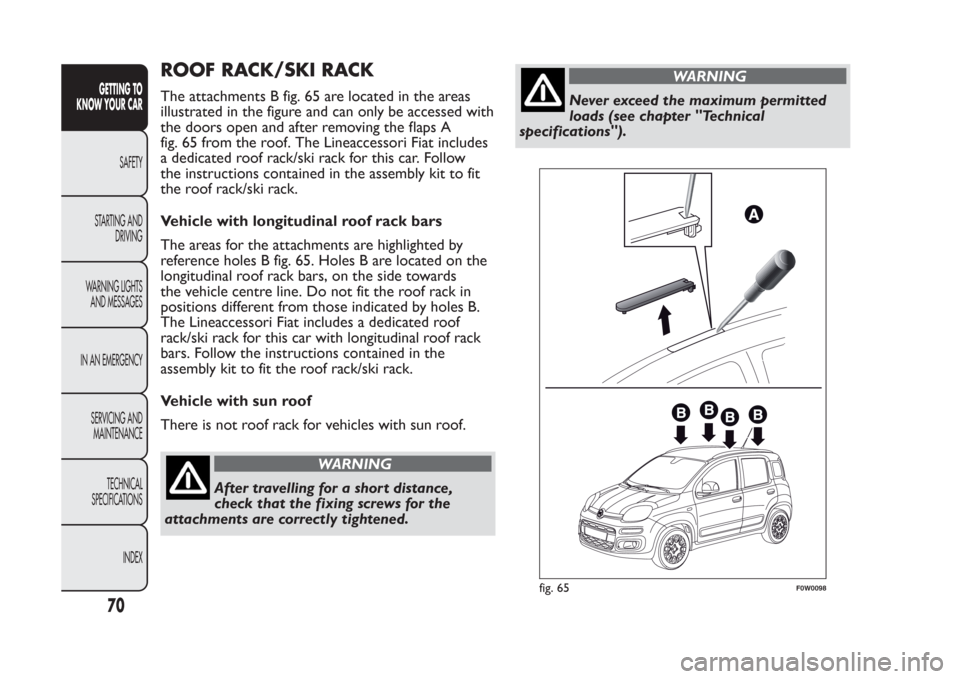
ROOF RACK/SKI RACKThe attachments B fig. 65 are located in the areas
illustrated in the figure and can only be accessed with
the doors open and after removing the flaps A
fig. 65 from the roof. The Lineaccessori Fiat includes
a dedicated roof rack/ski rack for this car. Follow
the instructions contained in the assembly kit to fit
the roof rack/ski rack.
Vehicle with longitudinal roof rack bars
The areas for the attachments are highlighted by
reference holes B fig. 65. Holes B are located on the
longitudinal roof rack bars, on the side towards
the vehicle centre line. Do not fit the roof rack in
positions different from those indicated by holes B.
The Lineaccessori Fiat includes a dedicated roof
rack/ski rack for this car with longitudinal roof rack
bars. Follow the instructions contained in the
assembly kit to fit the roof rack/ski rack.
Vehicle with sun roof
There is not roof rack for vehicles with sun roof.
WARNING
After travelling for a short distance,
check that the fixing screws for the
attachments are correctly tightened.
WARNING
Never exceed the maximum permitted
loads (see chapter "Technical
specifications").
fig. 65
F0W0098
70GETTING TO
KNOW YOUR CAR
SAFETY
STARTING AND
DRIVING
WARNING LIGHTS
AND MESSAGES
IN AN EMERGENCY
SERVICING AND
MAINTENANCE
TECHNICAL
SPECIFICATIONS
INDEX
Page 90 of 284
Sensor operation may also be
compromised by the presence of dust ,
condensation, dirt or ice on the
windscreen, by traffic conditions (e.g. vehicles
that are driving not aligned with you car, vehicle
driving in a transverse or opposite way on the
same lane, bend with a small radius of curvature),
by road surface conditions and by driving
conditions (e.g. off-road driving). Make sure the
windscreen is always clean. Use specific
detergents and clean cloths to avoid scratching
the windscreen.The sensor operation may also be
limited or absent in some driving, traffic and
road surface conditions.Projecting loads on the roof of the car
may interfere with the correct operation
of the sensor. Before starting make sure
the load is correctly positioned, in order not to
cover the sensor operating range.If the windscreen must be replaced due to
scratches, chipping or breakage, contact
exclusively a Fiat Dealership. Do not
replace the windscreen on your own, risk of
malfunction! It is advisable to replace the
windscreen if it is damaged in the laser sensor
area.
Do not tamper nor operate on the laser
sensor. Do not close the openings in the
aesthetic cover located under the interior
rear view mirror. In the event of a sensor failure,
contact a Fiat Dealership.
IMPORTANT If you are driving on roads close to
trees with protruding branches it is advisable to
deactivate the system to prevent the branches at the
height of the bonnet or the windscreen from
interfering with the system.Do not cover the operating range of the
sensor with stickers or other objects.
Also pay attention to other objects on the
bonnet (e.g. a layer of snow) and make sure they
do not interfere with the light emitted by the
laser.
WARNING
The laser beam is not visible at the
naked eye. Do not look directly, or with
optical instruments (e.g. lenses), at the laser
beam from a distance lower than 10 cm: this
may cause damage to the sight .The laser beam
is also present when the key is at MAR-ON
but its operation is off, not available or
manually deactivated with the display Setup
Menu (see paragraph “Menu items” in this
chapter).
86GETTING TO
KNOW YOUR CAR
SAFETY
STARTING AND
DRIVING
WARNING LIGHTS
AND MESSAGES
IN AN EMERGENCY
SERVICING AND
MAINTENANCE
TECHNICAL
SPECIFICATIONS
INDEX