Eld FIAT PANDA 2016 319 / 3.G Owners Manual
[x] Cancel search | Manufacturer: FIAT, Model Year: 2016, Model line: PANDA, Model: FIAT PANDA 2016 319 / 3.GPages: 204, PDF Size: 18.77 MB
Page 22 of 204
WINDOW CLEANING
WINDSCREEN
WIPER/WASHER
4) 5) 6)This operates only with the ignition key
turned to MAR.
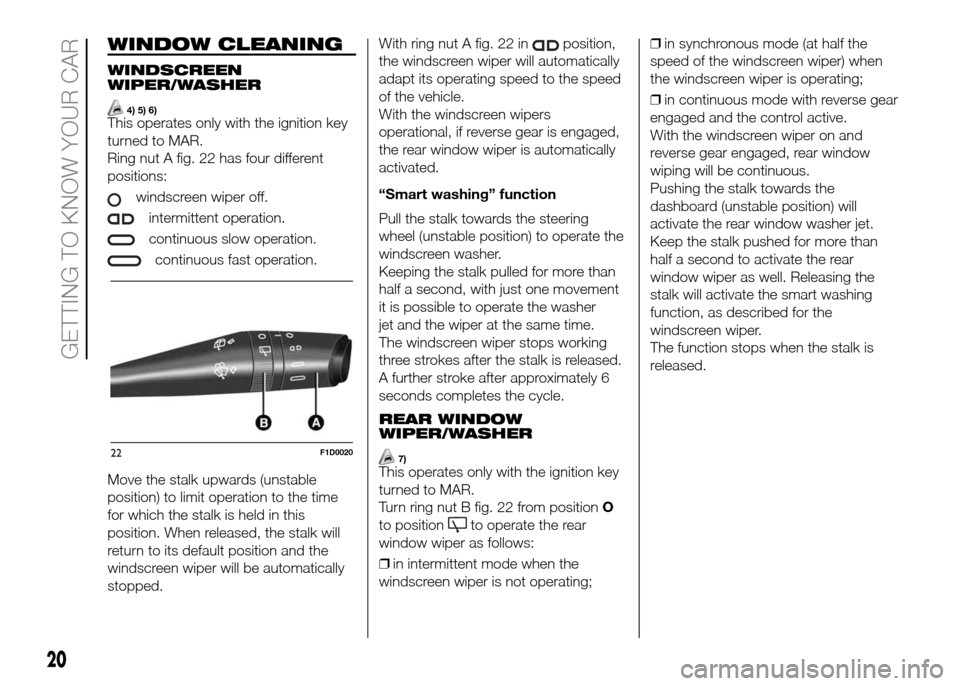
Ring nut A fig. 22 has four different
positions:
windscreen wiper off.
intermittent operation.
continuous slow operation.
continuous fast operation.
Move the stalk upwards (unstable
position) to limit operation to the time
for which the stalk is held in this
position. When released, the stalk will
return to its default position and the
windscreen wiper will be automatically
stopped.With ring nut A fig. 22 in
position,
the windscreen wiper will automatically
adapt its operating speed to the speed
of the vehicle.
With the windscreen wipers
operational, if reverse gear is engaged,
the rear window wiper is automatically
activated.
“Smart washing” function
Pull the stalk towards the steering
wheel (unstable position) to operate the
windscreen washer.
Keeping the stalk pulled for more than
half a second, with just one movement
it is possible to operate the washer
jet and the wiper at the same time.
The windscreen wiper stops working
three strokes after the stalk is released.
A further stroke after approximately 6
seconds completes the cycle.
REAR WINDOW
WIPER/WASHER
7)This operates only with the ignition key
turned to MAR.
Turn ring nut B fig. 22 from positionO
to position
to operate the rear
window wiper as follows:
❒in intermittent mode when the
windscreen wiper is not operating;❒in synchronous mode (at half the
speed of the windscreen wiper) when
the windscreen wiper is operating;
❒in continuous mode with reverse gear
engaged and the control active.
With the windscreen wiper on and
reverse gear engaged, rear window
wiping will be continuous.
Pushing the stalk towards the
dashboard (unstable position) will
activate the rear window washer jet.
Keep the stalk pushed for more than
half a second to activate the rear
window wiper as well. Releasing the
stalk will activate the smart washing
function, as described for the
windscreen wiper.
The function stops when the stalk is
released.
22F1D0020
20
GETTING TO KNOW YOUR CAR
Page 30 of 204
❒hold down button B until the roof is
completely closed: the initialisation
procedure has ended;
❒press button B again within 3
seconds from the conclusion of the
initialisation procedure;
❒hold down button B: the roof will
perform an automatic opening and
closing cycle: should this not occur,
repeat the operation from the
beginning;
❒keeping button B held down, wait
until the roof is completely closed.
WARNING
21)When leaving the vehicle, always
remove the key from the ignition to avoid
the risk of injury due to accidental
operation of the sun roof. Improper use of
the roof can be dangerous. Before and
during operation, always check that
nobody is at risk of being injured by the
moving sun roof or by objects getting
caught or hit by it.
WARNING
8)Do not open the sunroof if snow or ice is
over it: you may damage it. In vehicles
with sun roof no roof rack can be fitted.
DUALDRIVE
ELECTRIC POWER
STEERING
22) 23)
This only operates with the key turned
to MAR and the engine started. The
steering allows the force required at the
steering wheel to be adjusted to suit
driving conditions.
IMPORTANT When turning the ignition
key quickly, full power steering
functionality can be achieved after a
few seconds.
CITY FUNCTION
ACTIVATION/
DEACTIVATION
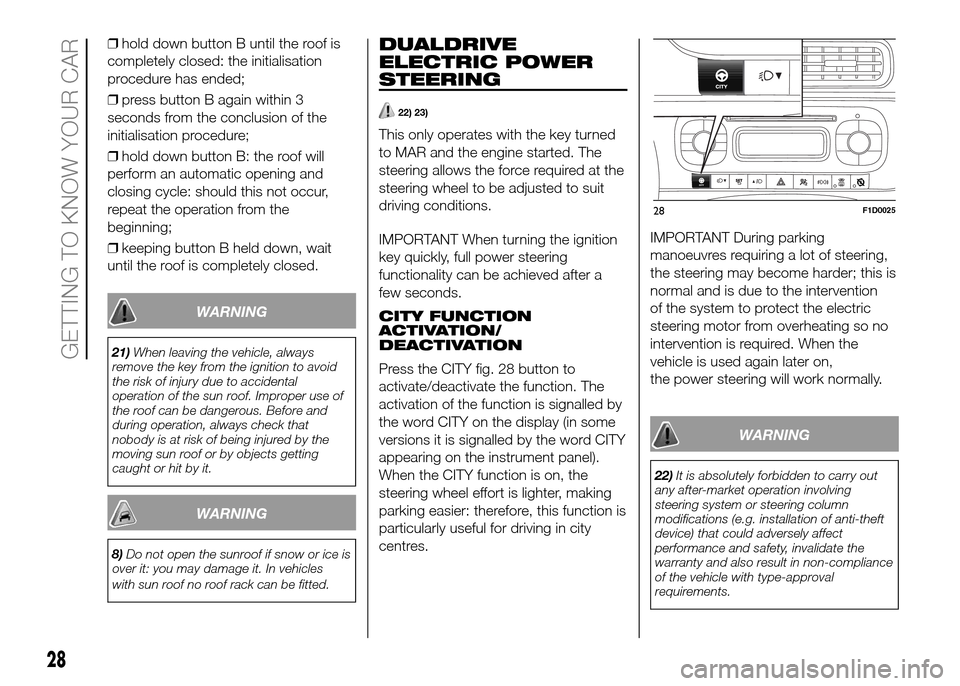
Press the CITY fig. 28 button to
activate/deactivate the function. The
activation of the function is signalled by
the word CITY on the display (in some
versions it is signalled by the word CITY
appearing on the instrument panel).
When the CITY function is on, the
steering wheel effort is lighter, making
parking easier: therefore, this function is
particularly useful for driving in city
centres.IMPORTANT During parking
manoeuvres requiring a lot of steering,
the steering may become harder; this is
normal and is due to the intervention
of the system to protect the electric
steering motor from overheating so no
intervention is required. When the
vehicle is used again later on,
the power steering will work normally.
WARNING
22)It is absolutely forbidden to carry out
any after-market operation involving
steering system or steering column
modifications (e.g. installation of anti-theft
device) that could adversely affect
performance and safety, invalidate the
warranty and also result in non-compliance
of the vehicle with type-approval
requirements.
28F1D0025
28
GETTING TO KNOW YOUR CAR
Page 52 of 204
Warning light What it means
ESC SYSTEM
(for versions/markets, where provided)
When the key is turned to MAR, the warning light switches on but it should switch off after a few seconds.
If the warning light does not switch off or stays on while driving, on some versions along with a message
on the display, contact a Fiat Dealership. Flashing of the warning light while driving indicates the
intervention of the ESC system.
Hill Holder failure
This warning light switches on, on some versions along with a dedicated message on the display, in the
case of a Hill Holder system fault.
In this case, contact a Fiat Dealership.
ELD system failure
(For versions/markets, where provided)
This warning light switches on, on some versions along with a dedicated message on the display, in the
case of an ELD system failure.
In this case, contact a Fiat Dealership as soon as possible.
FIAT CODE SYSTEM FAILURE
The warning light (or the symbol on the display) switches on, on some versions along with a dedicated
message on the display, to signal the Fiat CODE system failure.
In this case, contact a Fiat Dealership as soon as possible.
50
KNOWING THE INSTRUMENT PANEL
Page 56 of 204
Warning light What it means
Parking sensor failure
(for versions/markets, where provided)
The warning light switches on, on some versions along with a dedicated message on the display, when a
fault is detected in the parking sensors.
Exterior light failure
(for versions/markets, where provided)
The warning light switches on when a fault is detected in one of the following lights: side lights, number
plate lights, rear fog lights, direction indicators, daytime running lights (DRL).
Engine oil pressure sensor failure
(for versions/markets, where provided)
The engine oil pressure sensor failure is indicated by the activation of the warning light on the instrument
panel.
ELD system fault(Panda Cross and Panda 4x4 versions)
The warning light switches on, on some versions along with a dedicated message on the display, when a
fault is detected in the 4x4 drive. Contact a Fiat Dealership as soon as possible.
Water in diesel filter(diesel versions)
(for versions/markets, where provided)
When the key is turned to MAR, the warning light switches on but it should switch off after a few seconds.
The warning light switches on when water is detected in the diesel filter. On certain versions a dedicated
message is displayed.
25)
WARNING
25)If thewarning light switches on (on some versions together with the dedicated message on the display), contact a Fiat Dealership as
soon as possible to have the system bled. If this problem is indicated immediately after refuelling, water may have entered the fuel tank. In
this case, immediately turn off the engine and contact a Fiat Dealership.
54
KNOWING THE INSTRUMENT PANEL
Page 58 of 204
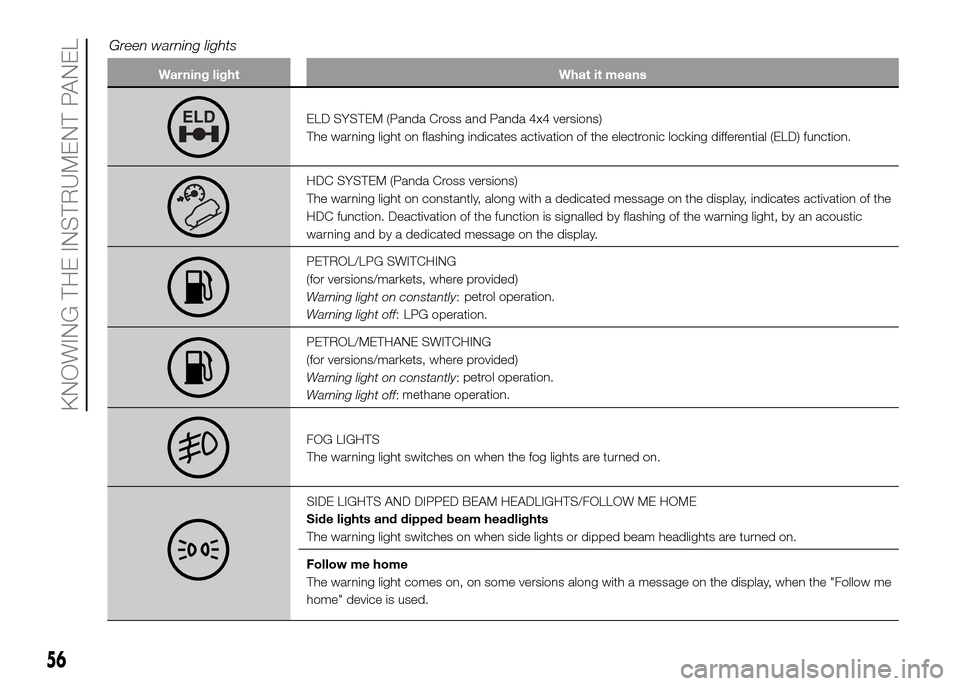
Warning light What it means
ELD SYSTEM (Panda Cross and Panda 4x4 versions)
The warning light on flashing indicates activation of the electronic locking differential (ELD) function.
HDC SYSTEM (Panda Cross versions)
The warning light on constantly, along with a dedicated message on the display, indicates activation of the
HDC function. Deactivation of the function is signalled by flashing of the warning light, by an acoustic
warning and by a dedicated message on the display.
PETROL/LPG SWITCHING
(for versions/markets, where provided)
Warning light on constantly:
LPG operation.
Warning light off:petrol operation.
PETROL/METHANE SWITCHING
(for versions/markets, where provided)
Warning light on constantly:
methane operation.
Warning light off:petrol operation.
FOG LIGHTS
The warning light switches on when the fog lights are turned on.
SIDE LIGHTS AND DIPPED BEAM HEADLIGHTS/FOLLOW ME HOME
Side lights and dipped beam headlights
The warning light switches on when side lights or dipped beam headlights are turned on.
Follow me home
The warning light comes on, on some versions along with a message on the display, when the "Follow me
home" device is used.
56
KNOWING THE INSTRUMENT PANEL
Green warning lights
Page 64 of 204
ASR (AntiSlip
Regulation) SYSTEM
It is an integral part of the ESC system.
It is automatically activated in the case
of drive wheels slipping, loss of grip
on wet roads (aquaplaning) and
acceleration on slippery, snowy or icy
roads, etc.
Depending on the slipping conditions,
two different control systems are
activated:
❒if the slipping involves both drive
wheels, the ASR intervenes reducing
the power transmitted by the engine;
❒if the slipping only involves one of the
drive wheels, it intervenes automatically
braking the wheel that is slipping.
Engagement/disengagement of the
ASR system
The ASR system switches on
automatically each time the engine is
started.
Whilst driving, the ASR can be switched
off and subsequently switched on
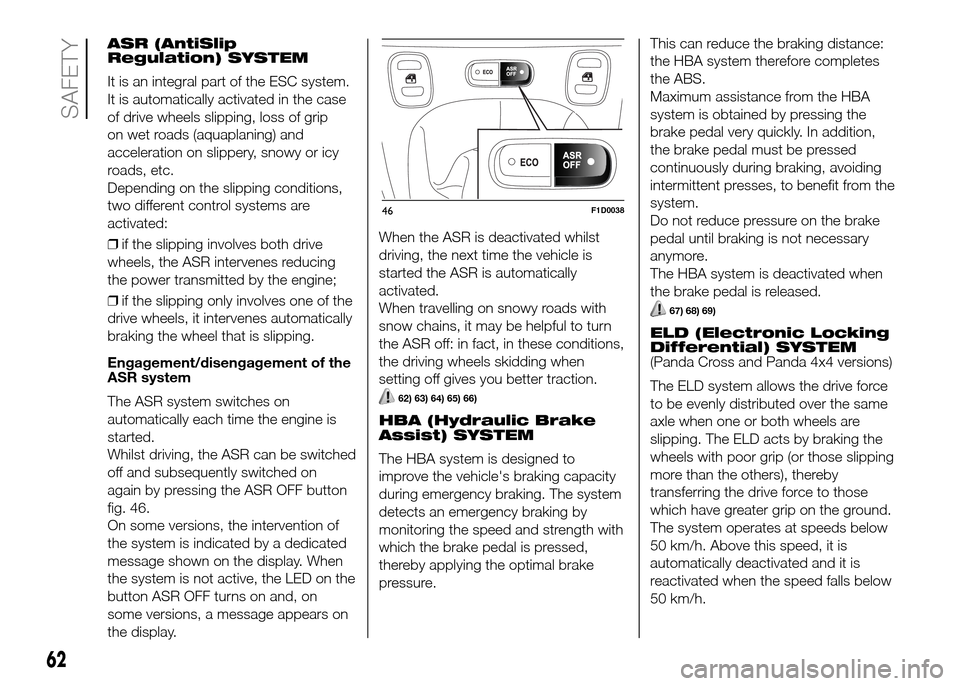
again by pressing the ASR OFF button
fig. 46.
On some versions, the intervention of
the system is indicated by a dedicated
message shown on the display. When
the system is not active, the LED on the
button ASR OFF turns on and, on
some versions, a message appears on
the display.When the ASR is deactivated whilst
driving, the next time the vehicle is
started the ASR is automatically
activated.
When travelling on snowy roads with
snow chains, it may be helpful to turn
the ASR off: in fact, in these conditions,
the driving wheels skidding when
setting off gives you better traction.
62) 63) 64) 65) 66)
HBA (Hydraulic Brake
Assist) SYSTEM
The HBA system is designed to
improve the vehicle's braking capacity
during emergency braking. The system
detects an emergency braking by
monitoring the speed and strength with
which the brake pedal is pressed,
thereby applying the optimal brake
pressure.This can reduce the braking distance:
the HBA system therefore completes
the ABS.
Maximum assistance from the HBA
system is obtained by pressing the
brake pedal very quickly. In addition,
the brake pedal must be pressed
continuously during braking, avoiding
intermittent presses, to benefit from the
system.
Do not reduce pressure on the brake
pedal until braking is not necessary
anymore.
The HBA system is deactivated when
the brake pedal is released.
67) 68) 69)
ELD (Electronic Locking
Differential) SYSTEM
(Panda Cross and Panda 4x4 versions)
The ELD system allows the drive force
to be evenly distributed over the same
axle when one or both wheels are
slipping. The ELD acts by braking the
wheels with poor grip (or those slipping
more than the others), thereby
transferring the drive force to those
which have greater grip on the ground.
The system operates at speeds below
50 km/h. Above this speed, it is
automatically deactivated and it is
reactivated when the speed falls below
50 km/h.
46F1D0038
62
SAFETY
Page 65 of 204
The activation of the ELD system
involves the following functions being
switched on:
❒inhibition of the ASR function, in
order to fully exploit the engine torque;
❒differential lock effect on the front and
rear axles, via the braking system, to
improve drive on uneven surfaces.
Enabling the system
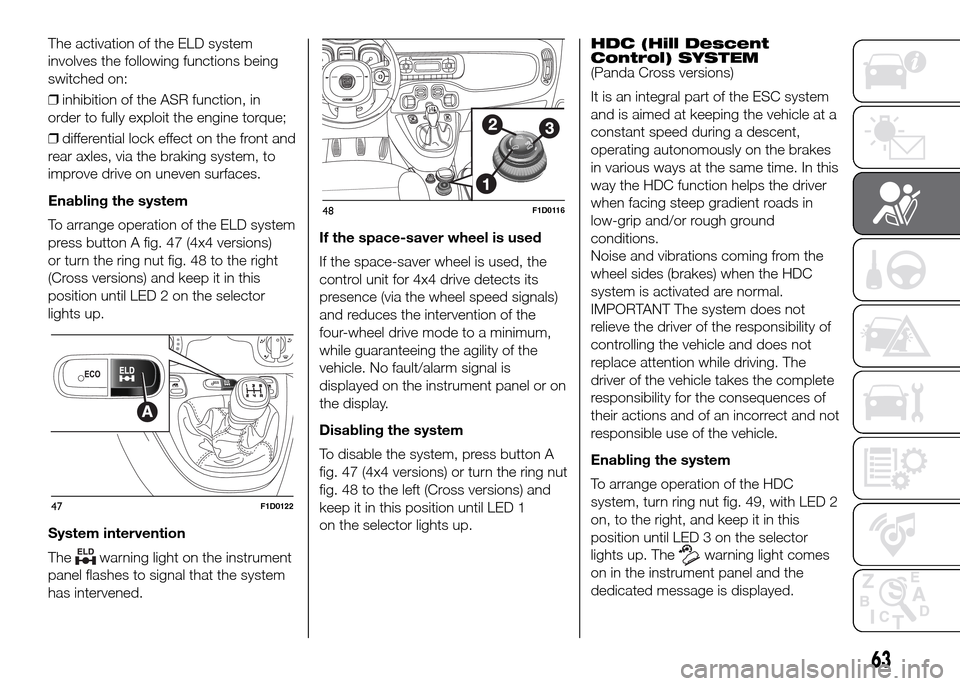
To arrange operation of the ELD system
press button A fig. 47 (4x4 versions)
or turn the ring nut fig. 48 to the right
(Cross versions) and keep it in this
position until LED 2 on the selector
lights up.
System intervention
The
warning light on the instrument
panel flashes to signal that the system
has intervened.If the space-saver wheel is used
If the space-saver wheel is used, the
control unit for 4x4 drive detects its
presence (via the wheel speed signals)
and reduces the intervention of the
four-wheel drive mode to a minimum,
while guaranteeing the agility of the
vehicle. No fault/alarm signal is
displayed on the instrument panel or on
the display.
Disabling the system
To disable the system, press button A
fig. 47 (4x4 versions) or turn the ring nut
fig. 48 to the left (Cross versions) and
keep it in this position until LED 1
on the selector lights up.HDC (Hill Descent
Control) SYSTEM
(Panda Cross versions)
It is an integral part of the ESC system
and is aimed at keeping the vehicle at a
constant speed during a descent,
operating autonomously on the brakes
in various ways at the same time. In this
way the HDC function helps the driver
when facing steep gradient roads in
low-grip and/or rough ground
conditions.
Noise and vibrations coming from the
wheel sides (brakes) when the HDC
system is activated are normal.
IMPORTANT The system does not
relieve the driver of the responsibility of
controlling the vehicle and does not
replace attention while driving. The
driver of the vehicle takes the complete
responsibility for the consequences of
their actions and of an incorrect and not
responsible use of the vehicle.
Enabling the system
To arrange operation of the HDC
system, turn ring nut fig. 49, with LED 2
on, to the right, and keep it in this
position until LED 3 on the selector
lights up. Thewarning light comes
on in the instrument panel and the
dedicated message is displayed.
47F1D0122
48F1D0116
63
Page 100 of 204
MODE SELECTOR
(Panda Cross versions)
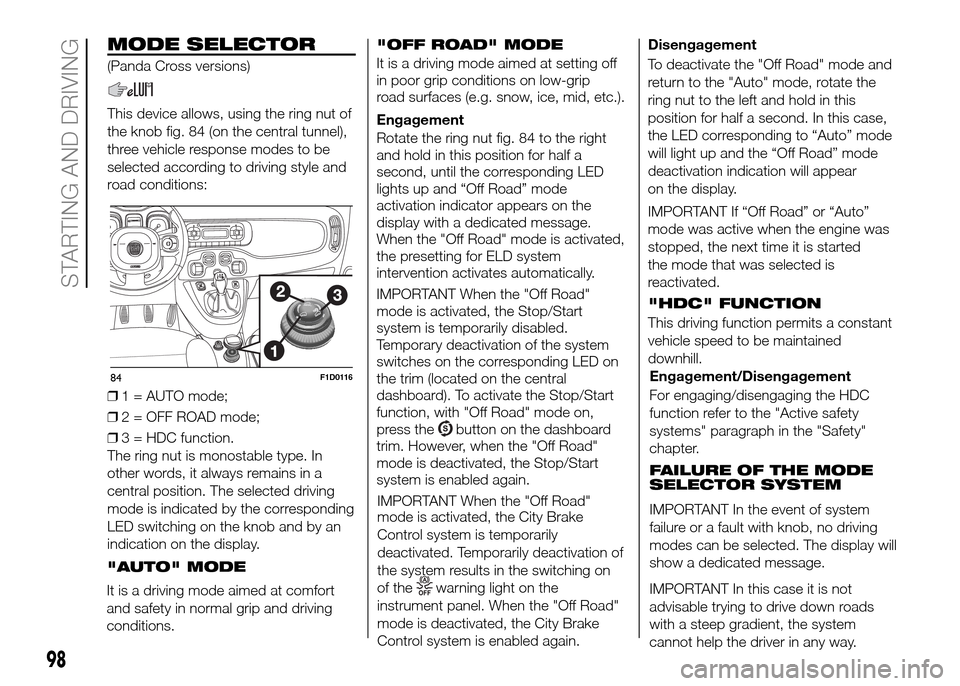
This device allows, using the ring nut of
the knob fig. 84 (on the central tunnel),
three vehicle response modes to be
selected according to driving style and
road conditions:
❒1 = AUTO mode;
❒2 = OFF ROAD mode;
❒3 = HDC function.
The ring nut is monostable type. In
other words, it always remains in a
central position. The selected driving
mode is indicated by the corresponding
LED switching on the knob and by an
indication on the display.
84F1D0116
98
STARTING AND DRIVING
"AUTO" MODE
It is a driving mode aimed at comfort
and safety in normal grip and driving
conditions."OFF ROAD" MODE
It is a driving mode aimed at setting off
in poor grip conditions on low-grip
road surfaces (e.g. snow, ice, mid, etc.).
Engagement
Rotate the ring nut fig. 84 to the right
and hold in this position for half a
second, until the corresponding LED
lights up and “Off Road” mode
activation indicator appears on the
display with a dedicated message.
When the "Off Road" mode is activated,
the presetting for ELD system
intervention activates automatically.
IMPORTANT When the "Off Road"
mode is activated, the Stop/Start
system is temporarily disabled.
Temporary deactivation of the system
switches on the corresponding LED on
the trim (located on the central
dashboard). To activate the Stop/Start
function, with "Off Road" mode on,
press the
button on the dashboard
trim. However, when the "Off Road"
mode is deactivated, the Stop/Start
system is enabled again.
IMPORTANT When the "Off Road"
mode is activated, the City Brake
Control system is temporarily
deactivated. Temporarily deactivation of
the system results in the switching on
of the
warning light on the
instrument panel. When the "Off Road"
mode is deactivated, the City Brake
Control system is enabled again.Disengagement
To deactivate the "Off Road" mode and
return to the "Auto" mode, rotate the
ring nut to the left and hold in this
position for half a second. In this case,
the LED corresponding to “Auto” mode
will light up and the “Off Road” mode
deactivation indication will appear
on the display.
IMPORTANT If “Off Road” or “Auto”
mode was active when the engine was
stopped, the next time it is started
the mode that was selected is
reactivated.
"HDC" FUNCTION
This driving function permits a constant
vehicle speed to be maintained
downhill.
Engagement/Disengagement
For engaging/disengaging the HDC
function refer to the "Active safety
systems" paragraph in the "Safety"
chapter.
FAILURE OF THE MODE
SELECTOR SYSTEM
IMPORTANT In the event of system
failure or a fault with knob, no driving
modes can be selected. The display will
show a dedicated message.
IMPORTANT In this case it is not
advisable trying to drive down roads
with a steep gradient, the system
cannot help the driver in any way.
Page 119 of 204
WARNING
52)Punctures caused by foreign bodies
can be repaired if the damage does not
exceed 4 mm on the tread and on the
shoulder of the tyre.
WARNING
3)Dispose of the bottle and the sealant
properly. Have them disposed of in
compliance with national and local
regulations.
JUMP STARTING
If the battery is flat, a jump starting can
be performed using the battery and
the cables of another vehicle, or using a
booster battery.
IMPORTANT
When a booster battery is used, comply
with the utilisation and precaution
instructions specified by the producer.
Do not use the booster battery or
any other source of external supply with
a voltage above 12 V: the battery, the
starter, the alternator and the electrical
system of the vehicle could be
damaged.
Do not attempt jump starting if the
battery is frozen. The battery could
break and explode!
PREPARATION TO JUMP
STARTING
156) 157)
53) 54)
IMPORTANT The positive terminal (+) of
the battery is shielded by a protective
cover. Lift the cover to access the
positive terminal.
Proceed as follows:❒engage the handbrake, move the
Dualogic gear lever to P (Park) or,
for versions with manual gearbox, to
neutral and bring the ignition key to
STOP;
❒switch off all the other electrical
devices in the vehicle;
❒if another vehicle is ready for jump
starting, park the vehicle within the
reach of the cables to be used for
starting, operate the handbrake and
make sure that the ignition is
deactivated.
IMPORTANT Avoid contact between
the two vehicles since this could cause
a connection to earth and may result
in serious injury to any people nearby.
PROCEDURE FOR JUMP
STARTING
IMPORTANT If the procedure below is
carried out incorrectly, it can cause
severe injury to people or damage the
recharging system of one or both
vehicles. Carefully follow the
instructions given below.
Cable connection
Proceed as follows to carry out a jump
starting:
❒connect one end of the cable used
for positive (+) to the positive terminal
(+) of the vehicle with flat battery;
117
Page 145 of 204
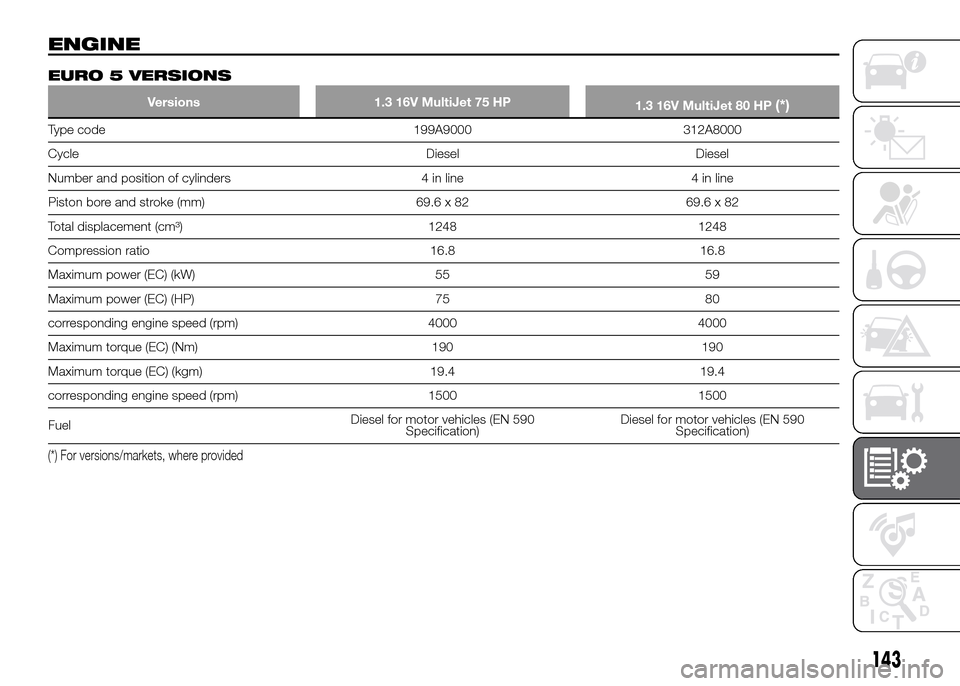
ENGINE
EURO 5 VERSIONS
Versions 1.3 16V MultiJet 75 HP
1.3 16V MultiJet 80 HP(*)
Type code 199A9000 312A8000
Cycle Diesel Diesel
Number and position of cylinders 4 in line 4 in line
Piston bore and stroke (mm) 69.6 x 82 69.6 x 82
Total displacement (cm³) 1248 1248
Compression ratio 16.8 16.8
Maximum power (EC) (kW) 55 59
Maximum power (EC) (HP) 75 80
corresponding engine speed (rpm) 4000 4000
Maximum torque (EC) (Nm) 190 190
Maximum torque (EC) (kgm) 19.4 19.4
corresponding engine speed (rpm) 1500 1500
FuelDiesel for motor vehicles (EN 590
Specification)Diesel for motor vehicles (EN 590
Specification)
(*) For versions/markets, where provided
143