heating FIAT PANDA 2016 319 / 3.G Owners Manual
[x] Cancel search | Manufacturer: FIAT, Model Year: 2016, Model line: PANDA, Model: FIAT PANDA 2016 319 / 3.GPages: 204, PDF Size: 18.77 MB
Page 9 of 204
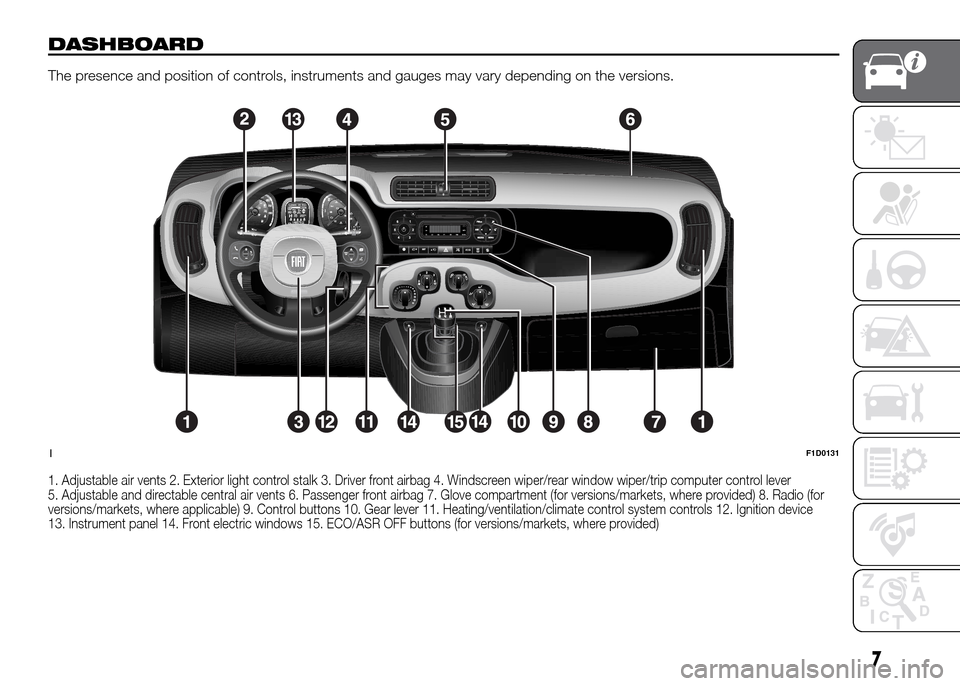
DASHBOARD
The presence and position of controls, instruments and gauges may vary depending on the versions.
1. Adjustable air vents 2. Exterior light control stalk 3. Driver front airbag 4. Windscreen wiper/rear window wiper/trip computer control lever
5. Adjustable and directable central air vents 6. Passenger front airbag 7. Glove compartment (for versions/markets, where provided) 8. Radio (for
versions/markets, where applicable) 9. Control buttons 10. Gear lever 11. Heating/ventilation/climate control system controls 12. Ignition device
13. Instrument panel 14. Front electric windows 15. ECO/ASR OFF buttons (for versions/markets, where provided)
1F1D0131
7
Page 14 of 204
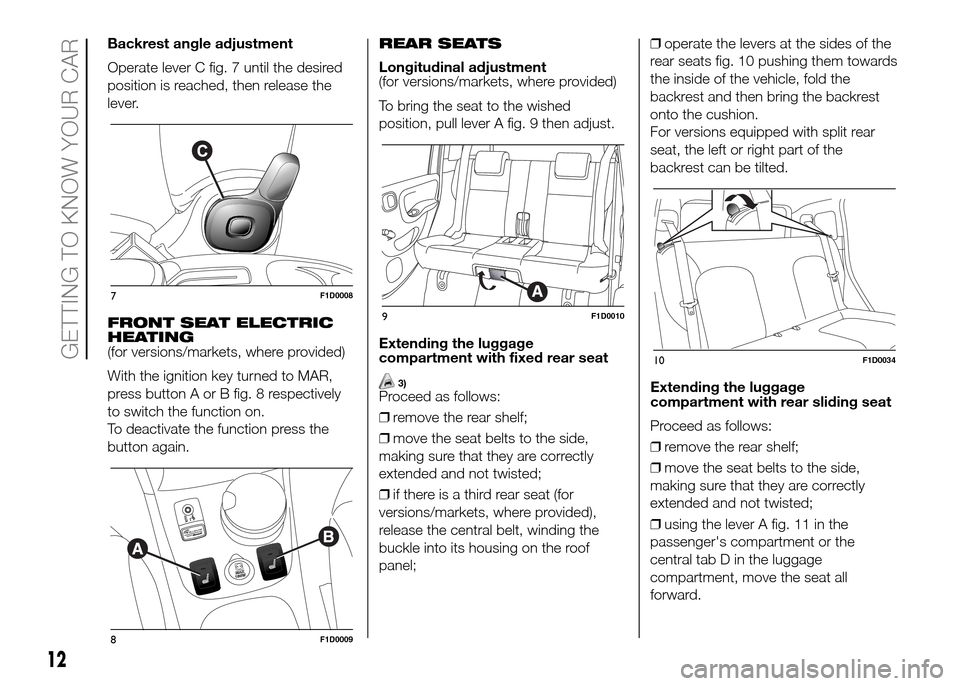
Backrest angle adjustment
Operate lever C fig. 7 until the desired
position is reached, then release the
lever.
FRONT SEAT ELECTRIC
HEATING
(for versions/markets, where provided)
With the ignition key turned to MAR,
press button A or B fig. 8 respectively
to switch the function on.
To deactivate the function press the
button again.REAR SEATS
Longitudinal adjustment
(for versions/markets, where provided)
To bring the seat to the wished
position, pull lever A fig. 9 then adjust.
Extending the luggage
compartment with fixed rear seat
3)Proceed as follows:
❒remove the rear shelf;
❒move the seat belts to the side,
making sure that they are correctly
extended and not twisted;
❒if there is a third rear seat (for
versions/markets, where provided),
release the central belt, winding the
buckle into its housing on the roof
panel;❒operate the levers at the sides of the
rear seats fig. 10 pushing them towards
the inside of the vehicle, fold the
backrest and then bring the backrest
onto the cushion.
For versions equipped with split rear
seat, the left or right part of the
backrest can be tilted.
Extending the luggage
compartment with rear sliding seat
Proceed as follows:
❒remove the rear shelf;
❒move the seat belts to the side,
making sure that they are correctly
extended and not twisted;
❒using the lever A fig. 11 in the
passenger's compartment or the
central tab D in the luggage
compartment, move the seat all
forward.
7F1D0008
8F1D0009
9F1D0010
10F1D0034
12
GETTING TO KNOW YOUR CAR
Page 26 of 204
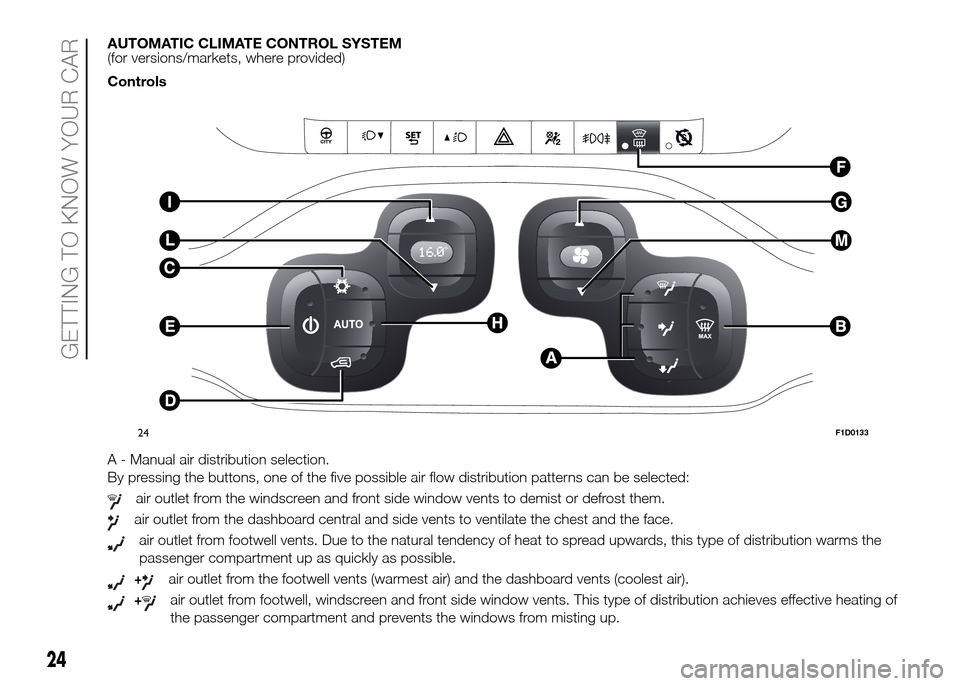
AUTOMATIC CLIMATE CONTROL SYSTEM
(for versions/markets, where provided)
Controls
A - Manual air distribution selection.
By pressing the buttons, one of the five possible air flow distribution patterns can be selected:
air outlet from the windscreen and front side window vents to demist or defrost them.
air outlet from the dashboard central and side vents to ventilate the chest and the face.
air outlet from footwell vents. Due to the natural tendency of heat to spread upwards, this type of distribution warms the
passenger compartment up as quickly as possible.
+air outlet from the footwell vents (warmest air) and the dashboard vents (coolest air).
+air outlet from footwell, windscreen and front side window vents. This type of distribution achieves effective heating of
the passenger compartment and prevents the windows from misting up.
24F1D0133
24
GETTING TO KNOW YOUR CAR
Page 30 of 204
❒hold down button B until the roof is
completely closed: the initialisation
procedure has ended;
❒press button B again within 3
seconds from the conclusion of the
initialisation procedure;
❒hold down button B: the roof will
perform an automatic opening and
closing cycle: should this not occur,
repeat the operation from the
beginning;
❒keeping button B held down, wait
until the roof is completely closed.
WARNING
21)When leaving the vehicle, always
remove the key from the ignition to avoid
the risk of injury due to accidental
operation of the sun roof. Improper use of
the roof can be dangerous. Before and
during operation, always check that
nobody is at risk of being injured by the
moving sun roof or by objects getting
caught or hit by it.
WARNING
8)Do not open the sunroof if snow or ice is
over it: you may damage it. In vehicles
with sun roof no roof rack can be fitted.
DUALDRIVE
ELECTRIC POWER
STEERING
22) 23)
This only operates with the key turned
to MAR and the engine started. The
steering allows the force required at the
steering wheel to be adjusted to suit
driving conditions.
IMPORTANT When turning the ignition
key quickly, full power steering
functionality can be achieved after a
few seconds.
CITY FUNCTION
ACTIVATION/
DEACTIVATION
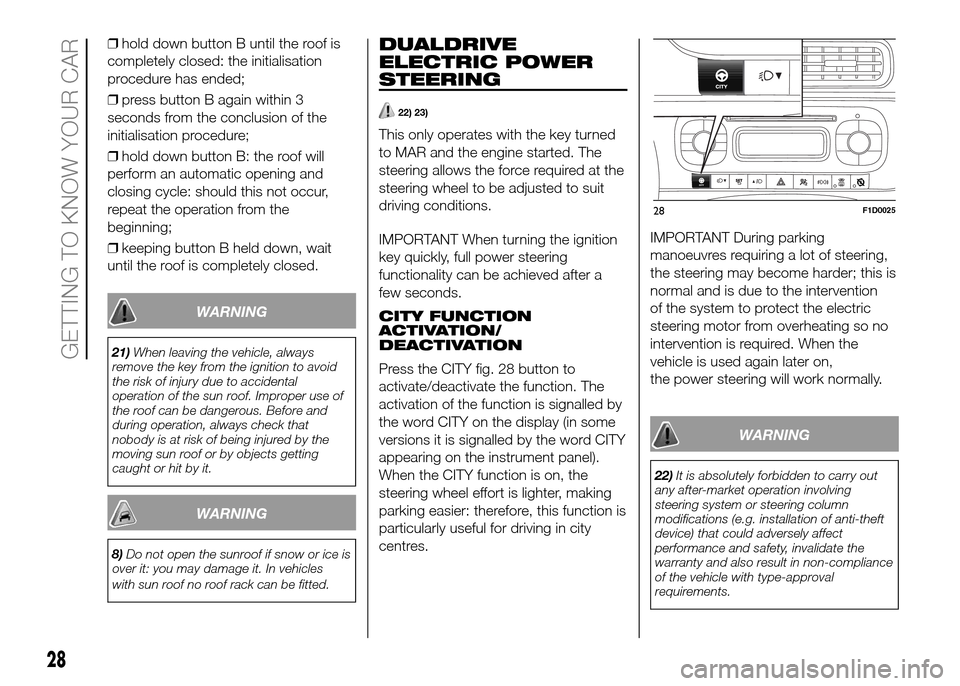
Press the CITY fig. 28 button to
activate/deactivate the function. The
activation of the function is signalled by
the word CITY on the display (in some
versions it is signalled by the word CITY
appearing on the instrument panel).
When the CITY function is on, the
steering wheel effort is lighter, making
parking easier: therefore, this function is
particularly useful for driving in city
centres.IMPORTANT During parking
manoeuvres requiring a lot of steering,
the steering may become harder; this is
normal and is due to the intervention
of the system to protect the electric
steering motor from overheating so no
intervention is required. When the
vehicle is used again later on,
the power steering will work normally.
WARNING
22)It is absolutely forbidden to carry out
any after-market operation involving
steering system or steering column
modifications (e.g. installation of anti-theft
device) that could adversely affect
performance and safety, invalidate the
warranty and also result in non-compliance
of the vehicle with type-approval
requirements.
28F1D0025
28
GETTING TO KNOW YOUR CAR
Page 53 of 204
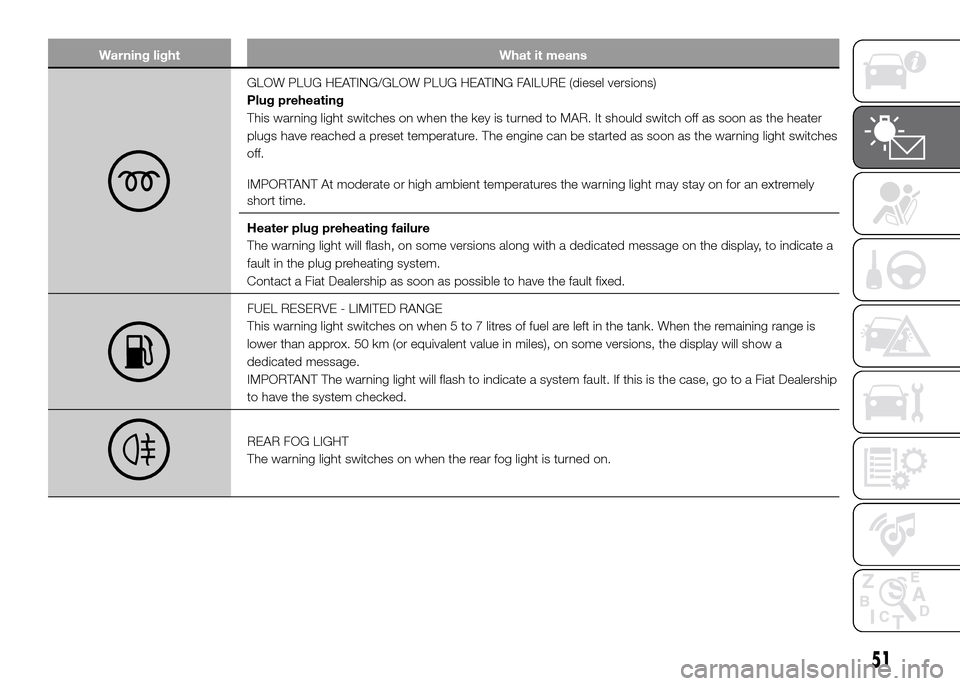
Warning light What it means
GLOW PLUG HEATING/GLOW PLUG HEATING FAILURE (diesel versions)
Plug preheating
This warning light switches on when the key is turned to MAR. It should switch off as soon as the heater
plugs have reached a preset temperature. The engine can be started as soon as the warning light switches
off.
IMPORTANT At moderate or high ambient temperatures the warning light may stay on for an extremely
short time.
Heater plug preheating failure
The warning light will flash, on some versions along with a dedicated message on the display, to indicate a
fault in the plug preheating system.
Contact a Fiat Dealership as soon as possible to have the fault fixed.
FUEL RESERVE - LIMITED RANGE
This warning light switches on when 5 to 7 litres of fuel are left in the tank. When the remaining range is
lower than approx. 50 km (or equivalent value in miles), on some versions, the display will show a
dedicated message.
IMPORTANT The warning light will flash to indicate a system fault. If this is the case, go to a Fiat Dealership
to have the system checked.
REAR FOG LIGHT
The warning light switches on when the rear fog light is turned on.
51
Page 61 of 204
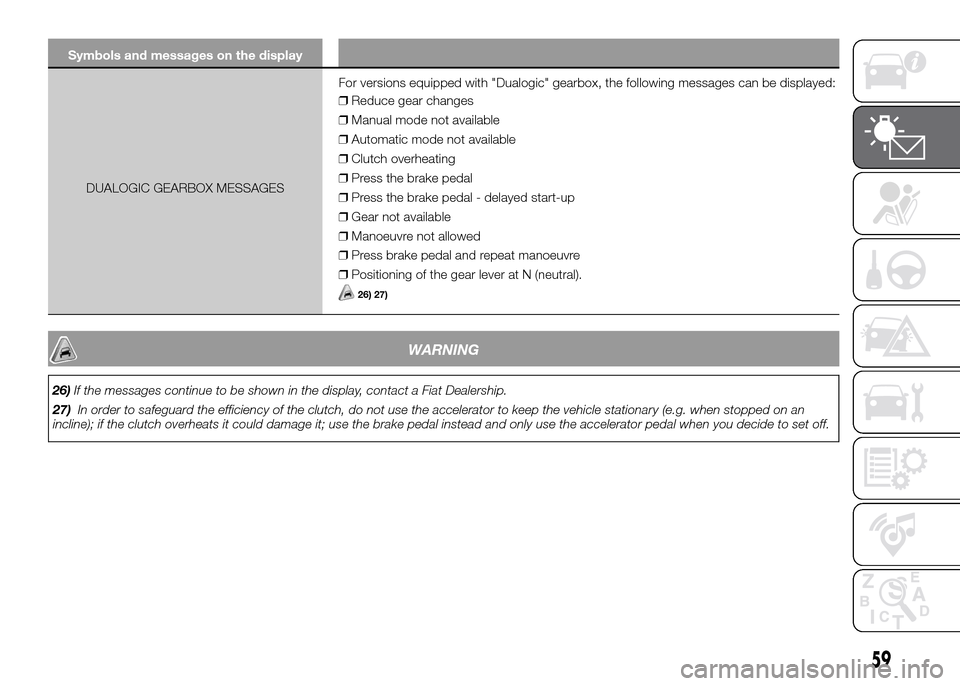
Symbols and messages on the display
DUALOGIC GEARBOX MESSAGESFor versions equipped with "Dualogic" gearbox, the following messages can be displayed:
❒Reduce gear changes
❒Manual mode not available
❒Automatic mode not available
❒Clutch overheating
❒Press the brake pedal
❒Press the brake pedal - delayed start-up
❒Gear not available
❒Manoeuvre not allowed
❒Press brake pedal and repeat manoeuvre
❒Positioning of the gear lever at N (neutral).
26) 27)
WARNING
26)If the messages continue to be shown in the display, contact a Fiat Dealership.
27)In order to safeguard the efficiency of the clutch, do not use the accelerator to keep the vehicle stationary (e.g. when stopped on an
incline); if the clutch overheats it could damage it; use the brake pedal instead and only use the accelerator pedal when you decide to set off.
59
Page 66 of 204
IMPORTANT System intervention
set-up can be engaged only with "Off
Road" mode activated.
System intervention
To activate the system reach a speed
slower than 25 km/h. After reaching the
desired speed, release the accelerator
and brake pedals completely. If you
want to increase/decrease the speed,
press the accelerator/brake pedals
again.
IMPORTANT The system is also
available for very low speeds between
the gearbox must be set to neutral to
prevent engine stalling.IMPORTANT For speeds above 9 km/h,
the HDC system must be used with a
gear that is suitable for the set speed,
in order to prevent possible engine
stalling. While the HDC system is
operating it is also possible to take
control of the vehicle again by pressing
the brake and accelerator pedals. If
the HDC is not available when system
intervention set-up is engaged, this
could be due to brake overheating. In
this case, wait for a few minutes.
IMPORTANT The system is available for
speeds between 5 km/h and 25 km/h.
It is advisable to use the system with
low gears (first, second and third).
IMPORTANT On level ground in urban
areas it is advisable to deactivate the
HDC system intervention set-up, since
for speeds below 25 km/h in some
usage conditions, such as when setting
off, gearshifting and driving over road
humps without using the accelerator
pedal, the system might activate.
Disabling the system
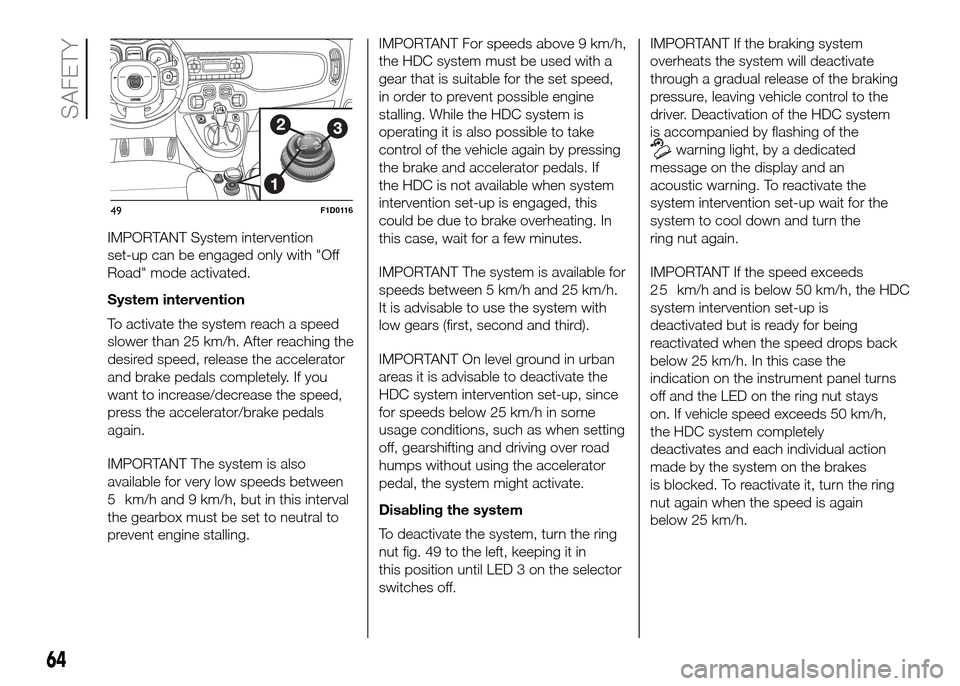
To deactivate the system, turn the ring
nut fig. 49 to the left, keeping it in
this position until LED 3 on the selector
switches off.IMPORTANT If the braking system
overheats the system will deactivate
through a gradual release of the braking
pressure, leaving vehicle control to the
driver. Deactivation of the HDC system
is accompanied by flashing of the
warning light, by a dedicated
message on the display and an
acoustic warning. To reactivate the
system intervention set-up wait for the
system to cool down and turn the
ring nut again.
IMPORTANT If the speed exceeds
system intervention set-up is
deactivated but is ready for being
reactivated when the speed drops back
below 25 km/h. In this case the
indication on the instrument panel turns
off and the LED on the ring nut stays
on. If vehicle speed exceeds 50 km/h,
the HDC system completely
deactivates and each individual action
made by the system on the brakes
is blocked. To reactivate it, turn the ring
nut again when the speed is again
below 25 km/h.
49F1D0116
64
SAFETY
5 km/h and 9 km/h, but in this interval2 5 km/h and is below 50 km/h, the HDC
Page 77 of 204
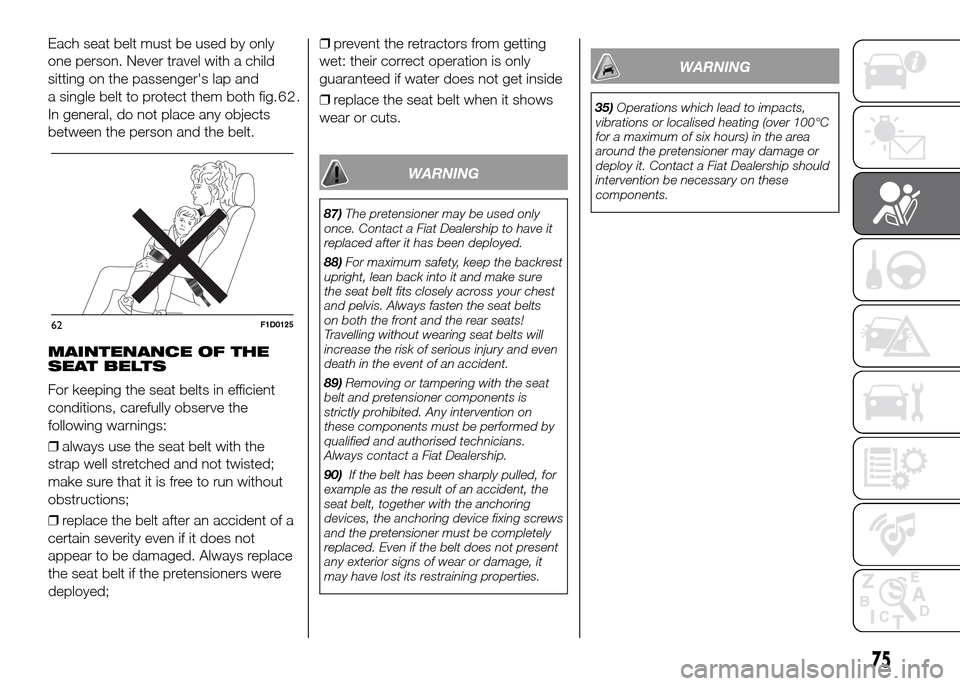
Each seat belt must be used by only
one person. Never travel with a child
sitting on the passenger's lap and
a single belt to protect them both fig.62.
In general, do not place any objects
between the person and the belt.
MAINTENANCE OF THE
SEAT BELTS
For keeping the seat belts in efficient
conditions, carefully observe the
following warnings:
❒always use the seat belt with the
strap well stretched and not twisted;
make sure that it is free to run without
obstructions;
❒replace the belt after an accident of a
certain severity even if it does not
appear to be damaged. Always replace
the seat belt if the pretensioners were
deployed;❒prevent the retractors from getting
wet: their correct operation is only
guaranteed if water does not get inside
❒replace the seat belt when it shows
wear or cuts.
WARNING
87)The pretensioner may be used only
once. Contact a Fiat Dealership to have it
replaced after it has been deployed.
88)For maximum safety, keep the backrest
upright, lean back into it and make sure
the seat belt fits closely across your chest
and pelvis. Always fasten the seat belts
on both the front and the rear seats!
Travelling without wearing seat belts will
increase the risk of serious injury and even
death in the event of an accident.
89)Removing or tampering with the seat
belt and pretensioner components is
strictly prohibited. Any intervention on
these components must be performed by
qualified and authorised technicians.
Always contact a Fiat Dealership.
90)If the belt has been sharply pulled, for
example as the result of an accident, the
seat belt, together with the anchoring
devices, the anchoring device fixing screws
and the pretensioner must be completely
replaced. Even if the belt does not present
any exterior signs of wear or damage, it
may have lost its restraining properties.
WARNING
35)Operations which lead to impacts,
vibrations or localised heating (over 100°C
for a maximum of six hours) in the area
around the pretensioner may damage or
deploy it. Contact a Fiat Dealership should
intervention be necessary on these
components.
62F1D0125
75
Page 95 of 204
WARNING
36)If the warning lightflashes for 60
seconds after starting or during an
extended towing period, this indicates a
problem in the glow plug preheating
system. You can use the vehicle as usual if
the engine starts but you should contact
a Fiat Dealership as soon as possible.
37)It is advisable not to demand maximum
performance from your vehicle (e.g.
excessive acceleration, long distances at
maximum rpm, excessively intense braking,
etc.) when it is first used.
38)When the engine is off, do not leave
the key turned to MAR to prevent
unnecessary electrical consumption from
draining the battery.
39)Never bump start the engine by
pushing, towing or coasting downhill. This
could cause fuel to flow into the catalytic
converter and damage it beyond repair.
40)There must therefore always be some
petrol in the tank to protect the petrol
pump and to guarantee temporary
switching from LPG or Methane to petrol
operation, if high performance is required.
41)A quick burst on the accelerator
before stopping the engine serves no
practical purpose; it wastes fuel and is
especially damaging to turbocharged
engines.
HANDBRAKE
121) 122) 123)
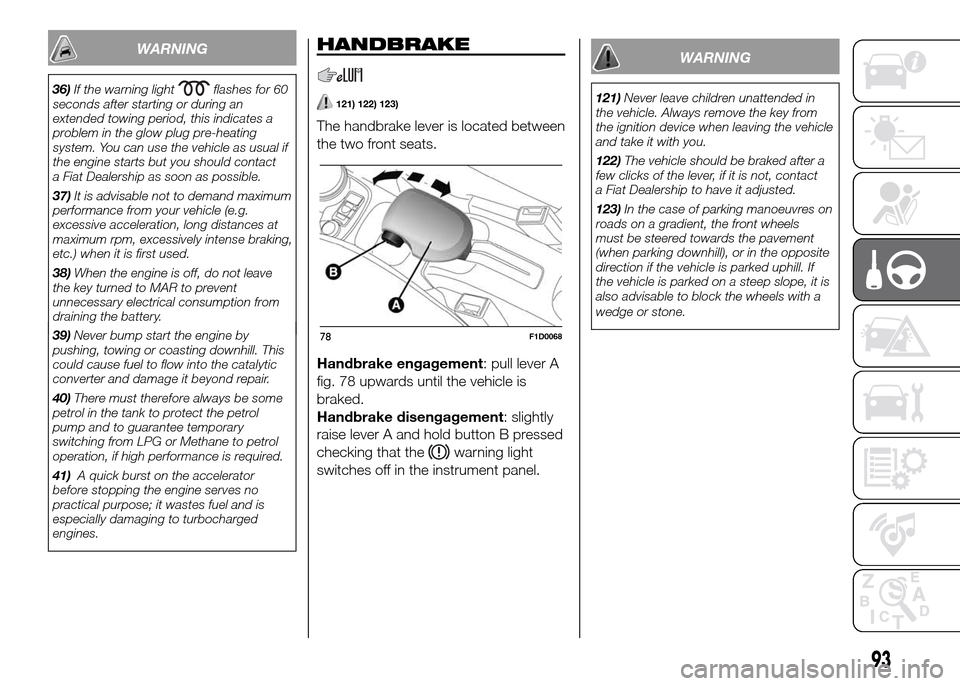
The handbrake lever is located between
the two front seats.
Handbrake engagement: pull lever A
fig. 78 upwards until the vehicle is
braked.
Handbrake disengagement: slightly
raise lever A and hold button B pressed
checking that the
warning light
switches off in the instrument panel.
78F1D0068
93
WARNING
121)Never leave children unattended in
the vehicle. Always remove the key from
the ignition device when leaving the vehicle
and take it with you.
122)The vehicle should be braked after a
few clicks of the lever, if it is not, contact
a Fiat Dealership to have it adjusted.
123)In the case of parking manoeuvres on
roads on a gradient, the front wheels
must be steered towards the pavement
(when parking downhill), or in the opposite
direction if the vehicle is parked uphill. If
the vehicle is parked on a steep slope, it is
also advisable to block the wheels with a
wedge or stone.
Page 118 of 204
❒make sure that the compressor
switch is in position 0 (off), start the
engine, plug into the power socket in
the central tunnel and operate the
compressor, turning switch A to
position I (on);
❒inflate the tyre to the pressure
specified in the "Inflation pressure"
paragraph in the "Technical
specifications" section. Check tyre
pressure on gauge B with compressor
off to obtain a more precise reading;
❒if after five minutes it is still impossible
to reach at least 1.8 bar, disengage
the compressor from the valve and
power socket, then move the vehicle
forwards by approx. ten metres in order
to distribute the sealing fluid inside the
tyre evenly, then repeat the inflation
operation;
❒if after this operation you still cannot
reach at least 1.8 bar after 5 minutes
from switching on the compressor,
do not resume driving but contact a
Fiat Dealership;
❒after driving for about 10 minutes
stop and check the tyre pressure again;
engage the handbrakeand park
safely;❒if a pressure value of at least 1.8 bar
is detected, restore the correct
pressure (with the engine running and
the handbrake engaged), resume
driving and drive with great care to the
nearest Fiat Dealership.
WARNING
147)Give the instruction brochure to the
personnel charged with handling the
tyre treated with the quick tyre repair kit.
148)Punctures on the sides of the tyre
cannot be repaired. Do not use the quick
tyre repair kit if the tyre is damaged as
a result of driving with it deflated.
149)If the wheel rim has been damaged
(bent so as to cause air to leak), the wheel
cannot be repaired. Do not remove foreign
bodies (screws or nails) from the tyre.
150)Do not use the compressor for more
than 20 consecutive minutes. Risk of
overheating. Tyres repaired with the quick
tyre repair kit must only be used
temporarily, as the kit is not suitable for a
definitive repair.
11
IN AN EMERGENCY
6
151)The information required by current
regulations, regarding the chemical
substances for the protection of human
health and the environment and on the safe
use of the sealing fluid, are on the
packaging label. Compliance with the
indications on the label is an essential
condition to ensure the safety and
the effectiveness of the product.
Remember to carefully read the label
before use; the user of the product
is responsible for any damages caused by
improper use. The sealing fluid has an
expiry date. Replace the bottle if the
sealant has expired.
152)Put on the protective gloves provided
together with the quick tyre repair kit.
153)Apply the adhesive label where it can
be easily seen by the driver as a reminder
that the tyre has been treated with the
quick repair kit. Drive carefully, particularly
on bends. Do not exceed 80 km/h. Avoid
sudden acceleration or braking.
154)If the pressure has fallen below 1.8
bar, do not drive any further: the quick tyre
repair kit cannot guarantee the correct
hold because the tyre is too damaged.
Contact a Fiat Dealership.
155)Always indicate that the tyre was
repaired using the quick tyre repair kit. Give
the leaflet to the personnel charged with
handling the tyre treated with the tyre
repair kit.