jack FIAT PANDA 2016 319 / 3.G Owners Manual
[x] Cancel search | Manufacturer: FIAT, Model Year: 2016, Model line: PANDA, Model: FIAT PANDA 2016 319 / 3.GPages: 204, PDF Size: 18.77 MB
Page 114 of 204
WARNING
136)If the replaced fuse blows again,
contact a Fiat Dealership.
137)Never replace a blown fuse with metal
wires or other material.
138)Never replace a fuse with another with
a higher amp rating; DANGER OF FIRE.
139)If a general fuse (MEGA-FUSE,
MIDI-FUSE, MAXI-FUSE) cuts in, do not
attempt any repair and contact a Fiat
Dealership.
140)Before replacing a fuse, make sure
that the ignition key has been removed and
that all the other devices are switched off
and/or deactivated.
141)If a general protection fuse for safety
systems (airbag system, braking system),
power unit systems (engine system,
transmission system) or steering system
blows, contact a Fiat Dealership.
WARNING
50)If you need to wash the engine
compartment, take care not to directly hit
the fuse box and the window wiper motors
with the water jet.
CHANGING A WHEEL
142) 143) 144) 145) 146)
JACK
Important notes:
❒the jack weight is 1.76 kg;
❒the jack requires no adjustment;
❒the jack cannot be repaired and in
the event of a fault it must be replaced
by another original one;
❒no tool other than its cranking device
may be fitted on the jack.
CHANGING PROCEDURE
Proceed as follows:
❒stop the vehicle in a position that is
not dangerous for oncoming traffic
where you can change the wheel safely.
The ground should be flat if possible,
and sufficiently firm;
❒switch off the engine, pull up the
handbrake and engage the 1
stgear or
reverse. Wear the reflective safety
jacket (compulsory by law) before
getting out of the vehicle;
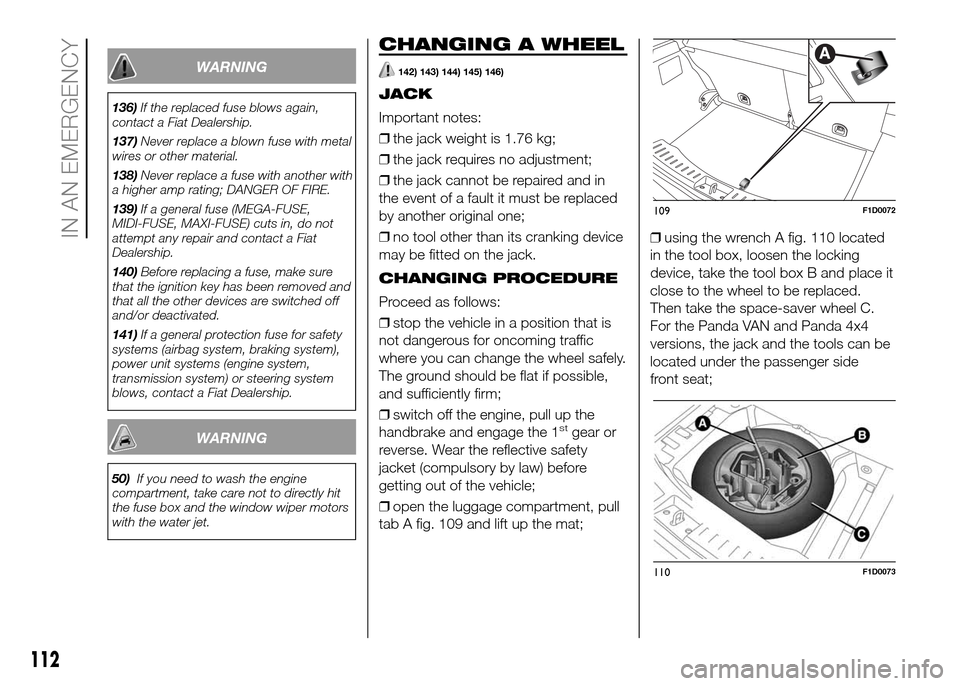
❒open the luggage compartment, pull
tab A fig. 109 and lift up the mat;❒using the wrench A fig. 110 located
in the tool box, loosen the locking
device, take the tool box B and place it
close to the wheel to be replaced.
Then take the space-saver wheel C.
For the Panda VAN and Panda 4x4
versions, the jack and the tools can be
located under the passenger side
front seat;
109F1D0072
110F1D0073
112
IN AN EMERGENCY
Page 115 of 204
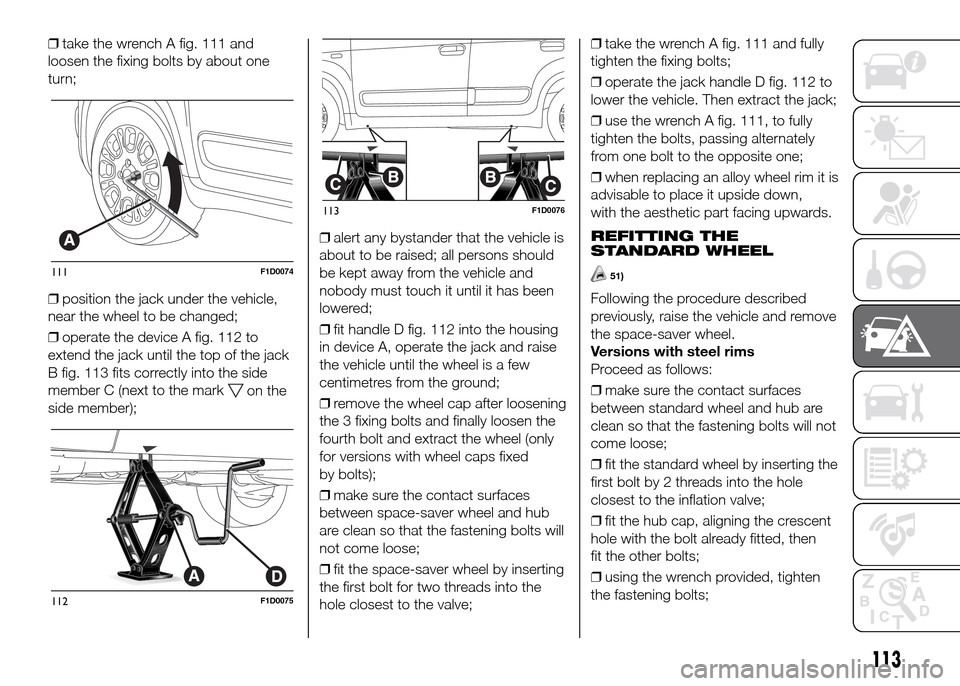
❒take the wrench A fig. 111 and
loosen the fixing bolts by about one
turn;
❒position the jack under the vehicle,
near the wheel to be changed;
❒operate the device A fig. 112 to
extend the jack until the top of the jack
B fig. 113 fits correctly into the side
member C (next to the mark
on the
side member);❒alert any bystander that the vehicle is
about to be raised; all persons should
be kept away from the vehicle and
nobody must touch it until it has been
lowered;
❒fit handle D fig. 112 into the housing
in device A, operate the jack and raise
the vehicle until the wheel is a few
centimetres from the ground;
❒remove the wheel cap after loosening
the 3 fixing bolts and finally loosen the
fourth bolt and extract the wheel (only
for versions with wheel caps fixed
by bolts);
❒make sure the contact surfaces
between space-saver wheel and hub
are clean so that the fastening bolts will
not come loose;
❒fit the space-saver wheel by inserting
the first bolt for two threads into the
hole closest to the valve;❒take the wrench A fig. 111 and fully
tighten the fixing bolts;
❒operate the jack handle D fig. 112 to
lower the vehicle. Then extract the jack;
❒use the wrench A fig. 111, to fully
tighten the bolts, passing alternately
from one bolt to the opposite one;
❒when replacing an alloy wheel rim it is
advisable to place it upside down,
with the aesthetic part facing upwards.
REFITTING THE
STANDARD WHEEL
51)
Following the procedure described
previously, raise the vehicle and remove
the space-saver wheel.
Versions with steel rims
Proceed as follows:
❒make sure the contact surfaces
between standard wheel and hub are
clean so that the fastening bolts will not
come loose;
❒fit the standard wheel by inserting the
first bolt by 2 threads into the hole
closest to the inflation valve;
❒fit the hub cap, aligning the crescent
hole with the bolt already fitted, then
fit the other bolts;
❒using the wrench provided, tighten
the fastening bolts;
111F1D0074
112F1D0075
113F1D0076
113
Page 116 of 204
❒lower the vehicle and remove the
jack;
❒use the wrench provided to fully
tighten the bolts, passing alternately
from one bolt to the opposite one.
Versions with alloy wheels
Proceed as follows:
❒insert the wheel on the hub and using
the wrench provided tighten the bolts;
❒lower the vehicle and remove the
jack;
❒use the wrench provided to fully
tighten the bolts, passing alternately
from one bolt to the opposite one.
❒reinsert the press-fitted hub cap,
making sure that the reference hole on
the wheel is aligned with the reference
pin on the cap.
IMPORTANT If it is not fitted properly,
the hub cap may detach itself when the
vehicle is running.
At the end of operation
❒stow the space-saver wheel in the
compartment provided in the luggage
compartment;
❒insert the jack and the other tools in
the container;
❒arrange the container and tools on
the space-saver wheel;
❒correctly reposition the boot mat.
WARNING
142)The space-saver wheel (for
versions/markets, where provided) is
specific to your vehicle, do not use it on
other models, or use the space-saver
wheel of other models on your vehicle. The
space-saver wheel must only be used in
the event of an emergency. It must only be
used for the distance necessary to reach
a service point and the vehicle speed must
not exceed 80 km/h. The space-saver
wheel has an orange label that
summarises the main cautions for use and
limitations. Never remove or cover the
label. The following information is provided
in four languages on the label: "Important!
For temporary use only! 80 km/h max!
Replace with a standard wheel as soon as
possible. Never cover this indication".
Never apply any hub cap to the
space-saver wheel.
143)Use your hazard lights, warning
triangle, etc to show that your vehicle is
stationary. Passengers should get out
of the vehicle, particularly if it is heavily
loaded, and wait for the wheel to be
changed away from the traffic. On hills or
uneven roads, use chocks or appropriate
objects to block the wheels of the vehicle.144)The vehicle's driving characteristics
will be modified with the space-saver wheel
fitted. Avoid violent acceleration and
braking, abrupt steering and fast cornering.
The overall duration of the space-saver
wheel is about 3000 km, after which the
relevant tyre must be replaced with another
one of the same type. Never install a
traditional tyre on a rim designed to be
used as a space-saver wheel. Have the
wheel repaired and refitted as soon as
possible. Using two or more space-saver
wheels at the same time is forbidden.
Do not apply grease to the bolt threads
before fitting: they could come unscrewed.
145)The jack may be used to replace
wheels only on the vehicle that it comes
with, or other vehicles of the same model.
Never use the jack for other purposes,
such as lifting other vehicle models. Never
use it for repair operations under the
vehicle. Incorrect positioning of the jack
may cause the vehicle to fall. Do not use
the jack for loads higher than those shown
on the label. Never install snow chains
on the space-saver wheel; if a front tyre
(driving wheel) is punctured and you need
to use snow chains, use a standard wheel
from the rear axle and install the
space-saver wheel on the rear axle. In this
way, with two normal front drive wheels,
it is possible to use snow chains.
146)Incorrect hub cap assembly may
cause it to come off when the vehicle is
moving. Never tamper with the inflation
valve. Never introduce tools of any kind
between rim and tyre. Check tyre and
space-saver wheel pressures regularly,
complying with the values given in the
"Technical specifications" chapter.
11
IN AN EMERGENCY
4
Page 141 of 204
IMPORTANT In versions with a sun
roof, make sure that the sun roof is
closed before operating the window
washer jets.
Rear window washer
The rear window washer jets are fixed.
The nozzle holder is located above
the rear window.
WARNING
176)Driving with worn windscreen/rear
window wiper blades is a serious hazard,
because visibility is reduced in bad
weather.
WARNING
61)Do not operate the windscreen wiper
with the blades lifted from the windscreen.
LIFTING THE
VEHICLE
177)
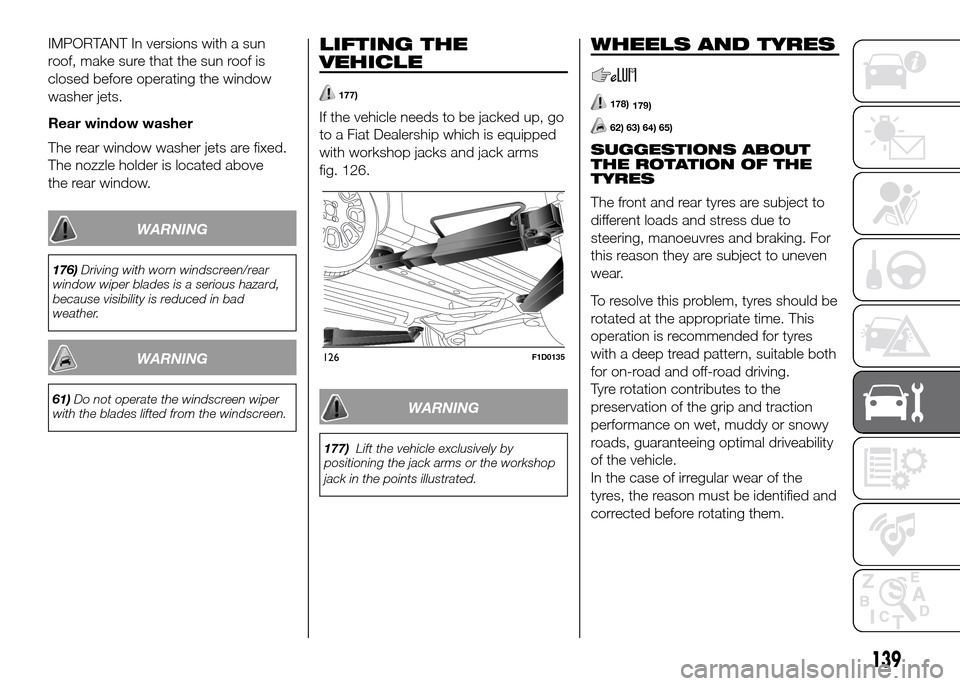
If the vehicle needs to be jacked up, go
to a Fiat Dealership which is equipped
with workshop jacks and jack arms
fig. 126.
WARNING
177)Lift the vehicle exclusively by
positioning the jack arms or the workshop
jack in the points illustrated.
WHEELS AND TYRES
178)
62) 63) 64) 65)
SUGGESTIONS ABOUT
THE ROTATION OF THE
TYRES
The front and rear tyres are subject to
different loads and stress due to
steering, manoeuvres and braking. For
this reason they are subject to uneven
wear.
To resolve this problem, tyres should be
rotated at the appropriate time. This
operation is recommended for tyres
with a deep tread pattern, suitable both
for on-road and off-road driving.
Tyre rotation contributes to the
preservation of the grip and traction
performance on wet, muddy or snowy
roads, guaranteeing optimal driveability
of the vehicle.
In the case of irregular wear of the
tyres, the reason must be identified and
corrected before rotating them.
126F1D0135
139
179)