lever FIAT PUNTO 1994 176 / 1.G Owner's Guide
[x] Cancel search | Manufacturer: FIAT, Model Year: 1994, Model line: PUNTO, Model: FIAT PUNTO 1994 176 / 1.GPages: 225, PDF Size: 18.54 MB
Page 194 of 225
Suspension and steering 10*6
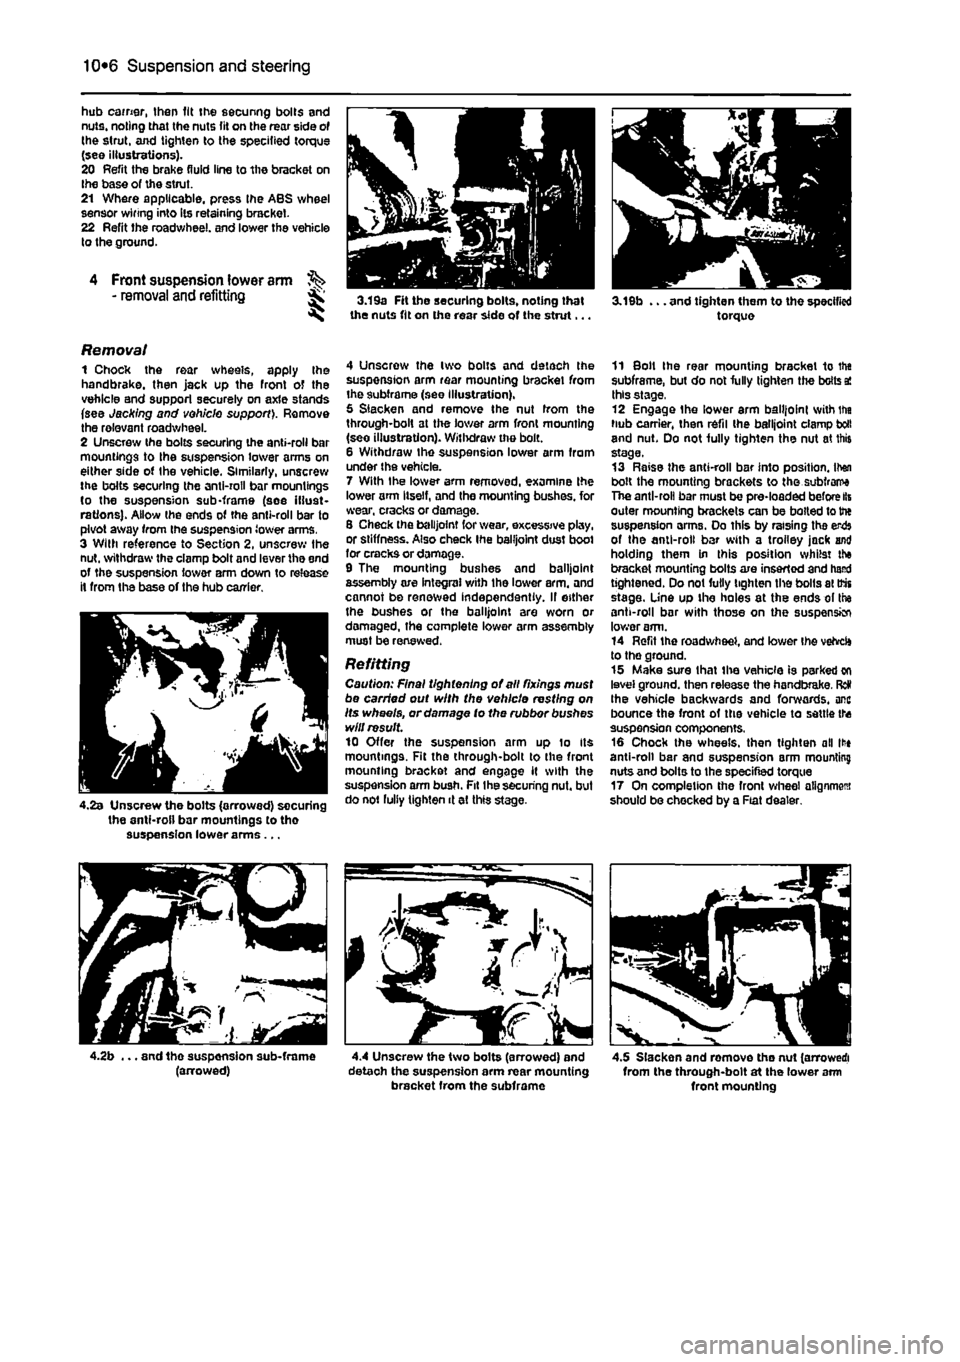
hub earner, then fit the securing bolts and nuts, noting that the nuts fit on the rear side of the strut, and tighten to the specified torque (see illustrations). 20 Refit the brake fluid line to the bracket on Ihe base of the strut. 21 Where applicable, press the ABS wheel sensor winng into its retaining bracket. 22 Refit the roadwheel. and lower the vehicle to the ground.
4 Front suspension lower arm - removal and refitting 3.19a Fit the securing bolts, noting that the nuts fit on the rear side of the strut...
Removal 1 Chock the rear wheels, apply the handbrake, then jack up the front of the vehicle and support securely on axle stands (see Jacking and vehicle support). Remove the relevant roadwheel. 2 Unscrew the bolts securing the anti-roll bar mountings to the suspension lower arms on either side ot Ihe vehicle. Similarly, unscrew the bolts securing the anti-roll bar mountings to the suspension sub-frame (see illust-rations). Allow the ends of the anti-roll bar to pivot away from the suspension lower arms. 3 With reference to Section 2, unscrew Ihe nut. withdraw the clamp bolt and lever the end of the suspension lower arm down to release it from the base of the hub carrier.
4.2s Unscrew the bolts (arrowed) securing the anti-roll bar mountings to tho suspension lower arms...
4 Unscrow the two bolts and detach the suspension arm rear mounting bracket from the subframe (see Illustration). 5 Slacken and remove the nut from the through-bolt at the lower arm front mounting (seo illustration). Withdraw the bolt. 6 Withdraw Ihe suspension lower arm from under the vehicle. 7 With the lower arm removed, examine the lower arm Itself, and the mounting bushes, for wear, cracks or damage. S Check the balljoint for wear, excessive play, or stiffness. Also check Ihe balljoint dust boot for cracks or damage. 9 The mounting bushes and balljoint assembly are integral with the lower arm. and cannot be renewed independently. If either the bushes or the balljoint are worn or damaged, the complete lower arm assembly must be renewed.
Refitting Caution: Final tightening of all fixings must be carried out with the vehicle resting on Its wheels, or damage to the rubbor bushes will result 10 Offer the suspension arm up lo Its mountings. Fit the through-bolt to the front mounting bracket and engage it with the suspension arm bush. Fit Ihe securing nut. but do not fully tighten it at this stage.
. and tho suspension sub-frame (arrowed) 4.4 Unscrew the two bolts (arrowed) and detaoh the suspension arm rear mounting bracket from the subframe
3.19b ... and tighten them to the specified torque
11 Bolt Ihe rear mounting bracket to the subframe, but do not fully tighten the bolts a! this stage, 12 Engage the lower arm balljoint svith ifia hub carrier, then refii the balljoint clamp boll and nut. Do not fully tighten the nut at this stage. 13 Raise the anti-roll bar into position. Itan bolt the mounting brackets to the subfrarra The anti-roll bar must be pre-loaded before lis outer mounting brackets can be bolted to the suspension arms. Do this by raising tha erds of the anti-roll bar with a trolley jack and holding them in this position whilst the bracket mounting bolts are inserted and hand tightened. Do not fully tighten the bolls at trts stage, line up the holes at the ends of the anti-roll bar with those on the suspension lower arm. 14 Refit the roadwheel, and lower the vehrcfe to the ground. 15 Make sure that the vehicle is parked on level ground, then release the handbrake. Red the vehicle backwards and forwards, arc bounce the front of the vehicle to settle the suspension components. 16 Chock the wheels, then tighten all lit* anti-roll bar and suspension arm mounting nuts and bolts to the specified torque 17 On completion the front wheel alignment should be chocked by a Fiat dealer.
4.5 Slacken and romove tho nut (arrowed! from the through-bolt at the lower arm front mounting
Page 206 of 225
Bodywork and fittings
11
*5
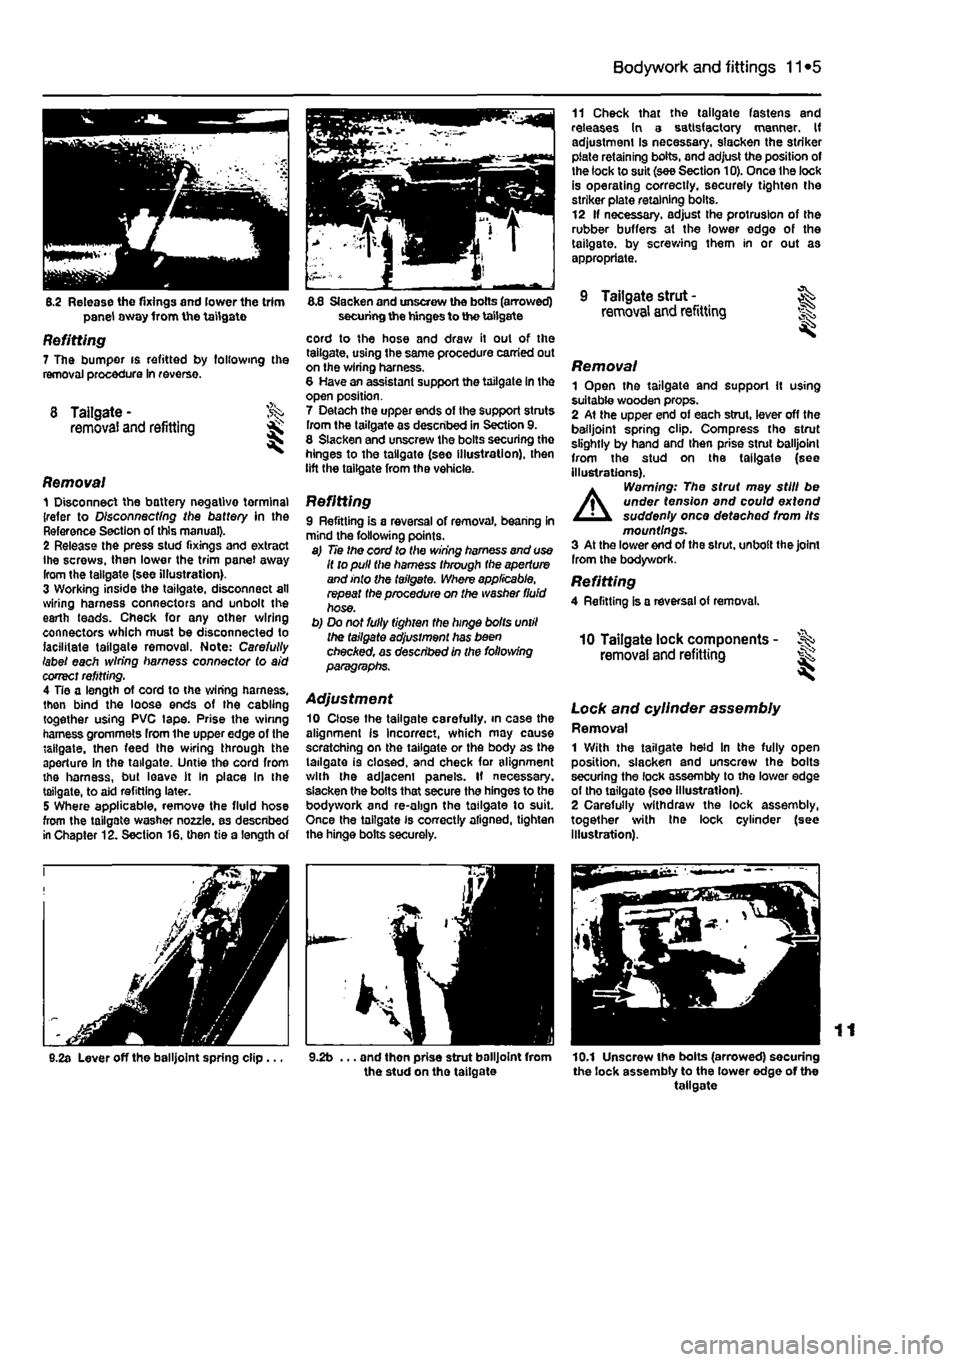
8.2 Release the fixings and lower the trim panel away from the tailgate
Refitting 7 The pumper is refitted by following the removal procedure In reverse.
8 Tailgate- ^ removal and refitting
Removal 1 Disconnect the battery negative tormina) {refer to D/sconnecf/ng the battery In the Reference Section of this manual}. 2 Release the press stud fixings and extract ihe screws, then lower the trim panel away from the tailgate (see illustration). 3 Working inside the tailgate, disconnect all wiring harness connectors and unbolt the earth leads. Check for any other wiring connectors which must be disconnected to facilitate tailgate removal. Note: Carefully label each wiring harness connector (o aid correct refitting. 4 Tie a length of cord to the wiring harness, then bind the loose ends of the cabling together using PVC tape. Prise the winng harness grommets from the upper edge of the tailgate, then feed the wiring through the aperture in the tailgate. Untie the cord from the harness, but leave it In place In the tailgate, to aid refitting later. 5 Where applicable, remove the fluid hose from the tailgate washer nozzle, as described in Chapter 12. Section 16. then tie a length of
8.2a Lever off the balljoint spring clip...
8.8 Slacken and unscrew the bolts (arrowed) securing the hinges to the tailgate
cord to the hose and draw it out of the tailgate, using the same procedure carried out on the wiring harness. 8 Have an assistant support the tailgate in the open position. 7 Detach the upper ends of the support stmts from the tailgate as described in Section 9. 8 Slacken and unscrew the bolts securing tho hinges to the tailgate (seo illustration), then lift the tailgate from the vehicle.
Refitting 9 Refitting is a reversal of removal, bearing in mind the following points. a) Tie the cord to the wiring harness and use It to pull the harness through the aperture and into the tailgate. Where applicable, repeat the procedure on the washer fluid hose. b) Do not fully tighten the hinge bolts until the tailgate adjustment has been checAed, as described in the following paragraphs.
Adjustment 10 Close the tailgate carefully, in case the alignment is Incorrect, which may cause scratching on the tailgate or the body as the tailgate is closed, and check for alignment with the adjacent panels. If necessary, slacken the bolts that secure the hinges to the bodywork and re-align the tailgate to suit. Once the tailgate is correctly aligned, tighten the hinge bolts securely.
9.2b ... and then prise strut balljoint from the stud on tho taitgate
11 Check that the tailgate fastens and releases In a satisfactory manner. If adjustment Is necessary, slacken the striker plate retaining bolts, and adjust the position of the lock to suit (see Section 10). Once the lock is operating correctly, securely tighten the striker plate retaining bolts. 12 If necessary, adjust the protrusion of the rubber buffers at the lower edge of the tailgate, by screwing them in or out as appropriate.
9 Tailgate strut - ^ removal and refitting
Removal 1 Open the tailgate and support it using suitable wooden props. 2 At the upper end of each strut, lever off the balljoint spring clip. Compress tho strut slightly by hand and then prise strut balljoint from the stud on the tailgate (see illustrations),
A
Warning: The strut may still be under tension and could extend suddenly once detached from Its mountings. 3 At the lower end of the strut, unbolt the joint Irom the bodywork. Refitting 4 Refitting is a reversal of removal.
10 Tailgate lock components -removal and refitting ^
Lock and cylinder assembly Removal 1 With the tailgate held In the fully open position, slacken and unscrew the bolts securing the lock assembly to tho lower edge of tho tailgate (soo illustration). 2 Carefully withdraw the lock assembly, together with tne lock cylinder (see Illustration).
10.1 Unscrew the bolts (arrowed) securing the lock assembly to the lower edge of the tailgate
Page 208 of 225
Bodywork and fittings
11
*7
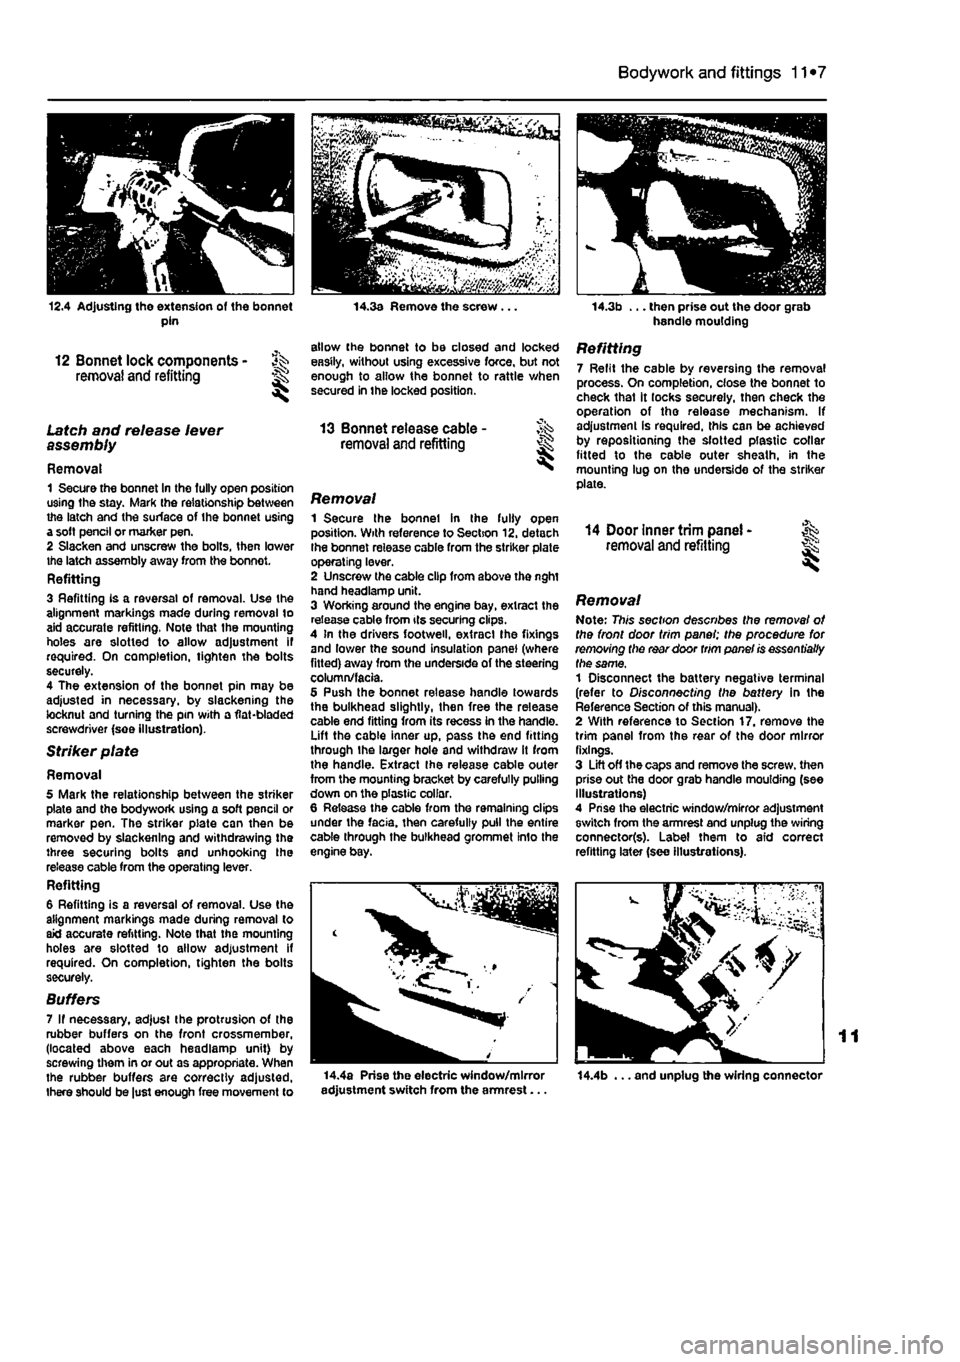
12.4 Adjusting the extension of the bonnet pin
12 Bonnet lock components - ^ removal and refitting H
Latch and release lever assembly
Removal 1 Secure the bonnet In the fully open position using the stay. Mark the relationship between the latch and the surface of the bonnet using a soft pencil or marker pen. 2 Slacken and unscrew the bolts, then lower the latch assembly away from the bonnot. Refitting 3 Refitting is a reversal of removal. Use the alignment markings made during removal to aid accurate refitting. Note that the mounting holes are slotted to allow adjustment if required. On completion, tighten the bolts securely. 4 The extension of the bonnet pin may be adjusted in necessary, by slackening the locknut and turning the pin with a flat-bladed screwdriver (see illustration).
Striker plate
Removal 5 Mark the relationship between the striker plate and the bodywork using a soft pencil or marker pen. The striker plate can then be removed by slackening and withdrawing the three securing bolts and unhooking the release cable from the operating lever. Refitting 6 Refitting is a reversal of removal. Use the alignment markings made during removal to aid accurate refitting. Note that the mounting holes are slotted to allow adjustment if required. On completion, tighten the bolts securely.
Suffers 7 If necessary, adjust the protrusion of the rubber buffers on the front crossmember, (located above each headlamp unit) by screwing them in or out as appropriate. When the rubber buffers are correctly adjusted, there should be just enough free movement to
14.3a Remove the screw .
allow the bonnet to be closed and locked easily, without using excessive force, but not enough to allow the bonnet to rattle when secured in the locked position.
13 Bonnet release cable -removal and refitting I
Removal 1 Secure the bonnet in the fully open position. With reference to Section 12, detach Ihe bonnet release cable from the striker plate operating lever. 2 Unscrew the cable clip from above the nght hand headlamp unit. 3 Working around the engine bay, extract the release cable from its securing clips. 4 In the drivers footweil, extracl Ihe fixings and lower the sound insulation panel (where fitted) away from the underside of the steering column/facia. 5 Push the bonnet release handle towards the bulkhead slightly, then free the release cable end fitting from its recess in the handle. Lift the cable inner up, pass the end fitting through the larger hole and withdraw it from the handle. Extract the release cable outer from the mounting bracket by carefully pulling down on the plastic collar. 6 Release the cable from the remaining clips under the facia, then carefully pull the entire cable through the bulkhead grommet Info the engine bay.
14.3b ... then prise out the door grab handle moulding
Refitting 7 Refit the cable by reversing the removal process. On completion, close the bonnet to check that it locks securely, then check the operation of tho release mechanism. If adjustment is required, this can be achieved by repositioning the slotted plastic collar fitted to the cable outer sheath, in the mounting lug on the underside of the striker plate.
14 Door inner trim panel -removal and refitting I
Removal Note: This section describes the removal of the front door trim panel; the procedure for removing the rear door trim panel is essentially the same, 1 Disconnect the battery negative terminal (refer to Disconnecting the battery in the Reference Section of this manual). 2 With reference to Section 17. remove the trim panel from the rear of the door mirror fixings. 3 Lift off the caps and remove the screw, then prise out the door grab handle moulding (see Illustrations) 4 Prise the electric window/mirror adjustment switch from the armrest and unplug the wiring connector(s). Label them to aid correct refitting later (see illustrations).
14.4a Prise the electric window/mirror adjustment switch from the armrest... 14.4b ... and unplug the wiring connector
Page 210 of 225
Bodywork and fittings
11
*9
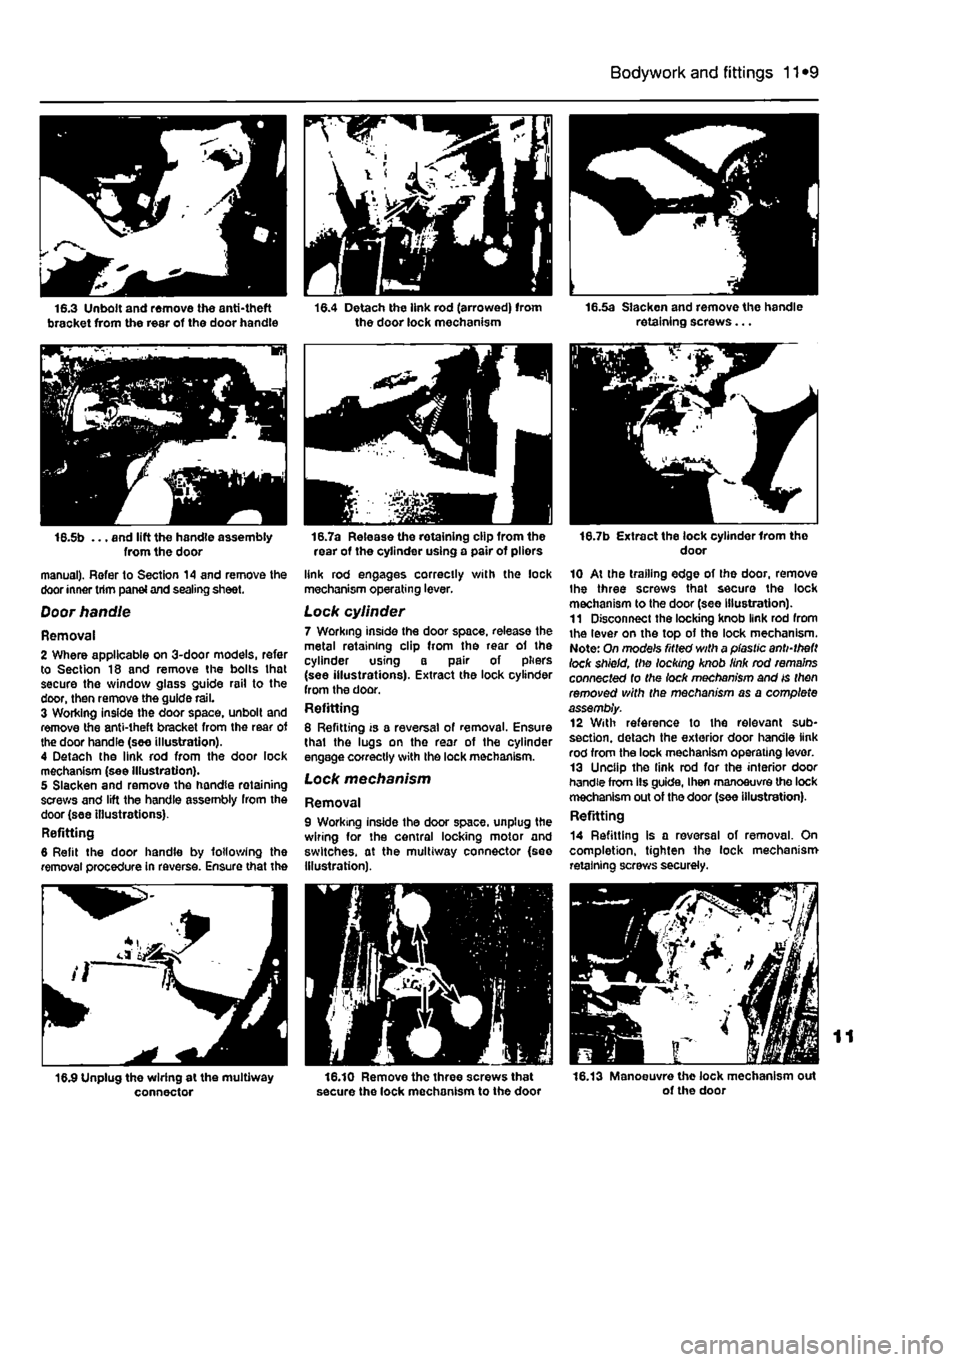
16.5b ... and lift the handle assembly from the door manual). Refer to Section 14 and remove the door inner trim panei and sealing sheet.
Door handle
Removal 2 Where applicable on 3-door models, refer to Section 18 and remove the bolts lhat secure the window glass guide rail to the door, then remove the guide rail. 3 Working inside the door space, unbolt and remove the anti-theft bracket from the rear of the door handle (see illustration). 4 Detach the link rod from the door lock mechanism (see Illustration). 5 Slacken and remove the handle retaining screws and lift the handle assembly from the door (see illustrations). Refitting 6 Refit the door handle by following the removal procedure in reverse. Ensure that the
connector
16.7a Release the retaining clip from the rear of the cylinder using a pair of pliors
link rod engages correctly with the lock mechanism operating lever.
Lock cylinder 7 Working inside the door space, release the metal retaining clip from the rear of the cylinder using a pair of pliers (see illustrations). Extract the lock cylinder from the door. Refitting 8 Refitting is a reversal of removal. Ensure thai the lugs on the rear of the cylinder engage correctly with the lock mechanism. Lock mechanism
Removal 9 Working inside the door space, unplug the wiring for the central locking motor and switches, at the multiway connector {see Illustration).
16.10 Remove the three screws that secure the lock mechanism to the door
16.7b Extract the lock cylinder Irom tho door
10 At the trailing edge of the door, remove Ihe three screws that secure the lock mechanism to the door (see Illustration). 11 Disconnect the locking knob link rod from the lever on the top of the lock mechanism. Note: On mode's fitted with a plastic anti-theft lock shield, the locking knob link rod remains connected to the lock mechanism and is then removed with the mechanism as a complete assembly. 12 With reference to the relevant sub-section. detach the exterior door handle link rod from the lock mechanism operating lever. 13 Unclip the link rod for the interior door handle from lis guide, I hen manoeuvre the lock mechanism out of the door (see illustration). Refitting
14 Refitting is a reversal of removal. On completion, tighten the lock mechanism retaining screws securely.
16.13 Manoeuvre the lock mechanism out of the door
Page 211 of 225
11
*10 Bodywork and fittings
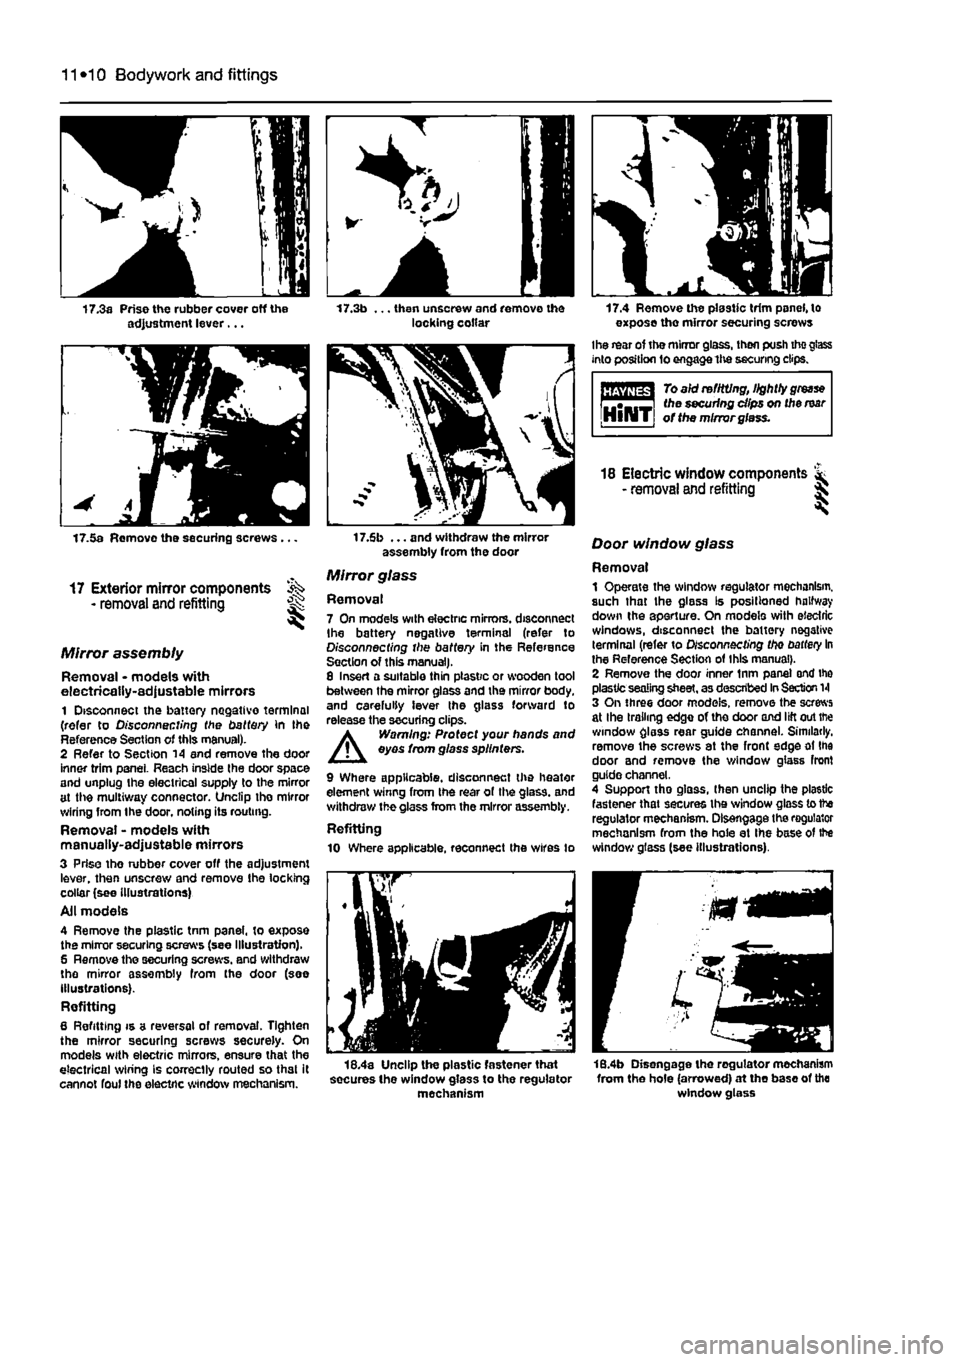
17.3a Prise the rubber cover off the adjustment lever... 17.3b ... then unscrew and remove the locking collar 17.4 Remove the plastic trim panel, to expose the mirror securing screws
Ihe rear of the mirror glass, then push tho glass into position fo engage the securing clips.
To aid re fitting, lightly
grease
^•-.—i the securing dips on the mar IjlllliTj of the mirror glass.
17.5a Remove the securing screws .
17 Exterior mirror components - removal and refitting
Mirror assembly
Removal • models with electrically-adjustable mirrors 1 Disconnect the battery negative terminal (refer to Disconnecting the battery in the Reference Section of this manual). 2 Refer to Section 14 and remove the door inner trim panel. Reach inside the door space and unplug the electrical supply to the mirror at the multiway connector. Unclip tho mirror wiring from Ihe door, noting its routing. Removal - models with manually-adjustable mirrors 3 Prise tho nibber cover off the adjustment lever, then unscrew and remove the locking collar (see Illustrations) Ail models 4 Remove the plastic tnm panel, to expose the mirror securing screws (see Illustration). 6 Remove the securing screws, and withdraw the mirror assembly from the door (see illustrations). Refitting 6 Refitting is a reversal of removal. Tighten the mirror securing screws securely. On models with electric mirrors, ensure that the electrical wiring is correctly routed so that it cannot foul the electric window mechanism.
17.6b ... and withdraw the mirror assembly from the door
Mirror glass
Removal 7 On models with electric mirrors, disconnect Ihe battery negative terminal (refer to Disconnecting the battery in the Reference Section of this manual). 8 Insert a suitable thin plastic or wooden tool between the mirror glass and the mirror body, and carefully lever the glass forward to release the securing clips. A Warning: Protect your hands and eyes from glass sp//nfers.
9 Where applicable, disconnect the heater element winng from the rear of the glass, and withdraw the glass from the mirror assembly. Refitting 10 Where applicable, reconnect the wires to
18 Electric window components & - removal and refitting 5
Door window glass
Removal 1 Operate the window regulator mechanism, such that the glass Is positioned halfway down the aperture. On modelo with electric windows, disconnect the battery negative terminal (refer to Disconnecting tho
battery
In the Reference Section of this manual). 2 Remove the door inner inm pane) ond ihe plastic sealing sheet, as described
In
Section
1
3 On three door models, remove the screws at Ihe trailing edge of the door and lift out the window glass rear guide channel. Similarly, remove the screws at the front edge at the door and remove the window glass front guide channel. 4 Support tho glass, (hen unclip the plastic fastener that secures the window glass to the regulator mechanism. Disengage the regulator mechanism from the hole at Ihe base of the window glass (see illustrations).
18.4a Unclip the plastic fastener that socures the window glass to the regulator mechanism
18.4b Disengage the regulator mechanism from the hole (arrowed) at the base of the window glass
Page 212 of 225
Bodywork and fittings
11
*11
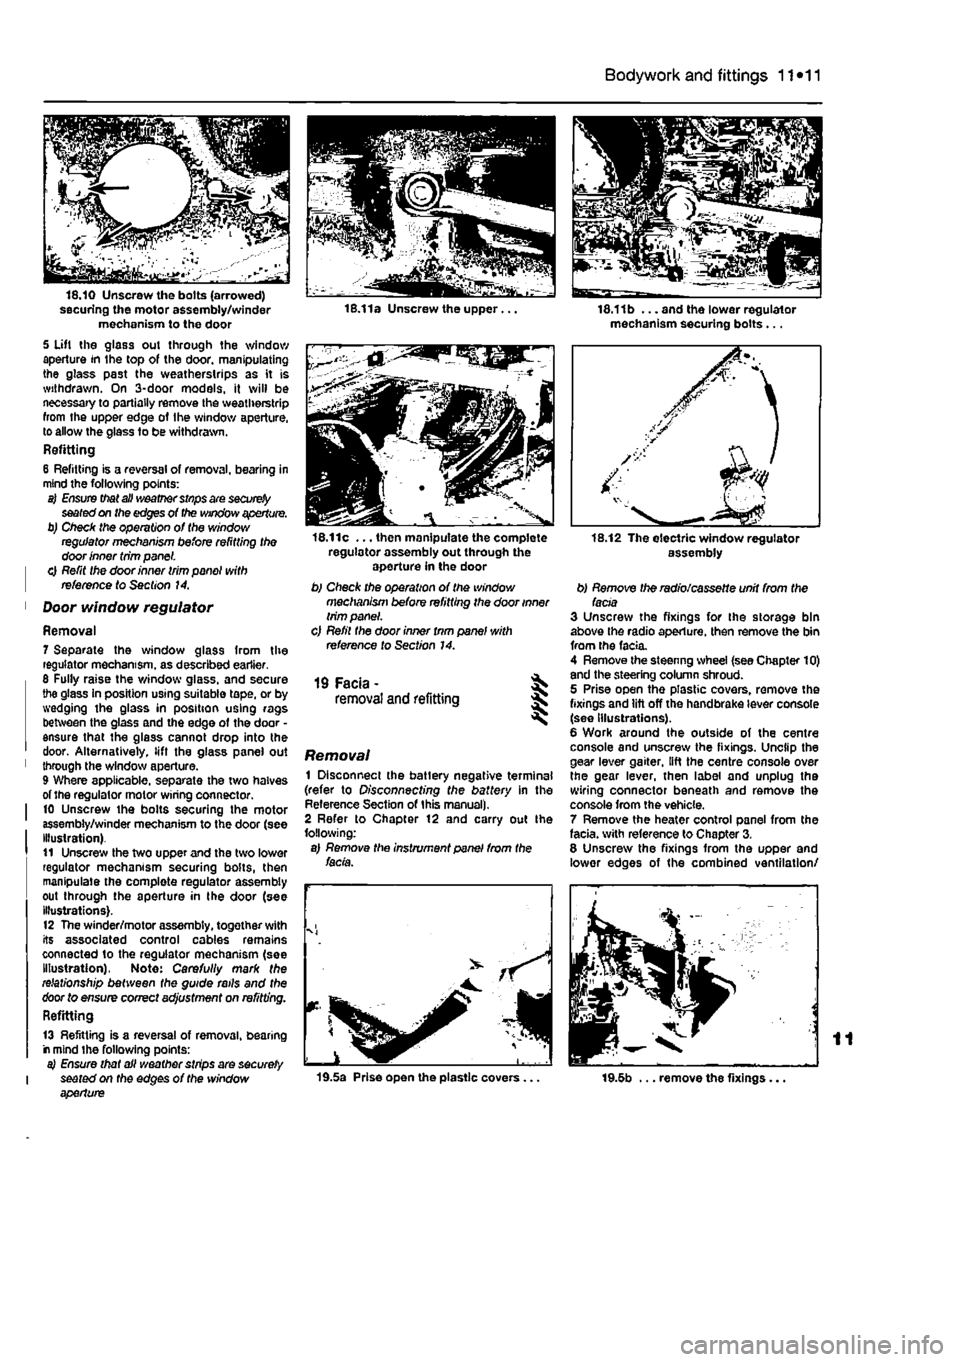
securing the motor assembly/winder mechanism to the door 5 Uft the glass out through the window aperture in the top of the door, manipulating the glass past the weatherstrips as it is withdrawn. On 3-door models, it will be necessary to partially remove the weatherstrip from the upper edge of Ihe window aperture, to allow the glass to be withdrawn. Refitting 6 Refitting is a reversal of removal, bearing in mind the following points: a) Ensure that all weather stnps are
securely
seated on the edges of the window aperture. b) Check the operation of the window regulator mechanism before refitting the door inner trim panel. | 0 Refit the door inner trim panel with | reference to Section 14.
1 Door window regulator
Removal 7 Separate the window glass from the regulator mechanism, as described earlier. 6 Fully raise the window glass, and secure the glass In position using suitable tape, or by wedging the glass in position using rags between the glass and the edge of the door • ensure that the glass cannot drop into the door. Alternatively, lift the glass panel out 1 through the window aperture. 9 Where applicable, separate the two halves of the regulator motor wiring connector. I 10 Unscrew the bolts securing the motor assembly/winder mechanism to the door (see Illustration). t1 Unscrew the two upper and the two lower regulator mechanism securing bolts, then manipulate the complete regulator assembly out through the aperture in the door (see illustrations). 12 The winder/motor assembly, together with its associated control cables remains connected to the regulator mechanism (see Illustration), Note: Carefully mark the relationship between the guide rails and the door to ensure correct adjustment on refitting. Refitting
13 Refitting is a reversal of removal, bearing r mind the following points: a) Ensure that all weather strips are securely I seated on the edges of the window aperture
16.11c ... then manipulate the complete regulator assembly out through the aperture in the door b) Check the operation of the window mechanism before refitting the door inner trim panel. c) Refil the door inner tnm panel with reference to Section 14.
19 Facia - ^ removal and refitting 5
Removal 1 Disconnect the batlery negative terminal (refer to Disconnecting the battery in the Reference Section of this manual). 2 Refer to Chapter 12 and carry out Ihe following: a) Remove the instrument panel from the facia.
19.5a Prise open the plastic covers...
18.11b ... and the lower regulator mechanism securing bolts...
assembly
b) Remove the radio/cassette unit from the facia 3 Unscrew the fixings for the storage bin above the radio aperture, then remove the bin from the facia. 4 Remove the steenng wheel (see Chapter 10) and the steering column shroud. 5 Prise open the plastic covers, remove the fixings and lift off the handbrake lever console (see Illustrations). 6 Work around the outside of the centre console and unscrew the fixings. Unclip the gear lever gaiter, lift the centre console over the gear lever, then label and unplug the wiring connector beneath and remove the console from the vehicle. 7 Remove the heater control panel from the facia, with reference to Chapter 3. 8 Unscrew the fixings from the upper and lower edges of the combined ventilation/
19.5b ... remove the fixings...
Page 217 of 225
12*4 Body electrical systems
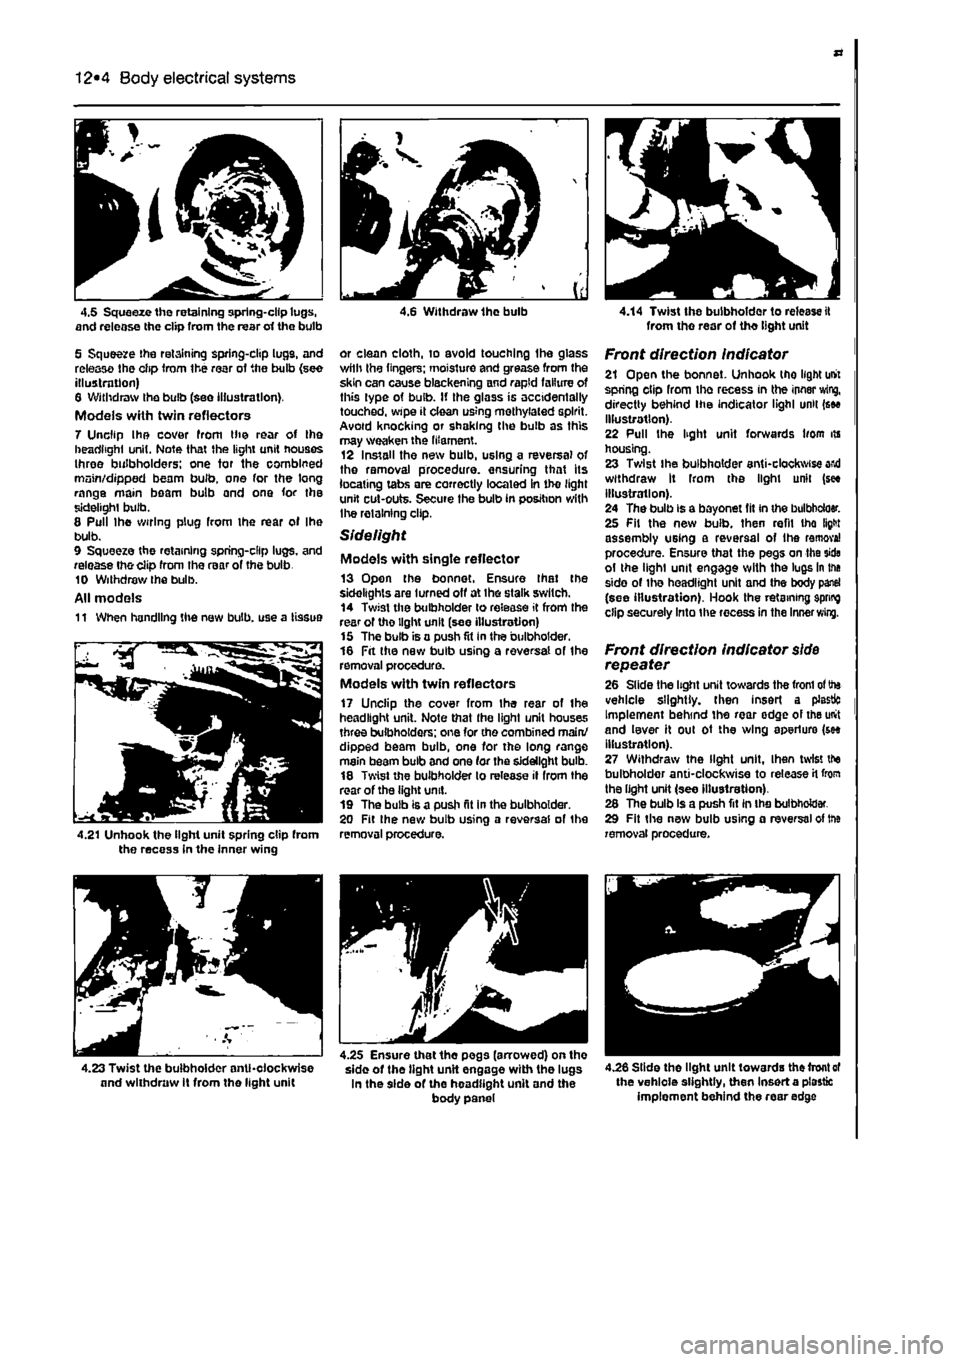
4.5 Squeeze the retaining spring-clip lugs, and release the clip from the rear erf the bulb
5 Squeeze the retaining spring-clip lugs, and release Ihe clip Irom the rear of the bulb {see illustration) 6 Withdraw the bulb (see illustration). Models with twin reflectors 7 Unclip Ihe cover from the rear of the headlight unit. Note that the light unit houses three bulbholders; one tor the combined main/dipped beam bulb, one for the long range main beam bulb and one for the sidelight bulb. 8 Pull Ihe wiring plug from the rear ol Ihe bulb. 9 Squeeze the retaining spring-clip lugs, and release tho clip from the rear of the bulb 10 Withdraw Ihe bulb. All models 11 When handling the new bulb, use a tissue
4.21 Unhook the light unit spring clip from the recess in the inner wing
4 6 Withdraw Ihe bulb
or clean cloth, to avoid touching Ihe glass wilh Ihe lingers; moisture and grease from the skin can cause blackening and rapid failure of this type of bulb. If the glass is accidentally touched, wipe it clean using methylated spirit. Avoid knocking or shaking the bulb as this may weaken the filament. 12 Install the new bulb, using a reversal of the removal procedure, ensuring that its locating tabs are correctly located in tho light unit cut-outs. Secure the bulb in position with Ihe retaining clip.
Sidelight
Models with single reflector 13 Open the bonnet. Ensure Ihat the sidelights are turned off at ihe stalk switch. 14 Twist the bulbholder lo release it from the rear of tho light unit (see illustration) 15 The bulb is a push fit in the bulbholder. 16 Fit the new bulb using a reversal of the removal procedure. Models with twin reflectors 17 Unclip the cover from Ihe rear of Ihe headlight unit. Note that Ihe light unit houses three bulbholders; one for the combined main/ dipped beam bulb, one for the long range main beam bulb and one (or the sidelight bulb. 18 Twist the bulbholder to release il from the rear of the light unit. 19 The bulb is a push fit in the bulbholder. 20 Fit Ihe new bulb using a reversal of the removal procedure.
4.14 Twist the bulbholder to release it from tho rear of tho light unit
Front direction indicator 21 Open the bonnet. Unhook tho light unit spring clip from the recess in the innsr wing, directly behind ihe indicator lighl unit (see illustration). 22 Pull the light unit forwards liom its housing. 23 Twist ihe bulbholder anti-clockwise and withdraw It from the light unit (see illustration). 24 The bulb is a bayonet fit in the bulbbdoer. 25 Fit the new bulb, then refil tho fight assembly using a reversal of Ihe remove! procedure. Ensure that the pegs on the side ol the lighl unit engage with the lugs in the side of the headlight unit and the body panel (see illustration). Hook the retaining spring clip securely Into the recess in the Inner
wing.
Front direction indicator
side
repeater 26 Slide the light unit towards the from
ol
the vehicle slightly, then insert a plastic Implement behind the rear edge of the unit and lever it oul ot the wing aperture (see illustration). 27 Withdraw the light unit. Ihen twist the bulbholder anti-clockwise to release
H
from the light unit (see illustration). 28 The bulb is a push fit in the bulbholder. 29 Fit the new bulb using a reversal of trie removal procedure.
4.26 Slide the light unit towards the front
of
the vehicle slightly, then Insert a plastic implement behind the rear edge
4.23 Twist the bulbholder anticlockwise and withdraw It from the light unit
4.25 Ensure that the pegs (arrowed) on tho sido of tho tight unit engage with the lugs In the side of the headlight unit and the body panel
Page 223 of 225
12*10 Body electrical systems
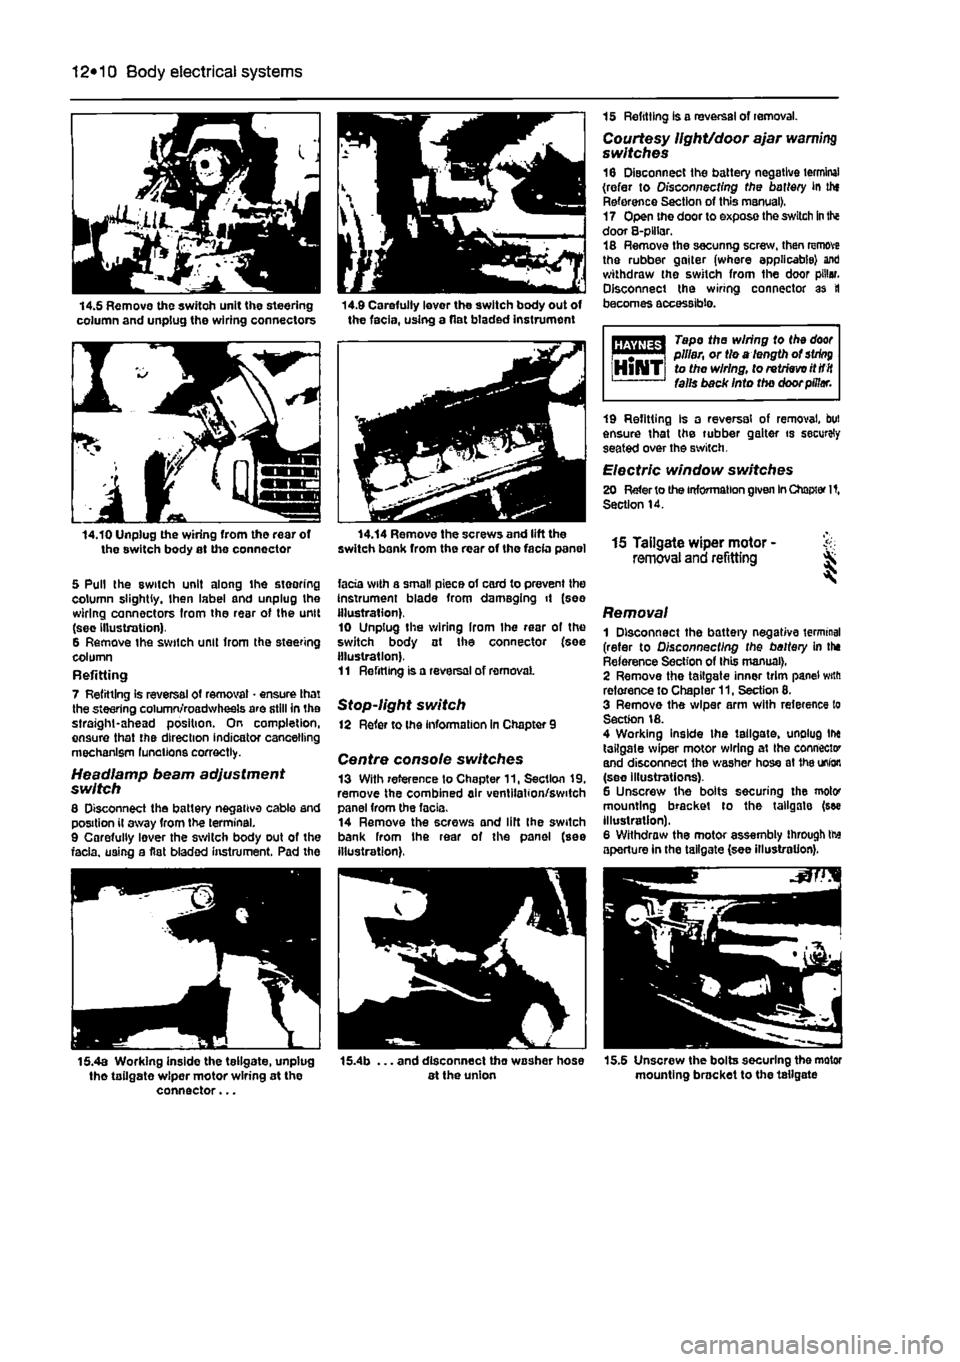
14.5 Remove the switch unit the steering column and unplug the wiring connectors 14.9 Carefully lever the switch body out of the facia, using a flat btaded instrument
14.10 Unplug the wiring from tho rear of the switch body at the connector
5 Pull the switch unit along ihe steering column slightly, then label and unplug the wiring connectors from the rear of the unit (sec Illustration). 6 Remove the switch unit from the steering column Refitting 7 Refitting is reversal of removal • ensure that the steering column/roadwheels are still in the straight-ahead position. On completion, ensure that the direction indicator cancelling mechanism lunations correctly.
Headlamp beam adjustment switch 8 Disconnect the battery negative cable and position il away from the terminal. 9 Carefully lever the switch body out of the facia, using a flat bladed instrument. Pad the
15 Refitting is a reversal of removal. Courtesy light/door ajar warning switches 16 Disconnect the battery negative terminal (refer to Disconnecting the battery in thf Reference Section of this manual). 17 Open the door to expose the switch
in
the door 8-plHar. 18 Remove the secunng screw, then remove the rubber gaiter (where applicable) ant) withdraw the switch from the door pillar. Disconnect the wiring connector as tl becomes accessible.
Tape the wiring to the
door
i m | pillar, or tie a length of
string
HlNTi to the wiring, to retrieve itttit falls back Into the door pillar.
14.14 Remove the screws and lift the switch bank from the rear of the facia panel
facia with a small piece of card to prevent the Instrument blade from damaging it (see illustration). 10 Unplug the wiring Irom Ihe rear of the switch body at Ihe connector (see illustration). 11 Refitting is a reversal of removal
Stop-light switch 12 Refer to the information in Chapter 9
Centre console switches 13 With reference to Chapter 11, Section 19, remove the combined air ventilation/switch panel from the facia. 14 Remove the screws and lift Ihe switch bank from Ihe rear of the panel (see illustration),
19 Refitting Is a reversal of removal, but ensure that the rubber gaiter is securely seated over the switch.
Electric window switches 20 Refer to the information given
In
Chapter It, Section 14.
15 Tailgate wiper motor - & removal and refitting ^
Removal 1 Disconnect the battery negative terminal (refer to Disconnecting the battery in the Reference Section of this manual), 2 Remove the tailgate inner trim panel with reference to Chapter 11, Section 8. 3 Remove the wiper arm with reference to Section 18. 4 Working inside the tailgate, unplug tlx tailgate wiper motor wiring at Ihe connector and disconnect the washer hose at
1he
union (see illustrations). 6 Unscrew the bolts securing the motor mounting bracket to the tailgate (see illustration). 6 Withdraw the motor assembly through tte aperture in the tailgate (see illustration).
15.4a Working inside the tellgate, unplug tho tailgate wiper motor wiring at the connector...
. and disconnect tho washer hose at the union 15.5 Unscrew the bolts securing the motor mounting bracket to the tailgate