FIAT PUNTO 2019 Owner handbook (in English)
Manufacturer: FIAT, Model Year: 2019, Model line: PUNTO, Model: FIAT PUNTO 2019Pages: 219, PDF Size: 9.82 MB
Page 31 of 219
27
SAFETY
STARTING
AND DRIVING
WARNING
LIGHTS AND MESSAGES
IN AN
EMERGENCY
SERVICE
AND CARE
TECHNICAL
SPECIFICATIONS
INDEX
CONTROLS
AND DEVICES
Selecting language (Language)
Display messages can be shown in differ-
ent languages: Italian, English, German,
Portuguese, Spanish, French, Polish and
Dutch.
To set the required language, proceed as
follows:
– briefly press MENU ESC – the previ-
ously set language will flash on the display;
– press + or –to make your choice;
– briefly press MENU ESC to return to
the menu screen or hold the button down
to return to the standard screen without
saving. Adjusting the failure/warning
buzzer volume (Alert Volume)
This function allows the volume of the
buzzer which accompanies the display of
failures/warnings to be adjusted (over
8 levels).
To set the desired volume, proceed as fol-
lows:
– briefly press MENU ESC
– the previ-
ously set volume level will flash on the dis-
play;
– press + or –to set the value;
– briefly press MENU ESCto return to
the menu screen or hold the button down
to return to the standard screen without
saving.
If the distance unit set is “km” the fuel con-
sumption unit will be displayed in km/l or
l/100km.
If the distance unit set is “mi” the fuel con-
sumption unit will be displayed in “mpg”.
– press +
or –to make your choice;
– if selecting “Temperature” : briefly press
MENU ESC and the display will show
“C” or “F” (depending on the previous
setting);
– press + or –to make your choice;
When you have made the adjustment,
briefly press MENU ESC to go back to
the sub-menu screen or hold the button
down to go back to the main menu with-
out saving.
– hold down MENU ESC again to go
back to the standard screen or main
menu, depending on where you are in the
menu.
001-032 PUNTO POP 1ed EN 31/03/14 09:03 Pagina 27
Page 32 of 219
28
SAFETY
STARTING
AND DRIVING
WARNING
LIGHTS AND MESSAGES
IN AN
EMERGENCY
SERVICE
AND CARE
TECHNICAL
SPECIFICATIONS
INDEX
CONTROLS
AND DEVICES
Adjusting the button volume
(Button Vol.)
This function may be used to adjust (over
8 levels) the volume of the noise made
when the MENU ESC, +and –buttons
are pressed.
To set the desired volume, proceed as fol-
lows:
– briefly press MENU ESC – the previ-
ously set volume level will flash on the dis-
play;
– press + or –to set the value;
– briefly press MENU ESCto return to
the menu screen or hold the button down
to return to the standard screen without
saving. SERVICE (Scheduled servicing)
This function allows you to display the in-
formation about km/mileage intervals or,
for versions/markets, where provided,
time intervals for car servicing.
To consult this information, proceed as
follows:
– briefly press the MENU ESC
button:
the display shows when servicing is due in
km/mi or days (where provided) accord-
ing to the previous setting (see paragraph
“Units of measurement”);
– press the MENU ESC button briefly to
return to the menu screen or hold the
button down to return to the standard
screen.
IMPORTANT The “Scheduled Servicing
Plan” includes car maintenance at fixed in-
tervals (refer to the “Maintenance and
care” chapter). This is displayed automatically, with igni-
tion key at
MAR-ON, 2000 km (or equiv-
alent value in miles) before servicing or,
where provided, 30 days before servicing.
It is also displayed each time the key is
turned to MAR-ON or, for versions/mar-
kets, where provided, every 200 km (or
equivalent value in miles). Below this
threshold servicing indications are more
frequent. The display will be in km or miles
according to the unit of measurement set.
When the next scheduled service is ap-
proaching, the word “Service” will appear
on the display, followed by the number
of kilometres/miles or days (where pro-
vided) left, when the key is turned to
MAR-ON. Contact a Fiat Dealership,
where the operations in the “Scheduled
Servicing Plan” will be performed and the
message will be reset.
When the service interval is reached and
for about 1000 km/600 mi or 30 days, a
service due message is displayed.
001-032 PUNTO POP 1ed EN 31/03/14 09:03 Pagina 28
Page 33 of 219
29
SAFETY
STARTING
AND DRIVING
WARNING
LIGHTS AND MESSAGES
IN AN
EMERGENCY
SERVICE
AND CARE
TECHNICAL
SPECIFICATIONS
INDEX
CONTROLS
AND DEVICES
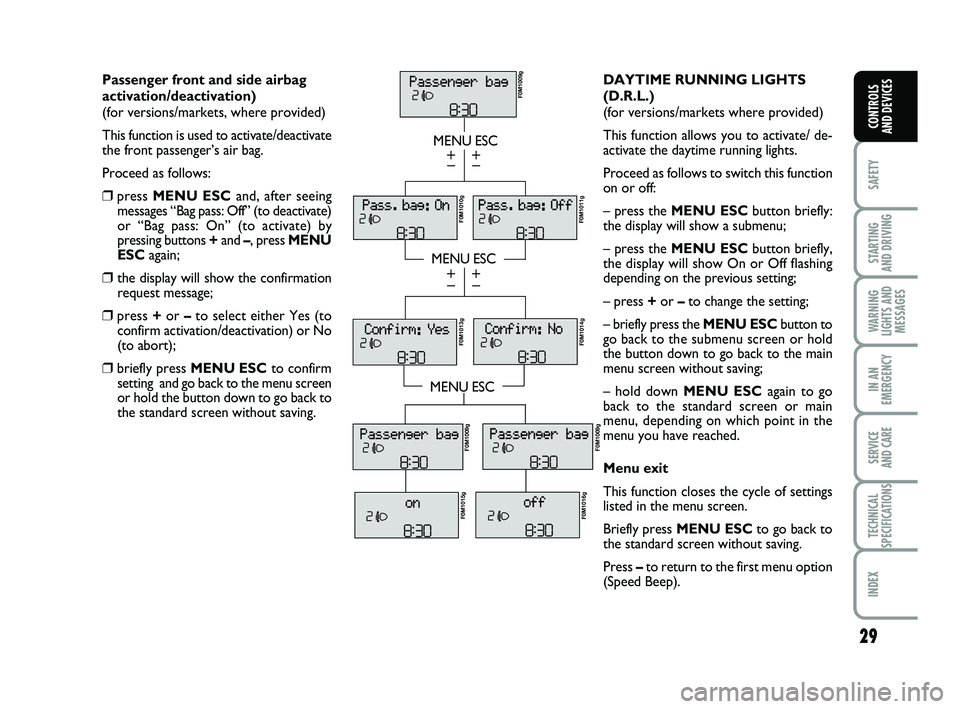
Passenger front and side airbag
activation/deactivation)
(for versions/markets, where provided)
This function is used to activate/deactivate
the front passenger’s air bag.
Proceed as follows:
❒press MENU ESC and, after seeing
messages “Bag pass: Off” (to deactivate)
or “Bag pass: On” (to activate) by
pressing buttons +and –, press MENU
ESC again;
❒the display will show the confirmation
request message;
❒press +or –to select either Yes (to
confirm activation/deactivation) or No
(to abort);
❒briefly press MENU ESC to confirm
setting and go back to the menu screen
or hold the button down to go back to
the standard screen without saving.
MENU ESC
MENU ESC
MENU ESC
–
+
–
+
–
+
–
+
F0M1009g
F0M1011g F0M1010g
F0M1013g
F0M1014g
F0M1009g
F0M1015g
F0M1016g F0M1009g
DAYTIME RUNNING LIGHTS
(D.R.L.)
(for versions/markets where provided)
This function allows you to activate/ de-
activate the daytime running lights.
Proceed as follows to switch this function
on or off:
– press the MENU ESC
button briefly:
the display will show a submenu;
– press the MENU ESC button briefly,
the display will show On or Off flashing
depending on the previous setting;
– press + or –to change the setting;
– briefly press the MENU ESC button to
go back to the submenu screen or hold
the button down to go back to the main
menu screen without saving;
– hold down MENU ESC again to go
back to the standard screen or main
menu, depending on which point in the
menu you have reached.
Menu exit
This function closes the cycle of settings
listed in the menu screen.
Briefly press MENU ESC to go back to
the standard screen without saving.
Press –to return to the first menu option
(Speed Beep).
001-032 PUNTO POP 1ed EN 31/03/14 09:03 Pagina 29
Page 34 of 219
30
SAFETY
STARTING
AND DRIVING
WARNING
LIGHTS AND MESSAGES
IN AN
EMERGENCY
SERVICE
AND CARE
TECHNICAL
SPECIFICATIONS
INDEX
CONTROLS
AND DEVICES
TRIP COMPUTER
Introduction
The “Trip computer” is used to display in-
formation on car operation when the key
is turned to MAR. This function allows
you to define two separate trips called
“Trip A” and “Trip B” for monitoring the
car’s “complete journey” in a reciprocal-
ly independent manner.
Both functions are resettable (reset – start
of a new journey).
“Trip A” shall be used to display the fig-
ures relating to:
– Outside temperature;
– Range
– Distance travelled
– Average consumption
– Instant consumption
– Average speed
– Travel time (driving time). “Trip B”, available on multifunction display
only, shall be used to display the figures
relating to:
– Distance travelled B
– Average consumption B
– Average speed B
– Travel time B (driving time).
NB
“Trip B” functions may be excluded
(see “Trip B on”). “Range” and “Instant
consumption” parameters cannot be reset.
Values displayed
Outside temperature
Indicates the temperature outside the
vehicle passenger compartment.
Range
This indicates the distance which may be
travelled with the fuel in the tank assum-
ing that driving style does not change. The
display will show the reading “- - - -“ when
the following events take place:
– value lower than 50 km (or 30 mi)
– car left parked with engine running for
a long time.
Distance travelled
This value shows the distance covered
from the start of the new journey. Average consumption
This value shows the average consump-
tion from the start of the new journey.
Instant fuel consumption
Indicates the fuel consumption. The val-
ue is constantly updated. The message
“- - - -” will appear on the display if the car
is parked with the engine running.
Average speed
This value shows the car’s average speed
based on the overall time elapsed since the
start of the new journey.
Journey time
This value shows the time elapsed since
the start of the new journey.
IMPORTANT If information is not avail-
able, the message “- - - -” will appear in-
stead of the Trip Computer values.
Counting of the different values will be re-
sumed regularly when normal operation
is restored. This will not cause any reset-
ting of the values displayed before the fail-
ure nor the starting of a new journey.
001-032 PUNTO POP 1ed EN 31/03/14 09:03 Pagina 30
Page 35 of 219
31
SAFETY
STARTING
AND DRIVING
WARNING
LIGHTS AND MESSAGES
IN AN
EMERGENCY
SERVICE
AND CARE
TECHNICAL
SPECIFICATIONS
INDEX
CONTROLS
AND DEVICES
fig. 21F0M0609m
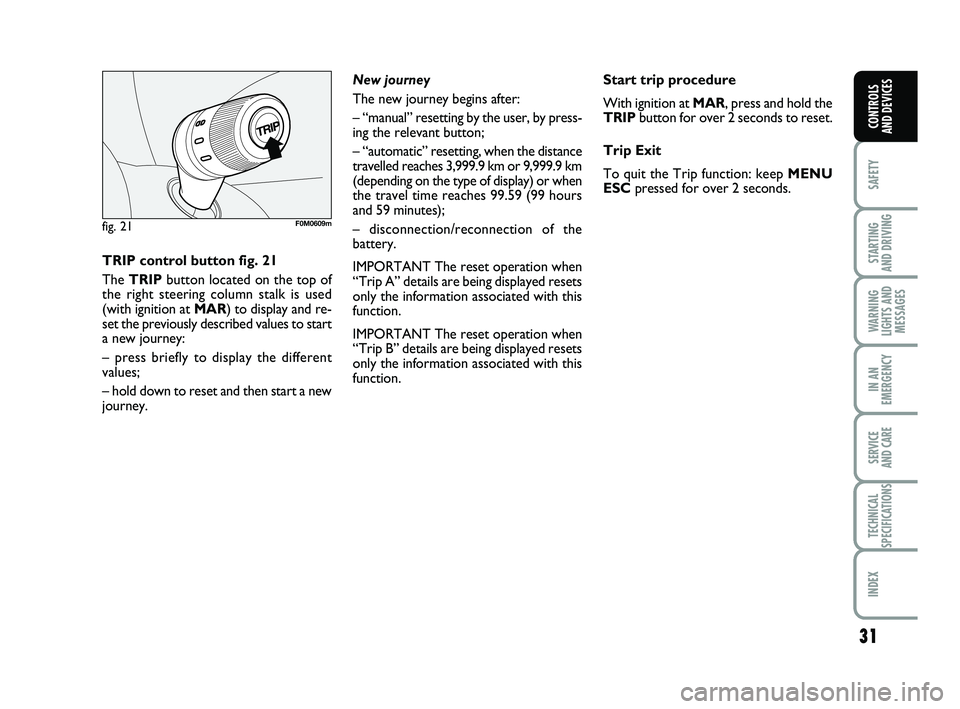
TRIP control button fig. 21
The TRIP button located on the top of
the right steering column stalk is used
(with ignition at MAR) to display and re-
set the previously described values to start
a new journey:
– press briefly to display the different
values;
– hold down to reset and then start a new
journey. New journey
The new journey begins after:
– “manual” resetting by the user, by press-
ing the relevant button;
– “automatic” resetting, when the distance
travelled reaches 3,999.9 km or 9,999.9 km
(depending on the type of display) or when
the travel time reaches 99.59 (99 hours
and 59 minutes);
– disconnection/reconnection of the
battery.
IMPORTANT The reset operation when
“Trip A” details are being displayed resets
only the information associated with this
function.
IMPORTANT The reset operation when
“Trip B” details are being displayed resets
only the information associated with this
function.
Start trip procedure
With ignition at MAR, press and hold the
TRIP
button for over 2 seconds to reset.
Trip Exit
To quit the Trip function: keep MENU
ESC pressed for over 2 seconds.
001-032 PUNTO POP 1ed EN 31/03/14 09:03 Pagina 31
Page 36 of 219
32
SAFETY
STARTING
AND DRIVING
WARNING
LIGHTS AND MESSAGES
IN AN
EMERGENCY
SERVICE
AND CARE
TECHNICAL
SPECIFICATIONS
INDEX
CONTROLS
AND DEVICES
The fabric upholstery of your
car is designed to withstand
normal wear and tear for
a long time. Some precau-
tions are needed though. Avoid pro-
longed and/or excessive rubbing
against clothing accessories such as
metal buckles and Velcro strips which,
by applying a high pressure on the fab-
ric in a small area, could cause some
threads to break, thereby damaging
the upholstery.
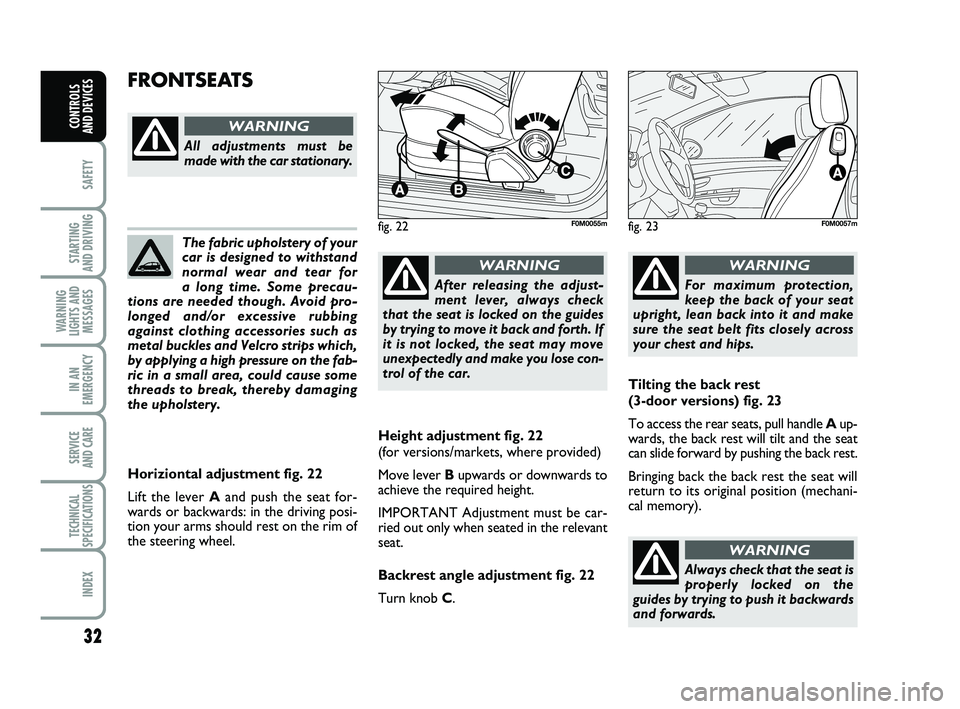
Height adjustment fig. 22
(for versions/markets, where provided)
Move lever B upwards or downwards to
achieve the required height.
IMPORTANT Adjustment must be car-
ried out only when seated in the relevant
seat.
Backrest angle adjustment fig. 22
Turn knob C .
FRONTSEATS
fig. 22F0M0055m
All adjustments must be
made with the car stationary.
WARNING
Horiziontal adjustment fig. 22
Lift the lever A and push the seat for-
wards or backwards: in the driving posi-
tion your arms should rest on the rim of
the steering wheel.
After releasing the adjust-
ment lever, always check
that the seat is locked on the guides
by trying to move it back and forth. If
it is not locked, the seat may move
unexpectedly and make you lose con-
trol of the car.
WARNING
For maximum protection,
keep the back of your seat
upright, lean back into it and make
sure the seat belt fits closely across
your chest and hips.
WARNING
fig. 23F0M0057m
Tilting the back rest
(3-door versions) fig. 23
To access the rear seats, pull handle Aup-
wards, the back rest will tilt and the seat
can slide forward by pushing the back rest.
Bringing back the back rest the seat will
return to its original position (mechani-
cal memory).
Always check that the seat is
properly locked on the
guides by trying to push it backwards
and forwards.
WARNING
001-032 PUNTO POP 1ed EN 31/03/14 09:03 Pagina 32
Page 37 of 219
33
SAFETY
STARTING
AND DRIVING
WARNING
LIGHTS AND MESSAGES
IN AN
EMERGENCY
SERVICE
AND CARE
TECHNICAL
SPECIFICATIONS
INDEX
CONTROLS
AND DEVICES
The fabric upholstery of your
car is designed to withstand
normal wear and tear for
a long time. Some precautions
are needed though. Avoid prolonged
and/or excessive rubbing against cloth-
ing accessories such as metal buckles
and Velcro strips which, by applying
a high pressure on the fabric in a small
area, could cause some threads to
break, thereby damaging the upholstery.
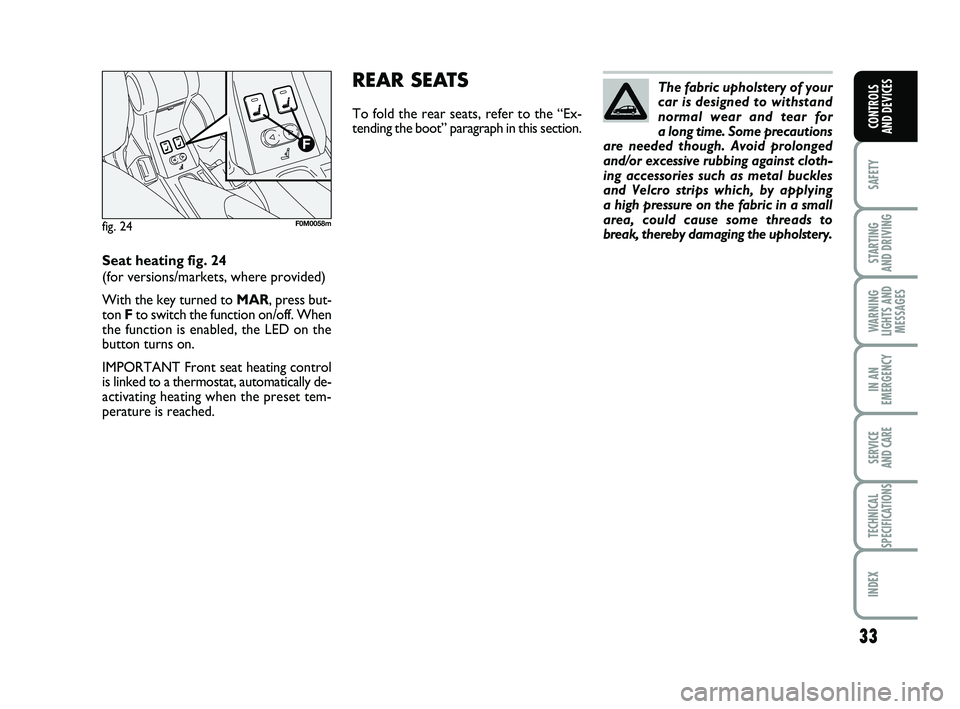
Seat heating fig. 24
(for versions/markets, where provided)
With the key turned to MAR, press but-
ton Fto switch the function on/off. When
the function is enabled, the LED on the
button turns on.
IMPORTANT Front seat heating control
is linked to a thermostat, automatically de-
activating heating when the preset tem-
perature is reached.REAR SEATS
To fold the rear seats, refer to the “Ex-
tending the boot” paragraph in this section.
fig. 24F0M0058m
033-069 PUNTO POP 1ed EN 29/08/13 14.34 Pagina 33
Page 38 of 219
34
SAFETY
STARTING
AND DRIVING
WARNING
LIGHTS AND MESSAGES
IN AN
EMERGENCY
SERVICE
AND CARE
TECHNICAL
SPECIFICATIONS
INDEX
CONTROLS
AND DEVICES
HEAD RESTRAINTS
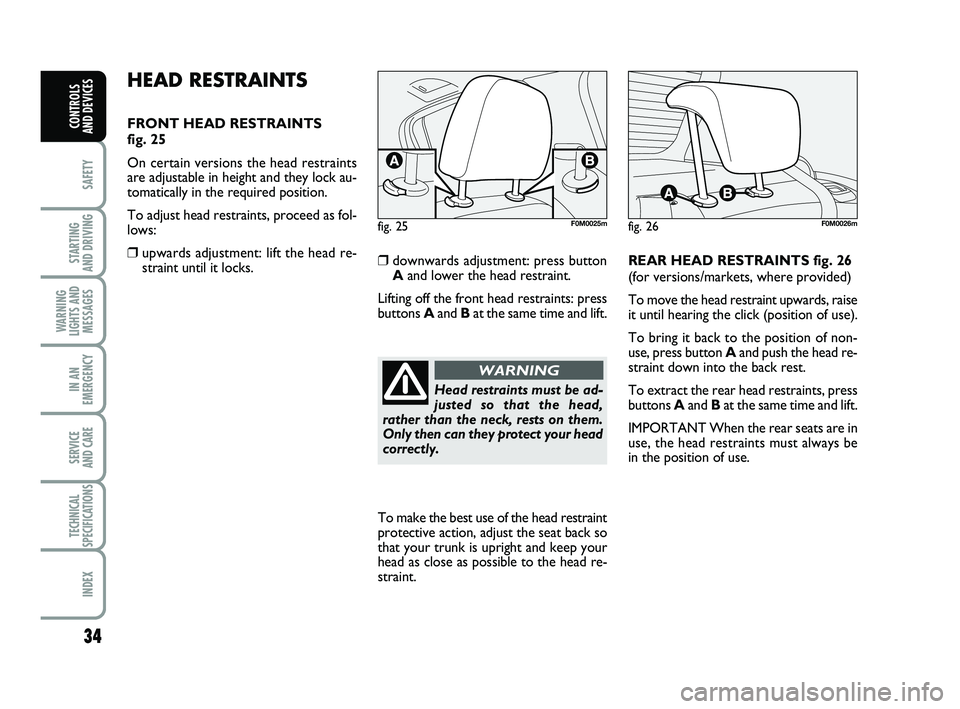
FRONT HEAD RESTRAINTS
fig. 25
On certain versions the head restraints
are adjustable in height and they lock au-
tomatically in the required position.
To adjust head restraints, proceed as fol-
lows:
❒upwards adjustment: lift the head re- straint until it locks.❒downwards adjustment: press buttonA and lower the head restraint.
Lifting off the front head restraints: press
buttons Aand Bat the same time and lift. REAR HEAD RESTRAINTS fig. 26
(for versions/markets, where provided)
To move the head restraint upwards, raise
it until hearing the click (position of use).
To bring it back to the position of non-
use, press button
Aand push the head re-
straint down into the back rest.
To extract the rear head restraints, press
buttons Aand Bat the same time and lift.
IMPORTANT When the rear seats are in
use, the head restraints must always be
in the position of use.
fig. 25F0M0025mfig. 26F0M0026m
Head restraints must be ad-
justed so that the head,
rather than the neck, rests on them.
Only then can they protect your head
correctly.
WARNING
To make the best use of the head restraint
protective action, adjust the seat back so
that your trunk is upright and keep your
head as close as possible to the head re-
straint.
033-069 PUNTO POP 1ed EN 29/08/13 14.34 Pagina 34
Page 39 of 219
35
SAFETY
STARTING
AND DRIVING
WARNING
LIGHTS AND MESSAGES
IN AN
EMERGENCY
SERVICE
AND CARE
TECHNICAL
SPECIFICATIONS
INDEX
CONTROLS
AND DEVICES
MIRRORS
REAR-VIEW MIRROR fig. 28
The mirror is fitted with a safety device
that causes its release in the event of a vi-
olent impact with the passenger.
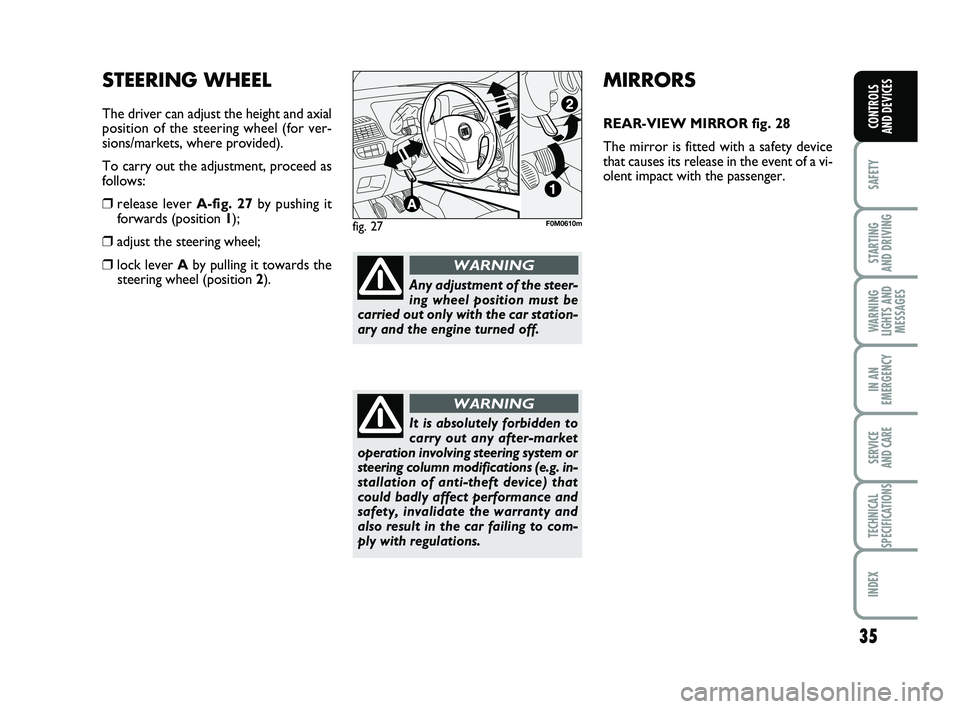
STEERING WHEEL
The driver can adjust the height and axial
position of the steering wheel (for ver-
sions/markets, where provided).
To carry out the adjustment, proceed as
follows:
❒release lever A-fig. 27by pushing it
forwards (position 1 );
❒adjust the steering wheel;
❒lock lever Aby pulling it towards the
steering wheel (position 2).
fig. 27F0M0610m
Any adjustment of the steer-
ing wheel position must be
carried out only with the car station-
ary and the engine turned off.
WARNING
It is absolutely forbidden to
carry out any after-market
operation involving steering system or
steering column modifications (e.g. in-
stallation of anti-theft device) that
could badly affect performance and
safety, invalidate the warranty and
also result in the car failing to com-
ply with regulations.
WARNING
033-069 PUNTO POP 1ed EN 29/08/13 14.34 Pagina 35
Page 40 of 219
36
SAFETY
STARTING
AND DRIVING
WARNING
LIGHTS AND MESSAGES
IN AN
EMERGENCY
SERVICE
AND CARE
TECHNICAL
SPECIFICATIONS
INDEX
CONTROLS
AND DEVICES
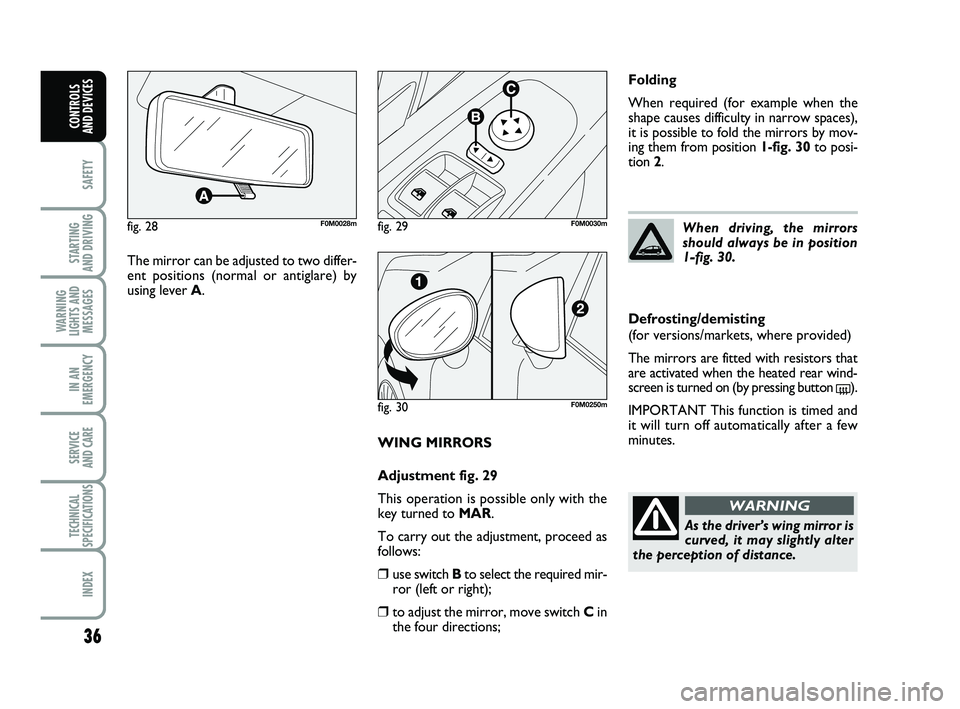
WING MIRRORS
Adjustment fig. 29
This operation is possible only with the
key turned to MAR.
To carry out the adjustment, proceed as
follows:
❒use switch B to select the required mir-
ror (left or right);
❒to adjust the mirror, move switch C in
the four directions;
fig. 28F0M0028mfig. 29F0M0030m
The mirror can be adjusted to two differ-
ent positions (normal or antiglare) by
using lever A.
fig. 30F0M0250m
Folding
When required (for example when the
shape causes difficulty in narrow spaces),
it is possible to fold the mirrors by mov-
ing them from position 1-fig. 30 to posi-
tion 2.
When driving, the mirrors
should always be in position
1-fig. 30.
As the driver’s wing mirror is
curved, it may slightly alter
the perception of distance.
WARNING
Defrosting/demisting
(for versions/markets, where provided)
The mirrors are fitted with resistors that
are activated when the heated rear wind-
screen is turned on (by pressing button
().
IMPORTANT This function is timed and
it will turn off automatically after a few
minutes.
033-069 PUNTO POP 1ed EN 29/08/13 14.34 Pagina 36