key FIAT PUNTO 2020 Owner handbook (in English)
[x] Cancel search | Manufacturer: FIAT, Model Year: 2020, Model line: PUNTO, Model: FIAT PUNTO 2020Pages: 219, PDF Size: 9.82 MB
Page 25 of 219
21
SAFETY
STARTING
AND DRIVING
WARNING
LIGHTS AND MESSAGES
IN AN
EMERGENCY
SERVICE
AND CARE
TECHNICAL
SPECIFICATIONS
INDEX
CONTROLS
AND DEVICES
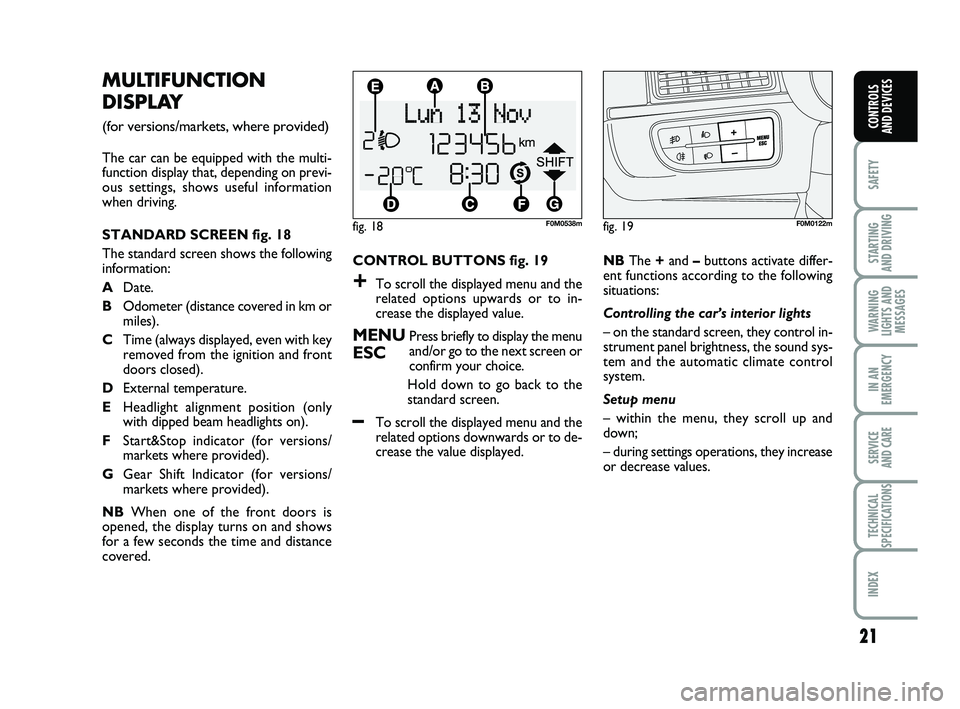
CONTROL BUTTONS fig. 19
+To scroll the displayed menu and the
related options upwards or to in-
crease the displayed value.
MENUPress briefly to display the menu
ESCand/or go to the next screen or
confirm your choice.
Hold down to go back to the
standard screen.
–To scroll the displayed menu and the
related options downwards or to de-
crease the value displayed.
MULTIFUNCTION
DISPLAY
(for versions/markets, where provided)
The car can be equipped with the multi-
function display that, depending on previ-
ous settings, shows useful information
when driving.
STANDARD SCREEN fig. 18
The standard screen shows the following
information:
A Date.
B Odometer (distance covered in km or
miles).
C Time (always displayed, even with key
removed from the ignition and front
doors closed).
D External temperature.
E Headlight alignment position (only
with dipped beam headlights on).
F Start&Stop indicator (for versions/
markets where provided).
G Gear Shift Indicator (for versions/
markets where provided).
NB When one of the front doors is
opened, the display turns on and shows
for a few seconds the time and distance
covered.
fig. 18F0M0538m
NB The +and –buttons activate differ-
ent functions according to the following
situations:
Controlling the car’s interior lights
– on the standard screen, they control in-
strument panel brightness, the sound sys-
tem and the automatic climate control
system.
Setup menu
– within the menu, they scroll up and
down;
– during settings operations, they increase
or decrease values.
fig. 19F0M0122m
001-032 PUNTO POP 1ed EN 31/03/14 09:03 Pagina 21
Page 29 of 219
25
SAFETY
STARTING
AND DRIVING
WARNING
LIGHTS AND MESSAGES
IN AN
EMERGENCY
SERVICE
AND CARE
TECHNICAL
SPECIFICATIONS
INDEX
CONTROLS
AND DEVICES
Setting date (Set Date)
Using this function it is possible to change
the date (day – month – year).
To update, proceed as follows:
– briefly press MENU ESC – “day” (dd)
will flash on the display;
– press + or –to set the value;
– briefly press MENU ESC – “month”
(mm) will flash on the display;
– press + or –to set the value;
– briefly press MENU ESC – “year”
(yyyy) will flash on the display;
– press + or –to make the adjustment.
NB The setting increases or decreases by
one unit each time +or – is pressed. Hold
the button down to increase/decrease the
setting rapidly. Complete the setting with
single presses of the button when you ap-
proach the required setting.
– briefly press MENU ESC to return to
the menu screen or hold the button down
to return to the standard screen without
saving.
– press +
or –to adjust the value;
– if selecting “Mode”, briefly press MENU
ESC – the mode will flash on the display;
– press + or –to select “24h” or “12h”.
When you have made the required ad-
justments, briefly press MENU ESC to
go back to the menu screen or hold the
button down to go back to the main menu
without saving.
– hold MENU ESC down to go back to
the standard screen or main menu, de-
pending on where you are in the menu. Initial page (display of information
on the main screen)
(for versions/markets, where provided)
This function allows you to choose the in-
formation you would like to see on the
main screen. You can choose to display the
date or the turbocharger boost pressure.
To make your choice, proceed as follows:
– briefly press MENU ESC
– “Initial
page” will appear on the display;
– briefly press MENU ESC once again to
show the display options “Date” and “En-
gine info”;
– press + or –to select the information
you wish to see on the main page of the
display;
– briefly press MENU ESC to return to
the menu screen or hold the button down
to return to the standard screen without
saving.
When the key is turned to MARand the
initial check stage is over, the display will
show the information selected via the “Ini-
tial page” menu function.
001-032 PUNTO POP 1ed EN 31/03/14 09:03 Pagina 25
Page 32 of 219
28
SAFETY
STARTING
AND DRIVING
WARNING
LIGHTS AND MESSAGES
IN AN
EMERGENCY
SERVICE
AND CARE
TECHNICAL
SPECIFICATIONS
INDEX
CONTROLS
AND DEVICES
Adjusting the button volume
(Button Vol.)
This function may be used to adjust (over
8 levels) the volume of the noise made
when the MENU ESC, +and –buttons
are pressed.
To set the desired volume, proceed as fol-
lows:
– briefly press MENU ESC – the previ-
ously set volume level will flash on the dis-
play;
– press + or –to set the value;
– briefly press MENU ESCto return to
the menu screen or hold the button down
to return to the standard screen without
saving. SERVICE (Scheduled servicing)
This function allows you to display the in-
formation about km/mileage intervals or,
for versions/markets, where provided,
time intervals for car servicing.
To consult this information, proceed as
follows:
– briefly press the MENU ESC
button:
the display shows when servicing is due in
km/mi or days (where provided) accord-
ing to the previous setting (see paragraph
“Units of measurement”);
– press the MENU ESC button briefly to
return to the menu screen or hold the
button down to return to the standard
screen.
IMPORTANT The “Scheduled Servicing
Plan” includes car maintenance at fixed in-
tervals (refer to the “Maintenance and
care” chapter). This is displayed automatically, with igni-
tion key at
MAR-ON, 2000 km (or equiv-
alent value in miles) before servicing or,
where provided, 30 days before servicing.
It is also displayed each time the key is
turned to MAR-ON or, for versions/mar-
kets, where provided, every 200 km (or
equivalent value in miles). Below this
threshold servicing indications are more
frequent. The display will be in km or miles
according to the unit of measurement set.
When the next scheduled service is ap-
proaching, the word “Service” will appear
on the display, followed by the number
of kilometres/miles or days (where pro-
vided) left, when the key is turned to
MAR-ON. Contact a Fiat Dealership,
where the operations in the “Scheduled
Servicing Plan” will be performed and the
message will be reset.
When the service interval is reached and
for about 1000 km/600 mi or 30 days, a
service due message is displayed.
001-032 PUNTO POP 1ed EN 31/03/14 09:03 Pagina 28
Page 34 of 219
30
SAFETY
STARTING
AND DRIVING
WARNING
LIGHTS AND MESSAGES
IN AN
EMERGENCY
SERVICE
AND CARE
TECHNICAL
SPECIFICATIONS
INDEX
CONTROLS
AND DEVICES
TRIP COMPUTER
Introduction
The “Trip computer” is used to display in-
formation on car operation when the key
is turned to MAR. This function allows
you to define two separate trips called
“Trip A” and “Trip B” for monitoring the
car’s “complete journey” in a reciprocal-
ly independent manner.
Both functions are resettable (reset – start
of a new journey).
“Trip A” shall be used to display the fig-
ures relating to:
– Outside temperature;
– Range
– Distance travelled
– Average consumption
– Instant consumption
– Average speed
– Travel time (driving time). “Trip B”, available on multifunction display
only, shall be used to display the figures
relating to:
– Distance travelled B
– Average consumption B
– Average speed B
– Travel time B (driving time).
NB
“Trip B” functions may be excluded
(see “Trip B on”). “Range” and “Instant
consumption” parameters cannot be reset.
Values displayed
Outside temperature
Indicates the temperature outside the
vehicle passenger compartment.
Range
This indicates the distance which may be
travelled with the fuel in the tank assum-
ing that driving style does not change. The
display will show the reading “- - - -“ when
the following events take place:
– value lower than 50 km (or 30 mi)
– car left parked with engine running for
a long time.
Distance travelled
This value shows the distance covered
from the start of the new journey. Average consumption
This value shows the average consump-
tion from the start of the new journey.
Instant fuel consumption
Indicates the fuel consumption. The val-
ue is constantly updated. The message
“- - - -” will appear on the display if the car
is parked with the engine running.
Average speed
This value shows the car’s average speed
based on the overall time elapsed since the
start of the new journey.
Journey time
This value shows the time elapsed since
the start of the new journey.
IMPORTANT If information is not avail-
able, the message “- - - -” will appear in-
stead of the Trip Computer values.
Counting of the different values will be re-
sumed regularly when normal operation
is restored. This will not cause any reset-
ting of the values displayed before the fail-
ure nor the starting of a new journey.
001-032 PUNTO POP 1ed EN 31/03/14 09:03 Pagina 30
Page 37 of 219
33
SAFETY
STARTING
AND DRIVING
WARNING
LIGHTS AND MESSAGES
IN AN
EMERGENCY
SERVICE
AND CARE
TECHNICAL
SPECIFICATIONS
INDEX
CONTROLS
AND DEVICES
The fabric upholstery of your
car is designed to withstand
normal wear and tear for
a long time. Some precautions
are needed though. Avoid prolonged
and/or excessive rubbing against cloth-
ing accessories such as metal buckles
and Velcro strips which, by applying
a high pressure on the fabric in a small
area, could cause some threads to
break, thereby damaging the upholstery.
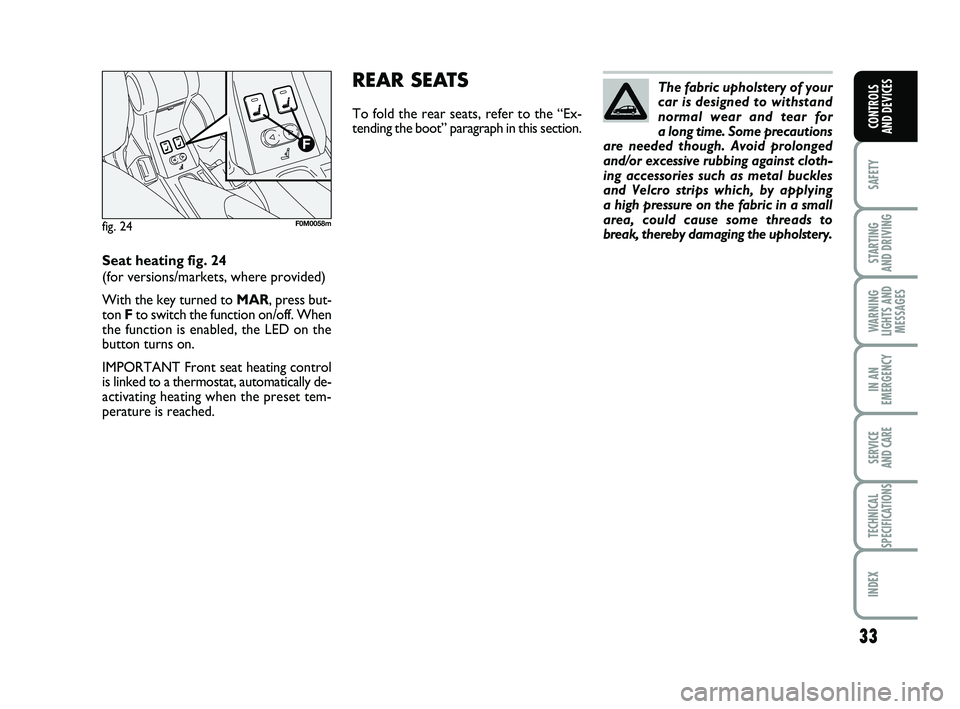
Seat heating fig. 24
(for versions/markets, where provided)
With the key turned to MAR, press but-
ton Fto switch the function on/off. When
the function is enabled, the LED on the
button turns on.
IMPORTANT Front seat heating control
is linked to a thermostat, automatically de-
activating heating when the preset tem-
perature is reached.REAR SEATS
To fold the rear seats, refer to the “Ex-
tending the boot” paragraph in this section.
fig. 24F0M0058m
033-069 PUNTO POP 1ed EN 29/08/13 14.34 Pagina 33
Page 40 of 219
36
SAFETY
STARTING
AND DRIVING
WARNING
LIGHTS AND MESSAGES
IN AN
EMERGENCY
SERVICE
AND CARE
TECHNICAL
SPECIFICATIONS
INDEX
CONTROLS
AND DEVICES
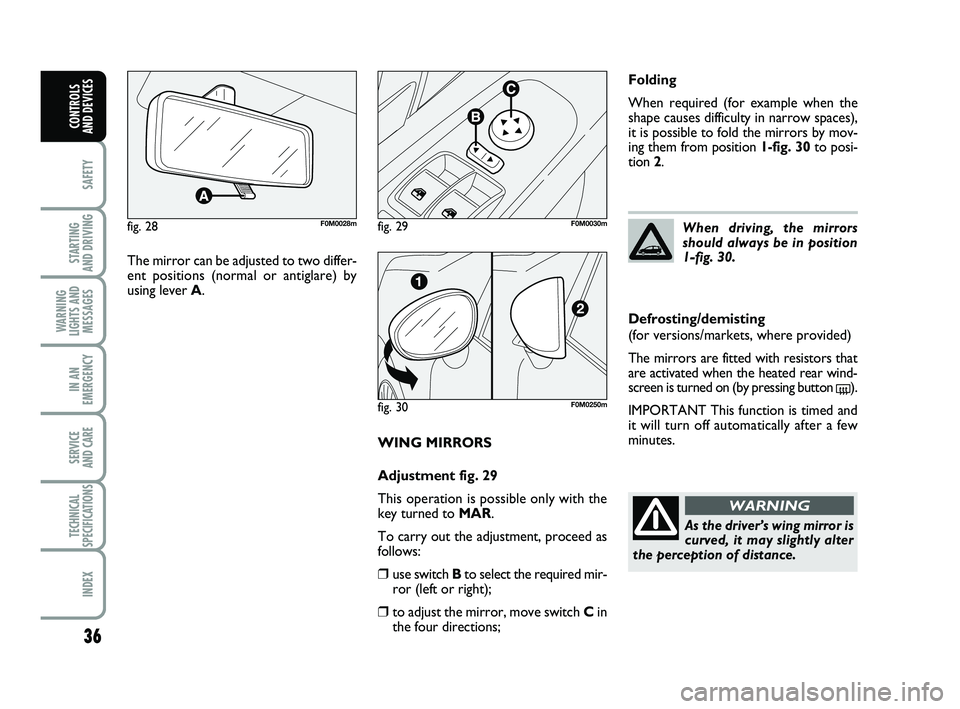
WING MIRRORS
Adjustment fig. 29
This operation is possible only with the
key turned to MAR.
To carry out the adjustment, proceed as
follows:
❒use switch B to select the required mir-
ror (left or right);
❒to adjust the mirror, move switch C in
the four directions;
fig. 28F0M0028mfig. 29F0M0030m
The mirror can be adjusted to two differ-
ent positions (normal or antiglare) by
using lever A.
fig. 30F0M0250m
Folding
When required (for example when the
shape causes difficulty in narrow spaces),
it is possible to fold the mirrors by mov-
ing them from position 1-fig. 30 to posi-
tion 2.
When driving, the mirrors
should always be in position
1-fig. 30.
As the driver’s wing mirror is
curved, it may slightly alter
the perception of distance.
WARNING
Defrosting/demisting
(for versions/markets, where provided)
The mirrors are fitted with resistors that
are activated when the heated rear wind-
screen is turned on (by pressing button
().
IMPORTANT This function is timed and
it will turn off automatically after a few
minutes.
033-069 PUNTO POP 1ed EN 29/08/13 14.34 Pagina 36
Page 51 of 219
47
SAFETY
STARTING
AND DRIVING
WARNING
LIGHTS AND MESSAGES
IN AN
EMERGENCY
SERVICE
AND CARE
TECHNICAL
SPECIFICATIONS
INDEX
CONTROLS
AND DEVICES
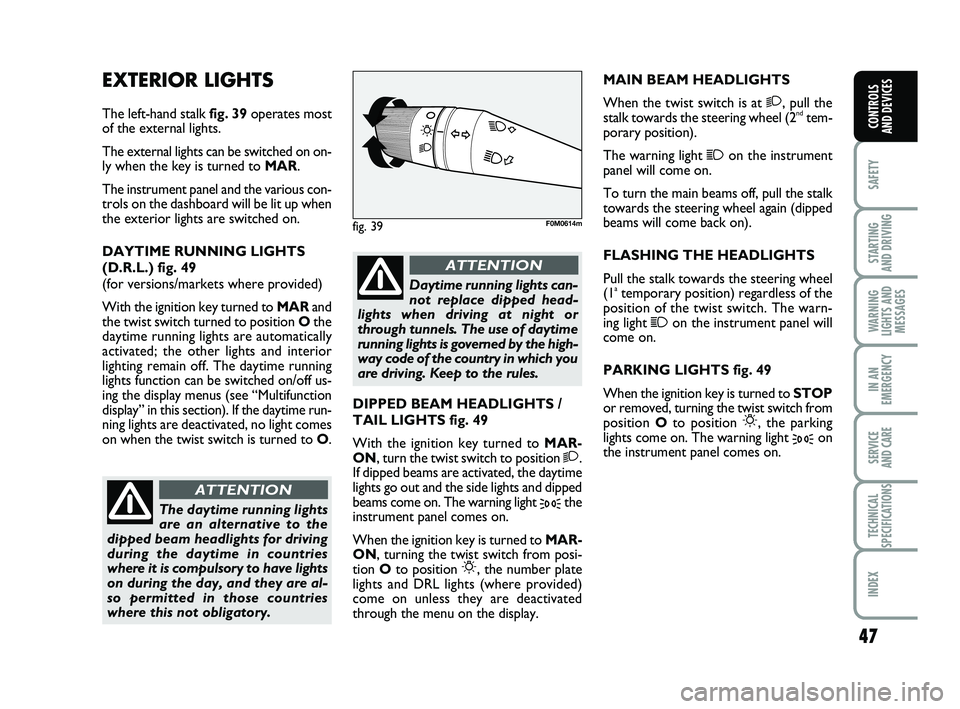
EXTERIOR LIGHTS
The left-hand stalk fig. 39operates most
of the external lights.
The external lights can be switched on on-
ly when the key is turned to MAR.
The instrument panel and the various con-
trols on the dashboard will be lit up when
the exterior lights are switched on.
DAYTIME RUNNING LIGHTS
(D.R.L.) fig. 49
(for versions/markets where provided)
With the ignition key turned to MARand
the twist switch turned to position Othe
daytime running lights are automatically
activated; the other lights and interior
lighting remain off. The daytime running
lights function can be switched on/off us-
ing the display menus (see “Multifunction
display” in this section). If the daytime run-
ning lights are deactivated, no light comes
on when the twist switch is turned to O . MAIN BEAM HEADLIGHTS
When the twist switch is at 2, pull the
stalk towards the steering wheel (2ndtem-
porary position).
The warning light
1on the instrument
panel will come on.
To turn the main beams off, pull the stalk
towards the steering wheel again (dipped
beams will come back on).
FLASHING THE HEADLIGHTS
Pull the stalk towards the steering wheel
(1
atemporary position) regardless of the
position of the twist switch. The warn-
ing light
1on the instrument panel will
come on.
PARKING LIGHTS fig. 49
When the ignition key is turned to STOP
or removed, turning the twist switch from
position Oto position
6, the parking
lights come on. The warning light
3on
the instrument panel comes on.
fig. 39F0M0614m
DIPPED BEAM HEADLIGHTS /
TAIL LIGHTS fig. 49
With the ignition key turned to MAR-
ON, turn the twist switch to position
2.
If dipped beams are activated, the daytime
lights go out and the side lights and dipped
beams come on. The warning light
3the
instrument panel comes on.
When the ignition key is turned to MAR-
ON, turning the twist switch from posi-
tion Oto position
6, the number plate
lights and DRL lights (where provided)
come on unless they are deactivated
through the menu on the display.
The daytime running lights
are an alternative to the
dipped beam headlights for driving
during the daytime in countries
where it is compulsory to have lights
on during the day, and they are al-
so permitted in those countries
where this not obligatory.
ATTENTION
Daytime running lights can-
not replace dipped head-
lights when driving at night or
through tunnels. The use of daytime
running lights is governed by the high-
way code of the country in which you
are driving. Keep to the rules.
ATTENTION
033-069 PUNTO POP 1ed EN 29/08/13 14.34 Pagina 47
Page 52 of 219
48
SAFETY
STARTING
AND DRIVING
WARNING
LIGHTS AND MESSAGES
IN AN
EMERGENCY
SERVICE
AND CARE
TECHNICAL
SPECIFICATIONS
INDEX
CONTROLS
AND DEVICES
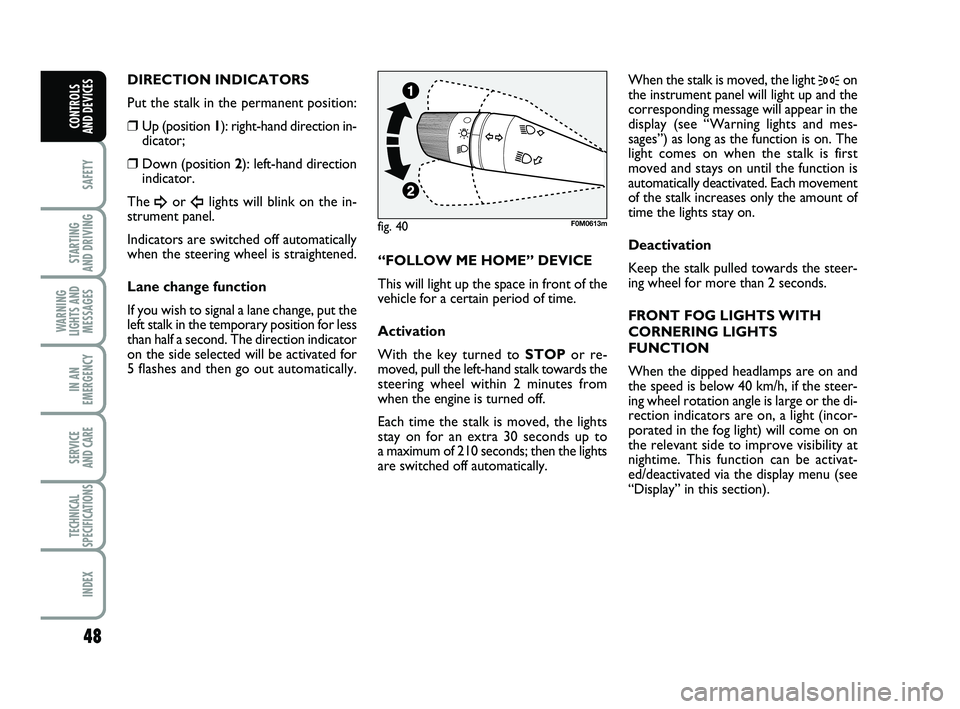
DIRECTION INDICATORS
Put the stalk in the permanent position:
❒Up (position 1 ): right-hand direction in-
dicator;
❒Down (position 2 ): left-hand direction
indicator.
The
¥or Îlights will blink on the in-
strument panel.
Indicators are switched off automatically
when the steering wheel is straightened.
Lane change function
If you wish to signal a lane change, put the
left stalk in the temporary position for less
than half a second. The direction indicator
on the side selected will be activated for
5 flashes and then go out automatically. “FOLLOW ME HOME” DEVICE
This will light up the space in front of the
vehicle for a certain period of time.
Activation
With the key turned to
STOPor re-
moved, pull the left-hand stalk towards the
steering wheel within 2 minutes from
when the engine is turned off.
Each time the stalk is moved, the lights
stay on for an extra 30 seconds up to
a maximum of 210 seconds; then the lights
are switched off automatically. When the stalk is moved, the light
3on
the instrument panel will light up and the
corresponding message will appear in the
display (see “Warning lights and mes-
sages”) as long as the function is on. The
light comes on when the stalk is first
moved and stays on until the function is
automatically deactivated. Each movement
of the stalk increases only the amount of
time the lights stay on.
Deactivation
Keep the stalk pulled towards the steer-
ing wheel for more than 2 seconds.
FRONT FOG LIGHTS WITH
CORNERING LIGHTS
FUNCTION
When the dipped headlamps are on and
the speed is below 40 km/h, if the steer-
ing wheel rotation angle is large or the di-
rection indicators are on, a light (incor-
porated in the fog light) will come on on
the relevant side to improve visibility at
nightime. This function can be activat-
ed/deactivated via the display menu (see
“Display” in this section).
fig. 40F0M0613m
033-069 PUNTO POP 1ed EN 29/08/13 14.34 Pagina 48
Page 53 of 219
49
SAFETY
STARTING
AND DRIVING
WARNING
LIGHTS AND MESSAGES
IN AN
EMERGENCY
SERVICE
AND CARE
TECHNICAL
SPECIFICATIONS
INDEX
CONTROLS
AND DEVICES
WINDOW WASHING
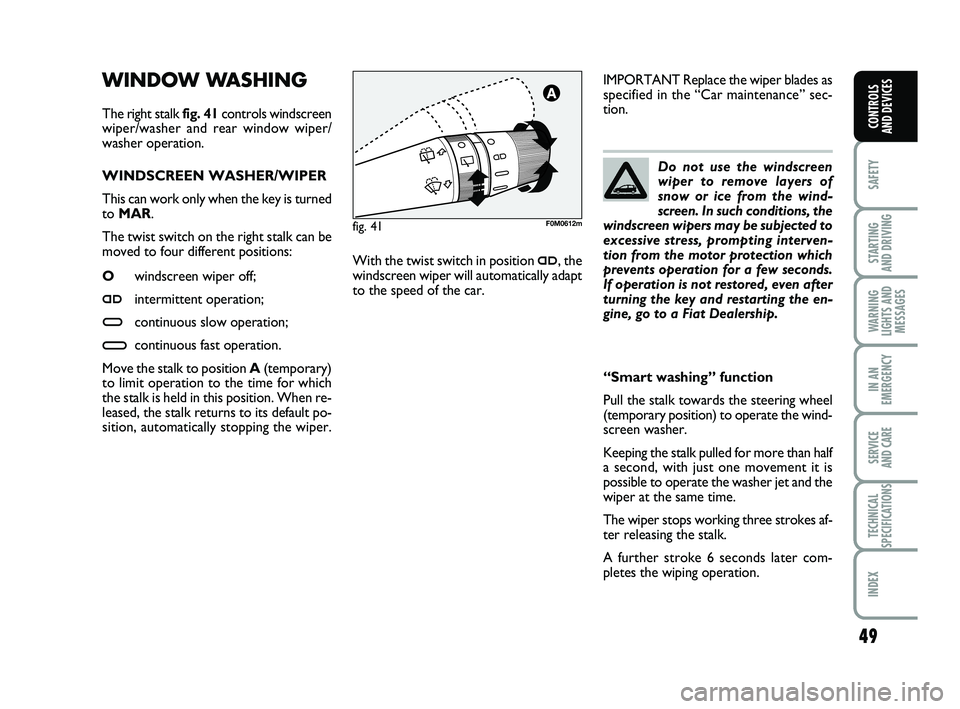
The right stalk fig. 41 controls windscreen
wiper/washer and rear window wiper/
washer operation.
WINDSCREEN WASHER/WIPER
This can work only when the key is turned
to MAR.
The twist switch on the right stalk can be
moved to four different positions:
O windscreen wiper off;
≤ intermittent operation;
≥ continuous slow operation;
¥ continuous fast operation.
Move the stalk to position A (temporary)
to limit operation to the time for which
the stalk is held in this position. When re-
leased, the stalk returns to its default po-
sition, automatically stopping the wiper. Do not use the windscreen
wiper to remove layers of
snow or ice from the wind-
screen. In such conditions, the
windscreen wipers may be subjected to
excessive stress, prompting interven-
tion from the motor protection which
prevents operation for a few seconds.
If operation is not restored, even after
turning the key and restarting the en-
gine, go to a Fiat Dealership.
With the twist switch in position ≤, the
windscreen wiper will automatically adapt
to the speed of the car. IMPORTANT Replace the wiper blades as
specified in the “Car maintenance” sec-
tion.
fig. 41F0M0612m
“Smart washing” function
Pull the stalk towards the steering wheel
(temporary position) to operate the wind-
screen washer.
Keeping the stalk pulled for more than half
a second, with just one movement it is
possible to operate the washer jet and the
wiper at the same time.
The wiper stops working three strokes af-
ter releasing the stalk.
A further stroke 6 seconds later com-
pletes the wiping operation.
033-069 PUNTO POP 1ed EN 29/08/13 14.34 Pagina 49
Page 54 of 219
50
SAFETY
STARTING
AND DRIVING
WARNING
LIGHTS AND MESSAGES
IN AN
EMERGENCY
SERVICE
AND CARE
TECHNICAL
SPECIFICATIONS
INDEX
CONTROLS
AND DEVICES
REAR WINDOW WASHER/WIPER
fig. 41
This can work only when the key is turned
to MAR.
The function stops when the stalk is re-
leased.
Turning the twist switch from Oto
'will
operate the rear window wiper as follows:
❒intermittent operation if the wind- screen wiper is off;
❒synchronised operation (but with half-stroke frequency) when the windscreen
wiper is on;
❒continuous operation with reverse en-gaged and function on. Do not use the rear window
wiper to remove layers of
snow or ice. In such condi-
tions, the rear window wiper
may be subjected to excessive stress,
prompting intervention from the mo-
tor protection which prevents opera-
tion for a few seconds. If operation is
not restored, even after turning the key
and restarting the engine, go to a Fiat
Dealership.
The rear window wiper will run in con-
tinuous mode when the windscreen wiper
is on and reverse gear is engaged.
Pushing the stalk towards the dashboard
(temporary position) will activate the rear
window washer jet.
Keeping the stalk pushed for more than
half a second will also activate the rear
window wiper.
Smart wash function is activated when the
stalk is released, like for the windscreen
wiper.
033-069 PUNTO POP 1ed EN 29/08/13 14.34 Pagina 50