service indicator FIAT PUNTO 2020 Owner handbook (in English)
[x] Cancel search | Manufacturer: FIAT, Model Year: 2020, Model line: PUNTO, Model: FIAT PUNTO 2020Pages: 219, PDF Size: 9.82 MB
Page 8 of 219
4
SAFETY
STARTING
AND DRIVING
WARNING
LIGHTS AND MESSAGES
IN AN
EMERGENCY
SERVICE
AND CARE
TECHNICAL
SPECIFICATIONS
INDEX
CONTROLS
AND DEVICESDASHBOARD ......................................................................\
5
SYMBOLS ........................................................................\
....... 6
THE FIAT C ODE SYSTEM ................................................. 6
THE KEYS ........................................................................\
...... 8
ALARM ........................................................................\
........... 10
IGNITION .......................................................................\
...... 12
INSTRUMENT PANEL ........................................................ 13
INSTRUMENTS .................................................................... 14
DIGITAL DISPLAY ............................................................... 16
MULTIFUNCTION DISPLAY ............................................ 21
TRIP COMPUTER ................................................................ 30
FRONT SEATS ..................................................................... 32
REAR S EATS ........................................................................\
.. 33
HEAD RESTRAINTS ........................................................... 34
STEERING WHEEL .............................................................. 35
MIRRORS .......................................................................\
........ 35
HEATING AND VENTILATION SYSTE M .................... 37
MANUAL CLIMATE CONTROL SYSTE M .................... 41
EXTERIOR LIGHTS ............................................................. 47
WINDOW CLEAN ING ..................................................... 49
CEILING COURTESY LIGHTS ......................................... 51
CONTROLS .......................................................................\
. 53
FUEL CUT-OFF SYSTEM ................................................... 55 INTERIOR FI
TTINGS ........................................................... 56
DOORS ........................................................................\
.......... 60
ELECTRIC WINDOW OPENING ................................. 63
BOOT ........................................................................\
............. 65
BONNET .......................................................................\
........ 68
ROOF RACK/SKI RACK .................................................... 69
HEADLIGHTS ....................................................................... 70
ABS SYSTE M ......................................................................\
... 72
ESP SYSTEM ......................................................................\
.... 73
EOBD SYSTEM ..................................................................... 76
“DUAL DRIVE” ELECTRIC POWER
STEERING SYSTEM ............................................................. 77
START&STOP SYSTEM ...................................................... 79
SYSTÈME GEAR SHIFT INDICATOR ............................. 84
SOUND SYSTE M ................................................................. 85
ABILITY TO INSTALL A PORTABLE
NAVIGATION SYSTEM ..................................................... 86
ACCESSORIES PURCHASED BY THE OWNER ......... 86
REFEULLING THE CAR ..................................................... 88
PROTECTING THE ENVIRONMENT ........................... 89
C
C
O
O
N
N
T
T
R
R
O
O
L
L
S
S
A
A
N
N
D
D
D
D
E
E
V
V
I
I
C
C
E
E
S
S
001-032 PUNTO POP 1ed EN 31/03/14 09:02 Pagina 4
Page 13 of 219
9
SAFETY
STARTING
AND DRIVING
WARNING
LIGHTS AND MESSAGES
IN AN
EMERGENCY
SERVICE
AND CARE
TECHNICAL
SPECIFICATIONS
INDEX
CONTROLS
AND DEVICES
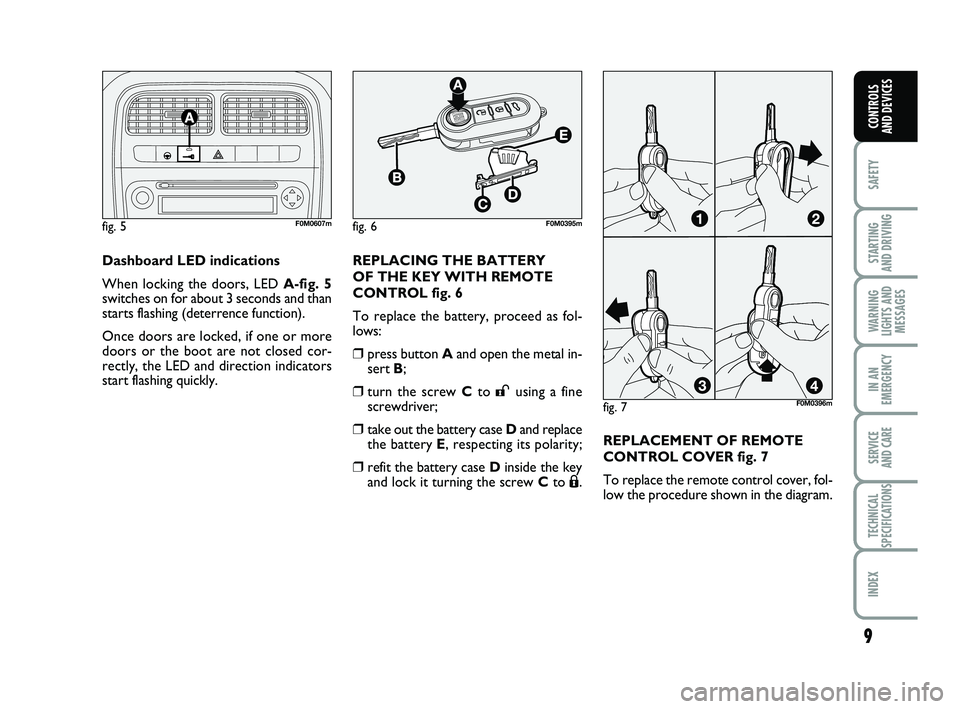
Dashboard LED indications
When locking the doors, LED A-fig. 5
switches on for about 3 seconds and than
starts flashing (deterrence function).
Once doors are locked, if one or more
doors or the boot are not closed cor-
rectly, the LED and direction indicators
start flashing quickly.
fig. 5F0M0607m
fig. 7
fig. 6F0M0395m
F0M0396m
REPLACING THE BATTERY
OF THE KEY WITH REMOTE
CONTROL fig. 6
To replace the battery, proceed as fol-
lows:
❒press button Aand open the metal in-
sert B;
❒turn the screw C to :using a fine
screwdriver;
❒take out the battery case D and replace
the battery E , respecting its polarity;
❒refit the battery case Dinside the key
and lock it turning the screw C to Á.REPLACEMENT OF REMOTE
CONTROL COVER fig. 7
To replace the remote control cover, fol-
low the procedure shown in the diagram.
001-032 PUNTO POP 1ed EN 31/03/14 09:03 Pagina 9
Page 15 of 219
11
SAFETY
STARTING
AND DRIVING
WARNING
LIGHTS AND MESSAGES
IN AN
EMERGENCY
SERVICE
AND CARE
TECHNICAL
SPECIFICATIONS
INDEX
CONTROLS
AND DEVICES
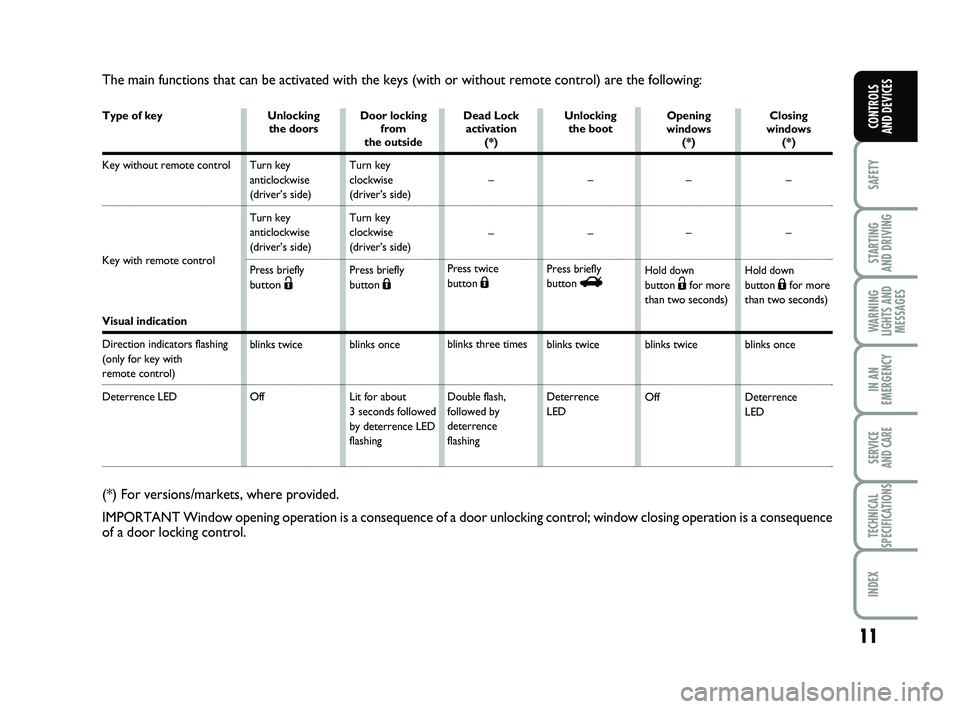
The main functions that can be activated with the keys (with or without\
remote control) are the following:
Type of key
Key without remote control
Key with remote control
Visual indication
Direction indicators flashing
(only for key with
remote control)
Deterrence LED
Unlocking
the doors
Turn key
anticlockwise
(driver’s side)
Turn key
anticlockwise
(driver’s side)
Press briefly
b
utton Ë
blinks twice
Off Door locking
from
the outside
Turn key
clockwise
(driver’s side)
Turn key
clockwise
(driver’s side)
Press briefly
button
Á
blinks once
Lit for about
3 seconds followed
by deterrence LED
flashing Dead Lock
activation (*)
–
–
Press twice
button
Á
blinks three times
Double flash,
followed by
deterrence
flashing Unlocking
the boot
–
–
Press briefly
button
R
blinks twice
Deterrence
LED
(*) For versions/markets, where provided.
IMPORTANT Window opening operation is a consequence of a door unlocking \
control; window closing operation is a consequence
of a door locking control.
Opening
windows (*)
–
–
Hold downbutton Ëfor more
than two seconds)
blinks twice
Off Closing
windows (*)
–
–Hold downbutton Áfor more
than two seconds)
blinks once
Deterrence
LED
001-032 PUNTO POP 1ed EN 31/03/14 09:03 Pagina 11
Page 20 of 219
16
SAFETY
STARTING
AND DRIVING
WARNING
LIGHTS AND MESSAGES
IN AN
EMERGENCY
SERVICE
AND CARE
TECHNICAL
SPECIFICATIONS
INDEX
CONTROLS
AND DEVICES
DIGITAL DISPLAY
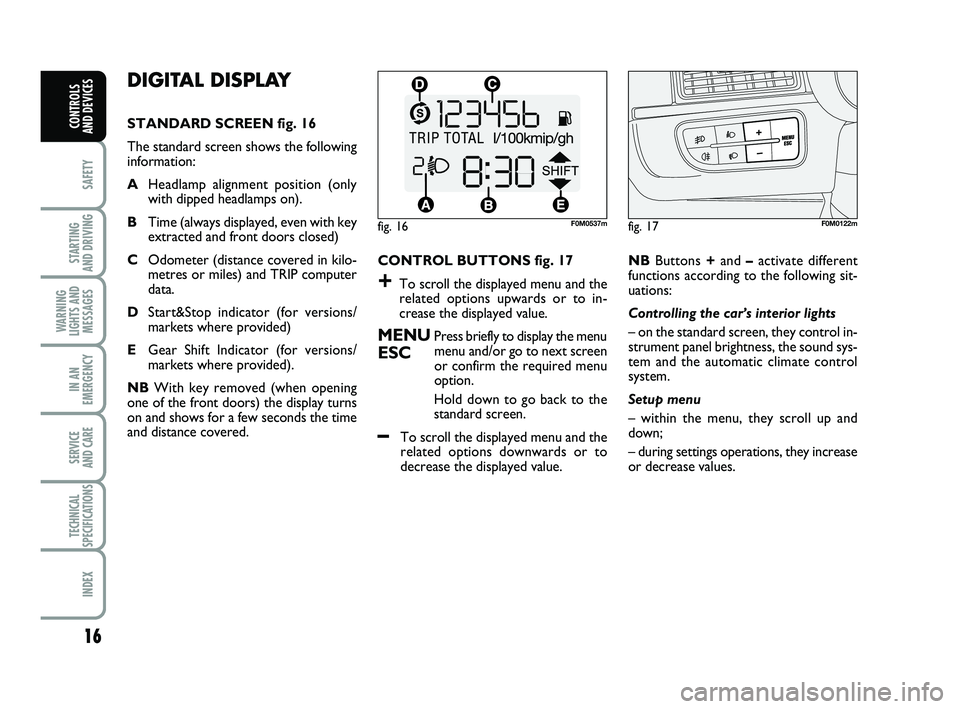
STANDARD SCREEN fig. 16
The standard screen shows the following
information:
A Headlamp alignment position (only
with dipped headlamps on).
B Time (always displayed, even with key
extracted and front doors closed)
C Odometer (distance covered in kilo-
metres or miles) and TRIP computer
data.
D Start&Stop indicator (for versions/
markets where provided)
E Gear Shift Indicator (for versions/
markets where provided).
NB With key removed (when opening
one of the front doors) the display turns
on and shows for a few seconds the time
and distance covered. CONTROL BUTTONS fig. 17
+To scroll the displayed menu and the
related options upwards or to in-
crease the displayed value.
MENUPress briefly to display the menu
ESCmenu and/or go to next screen
or confirm the required menu
option.
Hold down to go back to the
standard screen.
–To scroll the displayed menu and the
related options downwards or to
decrease the displayed value. NB
Buttons +and –activate different
functions according to the following sit-
uations:
Controlling the car’s interior lights
– on the standard screen, they control in-
strument panel brightness, the sound sys-
tem and the automatic climate control
system.
Setup menu
– within the menu, they scroll up and
down;
– during settings operations, they increase
or decrease values.
fig. 16F0M0537mfig. 17F0M0122m
001-032 PUNTO POP 1ed EN 31/03/14 09:03 Pagina 16
Page 25 of 219
21
SAFETY
STARTING
AND DRIVING
WARNING
LIGHTS AND MESSAGES
IN AN
EMERGENCY
SERVICE
AND CARE
TECHNICAL
SPECIFICATIONS
INDEX
CONTROLS
AND DEVICES
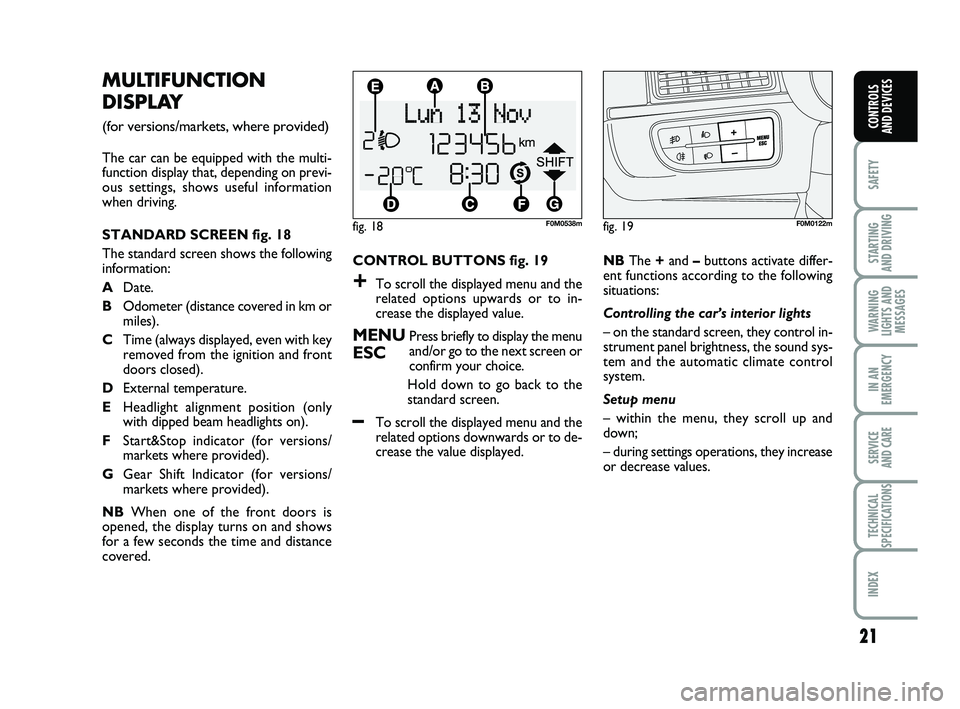
CONTROL BUTTONS fig. 19
+To scroll the displayed menu and the
related options upwards or to in-
crease the displayed value.
MENUPress briefly to display the menu
ESCand/or go to the next screen or
confirm your choice.
Hold down to go back to the
standard screen.
–To scroll the displayed menu and the
related options downwards or to de-
crease the value displayed.
MULTIFUNCTION
DISPLAY
(for versions/markets, where provided)
The car can be equipped with the multi-
function display that, depending on previ-
ous settings, shows useful information
when driving.
STANDARD SCREEN fig. 18
The standard screen shows the following
information:
A Date.
B Odometer (distance covered in km or
miles).
C Time (always displayed, even with key
removed from the ignition and front
doors closed).
D External temperature.
E Headlight alignment position (only
with dipped beam headlights on).
F Start&Stop indicator (for versions/
markets where provided).
G Gear Shift Indicator (for versions/
markets where provided).
NB When one of the front doors is
opened, the display turns on and shows
for a few seconds the time and distance
covered.
fig. 18F0M0538m
NB The +and –buttons activate differ-
ent functions according to the following
situations:
Controlling the car’s interior lights
– on the standard screen, they control in-
strument panel brightness, the sound sys-
tem and the automatic climate control
system.
Setup menu
– within the menu, they scroll up and
down;
– during settings operations, they increase
or decrease values.
fig. 19F0M0122m
001-032 PUNTO POP 1ed EN 31/03/14 09:03 Pagina 21
Page 52 of 219
48
SAFETY
STARTING
AND DRIVING
WARNING
LIGHTS AND MESSAGES
IN AN
EMERGENCY
SERVICE
AND CARE
TECHNICAL
SPECIFICATIONS
INDEX
CONTROLS
AND DEVICES
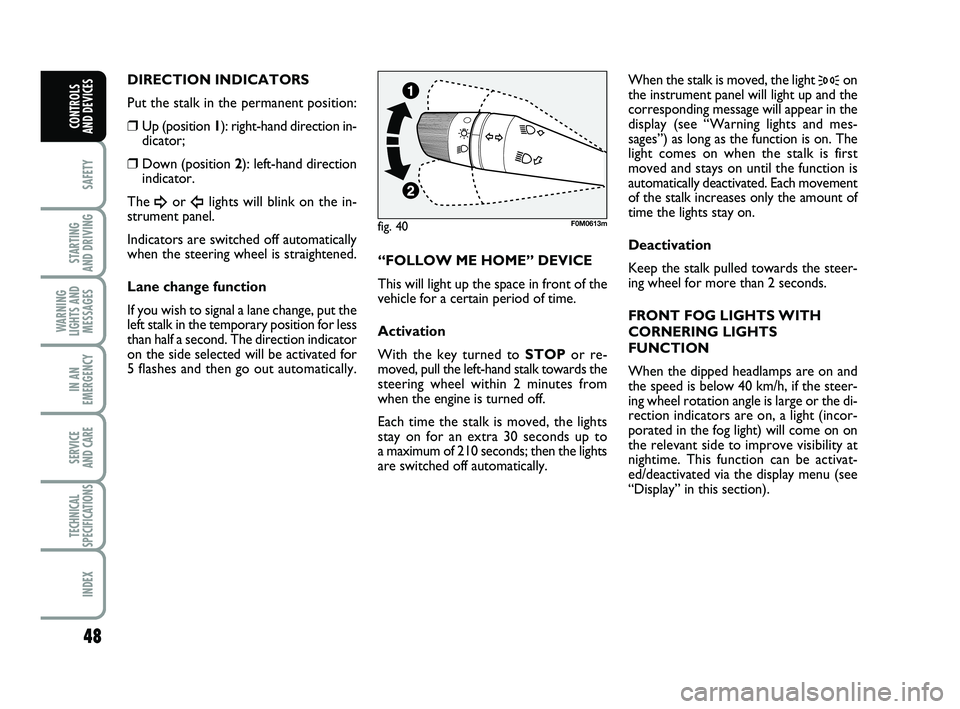
DIRECTION INDICATORS
Put the stalk in the permanent position:
❒Up (position 1 ): right-hand direction in-
dicator;
❒Down (position 2 ): left-hand direction
indicator.
The
¥or Îlights will blink on the in-
strument panel.
Indicators are switched off automatically
when the steering wheel is straightened.
Lane change function
If you wish to signal a lane change, put the
left stalk in the temporary position for less
than half a second. The direction indicator
on the side selected will be activated for
5 flashes and then go out automatically. “FOLLOW ME HOME” DEVICE
This will light up the space in front of the
vehicle for a certain period of time.
Activation
With the key turned to
STOPor re-
moved, pull the left-hand stalk towards the
steering wheel within 2 minutes from
when the engine is turned off.
Each time the stalk is moved, the lights
stay on for an extra 30 seconds up to
a maximum of 210 seconds; then the lights
are switched off automatically. When the stalk is moved, the light
3on
the instrument panel will light up and the
corresponding message will appear in the
display (see “Warning lights and mes-
sages”) as long as the function is on. The
light comes on when the stalk is first
moved and stays on until the function is
automatically deactivated. Each movement
of the stalk increases only the amount of
time the lights stay on.
Deactivation
Keep the stalk pulled towards the steer-
ing wheel for more than 2 seconds.
FRONT FOG LIGHTS WITH
CORNERING LIGHTS
FUNCTION
When the dipped headlamps are on and
the speed is below 40 km/h, if the steer-
ing wheel rotation angle is large or the di-
rection indicators are on, a light (incor-
porated in the fog light) will come on on
the relevant side to improve visibility at
nightime. This function can be activat-
ed/deactivated via the display menu (see
“Display” in this section).
fig. 40F0M0613m
033-069 PUNTO POP 1ed EN 29/08/13 14.34 Pagina 48
Page 60 of 219
56
SAFETY
STARTING
AND DRIVING
WARNING
LIGHTS AND MESSAGES
IN AN
EMERGENCY
SERVICE
AND CARE
TECHNICAL
SPECIFICATIONS
INDEX
CONTROLS
AND DEVICES
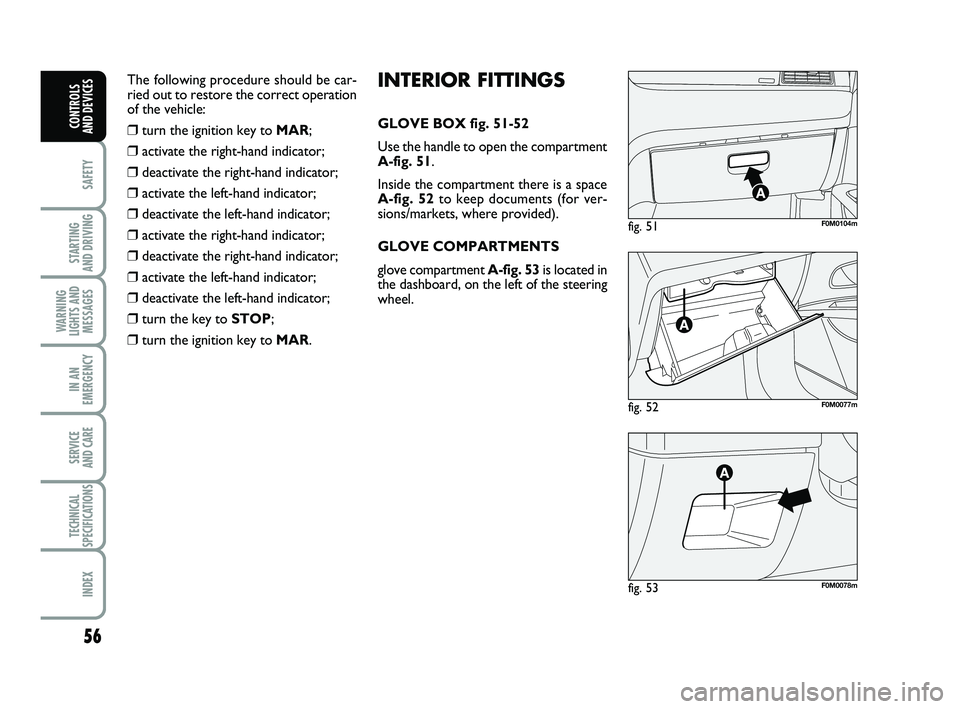
fig. 52F0M0077m
fig. 51F0M0104m
fig. 53F0M0078m
INTERIOR FITTINGS
GLOVE BOX fig. 51-52
Use the handle to open the compartment
A-fig. 51.
Inside the compartment there is a space
A-fig. 52 to keep documents (for ver-
sions/markets, where provided).
GLOVE COMPARTMENTS
glove compartment A-fig. 53 is located in
the dashboard, on the left of the steering
wheel.
The following procedure should be car-
ried out to restore the correct operation
of the vehicle:❒turn the ignition key to
MAR;
❒activate the right-hand indicator;
❒deactivate the right-hand indicator;
❒activate the left-hand indicator;
❒deactivate the left-hand indicator;
❒activate the right-hand indicator;
❒deactivate the right-hand indicator;
❒activate the left-hand indicator;
❒deactivate the left-hand indicator;
❒turn the key to STOP;
❒turn the ignition key to MAR.
033-069 PUNTO POP 1ed EN 29/08/13 14.34 Pagina 56
Page 64 of 219
60
SAFETY
STARTING
AND DRIVING
WARNING
LIGHTS AND MESSAGES
IN AN
EMERGENCY
SERVICE
AND CARE
TECHNICAL
SPECIFICATIONS
INDEX
CONTROLS
AND DEVICES
DOORS
CENTRAL DOOR LOCKING/
UNLOCKING SYSTEM
LOCKING FROM THE OUTSIDE
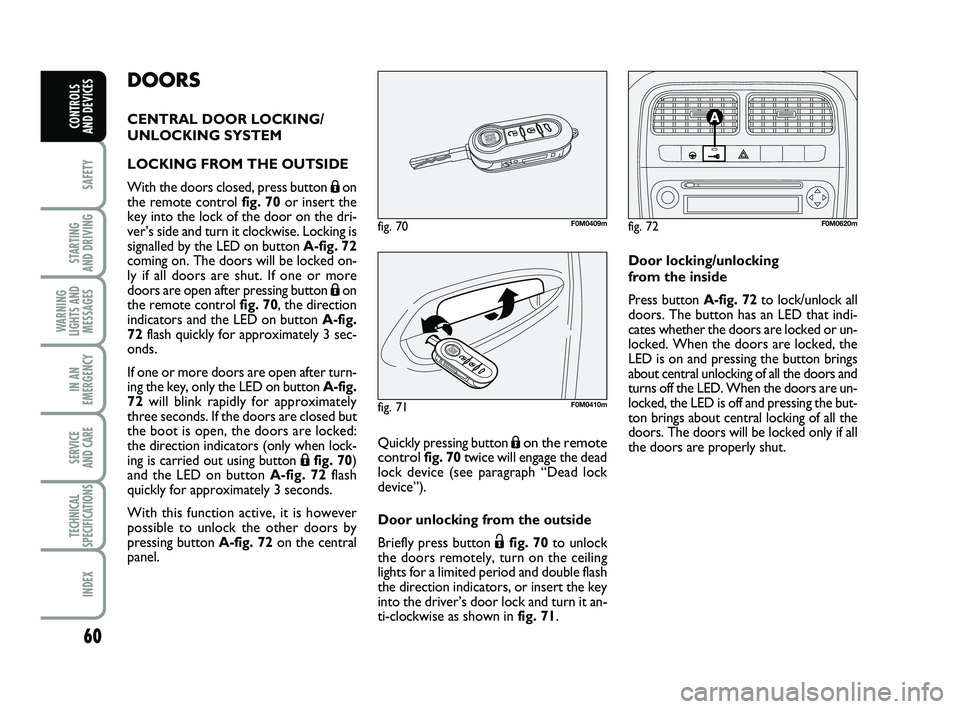
With the doors closed, press button
Áon
the remote control fig. 70or insert the
key into the lock of the door on the dri-
ver’s side and turn it clockwise. Locking is
signalled by the LED on button A-fig. 72
coming on. The doors will be locked on-
ly if all doors are shut. If one or more
doors are open after pressing button
Áon
the remote control fig. 70, the direction
indicators and the LED on button A-fig.
72 flash quickly for approximately 3 sec-
onds.
If one or more doors are open after turn-
ing the key, only the LED on button A-fig.
72 will blink rapidly for approximately
three seconds. If the doors are closed but
the boot is open, the doors are locked:
the direction indicators (only when lock-
ing is carried out using button
Áfig. 70)
and the LED on button A-fig. 72 flash
quickly for approximately 3 seconds.
With this function active, it is however
possible to unlock the other doors by
pressing button A-fig. 72 on the central
panel. Quickly pressing button
Á
on the remote
control fig. 70 twice will engage the dead
lock device (see paragraph “Dead lock
device”).
Door unlocking from the outside
Briefly press button
Ëfig. 70 to unlock
the doors remotely, turn on the ceiling
lights for a limited period and double flash
the direction indicators, or insert the key
into the driver’s door lock and turn it an-
ti-clockwise as shown in fig. 71.
fig. 72F0M0620m
Door locking/unlocking
from the inside
Press button A-fig. 72 to lock/unlock all
doors. The button has an LED that indi-
cates whether the doors are locked or un-
locked. When the doors are locked, the
LED is on and pressing the button brings
about central unlocking of all the doors and
turns off the LED. When the doors are un-
locked, the LED is off and pressing the but-
ton brings about central locking of all the
doors. The doors will be locked only if all
the doors are properly shut.
fig. 71F0M0410m
fig. 70F0M0409m
033-069 PUNTO POP 1ed EN 29/08/13 14.34 Pagina 60
Page 65 of 219
61
SAFETY
STARTING
AND DRIVING
WARNING
LIGHTS AND MESSAGES
IN AN
EMERGENCY
SERVICE
AND CARE
TECHNICAL
SPECIFICATIONS
INDEX
CONTROLS
AND DEVICES
Following the locking of the doors using:
❒remote control;
❒door catch;
it will not be possible to unlock them by
pressing button
A-fig. 72located on the
dashboard.
IMPORTANT With central locking on,
pulling the internal handle of one of the
front doors will unlock that door. Indi-
vidual doors can be unlocked by pulling
the internal handle of one of the rear
doors.
If a power supply is not present (blown
fuse, battery disconnected, etc.) it is, how-
ever, possible to lock the doors manually.
After exceeding a speed of 20 km/h, all
doors will be centrally locked automati-
cally if the setup menu function has been
selected (see paragraph “Multifunction dis-
play” in this section).
Once the dead lock system is
engaged, it is impossible to
open the doors from inside the vehi-
cle. Before getting out of the car,
please therefore check that there is
no-one left on board. If the remote
control battery is flat, the system can
be disengaged only by inserting the
key in either of the door locks as de-
scribed previously: in this case the de-
vice remains active only for the rear
doors.
DEAD LOCK
(for versions/markets, where provided)
This safety device inhibits the operation of:
❒interior handles;
❒locking/unlocking button
A-fig. 72;
thereby preventing the opening of the
doors from inside the passenger com-
partment if there has been a break-in at-
tempt (e.g. a window has been broken).
The dead lock device therefore offers the
best possible protection against break-in
attempts. We recommend engaging it
whenever the vehicle is parked and left un-
attended. Device activation
The dead lock device is automatically ac-
tivated on every door by briefly pressing
the remote control button
Áfig. 70
twice.
Device activation is indicated by 3 flashes
of the direction indicators and a flash of
the LED on button
A-fig. 72on the dash-
board.
If one or more of the doors is not closed
correctly, the dead lock device will not ac-
tivate, thus preventing a person from get-
ting stuck inside the passenger compart-
ment by entering the car through, and
then closing, the open door.
Device deactivation
The system is disabled automatically on
every door in the following cases:
❒when opening the driver’s door using the key without remote control;
❒when unlocking doors using the remotecontrol;
❒when turning the ignition key to MAR.
WARNING
033-069 PUNTO POP 1ed EN 29/08/13 14.34 Pagina 61
Page 69 of 219
65
SAFETY
STARTING
AND DRIVING
WARNING
LIGHTS AND MESSAGES
IN AN
EMERGENCY
SERVICE
AND CARE
TECHNICAL
SPECIFICATIONS
INDEX
CONTROLS
AND DEVICES
fig. 80F0M0095m
BOOT
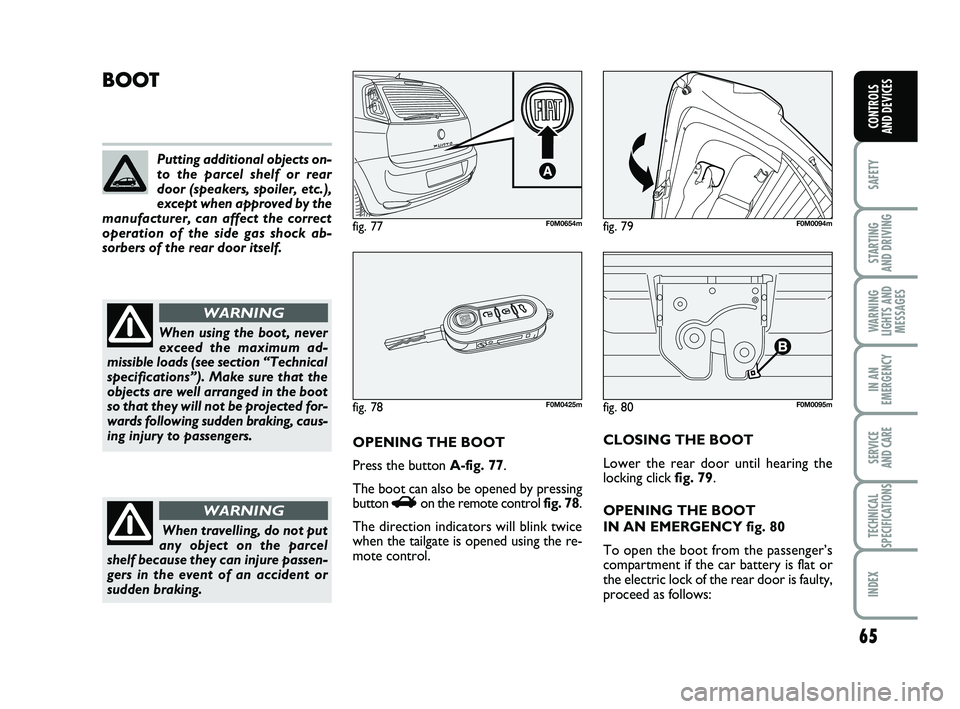
OPENING THE BOOT
Press the button A-fig. 77.
The boot can also be opened by pressing
button
Ron the remote control fig. 78.
The direction indicators will blink twice
when the tailgate is opened using the re-
mote control. CLOSING THE BOOT
Lower the rear door until hearing the
locking click
fig. 79.
OPENING THE BOOT
IN AN EMERGENCY fig. 80
To open the boot from the passenger’s
compartment if the car battery is flat or
the electric lock of the rear door is faulty,
proceed as follows:
fig. 78F0M0425m
fig. 79F0M0094m
Putting additional objects on-
to the parcel shelf or rear
door (speakers, spoiler, etc.),
except when approved by the
manufacturer, can affect the correct
operation of the side gas shock ab-
sorbers of the rear door itself.
When using the boot, never
exceed the maximum ad-
missible loads (see section “Technical
specifications”). Make sure that the
objects are well arranged in the boot
so that they will not be projected for-
wards following sudden braking, caus-
ing injury to passengers.
WARNING
When travelling, do not put
any object on the parcel
shelf because they can injure passen-
gers in the event of an accident or
sudden braking.
WARNING
fig. 77F0M0654m
033-069 PUNTO POP 1ed EN 29/08/13 14.34 Pagina 65