display FIAT PUNTO EVO 2010 1.G Owner's Manual
[x] Cancel search | Manufacturer: FIAT, Model Year: 2010, Model line: PUNTO EVO, Model: FIAT PUNTO EVO 2010 1.GPages: 270, PDF Size: 8.34 MB
Page 36 of 270
35
KNOWING
YOUR
VEHICLE
SAFETY
STARTING
AND DRIVING
WARNING LIGHTS
AND MESSAGES
IN AN
EMERGENCY
SERVICING
AND CARE
TECHNICAL
SPECIFICATIONS
CONTENTS
BUTTON VOLUME
(Adjusting the button volume)
This function may be used to adjust (over 8 levels) the vol-
ume of the noise made when the MENU ESC, +e –but-
tons are pressed.
To set the desired volume, proceed as follows:
– briefly press MENU ESC: the previously set volume lev-
el will flash on the display;
– press +or –to set the value;
– briefly press the MENU ESC button to go back to the
menu screen or hold the button down to go back to the
standard screen without saving.
SEAT BELT BUZZ
(SBR buzzer reactivation
(for versions/markets where provided)
This function can be displayed only after a Fiat Dealer-
ship has deactivated the SBR system (see “SBR system”
in the “Safety” section).SERVICE
(Scheduled servicing)
Through this function it is possible to display information
related to regular scheduling intervals.
This information can be consulted as follows:
– briefly press MENU ESC: service intervals in km or mi,
depending on the previous setting, will be displayed (see
“Measurement units”);
– press the MENU ESC button briefly to return to the
menu screen or hold the button down to return to the
standard screen.
NBThe “Scheduled Servicing Plan” requires the vehicle
to be serviced every 30,000 km (or 18,000 mi). This indi-
cation will appear automatically, with the key at MAR, start-
ing from 2,000 km (or 1,240 mi) and will be displayed every
200 km (or 124 mi). Below 200 km the signals become
more frequent. The indication will appear in kilometres or
miles depending on the unit of measurement settings.
When the next scheduled service is approaching, the mes-
sage “Service” will appear on the display, followed by the
number of kilometres or miles left, when the key is turned
to MAR. Go to a Fiat Dealership, where the “Scheduled
Servicing Plan” operations will be performed and the mes-
sage will be reset.
001-036 PUNTO FL EN 4ed 18-01-2010 12:22 Pagina 35
Page 37 of 270
36
KNOWING
YOUR
VEHICLE
SAFETY
STARTING
AND DRIVING
WARNING LIGHTS
AND MESSAGES
IN AN
EMERGENCY
SERVICING
AND CARE
TECHNICAL
SPECIFICATIONS
CONTENTS
AIRBAG/PASSENGER BAG
(Passenger front and side airbag activation/
deactivation)
(for versions/markets where available)
This function is used to activate/deactivate the front pas-
senger’s air bag.
Proceed as follows:
❒press MENU ESC and, after the message BAG P OFF
(to deactivate) or BAG P On (to activate) is displayed
by pressing buttons +or –, press MENU ESC again;
❒the display will show the confirmation request message;
❒press +or –to select either Yes (to confirm activa-
tion/deactivation) or No (to abort);
❒briefly press MENU ESC to confirm setting and go back
to the menu screen or hold the button down to go back
to the standard screen without saving.DAYTIME RUNNING LIGHTS (D.R.L.)
(for versions/markets where provided)
This function allows you to activate/deactivate the daytime
running lights.
Proceed as follows to switch this function on or off:
– press the MENU ESC button briefly: the display will show
a submenu;
– press the MENU ESC button briefly, the display will show
On or Off flashing depending on the previous setting;
– press +or –to change the setting;
– briefly press the MENU ESC button to go back to the
submenu screen or hold the button down to go back to
the main menu screen without saving;
– hold down MENU ESC again to go back to the standard
screen or main menu, depending on which point in the
menu you have reached.
EXIT MENU
This function closes the cycle of settings listed in the menu
screen.
Briefly press MENU ESC to go back to the standard screen
without saving.
Press –to return to the first menu option (Speed Beep).
001-036 PUNTO FL EN 4ed 18-01-2010 12:22 Pagina 36
Page 38 of 270
37
Values displayed
Outside temperature
Indicates the temperature outside the vehicle passenger
compartment.
Range
This indicates the approximate distance that may be trav-
elled with the fuel remaining in the tank, assuming that dri-
ving conditions do not change. The display will show the
reading “----” when the following events take place:
– value lower than 50 km (or 30 mi)
– car left parked with engine running for a long time.
Distance travelled
This value shows the distance covered from the start of
the new journey.
Average consumption
This value shows the approximate average fuel consump-
tion from the start of the new journey.
Current consumption
Indicates the fuel consumption. The value is constantly up-
dated. The message “----” will appear on the display if the
car is parked with the engine running.
Average speed
This value shows the car’s average speed based on the
overall time elapsed since the start of the new journey.TRIP COMPUTER
Introduction
The Trip computer is used to display information on car
operation when the key is turned to MAR. This function
allows you to define two separate trips, called “Trip A”
and “Trip B”, for monitoring the car’s “complete mission”
(journey) in a reciprocally independent manner.
Both functions can be reset (reset – start of a new jour-
ney).
“Trip A” is used to display the figures relating to:
– Outside temperature
– Range
– Distance travelled
– Average consumption
– Current consumption
– Average speed
– Journey time (driving time).
“Trip B”, available on multifunction display only, is used to
display the figures relating to:
– Distance travelled B
– Average consumption B
– Average speed B
– Travel time B (driving time).
NB“Trip B” functions may be excluded (see “Trip B on”).
“Range” and “Instant consumption” parameters cannot be
reset.
KNOWING
YOUR
VEHICLE
SAFETY
STARTING
AND DRIVING
WARNING LIGHTS
AND MESSAGES
IN AN
EMERGENCY
SERVICING
AND CARE
TECHNICAL
SPECIFICATIONS
CONTENTS
037-081 PUNTO FL EN 4ed 18-01-2010 12:23 Pagina 37
Page 39 of 270
38
F0U0022mfig. 28
New journey
The new journey begins after:
– “manual” resetting by the user, by pressing the relevant
button;
– “automatic” resetting, when the distance travelled reach-
es 99,999.9 km or when the journey time reaches 99.59
(99 hours and 59 minutes);
– disconnection and subsequent reconnection of the bat-
tery.
IMPORTANT The reset operation when “Trip A” details
are being displayed resets only the information associat-
ed with this function.
IMPORTANT The reset operation when “Trip B” details
are being displayed resets only the information associat-
ed with this function.
Start trip procedure
With the ignition key in the MAR position, reset by press-
ing the TRIP button and keeping it pressed for more than
2 seconds.
Trip Exit
To quit the Trip function: keep MENU ESC pressed for
over 2 seconds. Journey time
This value shows the time elapsed since the start of the
new journey.
IMPORTANT If information is not available, the message
“----” will appear instead of the Trip Computer values.
Counting of the different values will resume regularly when
normal operation is restored. This will not reset any of the
values displayed before the failure nor start a new jour-
ney.
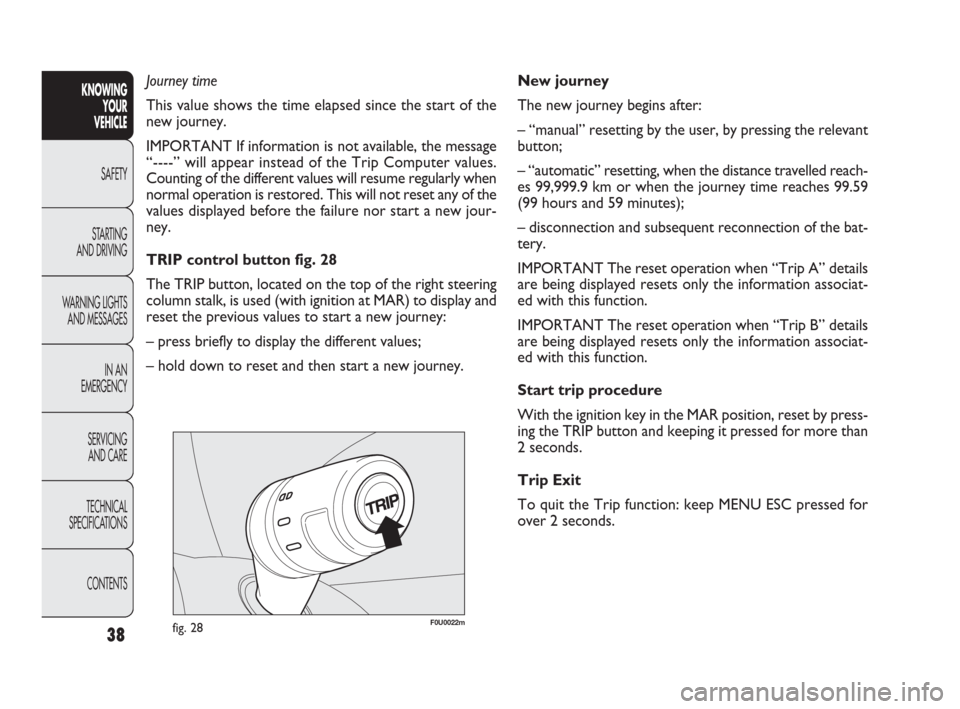
TRIP control button fig. 28
The TRIP button, located on the top of the right steering
column stalk, is used (with ignition at MAR) to display and
reset the previous values to start a new journey:
– press briefly to display the different values;
– hold down to reset and then start a new journey.KNOWING
YOUR
VEHICLE
SAFETY
STARTING
AND DRIVING
WARNING LIGHTS
AND MESSAGES
IN AN
EMERGENCY
SERVICING
AND CARE
TECHNICAL
SPECIFICATIONS
CONTENTS
037-081 PUNTO FL EN 4ed 18-01-2010 12:23 Pagina 38
Page 57 of 270
56
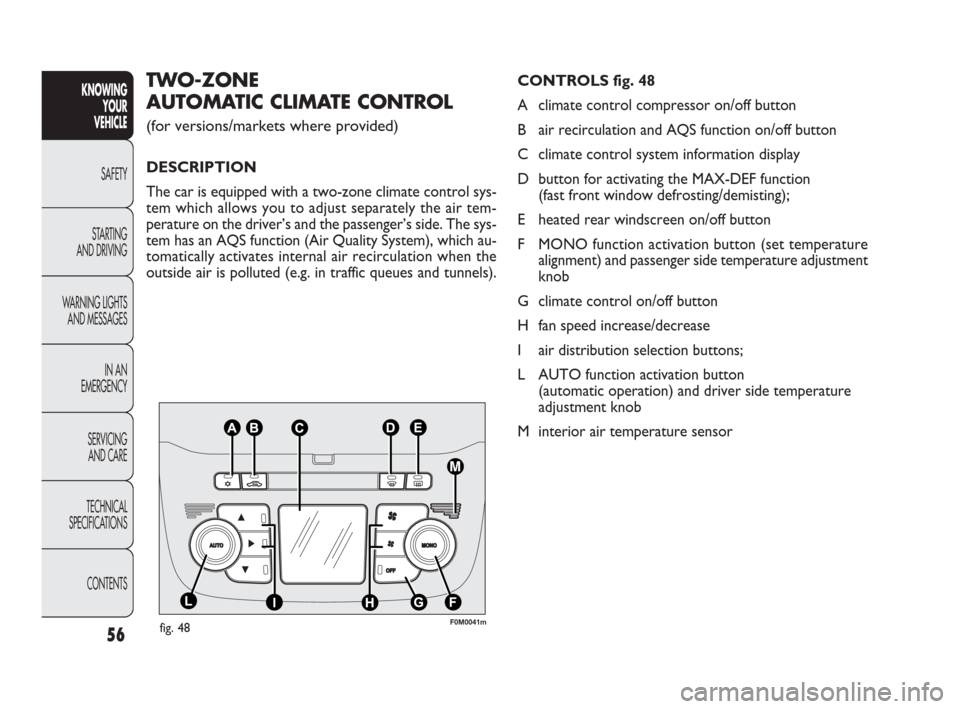
CONTROLS fig. 48
A climate control compressor on/off button
B air recirculation and AQS function on/off button
C climate control system information display
D button for activating the MAX-DEF function
(fast front window defrosting/demisting);
E heated rear windscreen on/off button
F MONO function activation button (set temperature
alignment) and passenger side temperature adjustment
knob
G climate control on/off button
H fan speed increase/decrease
I air distribution selection buttons;
L AUTO function activation button
(automatic operation) and driver side temperature
adjustment knob
M interior air temperature sensorTWO-ZONE
AUTOMATIC CLIMATE CONTROL
(for versions/markets where provided)
DESCRIPTION
The car is equipped with a two-zone climate control sys-
tem which allows you to adjust separately the air tem-
perature on the driver’s and the passenger’s side. The sys-
tem has an AQS function (Air Quality System), which au-
tomatically activates internal air recirculation when the
outside air is polluted (e.g. in traffic queues and tunnels).
fig. 48F0M0041m
KNOWING
YOUR
VEHICLE
SAFETY
STARTING
AND DRIVING
WARNING LIGHTS
AND MESSAGES
IN AN
EMERGENCY
SERVICING
AND CARE
TECHNICAL
SPECIFICATIONS
CONTENTS
037-081 PUNTO FL EN 4ed 18-01-2010 12:23 Pagina 56
Page 58 of 270
57
SWITCHING ON THE CLIMATE CONTROL
SYSTEM
The system can be activated by pressing any of the but-
tons; it is, however, advisable to set the desired temper-
atures on the display, then press the AUTO button.
The climate control system allows you to customise the
temperatures (driver side and passenger side) with a max-
imum difference of 7°C.
The climate control system compressor works only with
the engine running and with an outside temperature of
above 4°C.
AUTOMATIC FUNCTION OF THE CLIMATE
CONTROL SYSTEM (AUTO function)
Press the AUTO button; the system will automatically ad-
just:
❒the amount of air introduced into the passenger com-
partment;
❒the distribution of air inside the passenger compartment;
cancelling any previous manual settings.
During climate control system automatic operation, the
words FULL AUTO appear on the display.
During automatic operation it is still possible to adjust the
set temperature and carry out the following operations
manually:
❒adjust fan speed;
❒select air distribution;
❒switch air recirculation and AQS function on/off;
❒switch on the climate control system compressor.REGULATING THE FAN SPEED
Press button
pto increase/decrease the fan speed.
The 12 possible speeds are indicated by bars lighting up on
the display:
❒max fan speed = all bars lit;
❒min. fan speed = one bar lit.
The fan can be disabled (no bars lit) only if the climate con-
trol compressor has been switched off by pressing but-
ton
❄.
To restore automatic fan speed control after a manual ad-
justment, press AUTO.
RAPID FRONT WINDOWS DEMISTING/
DEFROSTING (MAX-DEF function)
Press button
-to automatically activate the timed op-
eration of all the functions required to rapidly
demist/defrost the windscreen and front side windows.
KNOWING
YOUR
VEHICLE
SAFETY
STARTING
AND DRIVING
WARNING LIGHTS
AND MESSAGES
IN AN
EMERGENCY
SERVICING
AND CARE
TECHNICAL
SPECIFICATIONS
CONTENTS
It is advisable not to use the air recircula-
tion function when the outside tempera-
ture is low to prevent the windows from rapidly
misting up.
WARNING
037-081 PUNTO FL EN 4ed 18-01-2010 12:23 Pagina 57
Page 60 of 270
Enabling the AQS (Air Quality System) function
The AQS function (AQS appears on the display), auto-
matically activates internal air recirculation when the out-
side air is polluted (e.g. in traffic queues and tunnels).
IMPORTANT With the AQS function active, after 15 con-
secutive minutes of the internal air recirculation system
functioning, the climate control system enables the intake
of outside air for approximately 1 minute to freshen the
air in the passenger compartment. This takes place re-
gardless of the pollution level of the outside air.
SET TEMPERATURE ALIGNMENT
(MONO function)
Press the MONO button to align the temperature be-
tween the driver side and passenger side.
Then turn the AUTO or MONO knob to in-
crease/decrease the temperature between the two areas
by the same amount.
Press MONO again to deactivate the function.
CLIMATE CONTROL COMPRESSOR
ACTIVATION/DEACTIVATION
Press button òto switch on the climate control system
compressor.Compressor on
❒the LED on button òis lit up;
❒symbol òis shown on the display.
Compressor off
❒the LED on button òis lit up;
❒symbol òis shown on the display.
❒internal air recirculation is prevented;
❒the AQS function is disabled.
With the climate control compressor switched off, air can-
not be introduced into the passenger compartment at a
lower temperature than the outside; in this case the ò
symbol on the display will flash.
The deactivation of the climate control compressor is
memorized even after the engine has stopped. To turn the
climate control compressor back on, press button òonce
again or press AUTO: if you press AUTO, the other man-
ual settings will be cancelled.
SETTING THE AIR DISTRIBUTION
Press one or more of buttons Q/E/Zto manually select
one of the 7 possible air distribution settings for the pas-
senger compartment:
QAir flow to the windscreen and front side window
vents to demist/defrost them.
ZAir flow to the front and rear footwell vents. This
air distribution warms up the passenger compart-
ment quickly.
59
KNOWING
YOUR
VEHICLE
SAFETY
STARTING
AND DRIVING
WARNING LIGHTS
AND MESSAGES
IN AN
EMERGENCY
SERVICING
AND CARE
TECHNICAL
SPECIFICATIONS
CONTENTS
037-081 PUNTO FL EN 4ed 18-01-2010 12:23 Pagina 59
Page 61 of 270
Q
ZEAir flow distribution between front and rear vents,
centre/side dashboard vents, rear vent and wind-
screen and front side window demisting/defrosting
vents.
EAir flow distribution to centre/side dashboard vents
(passenger’s body).
QAir flow distribution between the footwell
Zvents and the windscreen and front side window
demisting/defrosting vents. This distribution setting
allows warms up the passenger compartment and
prevents the windows from misting up.
ZEAir flow distribution between footwell vents (hot-
ter air) and centre/side dashboard vents and rear
vent (cooler air).
EQAir flow distribution between centre/side dash-
board vents, rear vent and windscreen and front
side window demisting/defrosting vents. This dis-
tribution setting ventilates the passenger compart-
ment and prevents the windows from misting up.
IMPORTANT For the climate control system to function,
at least one of the following buttons must be on: Q/E/Z.
The system does not allow all the buttons Q/E/Zto be
switched off.
IMPORTANT Push the OFF button to turn the climate
control system back on: in this way, all previously saved
operating conditions are restored before switching off.
To restore automatic control of the air distribution after
a manual selection, press the AUTO button.ADDITIONAL HEATER
(for versions/markets where provided)
This device warms up the passenger compartment more
quickly when it is very cold and the engine coolant tem-
perature is low.
In these conditions, the device comes on automatically
when the engine is started and the fan is on.
The additional heater turns off automatically after reach-
ing the required comfort conditions.
IMPORTANT The heater will not turn on if the battery
voltage is too low.
SWITCHING OFF THE CLIMATE CONTROL
SYSTEM
Press the OFF button.
The following information is shown on the display:
❒ the word OFF;
❒outside temperature reading;
❒indication that air recirculation is switched on (LED on
button
Tis lit).
60
KNOWING
YOUR
VEHICLE
SAFETY
STARTING
AND DRIVING
WARNING LIGHTS
AND MESSAGES
IN AN
EMERGENCY
SERVICING
AND CARE
TECHNICAL
SPECIFICATIONS
CONTENTS
037-081 PUNTO FL EN 4ed 18-01-2010 12:23 Pagina 60
Page 62 of 270
F0U0042mfig. 49
The daytime running lights are an alterna-
tive to the dipped beam headlights for dri-
ving during the daytime in countries where it is com-
pulsory to have lights on during the day, and they
are also permitted in those countries where this not
obligatory. Daytime running lights cannot replace
dipped headlights when driving at night or through
tunnels. The use of daytime running lights is gov-
erned by the highway code of the country in which
you are driving. Keep to the rules.
WARNING
EXTERIOR LIGHTS
The left-hand stalk operates most of the external lights.
The ignition key has to be in the MAR position for the
exterior lights to come on. The instrument panel and the
various controls on the dashboard will be lit up when the
exterior lights are switched on.
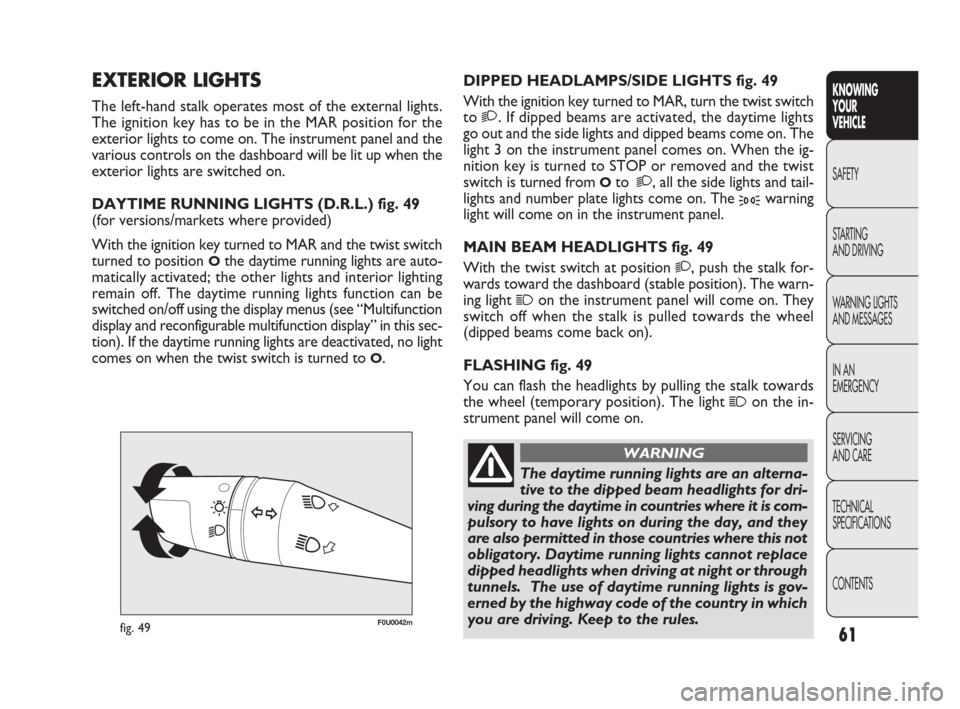
DAYTIME RUNNING LIGHTS (D.R.L.) fig. 49
(for versions/markets where provided)
With the ignition key turned to MAR and the twist switch
turned to position
Othe daytime running lights are auto-
matically activated; the other lights and interior lighting
remain off. The daytime running lights function can be
switched on/off using the display menus (see “Multifunction
display and reconfigurable multifunction display” in this sec-
tion). If the daytime running lights are deactivated, no light
comes on when the twist switch is turned to
O.DIPPED HEADLAMPS/SIDE LIGHTS fig. 49
With the ignition key turned to MAR, turn the twist switch
to
2. If dipped beams are activated, the daytime lights
go out and the side lights and dipped beams come on. The
light 3 on the instrument panel comes on. When the ig-
nition key is turned to STOP or removed and the twist
switch is turned from
Oto 2, all the side lights and tail-
lights and number plate lights come on. The
3warning
light will come on in the instrument panel.
MAIN BEAM HEADLIGHTS fig. 49
With the twist switch at position
2, push the stalk for-
wards toward the dashboard (stable position). The warn-
ing light
1on the instrument panel will come on. They
switch off when the stalk is pulled towards the wheel
(dipped beams come back on).
FLASHING fig. 49
You can flash the headlights by pulling the stalk towards
the wheel (temporary position). The light
1on the in-
strument panel will come on.
61
KNOWING
YOUR
VEHICLE
SAFETY
STARTING
AND DRIVING
WARNING LIGHTS
AND MESSAGES
IN AN
EMERGENCY
SERVICING
AND CARE
TECHNICAL
SPECIFICATIONS
CONTENTS
037-081 PUNTO FL EN 4ed 18-01-2010 12:23 Pagina 61
Page 63 of 270
“FOLLOW ME HOME” DEVICE
This will light up the space in front of the vehicle for
a certain period of time.
Activation
With the key turned to STOP or removed, pull the left-
hand stalk towards the steering wheel within 2 minutes
from when the engine is turned off.
Each time the stalk is moved, the lights stay on for an ex-
tra 30 seconds up to a maximum of 210 seconds; then the
lights are switched off automatically.
The warning light
3on the instrument panel will light up
and the corresponding message will appear in the display
(see “Warning lights and messages”) for as long as the func-
tion is activated. The light comes on when the stalk is first
moved and stays on until the function is automatically de-
activated. Each movement of the stalk increases only the
amount of time the lights stay on.
Deactivation
Keep the stalk pulled towards the steering wheel for more
than 2 seconds.
fig. 50F0U0043m
62
KNOWING
YOUR
VEHICLE
SAFETY
STARTING
AND DRIVING
WARNING LIGHTS
AND MESSAGES
IN AN
EMERGENCY
SERVICING
AND CARE
TECHNICAL
SPECIFICATIONS
CONTENTS
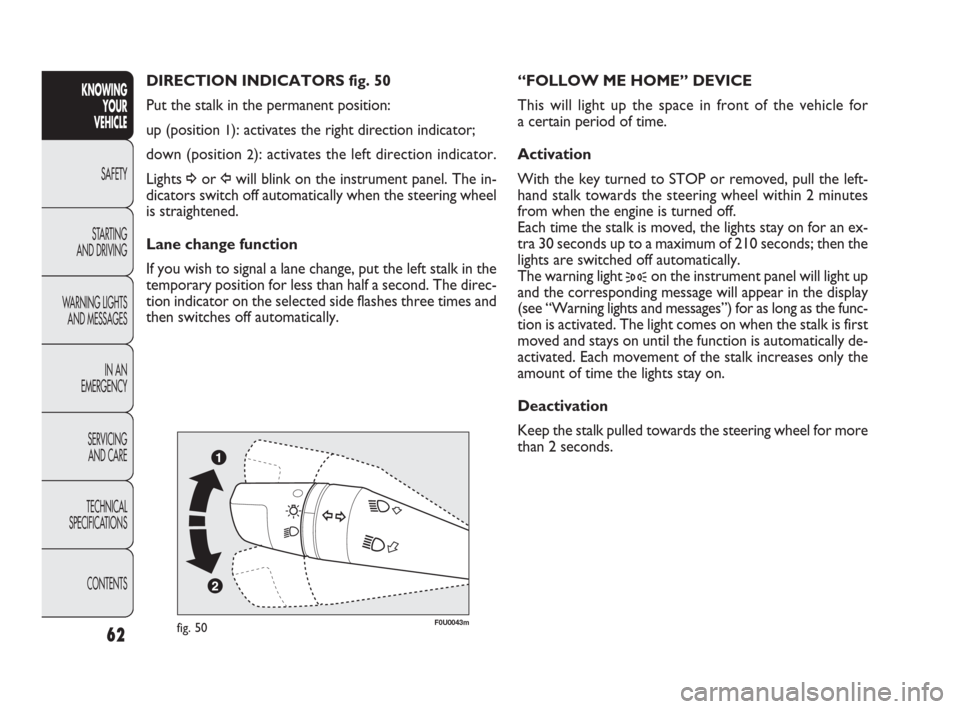
DIRECTION INDICATORS fig. 50
Put the stalk in the permanent position:
up (position
1): activates the right direction indicator;
down (position
2): activates the left direction indicator.
Lights
¥or Îwill blink on the instrument panel. The in-
dicators switch off automatically when the steering wheel
is straightened.
Lane change function
If you wish to signal a lane change, put the left stalk in the
temporary position for less than half a second. The direc-
tion indicator on the selected side flashes three times and
then switches off automatically.
037-081 PUNTO FL EN 4ed 18-01-2010 12:23 Pagina 62