dashboard warning lights FIAT QUBO 2008 1.G Owners Manual
[x] Cancel search | Manufacturer: FIAT, Model Year: 2008, Model line: QUBO, Model: FIAT QUBO 2008 1.GPages: 202, PDF Size: 3.43 MB
Page 135 of 202
134
SAFETY
MAINTENANCE
AND CARE
TECHNICAL
SPECIFICATIONS
INDEX
DASHBOARDAND CONTROLS
STARTING
AND DRIVING
WARNING
LIGHTS AND
MESSAGES
IN AN
EMERGENCY
DIPPED BEAM HEADLIGHTS/
MAIN BEAM HEADLIGHTS
To change the bulb (double filament), pro-
ceed as follows:
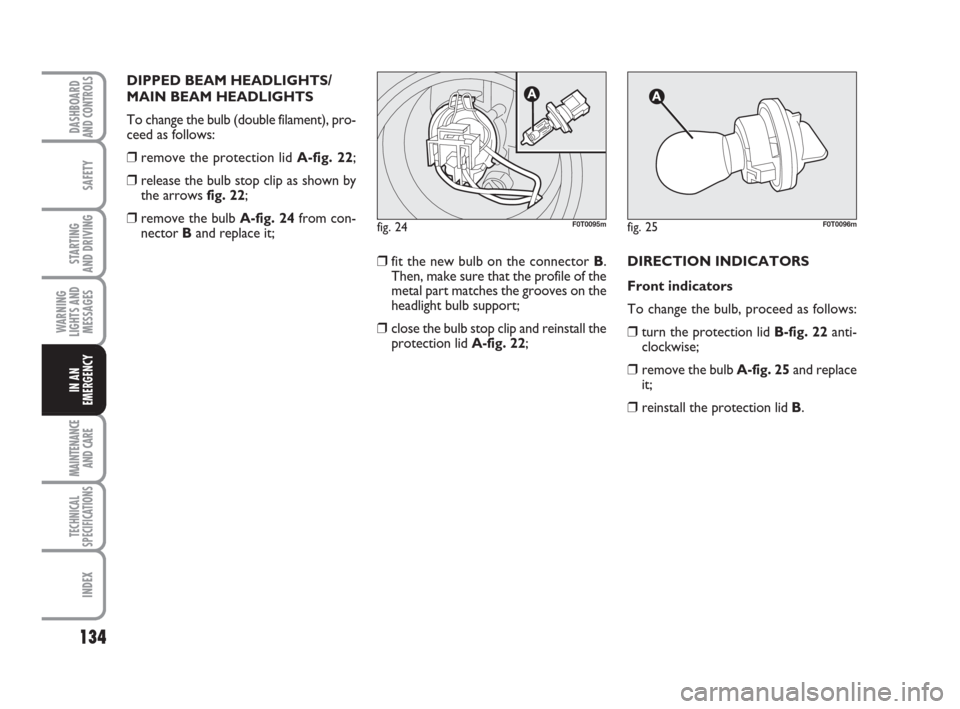
❒remove the protection lid A-fig. 22;
❒release the bulb stop clip as shown by
the arrows fig. 22;
❒remove the bulb A-fig. 24from con-
nector Band replace it;
❒fit the new bulb on the connector B.
Then, make sure that the profile of the
metal part matches the grooves on the
headlight bulb support;
❒close the bulb stop clip and reinstall the
protection lid A-fig. 22;DIRECTION INDICATORS
Front indicators
To change the bulb, proceed as follows:
❒turn the protection lid B-fig. 22anti-
clockwise;
❒remove the bulb A-fig. 25and replace
it;
❒reinstall the protection lid B.
fig. 24F0T0095mfig. 25F0T0096m
119-150 Fiorino GB 1ed 21-10-2008 15:05 Pagina 134
Page 136 of 202
135
SAFETY
MAINTENANCE
AND CARE
TECHNICAL
SPECIFICATIONS
INDEX
DASHBOARDAND CONTROLS
STARTING
AND DRIVING
WARNING
LIGHTS AND
MESSAGES
IN AN
EMERGENCY
Side indicators
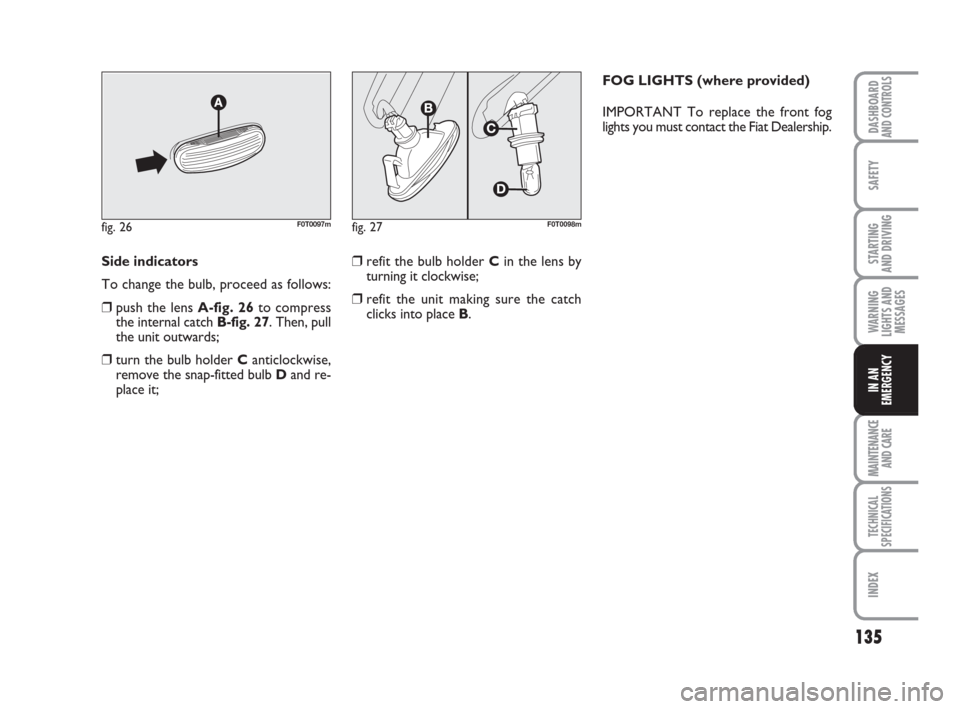
To change the bulb, proceed as follows:
❒push the lens A-fig. 26to compress
the internal catch B-fig. 27. Then, pull
the unit outwards;
❒turn the bulb holder C anticlockwise,
remove the snap-fitted bulb Dand re-
place it;
fig. 26F0T0097mfig. 27F0T0098m
❒refit the bulb holder Cin the lens by
turning it clockwise;
❒refit the unit making sure the catch
clicks into place B.FOG LIGHTS (where provided)
IMPORTANT To replace the front fog
lights you must contact the Fiat Dealership.
119-150 Fiorino GB 1ed 21-10-2008 15:05 Pagina 135
Page 137 of 202
136
SAFETY
MAINTENANCE
AND CARE
TECHNICAL
SPECIFICATIONS
INDEX
DASHBOARDAND CONTROLS
STARTING
AND DRIVING
WARNING
LIGHTS AND
MESSAGES
IN AN
EMERGENCY
REAR LIGHT CLUSTERS
Rear light clusters contain the bulbs of the
taillights, direction indicators, reverse/rear
fog lights and stop light.
Access to the light clusters is gained as fol-
lows:
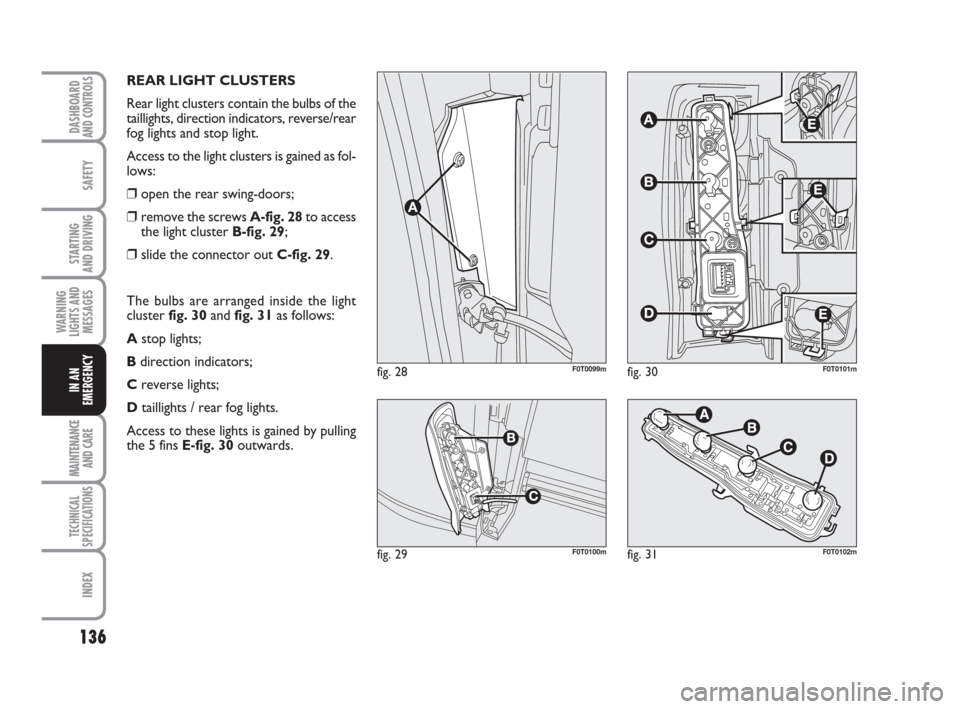
❒open the rear swing-doors;
❒remove the screws A-fig. 28to access
the light cluster B-fig. 29;
❒slide the connector out C-fig. 29.
The bulbs are arranged inside the light
cluster fig. 30and fig. 31as follows:
Astop lights;
Bdirection indicators;
Creverse lights;
Dtaillights / rear fog lights.
Access to these lights is gained by pulling
the 5 fins E-fig. 30outwards.
fig. 28F0T0099m
fig. 29F0T0100mfig. 31F0T0102m
fig. 30F0T0101m
119-150 Fiorino GB 1ed 21-10-2008 15:05 Pagina 136
Page 138 of 202
137
SAFETY
MAINTENANCE
AND CARE
TECHNICAL
SPECIFICATIONS
INDEX
DASHBOARDAND CONTROLS
STARTING
AND DRIVING
WARNING
LIGHTS AND
MESSAGES
IN AN
EMERGENCY
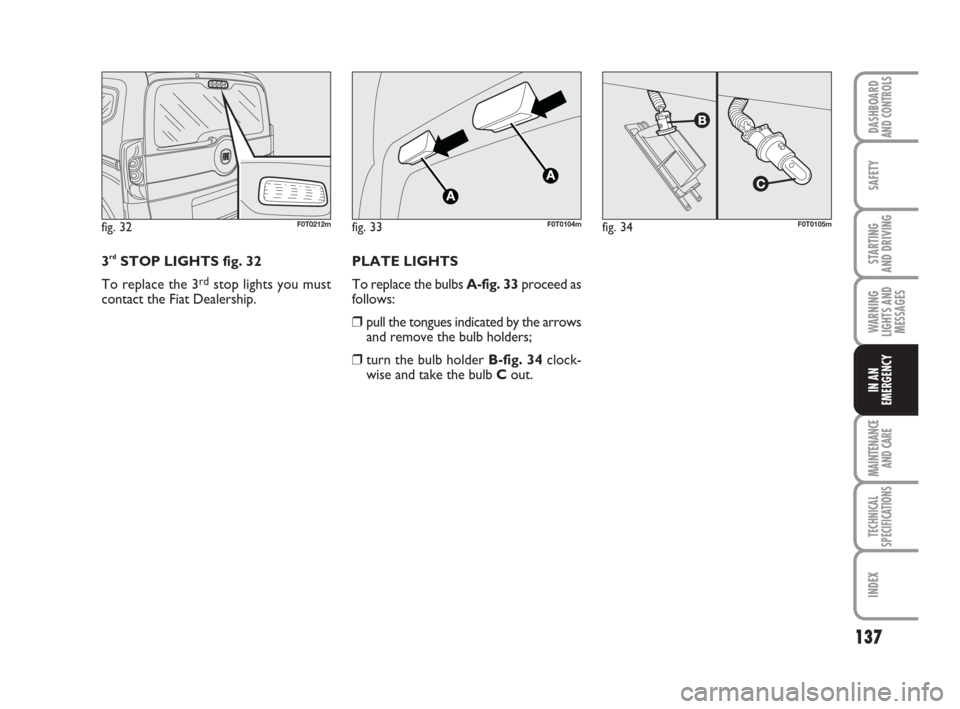
3rdSTOP LIGHTS fig. 32
To replace the 3
rdstop lights you must
contact the Fiat Dealership.
fig. 32F0T0212mfig. 33F0T0104mfig. 34F0T0105m
PLATE LIGHTS
To replace the bulbs A-fig. 33proceed as
follows:
❒pull the tongues indicated by the arrows
and remove the bulb holders;
❒turn the bulb holder B-fig. 34clock-
wise and take the bulb Cout.
119-150 Fiorino GB 1ed 21-10-2008 15:05 Pagina 137
Page 139 of 202
138
SAFETY
MAINTENANCE
AND CARE
TECHNICAL
SPECIFICATIONS
INDEX
DASHBOARDAND CONTROLS
STARTING
AND DRIVING
WARNING
LIGHTS AND
MESSAGES
IN AN
EMERGENCY
IF THE INTERIOR
LIGHT BURNS OUT
For the type of bulb and power rating, see
“When needing to change a bulb”.
FRONT CEILING LIGHT
Front ceiling light with
movable lens
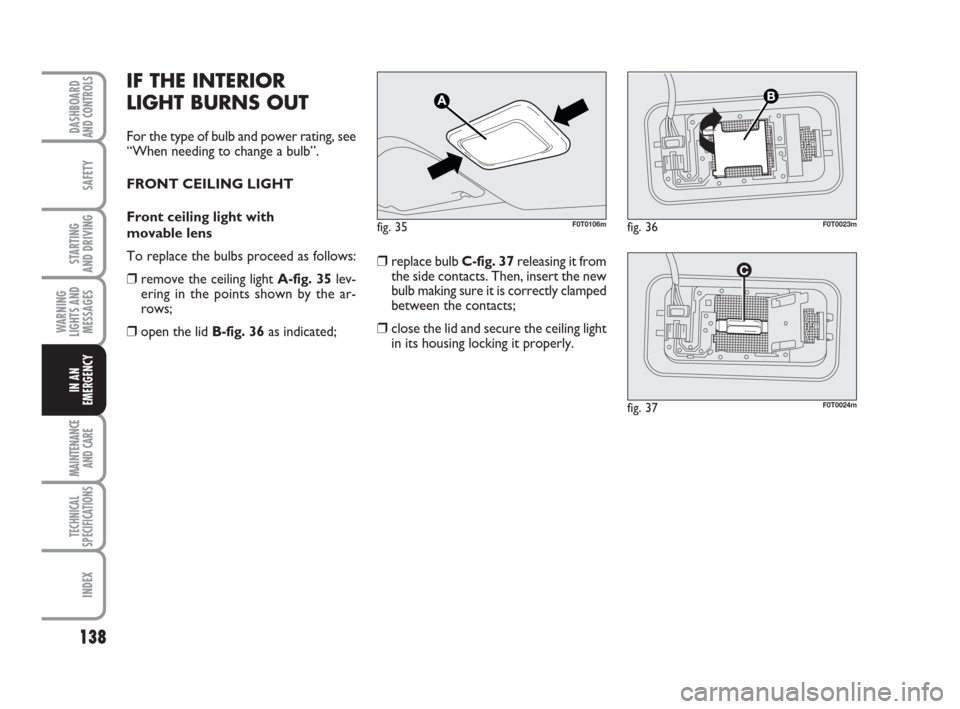
To replace the bulbs proceed as follows:
❒remove the ceiling light A-fig. 35lev-
ering in the points shown by the ar-
rows;
❒open the lid B-fig. 36as indicated;❒replace bulb C-fig. 37releasing it from
the side contacts. Then, insert the new
bulb making sure it is correctly clamped
between the contacts;
❒close the lid and secure the ceiling light
in its housing locking it properly.
fig. 35F0T0106mfig. 36F0T0023m
fig. 37F0T0024m
119-150 Fiorino GB 1ed 21-10-2008 15:05 Pagina 138
Page 140 of 202
139
SAFETY
MAINTENANCE
AND CARE
TECHNICAL
SPECIFICATIONS
INDEX
DASHBOARDAND CONTROLS
STARTING
AND DRIVING
WARNING
LIGHTS AND
MESSAGES
IN AN
EMERGENCY
Ceiling light with spot lights
(where provided)
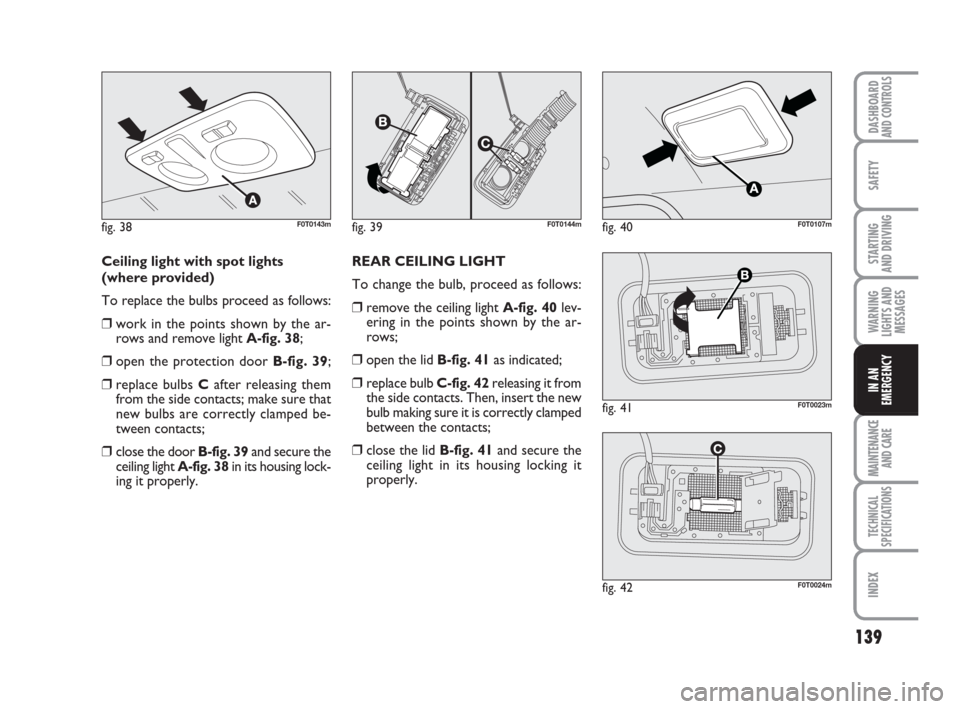
To replace the bulbs proceed as follows:
❒work in the points shown by the ar-
rows and remove light A-fig. 38;
❒open the protection door B-fig. 39;
❒replace bulbs Cafter releasing them
from the side contacts; make sure that
new bulbs are correctly clamped be-
tween contacts;
❒close the door B-fig. 39and secure the
ceiling light A-fig. 38in its housing lock-
ing it properly.REAR CEILING LIGHT
To change the bulb, proceed as follows:
❒remove the ceiling light A-fig. 40lev-
ering in the points shown by the ar-
rows;
❒open the lid B-fig. 41as indicated;
❒replace bulb C-fig. 42releasing it from
the side contacts. Then, insert the new
bulb making sure it is correctly clamped
between the contacts;
❒close the lid B-fig. 41and secure the
ceiling light in its housing locking it
properly.
fig. 38F0T0143mfig. 39F0T0144mfig. 40F0T0107m
fig. 41F0T0023m
fig. 42F0T0024m
119-150 Fiorino GB 1ed 21-10-2008 15:05 Pagina 139
Page 141 of 202
140
SAFETY
MAINTENANCE
AND CARE
TECHNICAL
SPECIFICATIONS
INDEX
DASHBOARDAND CONTROLS
STARTING
AND DRIVING
WARNING
LIGHTS AND
MESSAGES
IN AN
EMERGENCY
PORTABLE LIGHT
(where provided)
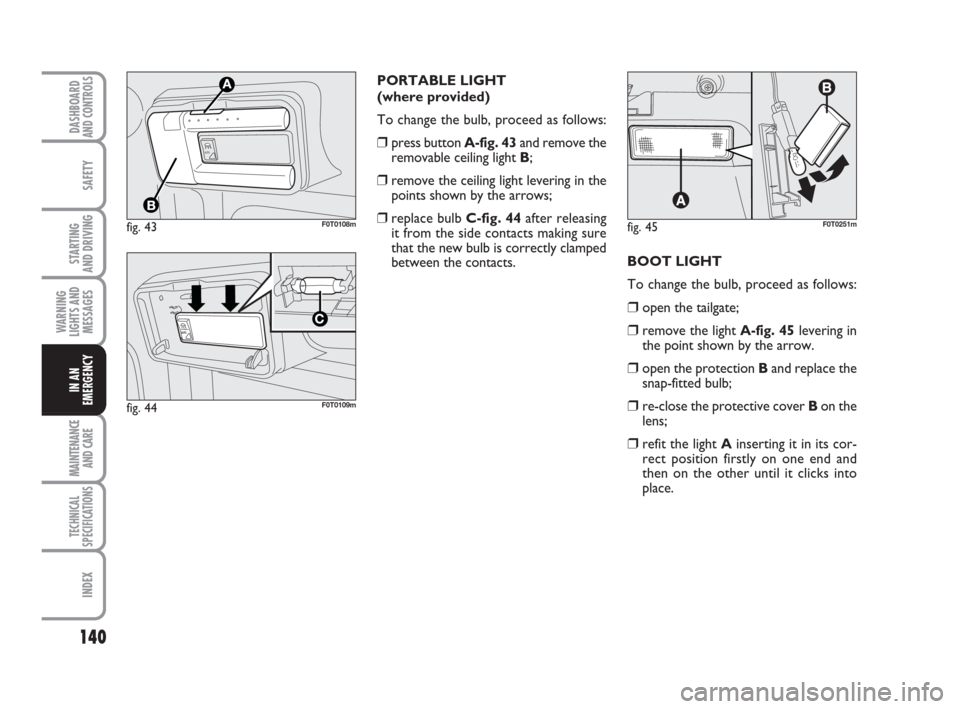
To change the bulb, proceed as follows:
❒press button A-fig. 43and remove the
removable ceiling light B;
❒remove the ceiling light levering in the
points shown by the arrows;
❒replace bulb C-fig. 44after releasing
it from the side contacts making sure
that the new bulb is correctly clamped
between the contacts.
fig. 43
AU
TO
F0T0108m
fig. 44
A
UTO
F0T0109m
BOOT LIGHT
To change the bulb, proceed as follows:
❒ open the tailgate;
❒remove the light A-fig. 45levering in
the point shown by the arrow.
❒open the protection Band replace the
snap-fitted bulb;
❒re-close the protective cover Bon the
lens;
❒refit the light Ainserting it in its cor-
rect position firstly on one end and
then on the other until it clicks into
place.
fig. 45F0T0251m
119-150 Fiorino GB 1ed 21-10-2008 15:05 Pagina 140
Page 142 of 202
141
SAFETY
MAINTENANCE
AND CARE
TECHNICAL
SPECIFICATIONS
INDEX
DASHBOARDAND CONTROLS
STARTING
AND DRIVING
WARNING
LIGHTS AND
MESSAGES
IN AN
EMERGENCY
IF A FUSE BLOWS
GENERAL
Fuses are protective devices for the elec-
tric system: they come into action (i.e. cut
off) mainly due to a fault or improper ac-
tion on the system.
When a specific device does not work cor-
rectly, check the efficiency of the corre-
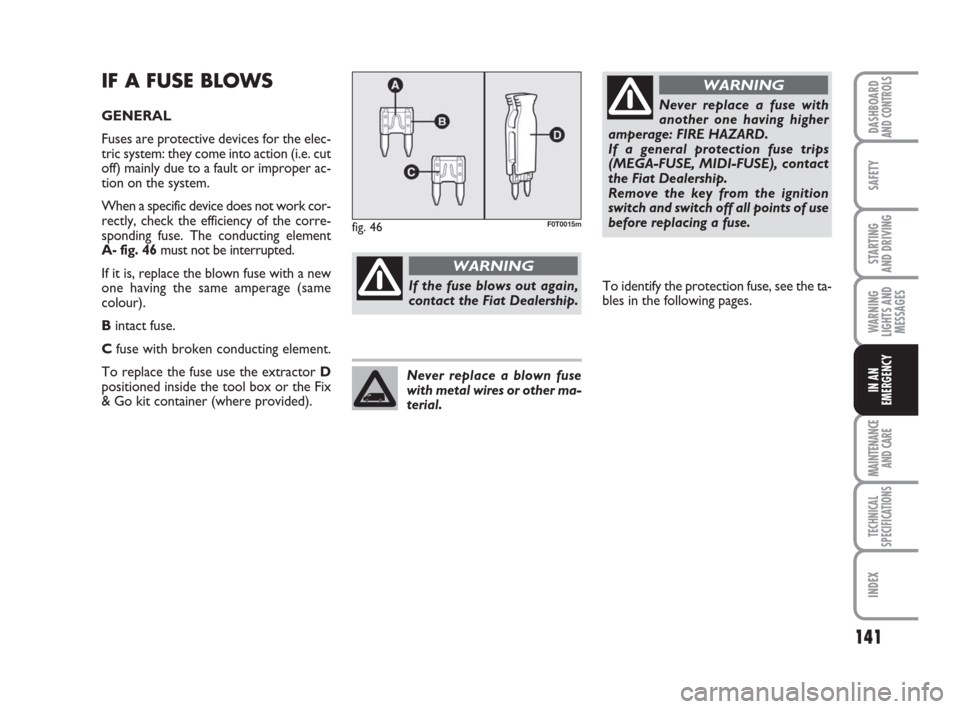
sponding fuse. The conducting element
A- fig. 46must not be interrupted.
If it is, replace the blown fuse with a new
one having the same amperage (same
colour).
Bintact fuse.
Cfuse with broken conducting element.
To replace the fuse use the extractor D
positioned inside the tool box or the Fix
& Go kit container (where provided).
If the fuse blows out again,
contact the Fiat Dealership.
WARNING
Never replace a fuse with
another one having higher
amperage: FIRE HAZARD.
If a general protection fuse trips
(MEGA-FUSE, MIDI-FUSE), contact
the Fiat Dealership.
Remove the key from the ignition
switch and switch off all points of use
before replacing a fuse.
WARNING
Never replace a blown fuse
with metal wires or other ma-
terial.
fig. 46F0T0015m
To identify the protection fuse, see the ta-
bles in the following pages.
119-150 Fiorino GB 1ed 21-10-2008 15:05 Pagina 141
Page 143 of 202
142
SAFETY
MAINTENANCE
AND CARE
TECHNICAL
SPECIFICATIONS
INDEX
DASHBOARDAND CONTROLS
STARTING
AND DRIVING
WARNING
LIGHTS AND
MESSAGES
IN AN
EMERGENCY
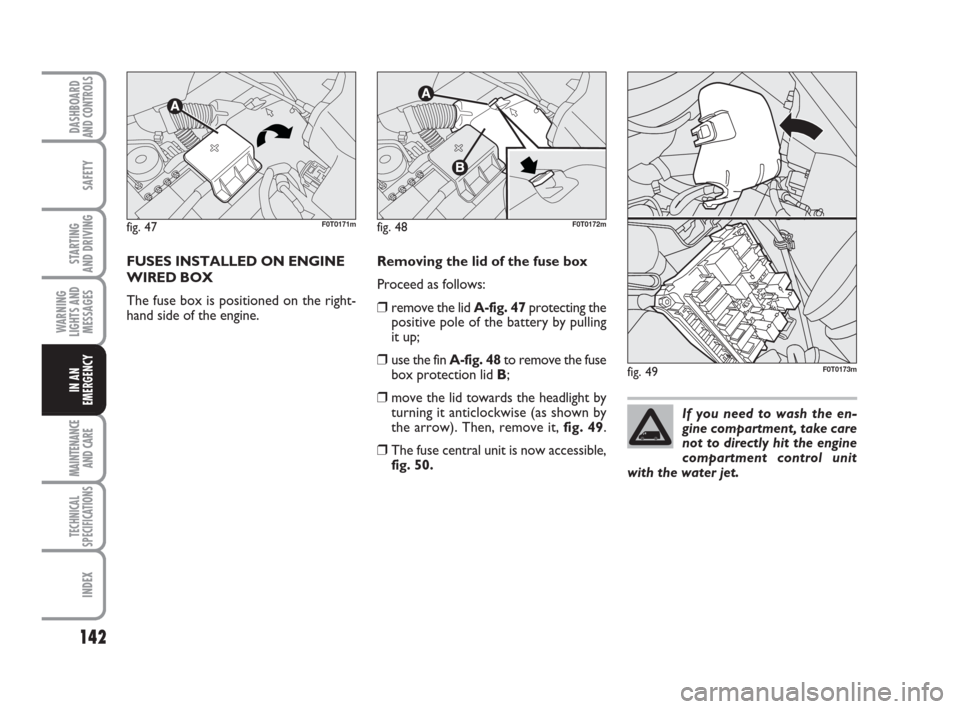
FUSES INSTALLED ON ENGINE
WIRED BOX
The fuse box is positioned on the right-
hand side of the engine.Removing the lid of the fuse box
Proceed as follows:
❒remove the lid A-fig. 47protecting the
positive pole of the battery by pulling
it up;
❒use the fin A-fig. 48to remove the fuse
box protection lid B;
❒move the lid towards the headlight by
turning it anticlockwise (as shown by
the arrow). Then, remove it, fig. 49.
❒The fuse central unit is now accessible,
fig. 50.
fig. 47F0T0171mfig. 48F0T0172m
fig. 49F0T0173m
If you need to wash the en-
gine compartment, take care
not to directly hit the engine
compartment control unit
with the water jet.
119-150 Fiorino GB 1ed 21-10-2008 15:05 Pagina 142
Page 144 of 202
143
SAFETY
MAINTENANCE
AND CARE
TECHNICAL
SPECIFICATIONS
INDEX
DASHBOARDAND CONTROLS
STARTING
AND DRIVING
WARNING
LIGHTS AND
MESSAGES
IN AN
EMERGENCY
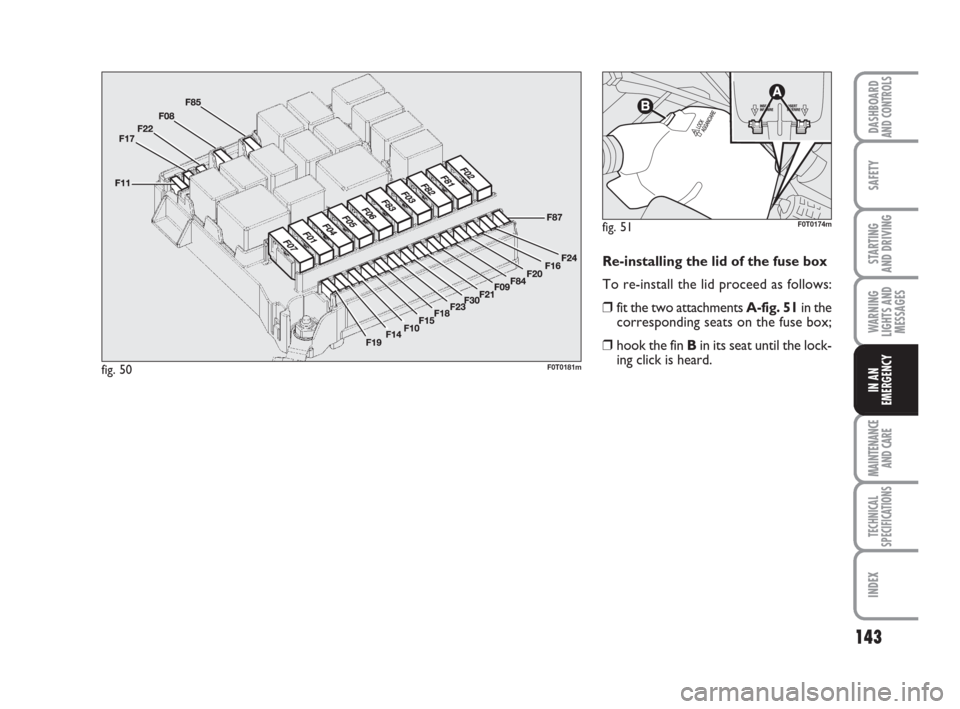
Re-installing the lid of the fuse box
To re-install the lid proceed as follows:
❒fit the two attachments A-fig. 51in the
corresponding seats on the fuse box;
❒hook the fin Bin its seat until the lock-
ing click is heard.
fig. 50F0T0181m
fig. 51F0T0174m
119-150 Fiorino GB 1ed 21-10-2008 15:05 Pagina 143