ESP FIAT QUBO 2010 1.G User Guide
[x] Cancel search | Manufacturer: FIAT, Model Year: 2010, Model line: QUBO, Model: FIAT QUBO 2010 1.GPages: 230, PDF Size: 4.38 MB
Page 95 of 230
WARNING
The pretensioner can be used only once.
G
o to a Fiat Dealership to have it
replaced after it has been deployed. Consult the
card in the glove box to check the status of
the pretensioners. Go to a Fiat Dealership to
have the device replaced when the expiration
date approaches.
Operations which lead to knocks,
vibrations or localised heating (over 100°C
for a maximum of 6 hours) in the area
around the pretensioners may cause damage or
trigger them.These devices are not affected by
vibrations caused by irregularities of the road
surface or low obstacles such as kerbs, etc .
Contact a Fiat Dealership for any assistance.
LOAD LIMITERS
(for versions/markets, where provided)
To increase passenger safety, the front and rear (for
versions/markets where provided) seat belt reels
contain a load limiter which controls the force acting
on the chest and shoulders during the belt
restraining action in the event of a head-on collision.GENERAL INSTRUCTIONS FOR USING
THE SEAT BELTS
The driver is responsible for respecting (and ensuring
that all the other passengers also respect) the local
laws in force regarding the use of seat belts. Always
fasten the seat belts before setting off.
Seat belts must also be worn by expectant mothers:
the risk of injury in the event of an accident is greatly
reduced for them and the unborn child if they are
wearing a seat belt. Pregnant women must position
the lower part of the belt very low down so that
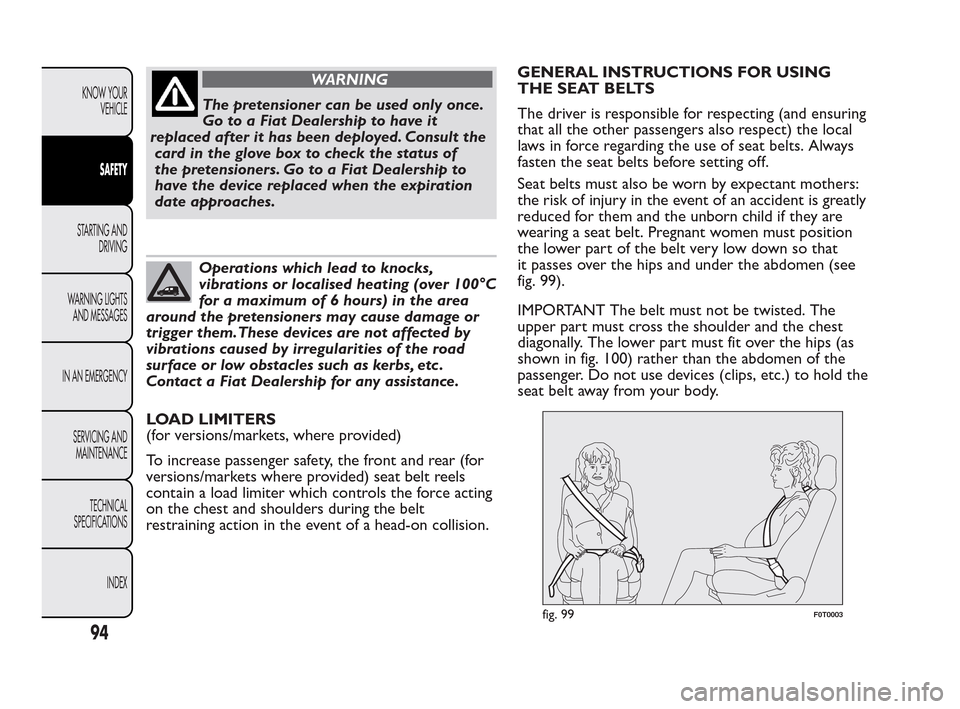
it passes over the hips and under the abdomen (see
fig. 99).
IMPORTANT The belt must not be twisted. The
upper part must cross the shoulder and the chest
diagonally. The lower part must fit over the hips (as
shown in fig. 100) rather than the abdomen of the
passenger. Do not use devices (clips, etc.) to hold the
seat belt away from your body.
fig. 99F0T0003
94
KNOW YOUR
VEHICLE
SAFETY
STARTING AND
DRIVING
W
ARNING LIGHTS
AND MESSAGES
IN AN EMERGENCY
SERVICING AND
MAINTENANCE
TECHNICAL
SPECIFICATIONS
INDEX
Page 100 of 230
GROUP 2
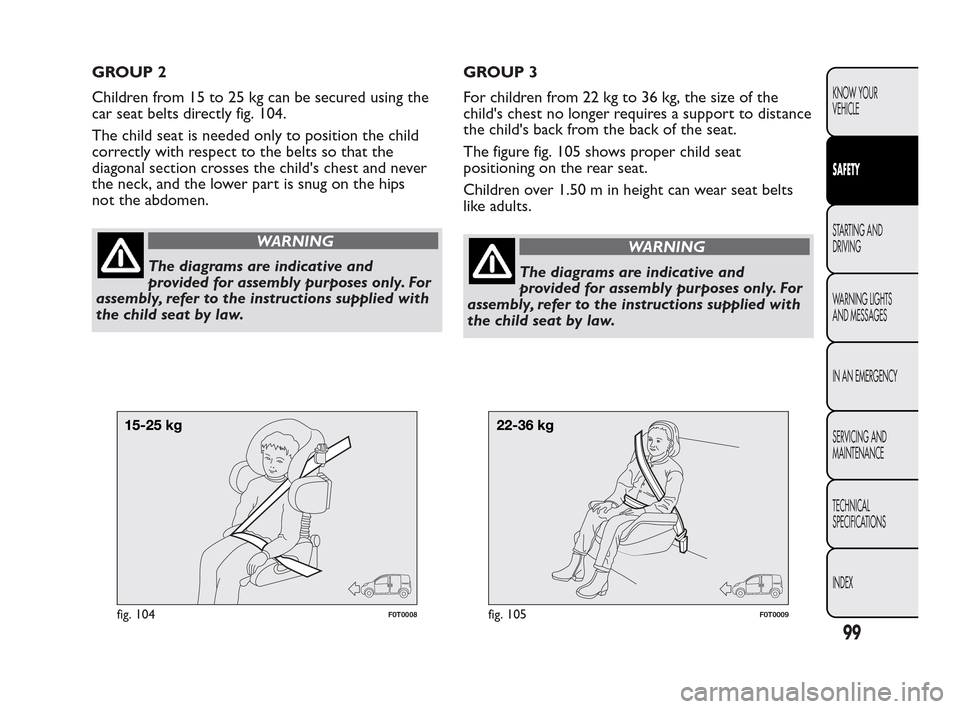
Children from 15 to 25 kg can be secured using the
car seat belts directly fig. 104.
The child seat is needed only to position the child
correctly with respect to the belts so that the
diagonal section crosses the child's chest and never
the neck, and the lower part is snug on the hips
not the abdomen.
WARNING
The diagrams are indicative and
pro
vided for assembly purposes only. For
assembly, refer to the instructions supplied with
the child seat by law.GROUP 3
For children from 22 kg to 36 kg, the size of the
child's chest no longer requires a support to distance
the child's back from the back of the seat.
The figure fig. 105 shows proper child seat
positioning on the rear seat.
Children over 1.50 m in height can wear seat belts
like adults.
WARNING
The diagrams are indicative and
pro
vided for assembly purposes only. For
assembly, refer to the instructions supplied with
the child seat by law.
fig. 104F0T0008fig. 105F0T0009
99
KNOW YOUR
VEHICLE
SAFETY
STARTING AND
DRIVING
W
ARNING LIGHTS
AND MESSAGES
IN AN EMERGENCY
SERVICING AND
MAINTENANCE
TECHNICAL
SPECIFICATIONS
INDEX
Page 105 of 230
PASSENGER SEAT COMPLIANCE WITH REGULATIONS ON UNIVERSAL ISOFIX CHILD
SEAT USE
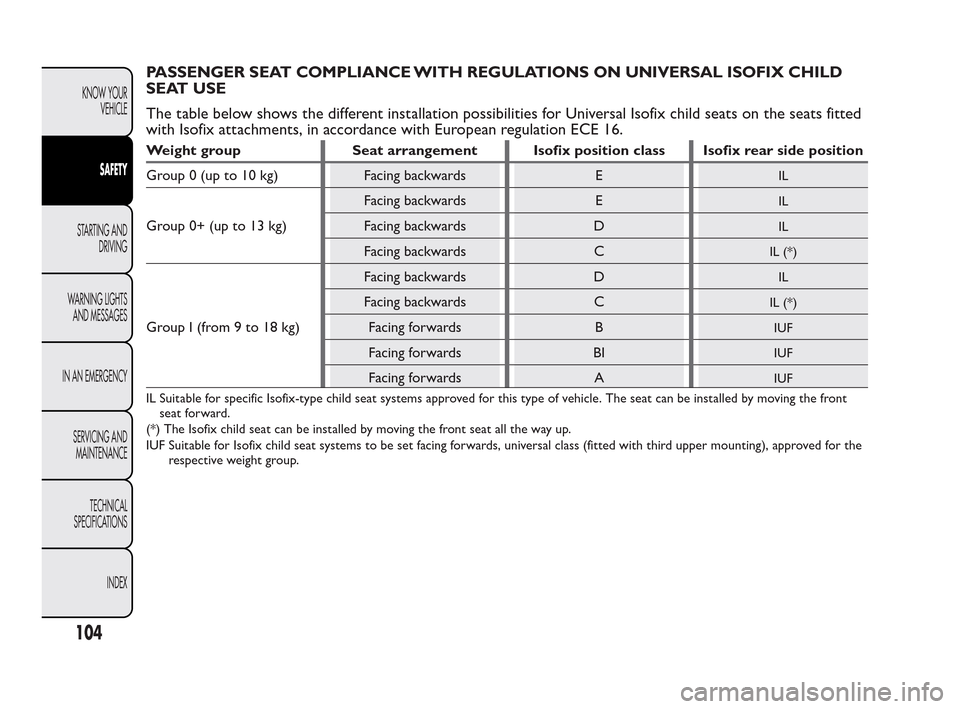
The table below shows the different installation possibilities for Universal Isofix child seats on the seats fitted
with Isofix attachments, in accordance with European regulation ECE 16.
Weight group Seat arrangement Isofix position class Isofix rear side position
Group 0 (up to 10 kg) Facing backwards E
IL
Group 0+ (up to 13 kg)Facing backwards E
IL
Facing backwards DIL
Facing backwards CIL (*)
GroupI(from9to18kg)Facing backwards D
IL
Facing backwards CIL (*)
Facing forwards BIUF
Facing forwards BIIUF
Facing forwards AIUF
IL Suitable for specific Isofix-type child seat systems approved for this type of vehicle. The seat can be installed by moving the front
seat forward.
(*) The Isofix child seat can be installed by moving the front seat all the way up.
IUF Suitable for Isofix child seat systems to be set facing forwards, universal class (fitted with third upper mounting), approved for the
respective weight group.
104
KNOW YOUR
VEHICLE
SAFETY
STARTING AND
DRIVING
W
ARNING LIGHTS
AND MESSAGES
IN AN EMERGENCY
SERVICING AND
MAINTENANCE
TECHNICAL
SPECIFICATIONS
INDEX
Page 113 of 230
IMPORTANT With the engine cold, the accelerator
pedal must be fully released when you turn the
ignition key to AVV.
If the engine does not start at the first attempt,
return the ignition key to STOP before repeating the
procedure.
If the
warning light stays on when the ignition key
is at MAR, turn the key to STOP and then back to
MAR; if the warning light remains on, try with the
other keys provided with the car.
Contact a Fiat Dealership if the engine still does not
start.
Warning lightwill blink for 60
seconds after starting or during prolonged
cranking to indicate a fault to the glow
plug heating system. Use the vehicle normally if
the engine starts, but go to a Fiat Dealership
as soon as possible.
HOW TO WARM UP THE ENGINE AFTER IT
HAS JUST STARTED
Proceed as follows:
❒drive off slowly, letting the engine turn at medium
revs. Do not accelerate abruptly;
❒do not demand to performance for the first few
kilometres. Wait until the engine coolant gauge
starts moving.EMERGENCY STARTING
Go to a Fiat Dealership immediately if warning light
comes on steady on the instrument panel.
Never jump start the engine by pushing,
towing or driving downhill.This could
cause fuel to flow into the catalytic
converter and damage it beyond repair.
STOPPING THE ENGINE
Turn the ignition key to STOP while the engine is
idling.
IMPORTANT After a long drive, you should allow
the engine to “catch its breath” before turning it off
by letting it idle to allow the temperature in the
engine compartment to fall.
A quick burst on the accelerator before
turning off the engine serves absolutely no
practical purpose; it wastes fuel and is
especially damaging to turbocharged engines.
112
KNOW YOUR
VEHICLE
SAFETY
STARTING AND
DRIVING
WARNING LIGHTS
AND
MESSAGES
IN AN EMERGENCY
SERVICING AND
MAINTENANCE
TECHNICAL
SPECIFICATIONS
INDEX
Page 115 of 230
SNOW TYRES
A Fiat Dealership will be happy to provide advice
concerning the most suitable type of tyre for your
requirements.
For the type, pressures and specifications of the
snow tyre to be used, follow carefully the
instructions given in the “Wheels” paragraph of the
“Technical specifications” section.
The winter performance of these tyres is
considerably reduced when the tread thickness is less
than 4 mm. If this is the case, replace them.
Due to their specific features, the performance of
snow tyres is much lower than that of standard tyres
in normal conditions or on long motorway stretches.
You should therefore use them only in the
conditions for which they were designed.
IMPORTANT When using snow tyres with a
maximum speed index below the one that can be
reached by the vehicle (increased by 5%), place
a notice in the passenger compartment, plainly in
view, which states the maximum speed allowed
by the snow tyres (as per EC Directive).
All four tyres should be the same (brand and profile)
to ensure greater safety when driving and braking
as well as making the car more responsive.
Remember that you should not change the rotation
direction of the tyres.
WARNING
You must not exceed 160 km/h on snow
t
yres with a “Q” mark; in any case, make
sure you stick to the rules of the highway code.
114
KNOW YOUR
VEHICLE
SAFETY
STARTING AND
DRIVING
WARNING LIGHTS
AND
MESSAGES
IN AN EMERGENCY
SERVICING AND
MAINTENANCE
TECHNICAL
SPECIFICATIONS
INDEX
Page 117 of 230
SAVING FUEL
Here are some useful tips to save fuel and minimise
harmful emissions of CO2 and other pollutants
(nitric oxides, unburnt hydrocarbons, fine dusts etc.).
GENERAL CONSIDERATIONS
General conditions which influence fuel consumption
are shown below.
Vehicle maintenance
Have checks and adjustments carried out in
accordance with the “Scheduled Servicing Plan”.
Ty r e s
Check the tyre pressure at least once every four
weeks: if the pressure is too low, consumption levels
increase as resistance to rolling is higher.
Unnecessary loads
Do not travel with an overloaded boot. The weight
of the vehicle (especially when driving in town)
and its trim greatly affect fuel consumption
and stability.
Roof rack/ski rack
Remove the roof rack or the ski rack from the roof
after use. These accessories reduce the aerodynamic
coefficient of the vehicle and have a negative effect
on fuel consumption. It is better to use a trailer
to transport particularly bulky objects.Electric devices
Use electrical devices only for the amount of time
needed. The heated rear window, auxiliary
headlights, windscreen wipers and fan heater use up
a considerable amount of current, causing increased
fuel consumption (up to +25% in the urban cycle).
Climate control system
The air conditioner leads to higher fuel consumption
(on average up to +20%). If the temperature outside
is not too extreme, try and use the air vents.
Spoilers
The use of non-certified spoilers may adversely affect
aerodynamics and fuel consumption.
DRIVING STYLE
The main driving styles affecting fuel consumption
are shown below.
Starting
Do not warm up the engine at low or high revs when
the vehicle is stationary; this causes the engine to
warm up more slowly, thereby increasing fuel
consumption and emissions. It is advisable to set off
immediately and slowly, avoiding high revs: this allows
the engine to warm up more quickly.
116
KNOW YOUR
VEHICLE
SAFETY
STARTING AND
DRIVING
WARNING LIGHTS
AND
MESSAGES
IN AN EMERGENCY
SERVICING AND
MAINTENANCE
TECHNICAL
SPECIFICATIONS
INDEX
Page 119 of 230
TOWING TRAILERS
IMPORTANT
The vehicle must be provided with a type-approved
tow hitch and adequate electrical system to tow
trailers. Installation must be performed by specialised
personnel who will issue the required papers for
travelling on roads.
Install any specific and/or additional rear-view mirrors
in accordance with the highway code of the country
in which you are travelling.
Remember that when towing a trailer, steep hills are
harder to climb, braking distances increase and
overtaking takes longer depending on the overall
weight of the trailer.
Engage a low gear when driving downhill, rather than
constantly using the brake.
The weight of the trailer on the vehicle tow hitch
will reduce the loading capacity of the vehicle by the
same amount.
Consider the weight at full load, including accessories
and luggage, to make sure you do not exceed the
maximum towable weight (shown in the log book).
Respect each country's speed limits for vehicles
towing trailers. In all cases, the top speed must not
exceed 80 km/h.
WARNING
The ABS with which the vehicle may be
equipped
will not control the braking
system of the trailer. Particular caution is
therefore required on slippery roads.
WARNING
Never modify the braking system of the
v
ehicle to control the trailer brake.
The trailer braking system must be fully
independent from the hydraulic system of the
vehicle.
118
KNOW YOUR
VEHICLE
SAFETY
STARTING AND
DRIVING
WARNING LIGHTS
AND
MESSAGES
IN AN EMERGENCY
SERVICING AND
MAINTENANCE
TECHNICAL
SPECIFICATIONS
INDEX
Page 124 of 230
ABS SYSTEM FAULT (amber)
When the ignition key is turned to MAR, the warning
light turns on but should go off after a few seconds.
The warning light comes on when the system is
either not working properly or not available. In this
case the braking system maintains its own unaltered
efficiency but without the advantage of the ABS
system. Drive carefully and go to a Fiat Dealership as
soon as possible.
A specific message is displayed on certain versions.
EBD FAULT (red/amber)
Simultaneous lighting of warning lights
and
with the engine running indicates an EBD system
fault or that the system is not available. In this case,
the rear wheels may suddenly lock and the vehicle
may swerve when braking sharply. Drive very
carefully to a Fiat Dealership to have the system
inspected immediately.
A specific message is displayed on certain versions.
ESP/TRACTION PLUS SYSTEM
FAULT (amber)
When the ignition key is turned to MAR, the warning
light turns on but should go off after a few seconds.
If the warning light does not go off, or stays on
together with the LED on the ASR OFF button when
travelling, contact a Fiat Dealership.
A specific message is displayed on certain versions.
NoteFlashing of the warning light while driving
indicates the action of the ESP system.
LOW ENGINE OIL PRESSURE (red)
When the ignition key is turned to MAR, the warning
light switches on, but it should go out as soon as
the engine is started.
The warning light turns on and stays on constantly
(in versions/markets, where provided) along with the
message on the display when the system detects
that engine oil pressure is low.
123
KNOW YOUR
VEHICLE
SAFETY
STARTING AND
DRIVING
WARNING LIGHTS
AND
MESSAGES
IN AN EMERGENCY
SERVICING
AND
MAINTENANCE
TECHNICAL
SPECIFICATIONS
INDEX
Page 144 of 230
CHANGING A BULB
GENERAL INSTRUCTIONS
❒Before changing a bulb check the contacts for
oxidation;
❒burnt bulbs must be replaced by others of the
same type and power;
❒always check the height of the headlight beam after
changing a bulb, for reasons of safety;
❒when a light is not working, check that the
corresponding fuse is intact before changing the
bulb. For the location of fuses, refer to the
“Changing a fuse” paragraph in this section;
WARNING
Modifications or repairs to the electrical
sys
tem that are not carried out
properly or do not take the system's technical
specifications into account can cause
malfunctions leading to the risk of fire.
WARNING
Halogen bulbs contain pressurised gas
w
hich may cause small fragments of
glass to be projected outwards if the bulb is
broken.
Halogen bulbs must be handled holding
the metallic part only.Touching the
transparent part of the bulb with your
fingers may reduce the intensity of the emitted
light and even reduce the lifespan of the bulb.
If you do touch it accidentally, rub the bulb with
an alcohol-soaked cloth and leave to dry.
If possible, we recommend have bulbs
replaced by a Fiat Dealership. Proper
operation and orientation of the external
lights are essential for the safety of the running
vehicle, and to avoid incurring legal sanctions.
IMPORTANT The internal surface of the light may
appear slightly misty: this does not indicate a fault,
and is actually caused by low temperature and the
degree of humidity in the air. Misting will rapidly
disappear when the headlights are switched on. The
presence of drops inside the headlights indicates
infiltration of water. Go to a Fiat Dealership.
143
KNOW YOUR
VEHICLE
SAFETY
STARTING AND
DRIVING
WARNING LIGHTS
AND MESSAGES
IN AN
EMERGENCY
SERVICING AND
MAINTENANCE
TECHNICAL
SPECIFICA
TIONS
INDEX
Page 147 of 230
CHANGING AN EXTERIOR BULB
For the type of bulb and corresponding power rating,
see the paragraph "Changing a bulb".
FRONT LIGHT CLUSTERS
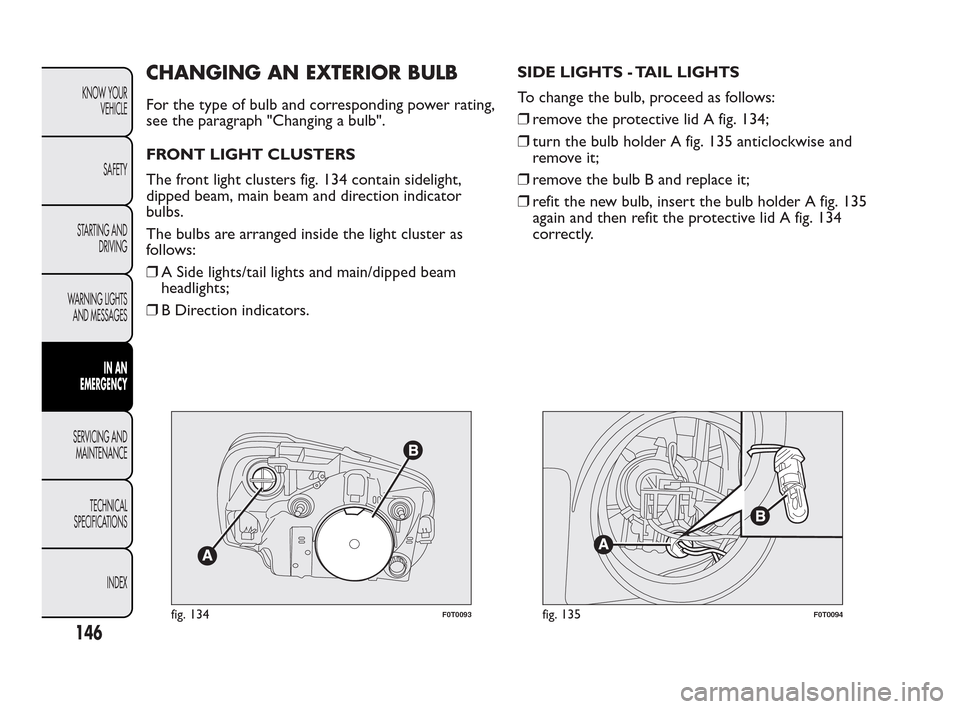
The front light clusters fig. 134 contain sidelight,
dipped beam, main beam and direction indicator
bulbs.
The bulbs are arranged inside the light cluster as
follows:
❒A Side lights/tail lights and main/dipped beam
headlights;
❒B Direction indicators.SIDE LIGHTS - TAIL LIGHTS
To change the bulb, proceed as follows:
❒remove the protective lid A fig. 134;
❒turn the bulb holder A fig. 135 anticlockwise and
remove it;
❒remove the bulb B and replace it;
❒refit the new bulb, insert the bulb holder A fig. 135
again and then refit the protective lid A fig. 134
correctly.
fig. 134F0T0093fig. 135F0T0094
146
KNOW YOUR
VEHICLE
SAFETY
STARTING AND
DRIVING
WARNING LIGHTS
AND MESSAGES
IN AN
EMERGENCY
SERVICING AND
MAINTENANCE
TECHNICAL
SPECIFICA
TIONS
INDEX