boot FIAT QUBO 2015 1.G User Guide
[x] Cancel search | Manufacturer: FIAT, Model Year: 2015, Model line: QUBO, Model: FIAT QUBO 2015 1.GPages: 231, PDF Size: 5.01 MB
Page 141 of 231
FIX & GO AUTOMATIC QUICK TYRE
REPAIR KITThe Fix&Go Automatic quick tyre repair kit is
located in a special container in the boot.
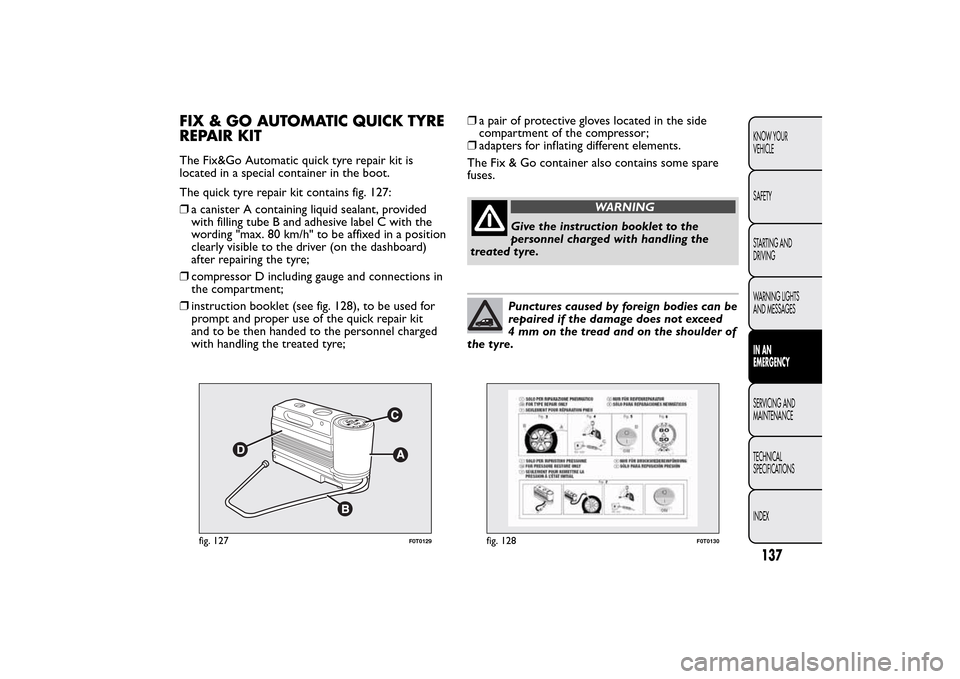
The quick tyre repair kit contains fig. 127:
❒a canister A containing liquid sealant, provided
with filling tube B and adhesive label C with the
wording "max. 80 km/h" to be affixed in a position
clearly visible to the driver (on the dashboard)
after repairing the tyre;
❒compressor D including gauge and connections in
the compartment;
❒instruction booklet (see fig. 128), to be used for
prompt and proper use of the quick repair kit
and to be then handed to the personnel charged
with handling the treated tyre;❒a pair of protective gloves located in the side
compartment of the compressor;
❒adapters for inflating different elements.
The Fix & Go container also contains some spare
fuses.
WARNING
Give the instruction booklet to the
personnel charged with handling the
treated tyre.Punctures caused by foreign bodies can be
repaired if the damage does not exceed
4 mm on the tread and on the shoulder of
the tyre.
fig. 127
F0T0129
fig. 128
F0T0130
137KNOW YOUR
VEHICLE
SAFETY
STARTING AND
DRIVING
WARNING LIGHTS
AND MESSAGESIN AN
EMERGENCYSERVICING AND
MAINTENANCE
TECHNICAL
SPECIFICATIONS
INDEX
Page 149 of 231
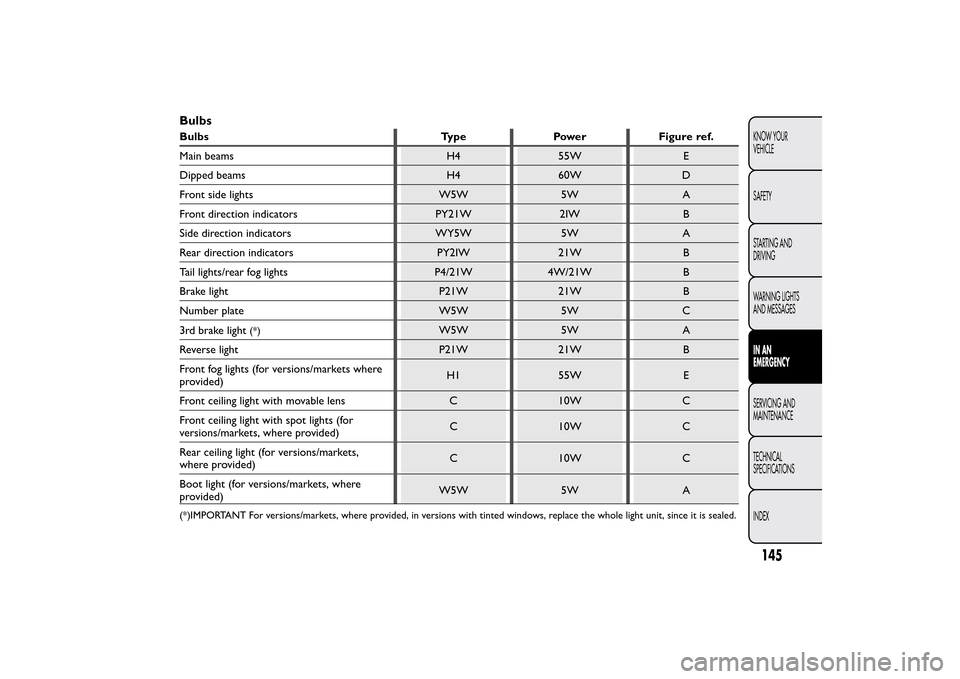
BulbsBulbs Type Power Figure ref.
Main beams H4 55W E
Dipped beams H4 60W D
Front side lights W5W 5W A
Front direction indicators PY21W 2IW B
Side direction indicators WY5W 5W A
Rear direction indicators PY2IW 21W B
Tail lights/rear fog lights P4/21W 4W/21W B
Brake light P21W 21W B
Number plate W5W 5W C
3rd brake light
(*)
W5W 5W A
Reverse light P21W 21W B
Front fog lights (for versions/markets where
provided)H1 55W E
Front ceiling light with movable lens C 10W C
Front ceiling light with spot lights (for
versions/markets, where provided)C 10W C
Rear ceiling light (for versions/markets,
where provided)C 10W C
Boot light (for versions/markets, where
provided)W5W 5W A
(*)IMPORTANT For versions/markets, where provided, in versions with tinted windows, replace the whole light unit, since it is sealed.
145KNOW YOUR
VEHICLE
SAFETY
STARTING AND
DRIVING
WARNING LIGHTS
AND MESSAGESIN AN
EMERGENCYSERVICING AND
MAINTENANCE
TECHNICAL
SPECIFICATIONS
INDEX
Page 159 of 231
BOOT LIGHT
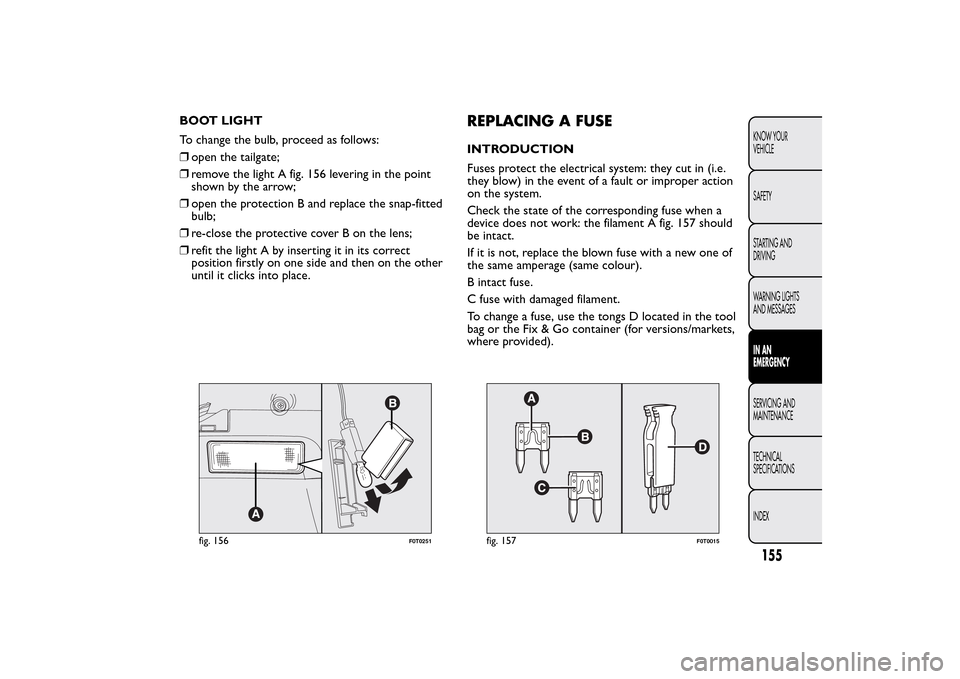
To change the bulb, proceed as follows:
❒open the tailgate;
❒remove the light A fig. 156 levering in the point
shown by the arrow;
❒open the protection B and replace the snap-fitted
bulb;
❒re-close the protective cover B on the lens;
❒refit the light A by inserting it in its correct
position firstly on one side and then on the other
until it clicks into place.
REPLACING A FUSEINTRODUCTION
Fuses protect the electrical system: they cut in (i.e.
they blow) in the event of a fault or improper action
on the system.
Check the state of the corresponding fuse when a
device does not work: the filament A fig. 157 should
be intact.
If it is not, replace the blown fuse with a new one of
the same amperage (same colour).
B intact fuse.
C fuse with damaged filament.
To change a fuse, use the tongs D located in the tool
bag or the Fix & Go container (for versions/markets,
where provided).
fig. 156
F0T0251
fig. 157
F0T0015
155KNOW YOUR
VEHICLE
SAFETY
STARTING AND
DRIVING
WARNING LIGHTS
AND MESSAGESIN AN
EMERGENCYSERVICING AND
MAINTENANCE
TECHNICAL
SPECIFICATIONS
INDEX
Page 166 of 231
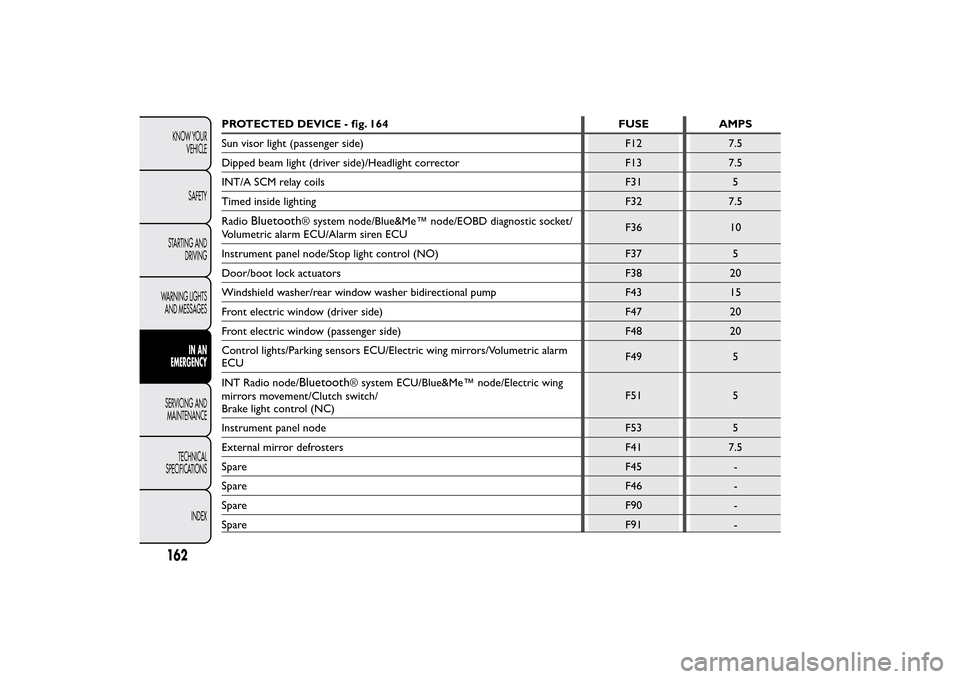
PROTECTED DEVICE - fig. 164 FUSE AMPS
Sun visor light (passenger side) F12 7.5
Dipped beam light (driver side)/Headlight corrector F13 7.5
INT/A SCM relay coils F31 5
Timed inside lighting F32 7.5
Radio
Bluetooth
®system node/Blue&Me™ node/EOBD diagnostic socket/
Volumetric alarm ECU/Alarm siren ECUF36 10
Instrument panel node/Stop light control (NO) F37 5
Door/boot lock actuators F38 20
Windshield washer/rear window washer bidirectional pump F43 15
Front electric window (driver side) F47 20
Front electric window (passenger side) F48 20
Control lights/Parking sensors ECU/Electric wing mirrors/Volumetric alarm
ECUF49 5
INT Radio node/Bluetooth
®system ECU/Blue&Me™ node/Electric wing
mirrors movement/Clutch switch/
Brake light control (NC)F51 5
Instrument panel node F53 5
External mirror defrosters F41 7.5
SpareF45 -
SpareF46 -
SpareF90 -
SpareF91 -
162KNOW YOUR
VEHICLE
SAFETY
STARTING AND
DRIVING
WARNING LIGHTS
AND MESSAGES
IN AN
EMERGENCY
SERVICING AND
MAINTENANCE
TECHNICAL
SPECIFICATIONS
INDEX
Page 169 of 231
LIFTING THE VEHICLEIf the vehicle needs to be lifted, go to a Fiat
Dealership which is equipped with the arm hoist or
workshop lift.
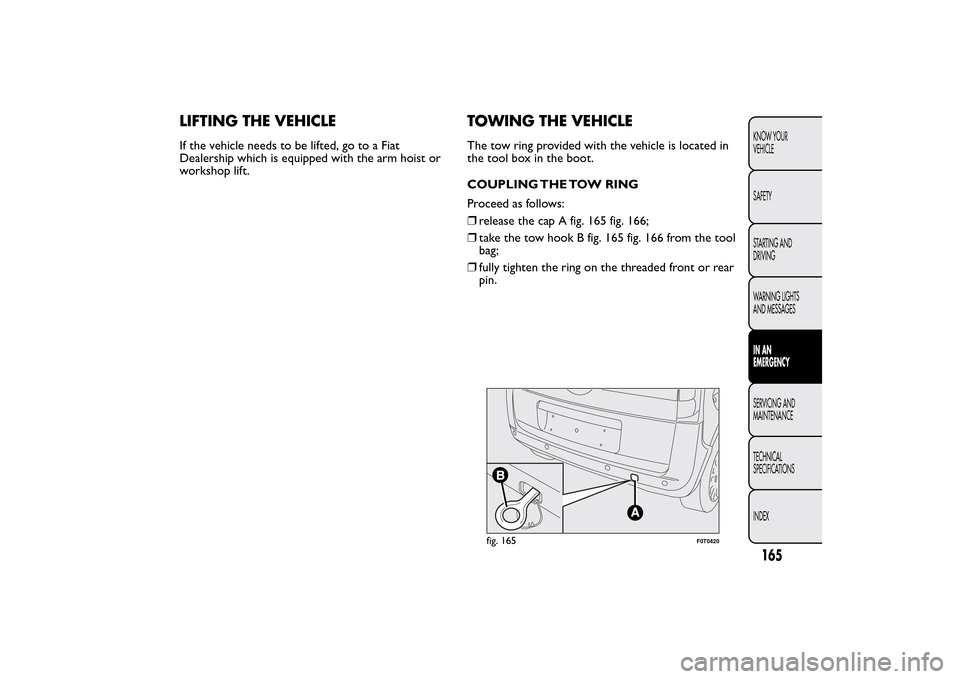
TOWING THE VEHICLEThe tow ring provided with the vehicle is located in
the tool box in the boot.
COUPLING THE TOW RING
Proceed as follows:
❒release the cap A fig. 165 fig. 166;
❒take the tow hook B fig. 165 fig. 166 from the tool
bag;
❒fully tighten the ring on the threaded front or rear
pin.
fig. 165
F0T0420
165KNOW YOUR
VEHICLE
SAFETY
STARTING AND
DRIVING
WARNING LIGHTS
AND MESSAGESIN AN
EMERGENCYSERVICING AND
MAINTENANCE
TECHNICAL
SPECIFICATIONS
INDEX
Page 175 of 231
REGULAR CHECKSEvery 1,000 km or before long journeys, check and, if
necessary, top up:
❒engine coolant level;
❒brake fluid level;
❒windscreen washer fluid level;
❒tyre inflation pressure and condition;
❒operation of lighting system (headlamps, direction
indicators, hazard warning lights, etc.);
❒operation of screen wash/wipe system and
positioning/wear of windscreen/rear window wiper
blades.
Check and top up, if required, the engine oil level
every 3,000 km.
You are recommended to use PETRONAS
LUBRICANTS products, which have been designed
and produced specifically for Fiat vehicles (see
“Capacities” table in the “Technical specifications”
section).
HEAVY USAGE OF THE VEHICLEShould prevailing use of the vehicle be under one of
the following specially heavy conditions:
❒towing a trailer or caravan;
❒dusty roads;
❒short, repeated journeys (less than 7-8 km) at
sub-zero outside temperatures;
❒engine often idling, or driving long distances at low
speed (e.g. door to door deliveries) or long period
of idleness;
❒urban trips;
you should perform the following inspections more
frequently than shown in the Scheduled Servicing
Plan:
❒check front disc brake pad condition and wear;
❒check cleanliness of bonnet and boot locks,
cleanliness and lubrication of linkage;
171KNOW YOUR
VEHICLE
SAFETY
STARTING AND
DRIVING
WARNING LIGHTS
AND MESSAGES
IN AN EMERGENCYSERVICING AND
MAINTENANCETECHNICAL
SPECIFICATIONS
INDEX
Page 176 of 231
❒visually inspect conditions of: engine, gearbox,
transmission, pipes and hoses (exhaust - fuel
system - brakes) and rubber elements (boots -
sleeves - bushes - etc.);
❒check battery charge status and fluid (electrolyte)
level (refer to "Battery - Check state of charge
and electrolyte level" paragraph in this chapter);
❒visually inspect condition of the auxiliary drive
belts;
❒check and, if necessary, replace pollen filter, in
particular it should be replaced if there is a
noticeable decrease in the passenger compartment
air intake flow rate.
❒check and, if necessary, replace air filter.
CHECKING LEVELS
When topping up, take care not to mix up
the various types of fluids: they are not
compatible with each other and could
seriously damage the vehicle.
WARNING
Never smoke while working in the
engine compar tment : inflammable gases
and vapours may be present , constituting a fire
risk.
172KNOW YOUR
VEHICLE
SAFETY
STARTING AND
DRIVING
WARNING LIGHTS
AND MESSAGES
IN AN EMERGENCY
SERVICING AND
MAINTENANCE
TECHNICAL
SPECIFICATIONS
INDEX
Page 185 of 231
Follow the battery manufacturer's instructions for
maintenance.
Incorrect assembly of electric and
electronic devices may cause severe
damage to your vehicle. Go to a Fiat
Dealership if you want to install accessories
(alarms, mobile phone, etc .): they will suggest the
most suitable devices and advise you if a higher
capacity batter y needs to be installed.Batteries contain substances that are very
harmful to the environment .You are
recommended to go to a Fiat Dealership
to have the batter y replaced where the old
battery will be disposed of respecting both the
environment and the laws in force.If the vehicle needs to be off the road for
a long period under conditions of intense
cold, remove the battery and take it to
a heated place, otherwise it may freeze.
WARNING
When performing any operation on the
battery or near it , always protect your
eyes with the special goggles.USEFUL ADVICE FOR EXTENDING THE
LIFE OF YOUR BATTERY
To avoid draining your battery and make it last
longer, follow these instructions closely:
❒when you park the vehicle, ensure the doors, boot
and bonnet are closed properly so that the ceiling
lights do not stay on;
❒turn off the ceiling lights, although the car does
have an automatic system for switching off internal
lights;
❒do not keep accessories (e.g. sound system, hazard
lights, etc.) switched on for a long time when the
engine is not running;
❒before performing any operation on the electrical
system, disconnect the battery negative cable;
❒make sure that battery terminals are always be
perfectly tight.
181KNOW YOUR
VEHICLE
SAFETY
STARTING AND
DRIVING
WARNING LIGHTS
AND MESSAGES
IN AN EMERGENCYSERVICING AND
MAINTENANCETECHNICAL
SPECIFICATIONS
INDEX
Page 208 of 231
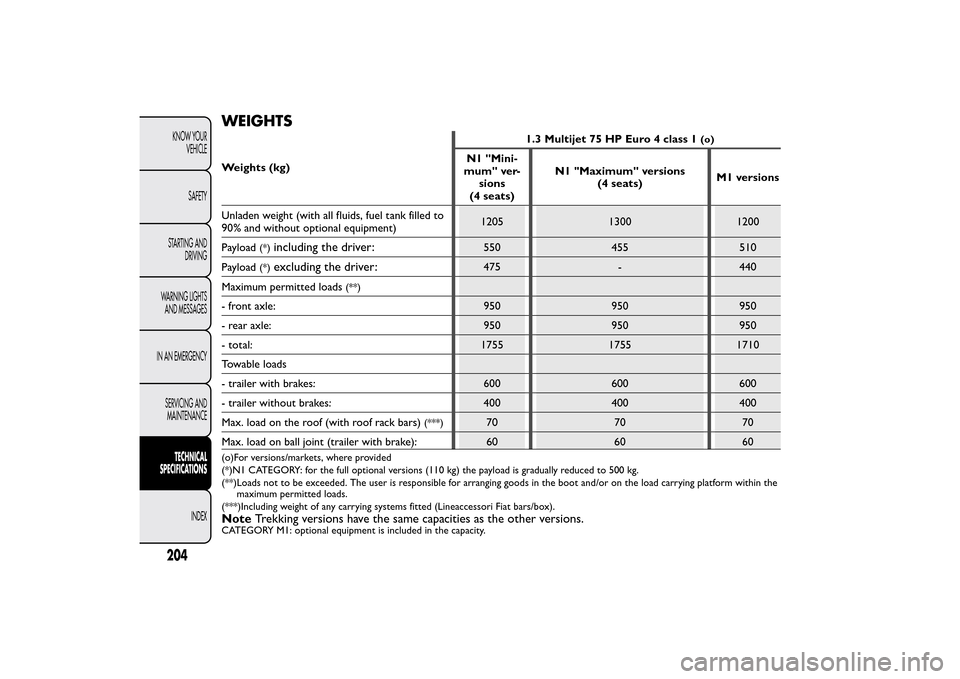
WEIGHTSWeights (kg)1.3 Multijet 75 HP Euro 4 class 1
(o)
N1 "Mini-
mum" ver-
sions
(4 seats)N1 "Maximum" versions
(4 seats)M1 versions
Unladen weight (with all fluids, fuel tank filled to
90% and without optional equipment)1205 1300 1200
Payload
(*)
including the driver:
550 455 510
Payload
(*)
excluding the driver:
475 - 440
Maximum permitted loads
(**)
- front axle: 950 950 950
- rear axle: 950 950 950
- total: 1755 1755 1710
Towable loads
- trailer with brakes: 600 600 600
- trailer without brakes: 400 400 400
Max. load on the roof (with roof rack bars)
(***)
70 70 70
Max. load on ball joint (trailer with brake): 60 60 60
(o)For versions/markets, where provided
(*)N1 CATEGORY: for the full optional versions (110 kg) the payload is gradually reduced to 500 kg.
(**)Loads not to be exceeded. The user is responsible for arranging goods in the boot and/or on the load carrying platform within the
maximum permitted loads.
(***)Including weight of any carrying systems fitted (Lineaccessori Fiat bars/box).NoteTrekking versions have the same capacities as the other versions.CATEGORY M1: optional equipment is included in the capacity.
204KNOW YOUR
VEHICLE
SAFETY
STARTING AND
DRIVING
WARNING LIGHTS
AND MESSAGES
IN AN EMERGENCY
SERVICING AND
MAINTENANCETECHNICAL
SPECIFICATIONS
INDEX
Page 209 of 231
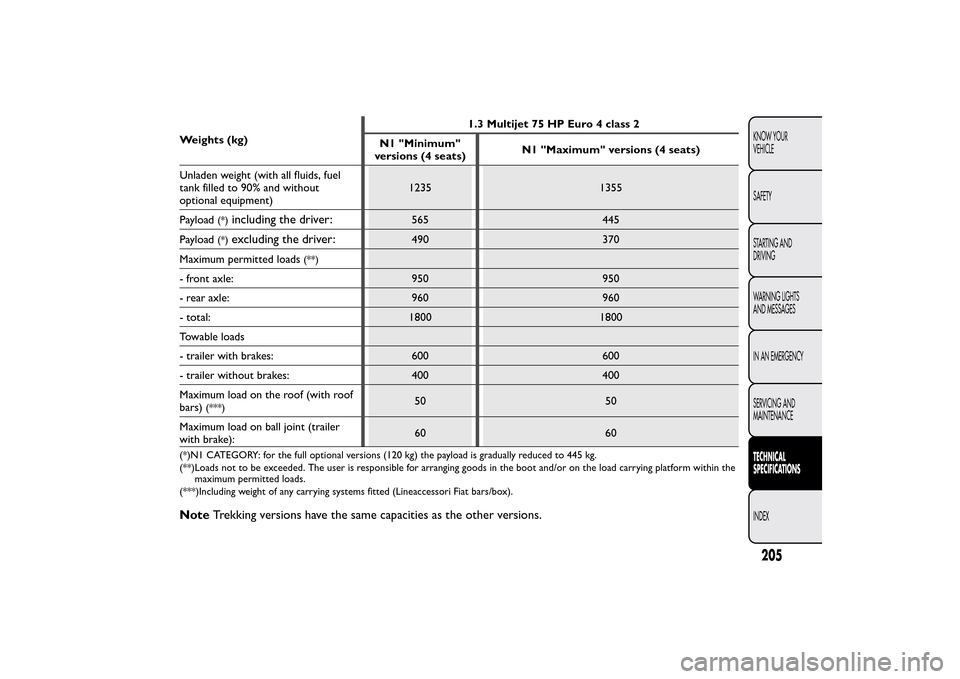
Weights (kg)1.3 Multijet 75 HP Euro 4 class 2
N1 "Minimum"
versions (4 seats)N1 "Maximum" versions (4 seats)
Unladen weight (with all fluids, fuel
tank filled to 90% and without
optional equipment)1235 1355
Payload
(*)
including the driver:
565 445
Payload
(*)
excluding the driver:
490 370
Maximum permitted loads
(**)
- front axle: 950 950
- rear axle: 960 960
- total: 1800 1800
Towable loads
- trailer with brakes: 600 600
- trailer without brakes: 400 400
Maximum load on the roof (with roof
bars)
(***)
50 50
Maximum load on ball joint (trailer
with brake):60 60
(*)N1 CATEGORY: for the full optional versions (120 kg) the payload is gradually reduced to 445 kg.
(**)Loads not to be exceeded. The user is responsible for arranging goods in the boot and/or on the load carrying platform within the
maximum permitted loads.
(***)Including weight of any carrying systems fitted (Lineaccessori Fiat bars/box).NoteTrekking versions have the same capacities as the other versions.
205KNOW YOUR
VEHICLE
SAFETY
STARTING AND
DRIVING
WARNING LIGHTS
AND MESSAGES
IN AN EMERGENCY
SERVICING AND
MAINTENANCETECHNICAL
SPECIFICATIONSINDEX