start stop button FIAT SCUDO 2010 Owner handbook (in English)
[x] Cancel search | Manufacturer: FIAT, Model Year: 2010, Model line: SCUDO, Model: FIAT SCUDO 2010Pages: 210, PDF Size: 3.32 MB
Page 31 of 210

30
SAFETY
DEVICES
CORRECT USE
OF THE
VEHICLE
WARNING
LIGHTS AND
MESSAGES
IN AN
EMERGENCY
VEHICLE
MAINTENANCE
TECHNICAL
SPECIFICATIONS
INDEX
DASHBOARD
AND
CONTROLS
FRONT WINDOW FAST
DEMISTING/
DEFROSTING (WINDSCREEN
AND SIDE WINDOWS)
Proceed as follows:
❒turn slider Cto red section;
❒turn air recirculation off (if on);
❒turn slider Ato -;
❒
turn slider Bto 4 -p(max. fan
speed).
After demisting/defrosting, operate the
controls to restore the required comfort.Window demisting
In the event of considerable outside mois-
ture and/or rain and/or considerable dif-
ferences in temperature inside and outside
the passenger compartment, perform the
following preventive demisting procedure:
❒turn slider Cto red section;
❒turn air recirculation off by pressing
button D(if off);
❒turn slider Ato -or to ∏if the win-
dows do not demist;
❒turn slider Bto 2ndspeed.HEATED REAR WINDOW AND
DOOR MIRROR
DEMISTING/DEFROSTING
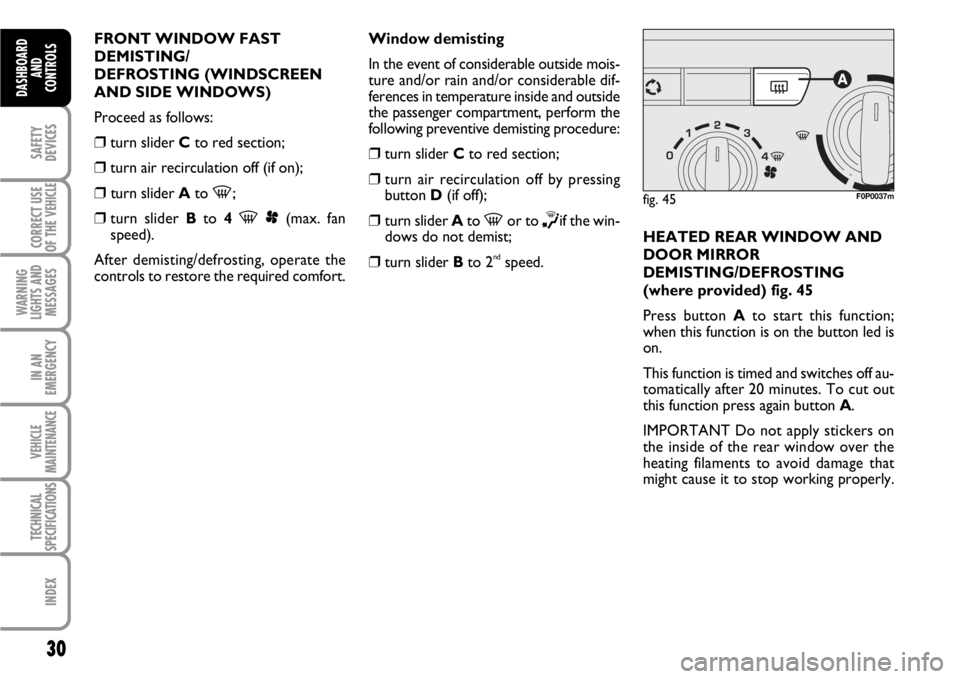
(where provided) fig. 45
Press button Ato start this function;
when this function is on the button led is
on.
This function is timed and switches off au-
tomatically after 20 minutes. To cut out
this function press again button A.
IMPORTANT Do not apply stickers on
the inside of the rear window over the
heating filaments to avoid damage that
might cause it to stop working properly.
fig. 45F0P0037m
Page 36 of 210

35
SAFETY
DEVICES
CORRECT USE
OF THE
VEHICLE
WARNING
LIGHTS AND
MESSAGES
IN AN
EMERGENCY
VEHICLE
MAINTENANCE
TECHNICAL
SPECIFICATIONS
INDEX
DASHBOARD
AND CONTROLS
Window demisting
In the event of considerable outside mois-
ture and/or rain and/or considerable dif-
ferences in temperature inside and outside
the passenger compartment, perform the
following preventive demisting procedure:
❒turn slider Cto red section;
❒turn air recirculation off by pressing
button D(if on);
❒turn slider Ato -or to ®if the win-
dows do not demist;
❒turn slider Bto 2ndspeed.
IMPORTANT The climate control system
is very useful to prevent window misting
up in presence of high humidity since it de-
humidifies the air.HEATED REAR WINDOW AND
DOOR MIRROR
DEMISTING/DEFROSTING
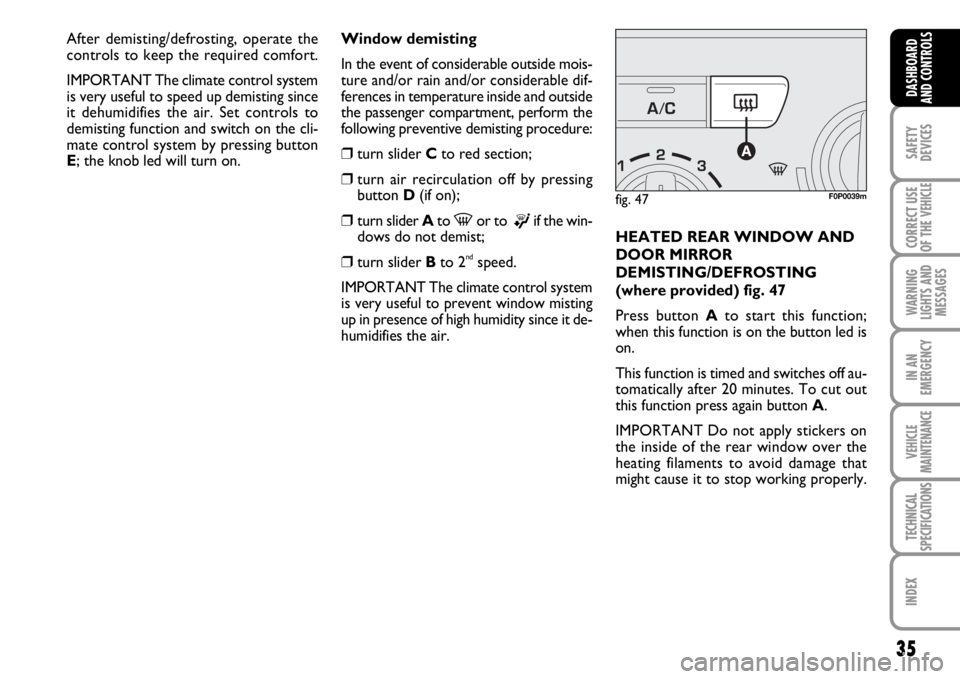
(where provided) fig. 47
Press button Ato start this function;
when this function is on the button led is
on.
This function is timed and switches off au-
tomatically after 20 minutes. To cut out
this function press again button A.
IMPORTANT Do not apply stickers on
the inside of the rear window over the
heating filaments to avoid damage that
might cause it to stop working properly.
fig. 47F0P0039m
After demisting/defrosting, operate the
controls to keep the required comfort.
IMPORTANT The climate control system
is very useful to speed up demisting since
it dehumidifies the air. Set controls to
demisting function and switch on the cli-
mate control system by pressing button
E; the knob led will turn on.
Page 44 of 210

43
SAFETY
DEVICES
CORRECT USE
OF THE
VEHICLE
WARNING
LIGHTS AND
MESSAGES
IN AN
EMERGENCY
VEHICLE
MAINTENANCE
TECHNICAL
SPECIFICATIONS
INDEX
DASHBOARD
AND CONTROLS
Fast window demisting/defrosting
button C
Press this button: the climate control sys-
tem will automatically switch on all the
functions required for fast windscreen and
front side window demisting/defrosting,
that is:
❒switches on climate control compressor
when climatic conditions are suitable;
❒air recirculation off;
❒maximum air temperature HIon both
areas;
❒activates proper fan speed according to
engine coolant temperature to limit the
flow into the passenger compartment of
air not warm enough to demist the win-
dows;
❒directs air flow to windscreen and front
side windows vents;
❒turns heated rear window on.
IMPORTANT Fast demisting/defrosting
function stays on for about 3 minutes,
since engine coolant temperature reach-
es the proper temperature.When the max. demisting/defrosting func-
tion is on, the button led and the heated
rear window button led are on.
When the max. demisting/defrosting func-
tion is on, the only manual operations pos-
sible are manual adjustment of the fan
speed and switching heated rear window
off. Pressing the max. demisting/defrost-
ing button or the air recirculation buttons
or compressor off button or the AUTO
button, the system switches off the max.
demisting/defrosting function and restores
the operating conditions of the system pri-
or to turning it on.Heated rear window and door
mirror demisting/defrosting button
(where provided) F
Press this button to activate heated rear
window demisting/defrosting.
When this function is on, the button led
is on.
This function is timed and switches off au-
tomatically after about 20 minutes or by
pressing again the button or by turning the
engine off. It will not be switched on au-
tomatically when restarting the engine.
IMPORTANT Do not apply stickers on the
inside of the rear window over the heat-
ing filaments to avoid damage that might
cause it to stop working properly.
Page 132 of 210

131
IN AN
EMERGENCY
VEHICLE
MAINTENANCE
TECHNICAL
SPECIFICATIONS
INDEX
DASHBOARD
AND CONTROLS
SAFETY
DEVICES
CORRECT USE
OF THE
VEHICLE
WARNING
LIGHTS AND
MESSAGES
BRAKE PAD WEAR
(amber)
The warning light on the dial
turns on if the front brake pads are
worn; in this case have them changed as
soon as possible.
d
REAR PNEUMATIC
SUSPENSIONS (red)
(where provided)
The warning light flashes when
an abnormal difference between the
detected height limit and that which is
recommended. In this case: with auto-
matic regulation, drive slowly (approx.
10 km/h) until the warning light switches
off. With manual regulation, return to
the recommended height limit which has
remained blocked high or low.
The warning light remains lit upon the
starting of the engine or during transit
when abnormal pneumatic compensa-
tion occurs. In this case: it is important
to stop and seek advice from the Fiat
Dealership.
…
FRONT FOG LIGHTS
(green)
The warning light turns on
when the front fog lights are turned on.
5
MAIN BEAM
HEADLIGHTS (blue)
The warning light turns on
when the main beams are
turned on.
1
LEFT-HAND
DIRECTION INDICATOR
(green - intermittent)
The warning light turns on when the
direction indicator control lever is
moved downwards or, together with the
right indicator, when the hazard warning
light button is pressed.
F
RIGHT-HAND
DIRECTION INDICATOR
(green - intermittent)
The warning light turns on when the
direction indicator control lever is
moved upwards or, together with the
left indicator, when the hazard warning
light button is pressed.
D
DIPPED HEADLAMPS
(green)
The warning light lights up ac-
tivating the dipped headlamps.
2