headlights FIAT SPIDER ABARTH 2017 User Guide
[x] Cancel search | Manufacturer: FIAT, Model Year: 2017, Model line: SPIDER ABARTH, Model: FIAT SPIDER ABARTH 2017Pages: 292, PDF Size: 9.24 MB
Page 101 of 292
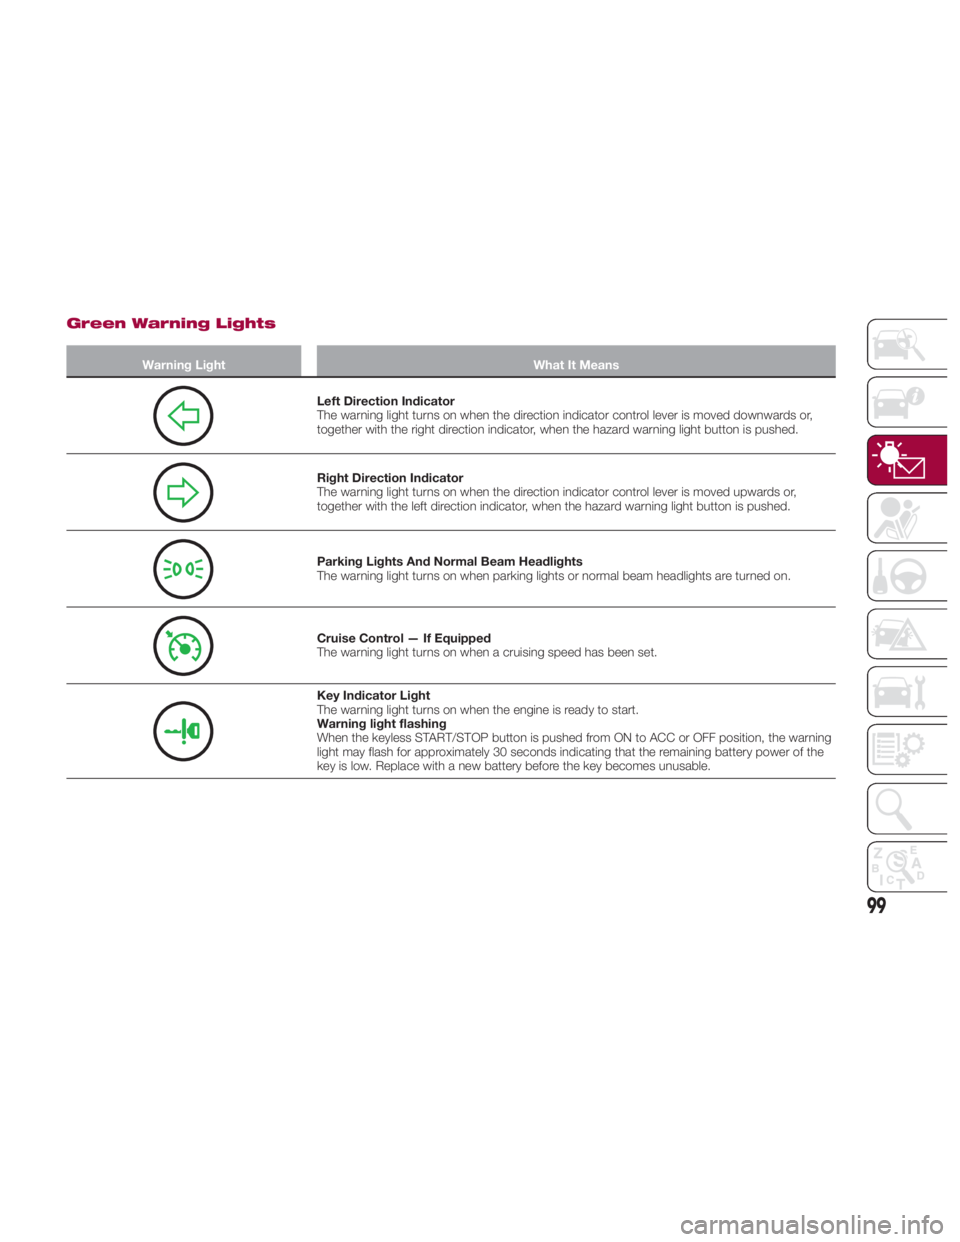
Green Warning Lights Warning Light What It Means
Left Direction Indicator
The warning light turns on when the direction indicator control lever is moved downwards or,
together with the right direction indicator, when the hazard warning light button is pushed.
Right Direction Indicator
The warning light turns on when the direction indicator control lever is moved upwards or,
together with the left direction indicator, when the hazard warning light button is pushed.
Parking Lights And Normal Beam Headlights
The warning light turns on when parking lights or normal beam headlights are turned on.
Cruise Control — If Equipped
The warning light turns on when a cruising speed has been set.
Key Indicator Light
The warning light turns on when the engine is ready to start.
Warning light flashing
When the keyless START/STOP button is pushed from ON to ACC or OFF position, the warning
light may flash for approximately 30 seconds indicating that the remaining battery power of the
key is low. Replace with a new battery before the key becomes unusable.
99
Page 102 of 292
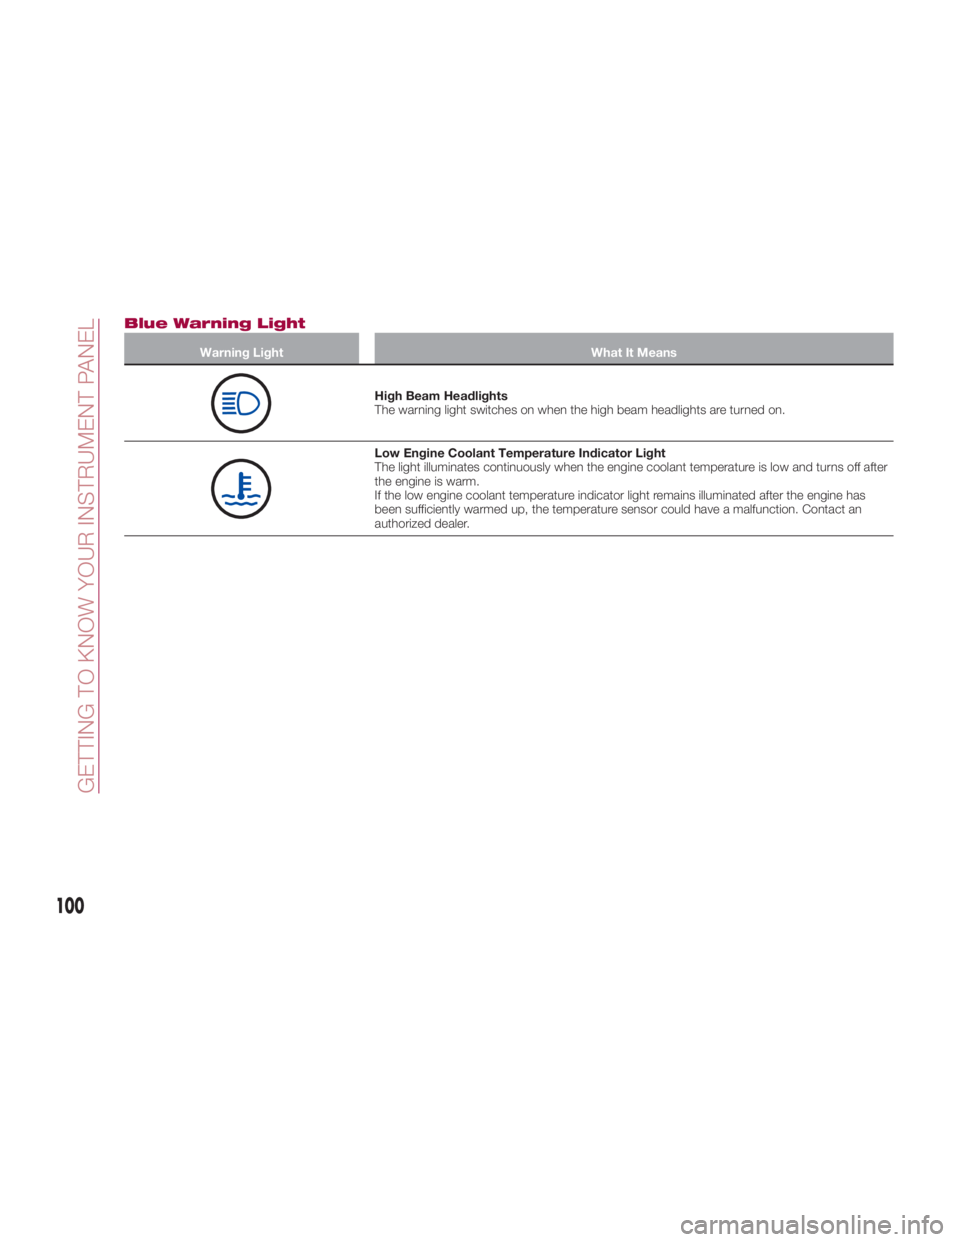
Blue Warning Light Warning Light What It Means
High Beam Headlights
The warning light switches on when the high beam headlights are turned on.
Low Engine Coolant Temperature Indicator Light
The light illuminates continuously when the engine coolant temperature is low and turns off after
the engine is warm.
If the low engine coolant temperature indicator light remains illuminated after the engine has
been sufficiently warmed up, the temperature sensor could have a malfunction. Contact an
authorized dealer.
100
GETTING TO KNOW YOUR INSTRUMENT PANEL
Page 109 of 292
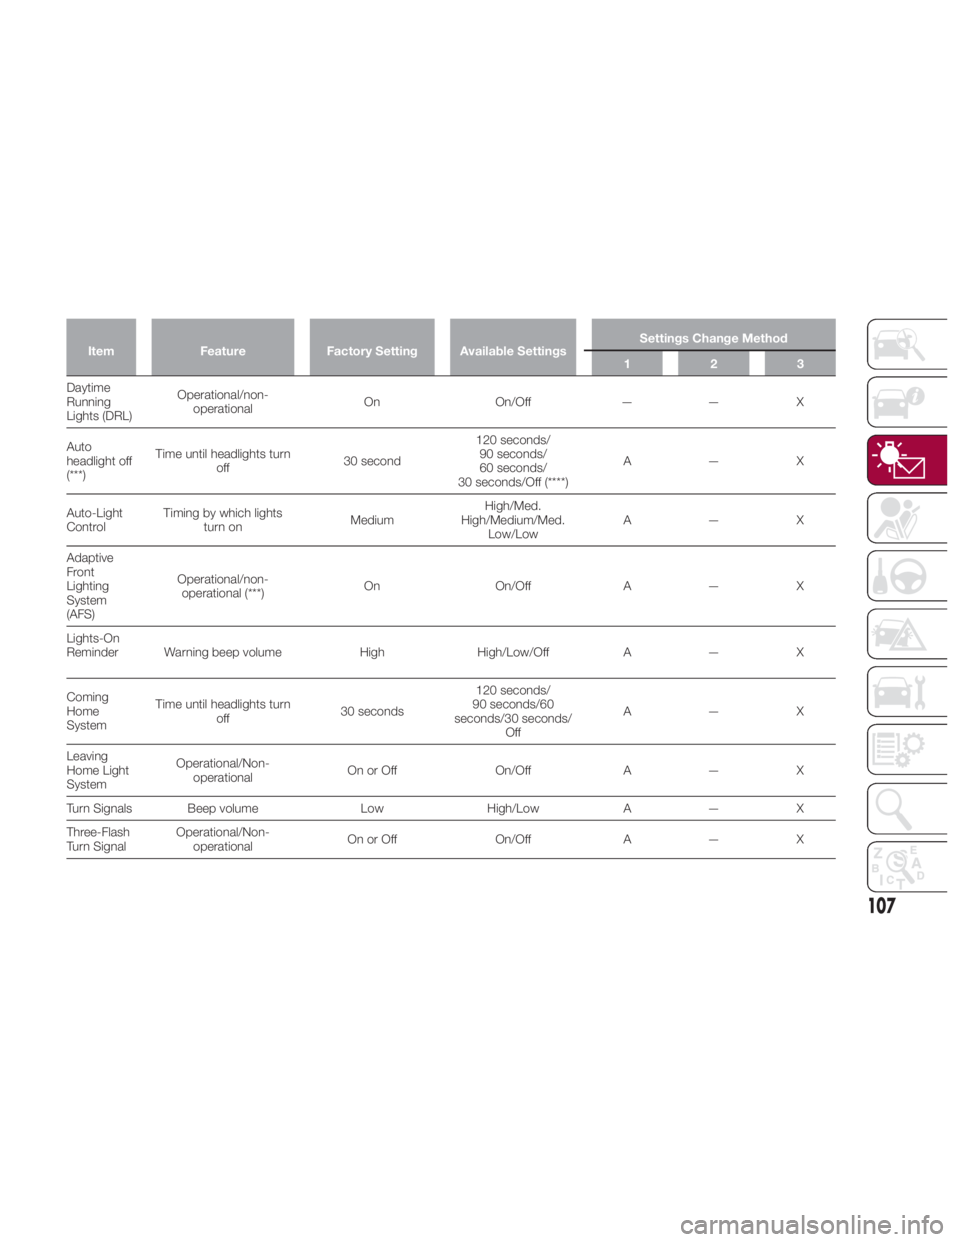
Item Feature Factory Setting Available Settings Settings Change Method
123
Daytime
Running
Lights
(DRL) Operational/non-
operational On On/Of f — — X
Auto
headlight off
(***) Time until headlights turn
off 30 second 120 seconds/
90 seconds/
60 seconds/
30 seconds/Off (****) A—X
Auto-Light
Control Timing by which lights
turn on Medium High/Med.
High/Medium/Med.
Low/Low A—X
Adaptive
Front
Lighting
System
(AFS) Operational/non-
operational (***) On On/Off A — X
Lights-On
Reminder Warning beep volume High High/Low/Off A — X
Coming
Home
System Time until headlights turn
off 30 seconds 120 seconds/
90 seconds/60
seconds/30 seconds/
Off A—X
Leaving
Home Light
System Operational/Non-
operational On or Off On/Off A — X
Turn Signals Beep volume Low High/Low A — X
Three-Flash
Turn Signal Operational/Non-
operational On or Off On/Off A — X
107
Page 187 of 292
Before replacing a bulb check the
contacts for oxidation.
Replace blown bulbs with others of
the same type and power.
After replacing a headlight bulb,
always check its alignment.
To replace the bulb, contact your
authorized dealer.
When a light is not working, check
that the corresponding fuse is intact
before replacing the bulb. For the
location of fuses, refer to the section on
“Replacing Fuses” in this chapter.
Caution!Use the protective cover and carton for the
replacement bulb to dispose of the old bulb
promptly and out of the reach of children. Note:
When removing the lens or light unit
using a flathead screwdriver, make
sure that the flathead screwdriver does
not contact the interior terminal. If the
flathead screwdriver contacts the
terminal, a short circuit may occur.
When the weather is cold or damp
or after heavy rain or washing, the
surface of headlights or rear lights may
steam up and/or form drops of
condensation on the inside. This is a
natural phenomenon due to the
difference in temperature and humidity
between the inside and the outside of
the glass which does not indicate a
fault and does not compromise the
normal operation of lighting devices.
The mist disappears quickly when the
lights are turned on, starting from the
center of the diffuser, extending
progressively towards the edges.
185
Page 188 of 292
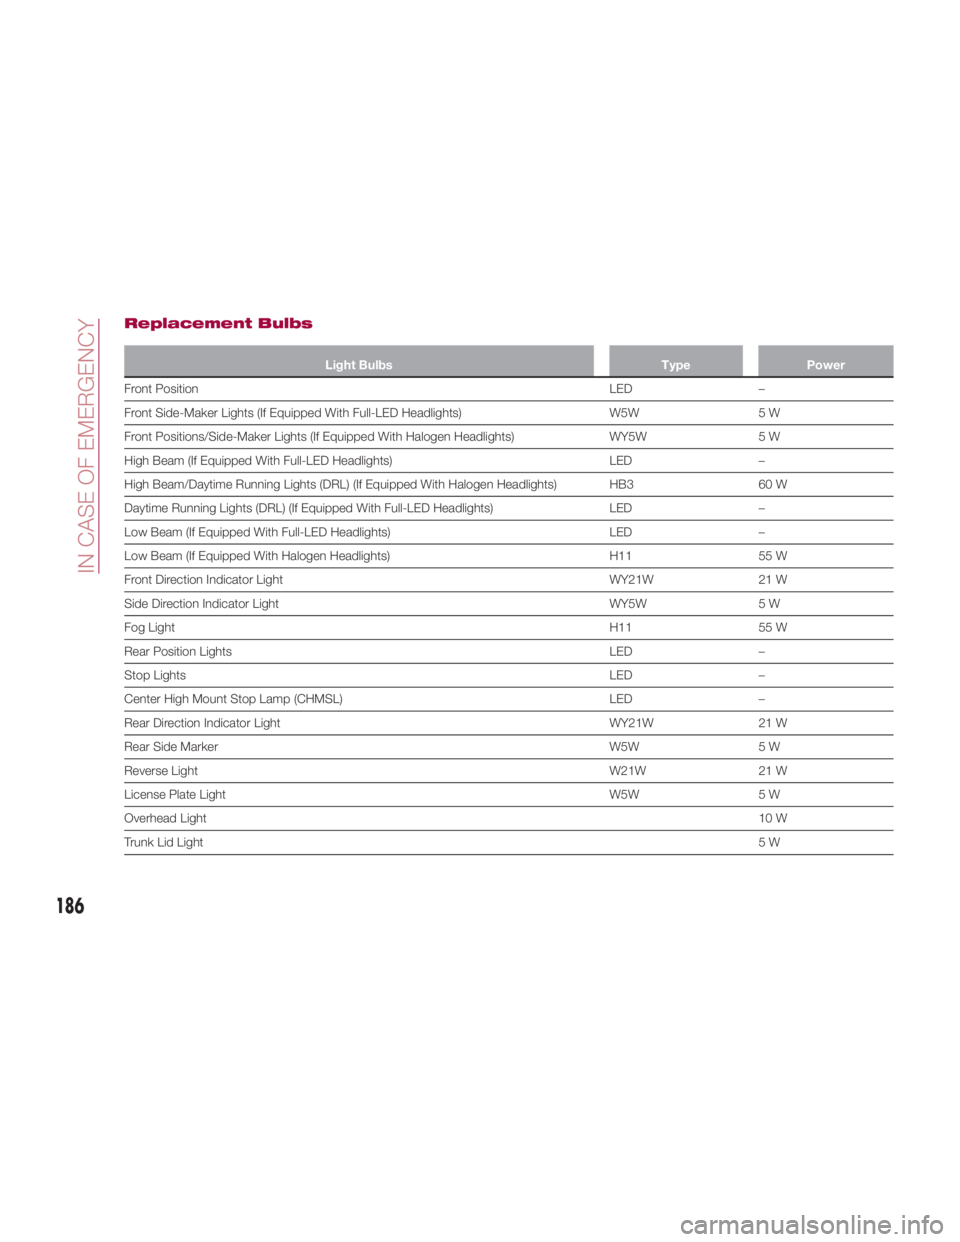
Replacement Bulbs Light Bulbs Type Power
Front Position LED –
Fr
ont Side-Maker Lights (If Equipped With Full-LED Headlights) W5W 5 W
Front Positions/Side-Maker Lights (If Equipped With Halogen Headlights) WY5W 5 W
High Beam (If Equipped With Full-LED Headlights) LED –
High Beam/Daytime Running Lights (DRL) (If Equipped With Halogen Headlights) HB3 60 W
Daytime Running Lights (DRL) (If Equipped With Full-LED Headlights) LED –
Low Beam (If Equipped With Full-LED Headlights) LED –
Low Beam (If Equipped With Halogen Headlights) H11 55 W
Front Direction Indicator Light WY21W 21 W
Side Direction Indicator Light WY5W 5 W
Fog Light H11 55 W
Rear Position Lights LED –
Stop Lights LED –
Center High Mount Stop Lamp (CHMSL) LED –
Rear Direction Indicator Light WY21W 21 W
Rear Side Marker W5W 5 W
Reverse Light W21W 21 W
License Plate Light W5W 5 W
Overhead Light 10 W
Trunk Lid Light 5W
186
IN CASE OF EMERGENCY
Page 189 of 292
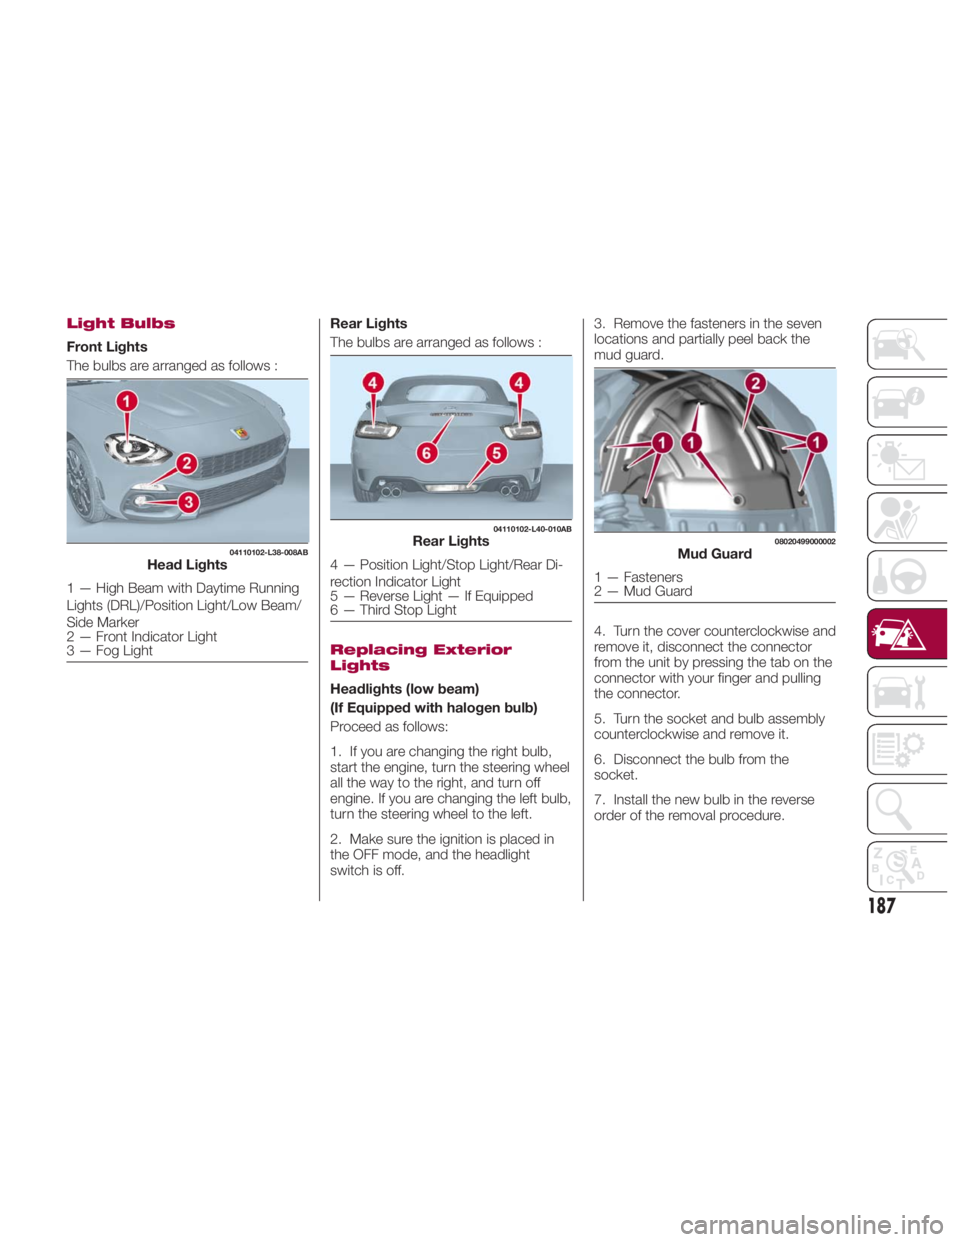
Light Bulbs
Front Lights
The bulbs are arranged as follows : Rear Lights
The bulbs are arranged as follows :
Replacing Exterior
Lights
Headlights (low beam)
(If Equipped with halogen bulb)
Proceed as follows:
1. If you are changing the right bulb,
start the engine, turn the steering wheel
all the way to the right, and turn off
engine. If you are changing the left bulb,
turn the steering wheel to the left.
2. Make sure the ignition is placed in
the OFF mode, and the headlight
switch is off. 3. Remove the fasteners in the seven
locations and partially peel back the
mud guard.
4. Turn the cover counterclockwise and
remove it, disconnect the connector
from the unit by pressing the tab on the
connector with your finger and pulling
the connector.
5. Turn the socket and bulb assembly
counterclockwise and remove it.
6. Disconnect the bulb from the
socket.
7. Install the new bulb in the reverse
order of the removal procedure.04110102-L38-008AB
Head Lights
1 — High Beam with Daytime Running
Lights (DRL)/Position Light/Low Beam/
Side Marker
2 — Front Indicator Light
3 — Fog Light 04110102-L40-010AB
Rear Lights
4 — Position Light/Stop Light/Rear Di-
rection Indicator Light
5 — Reverse Light — If Equipped
6 — Third Stop Light 08020499000002
Mud Guard
1 — Fasteners
2 — Mud Guard
187
Page 190 of 292
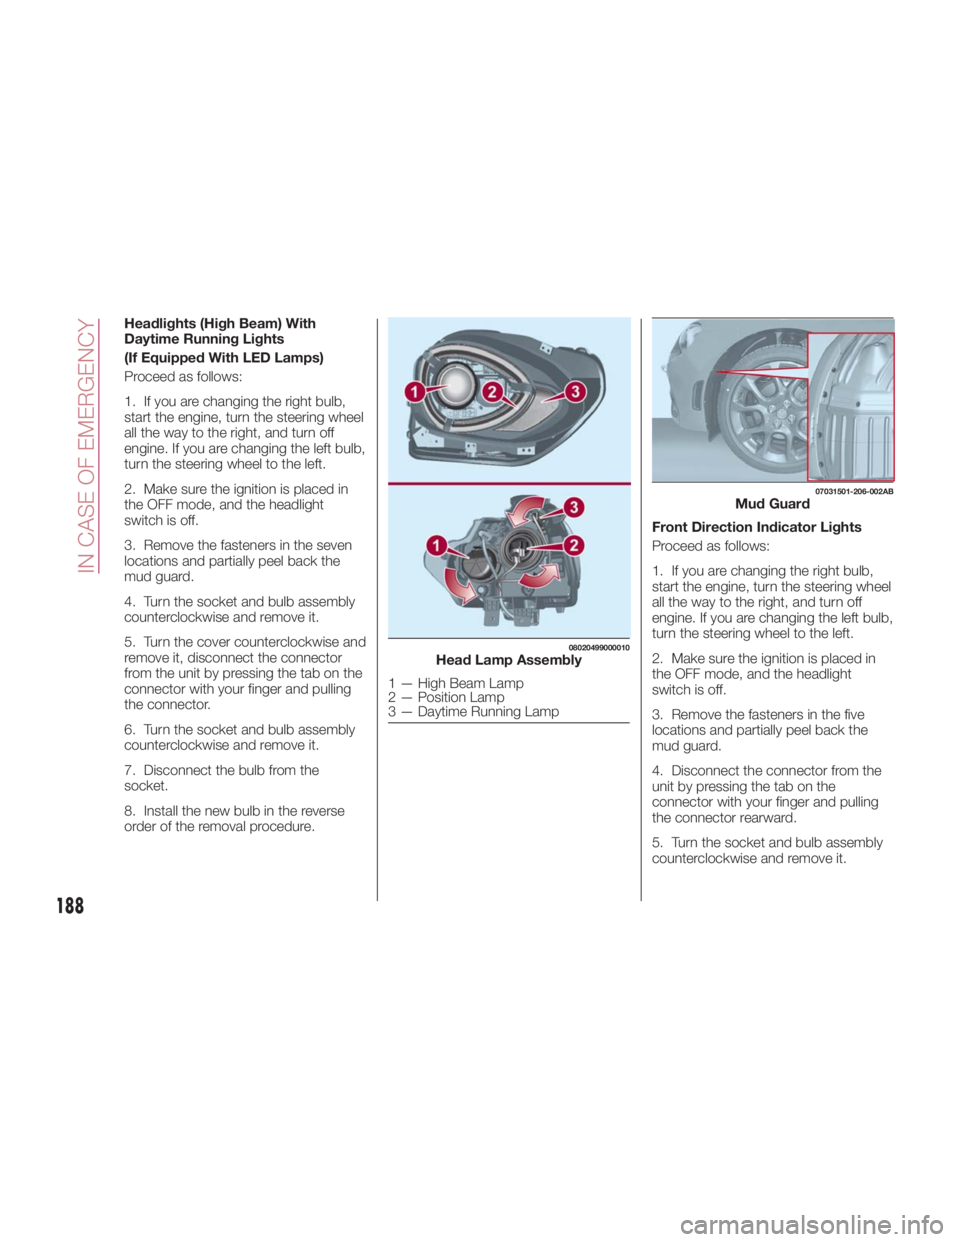
Headlights (High Beam) With
Daytime Running Lights
(If Equipped With LED Lamps)
Proceed as follows:
1. If you are changing the right bulb,
start the engine, turn the steering wheel
all the way to the right, and turn off
engine. If you are changing the left bulb,
turn the steering wheel to the left.
2. Make sure the ignition is placed in
the OFF mode, and the headlight
switch is off.
3. Remove the fasteners in the seven
locations and partially peel back the
mud guard.
4. Turn the socket and bulb assembly
counterclockwise and remove it.
5. Turn the cover counterclockwise and
remove it, disconnect the connector
from the unit by pressing the tab on the
connector with your finger and pulling
the connector.
6. Turn the socket and bulb assembly
counterclockwise and remove it.
7. Disconnect the bulb from the
socket.
8. Install the new bulb in the reverse
order of the removal procedure. Front Direction Indicator Lights
Proceed as follows:
1. If you are changing the right bulb,
start the engine, turn the steering wheel
all the way to the right, and turn off
engine. If you are changing the left bulb,
turn the steering wheel to the left.
2. Make sure the ignition is placed in
the OFF mode, and the headlight
switch is off.
3. Remove the fasteners in the five
locations and partially peel back the
mud guard.
4. Disconnect the connector from the
unit by pressing the tab on the
connector with your finger and pulling
the connector rearward.
5. Turn the socket and bulb assembly
counterclockwise and remove it. 08020499000010
Head Lamp Assembly
1 — High Beam Lamp
2 — Position Lamp
3 — Daytime Running Lamp 07031501-206-002AB
Mud Guard
188
IN CASE OF EMERGENCY
Page 198 of 292
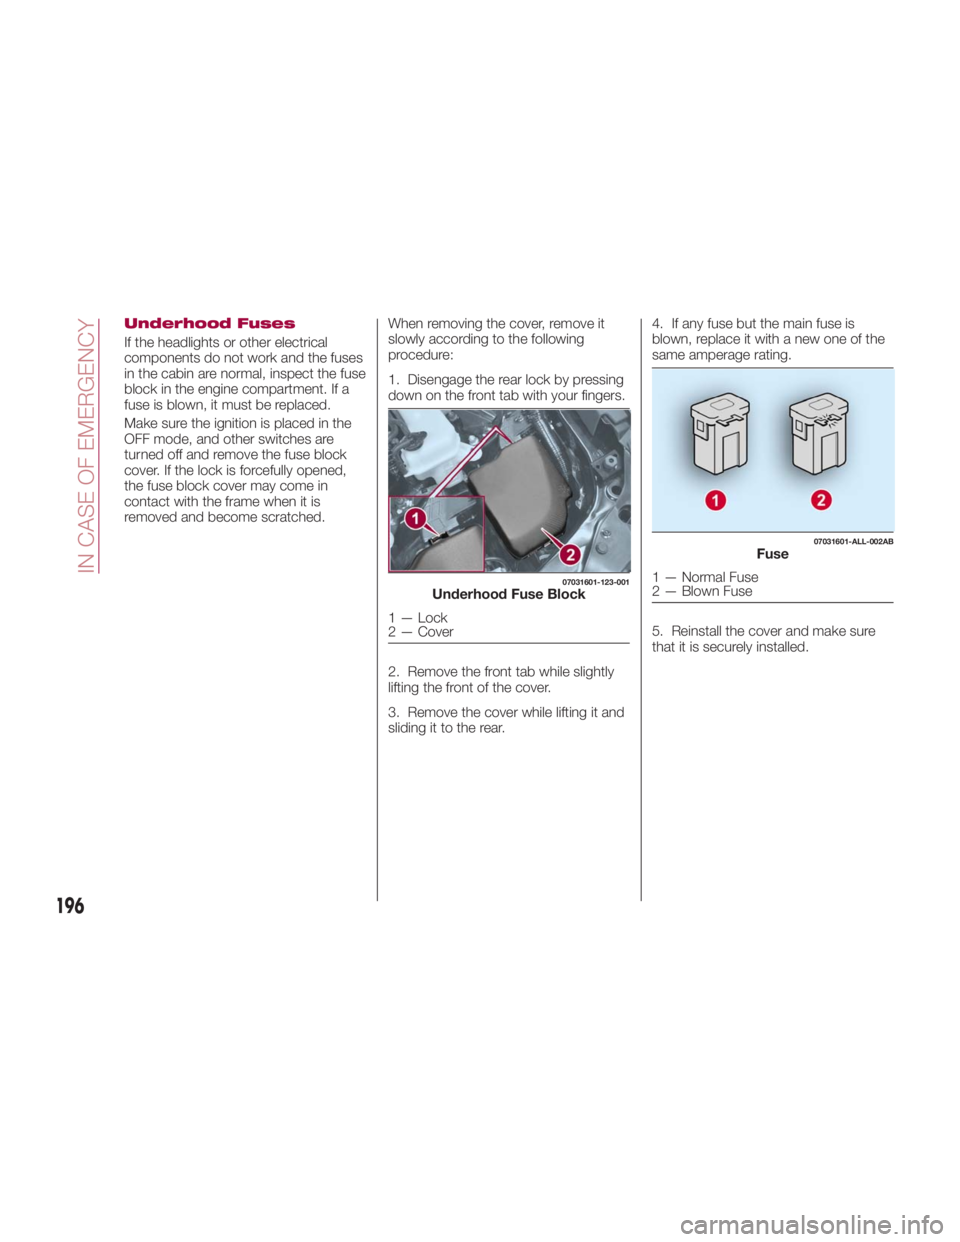
Underhood Fuses
If the headlights or other electrical
components do not work and the fuses
in the cabin are normal, inspect the fuse
block in the engine compartment. If a
fuse is blown, it must be replaced.
Make sure the ignition is placed in the
OFF mode, and other switches are
turned off and remove the fuse block
cover. If the lock is forcefully opened,
the fuse block cover may come in
contact with the frame when it is
removed and become scratched. When removing the cover, remove it
slowly according to the following
procedure:
1. Disengage the rear lock by pressing
down on the front tab with your fingers.
2. Remove the front tab while slightly
lifting the front of the cover.
3. Remove the cover while lifting it and
sliding it to the rear. 4. If any fuse but the main fuse is
blown, replace it with a new one of the
same amperage rating.
5. Reinstall the cover and make sure
that it is securely installed. 07031601-123-001
Underhood Fuse Block
1 — Lock
2 — Cover 07031601-ALL-002AB
Fuse
1 — Normal Fuse
2 — Blown Fuse
196
IN CASE OF EMERGENCY
Page 227 of 292
At least monthly perform inspection
of:
Tire inflation pressures
At least twice a year (for example,
every spring and fall) perform
inspection of:
Engine coolant
Engine oil
As explained in the “Introduction”
paragraph, several procedures can be
done only by a qualified service
technician with special tools.
For details, read the separate Warranty
Booklet provided with the vehicle. If you
are unsure about any servicing or
maintenance procedure, have it done
by an authorized dealer.
There are strict environmental laws
regarding the disposal of waste oil and
fluids. Please dispose of your waste
properly and with due regard to the
environment.
We recommend that you entrust the oil
and fluid changes of your vehicle to an
authorized dealer. Periodic Checks
Every 620 miles (1,000 km) or before
long trips check and, if necessary, top
off:
Engine coolant level.
Brake fluid level.
Windshield washer fluid level.
Tire inflation pressure and condition.
Operation of lighting system
(headlights, direction indicators, hazard
warning lights, etc.).
Operation of windshield
washer/wiper system and
positioning/wear of windshield wiper
blades.
Every 1860 miles (3,000 km) check
and top off the engine oil level if
required.
Heavy-Duty Use Of The
Vehicle
If the vehicle is used under one of the
following conditions:
Dusty roads.
Short, repeated trips less than 4.4 -
5 miles ( 7-8km)atsub -zero outside
temperatures.
Engine idling for long periods of time
or driving long distances at low speeds
or long periods of inactivity. The following checks must be carried
out more often than indicated in the
Scheduled Servicing Plan:
Check front disc brake pad condition
and wear.
Check cleanliness of underhood area
and all door and trunk locks, cleanliness
and lubrication of linkage.
Visually inspect conditions of the:
engine, transmission, lines and hoses
(exhaust/fuel system/brakes) and
rubber elements (hoses/belts/etc.).
Check battery charge and battery
fluid level.
Visually inspect conditions of the
accessory drive belts.
Check and, if necessary, change
engine oil and replace oil filter.
Check and, if necessary, replace
cabin air filter.
Check and, if necessary, replace air
cleaner.
Severe Duty All Models
Change Engine Oil at 4,000 miles
(6,500 km) if the vehicle is operated in a
dusty and off road environment or is
operated predominately at idle or only
very low engine RPM’s. This type of
vehicle use is considered Severe Duty.
225
Page 286 of 292
INDEX About Your Brakes .......... .150
ABS system ............... .112
Active Adaptive Shift (AAS) ..... .156
Adaptive Front Lighting System
(AFS) ...................42
Additives, Fuel ............. .174
Advanced Keyless Entry System
Key Left In Trunk ............21
Key left In Vehicle ...........21
Locking Doors .............21
Passive Entry ..............21
Request Switch ............21
Unlocking Doors ............21
AirBag............... .131,135
Advance Front Air Bag . . . .131,135
Air Bag Warning Light ...... .147
Event Data Recorder (EDR) .145,222
FrontAirBag ............ .147
Maintaining Your Air Bag
System ............... .145
Air Bag Maintenance ......... .145
Air Pressure, Tires ........... .246
Alarm
Vehicle Security Alarm ..... .24,25
Alarm (Security Alarm) ....... .24,25
Aluminium wheel maintenance . . . .259
Automatic Dimming Mirror ........36
Automatic Headlights ...........40 Automatic Temperature Control
(ATC) ...................52
Automatic Transmission ....... .153
Auxiliary Power Outlet ..........63
B-Pillar Location ............ .242
Battery (maintenance) ......... .234
Battery charging procedure ..... .235
Battery recharging ........... .235
Blind Spot Monitoring ......... .114
Body and underbody warranty . . . .256
Body lubrication ............ .235
Bodywork (care and maintenance). .256
Boot, Convertible Top Lowering ....70
Boot, Convertible Top Precautions . .73
Boot, Convertible Top Raising .....71
Brake System .............. .150
Brake/clutch fluid (level check) . . . .233
Brakes ............... .150,271
Bright-metal maintenance ......
.259
Camera,
Rear ..............
.167
Carbon Monoxide Warning ..... .175
Center Seat Storage Compartment .......................60
Certification Label ........... .176
Changing A Flat Tire .... .203,204,237
Chart, Tire Sizing ............ .239
Check Engine Light (Malfunction
Indicator Light) ........... .110 Checking levels ............. .231
Child Restraint ............. .128
Child Restraints
Child Restraints .......... .128
Clean Air Gasoline ........... .173
Cleaning
Wheels ............... .251
Climate Control ..............45
Close The Hood ..............69
Compact Spare Tire .......... .250
Contract, Service ........... .281
Convertible Top ..............70
Convertible top maintenance .... .260
Cooling
Air Conditioning ............50
Cupholders .................64
Customer Assistance ......... .280
Data Recorder, Event ......... .145
Daytime Running Lights .........40
Diagnostic System, Onboard .... .109
Dimensions ............... .274
Disabled Vehicle Towing .... .220,221
Driver's Seat Back Tilt ..........33
Driving in flooded area ........ .181
Driving tips ............... .178
Electric power steering ..........74
Electric Remote Mirrors .........37
INDEX