tailgate FIAT STILO 2006 1.G User Guide
[x] Cancel search | Manufacturer: FIAT, Model Year: 2006, Model line: STILO, Model: FIAT STILO 2006 1.GPages: 274, PDF Size: 4.76 MB
Page 84 of 274
83
SAFETY
DEVICES
CORRECT USE
OF THE CAR
WARNING
LIGHTS AND
MESSAGES
IN AN
EMERGENCY
CAR
MAINTENANCE
TECHNICAL
SPECIFICATIONS
INDEX
DASHBOARD
AND CONTROLS
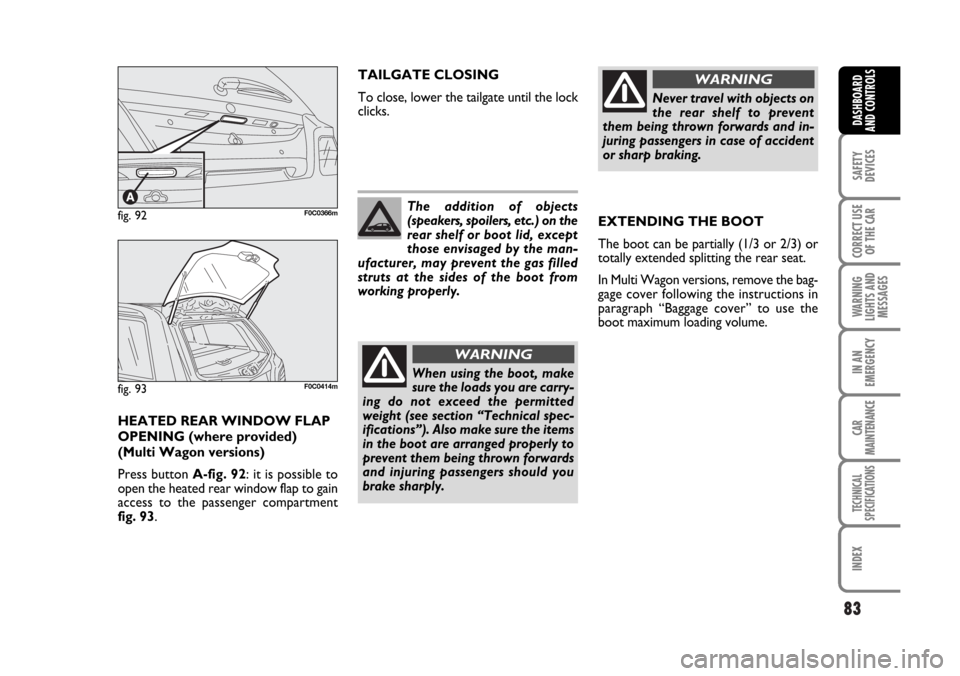
HEATED REAR WINDOW FLAP
OPENING (where provided)
(Multi Wagon versions)
Press button A-fig. 92: it is possible to
open the heated rear window flap to gain
access to the passenger compartment
fig. 93.TAILGATE CLOSING
To close, lower the tailgate until the lock
clicks.
EXTENDING THE BOOT
The boot can be partially (1/3 or 2/3) or
totally extended splitting the rear seat.
In Multi Wagon versions, remove the bag-
gage cover following the instructions in
paragraph “Baggage cover” to use the
boot maximum loading volume.
fig. 92F0C0366m
fig. 93F0C0414m
The addition of objects
(speakers, spoilers, etc.) on the
rear shelf or boot lid, except
those envisaged by the man-
ufacturer, may prevent the gas filled
struts at the sides of the boot from
working properly.
When using the boot, make
sure the loads you are carry-
ing do not exceed the permitted
weight (see section “Technical spec-
ifications”). Also make sure the items
in the boot are arranged properly to
prevent them being thrown forwards
and injuring passengers should you
brake sharply.
WARNING
Never travel with objects on
the rear shelf to prevent
them being thrown forwards and in-
juring passengers in case of accident
or sharp braking.
WARNING
Page 94 of 274
93
SAFETY
DEVICES
CORRECT USE
OF THE CAR
WARNING
LIGHTS AND
MESSAGES
IN AN
EMERGENCY
CAR
MAINTENANCE
TECHNICAL
SPECIFICATIONS
INDEX
DASHBOARD
AND CONTROLS
ROOF RACK/
SKI RACK
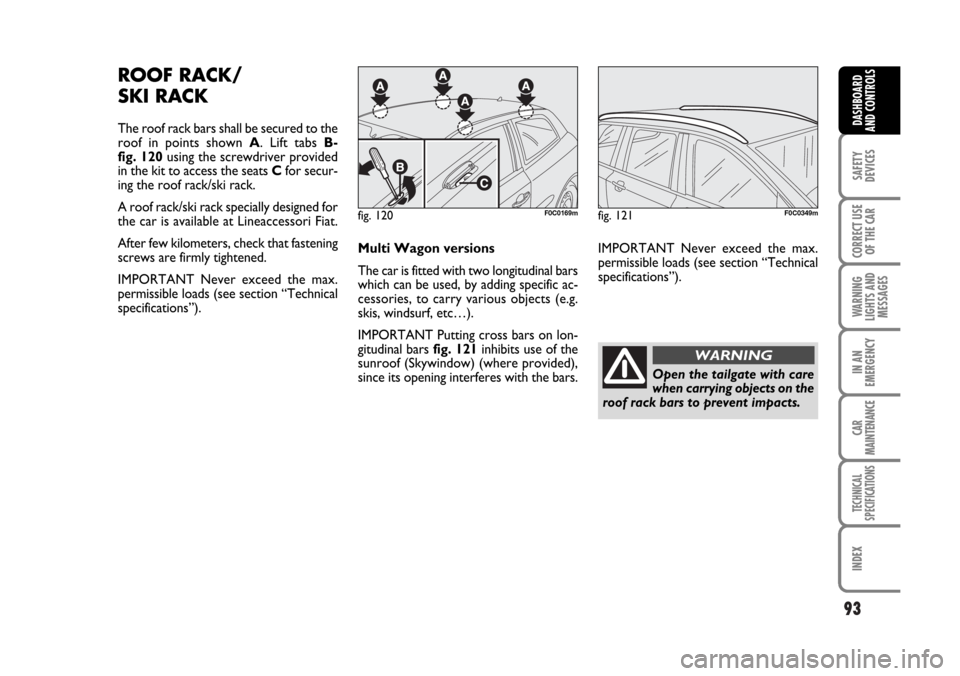
The roof rack bars shall be secured to the
roof in points shown A. Lift tabs B-
fig. 120using the screwdriver provided
in the kit to access the seats Cfor secur-
ing the roof rack/ski rack.
A roof rack/ski rack specially designed for
the car is available at Lineaccessori Fiat.
After few kilometers, check that fastening
screws are firmly tightened.
IMPORTANT Never exceed the max.
permissible loads (see section “Technical
specifications”).Multi Wagon versions
The car is fitted with two longitudinal bars
which can be used, by adding specific ac-
cessories, to carry various objects (e.g.
skis, windsurf, etc…).
IMPORTANT Putting cross bars on lon-
gitudinal bars fig. 121inhibits use of the
sunroof (Skywindow) (where provided),
since its opening interferes with the bars.
fig. 120F0C0169mfig. 121F0C0349m
Open the tailgate with care
when carrying objects on the
roof rack bars to prevent impacts.
WARNING
IMPORTANT Never exceed the max.
permissible loads (see section “Technical
specifications”).
Page 133 of 274
132
CORRECT USE
OF THE CAR
WARNING
LIGHTS AND
MESSAGES
IN AN
EMERGENCY
CAR
MAINTENANCE
TECHNICAL
SPECIFICATIONS
IINDEX
DASHBOARD
AND CONTROLS
SAFETY
DEVICES
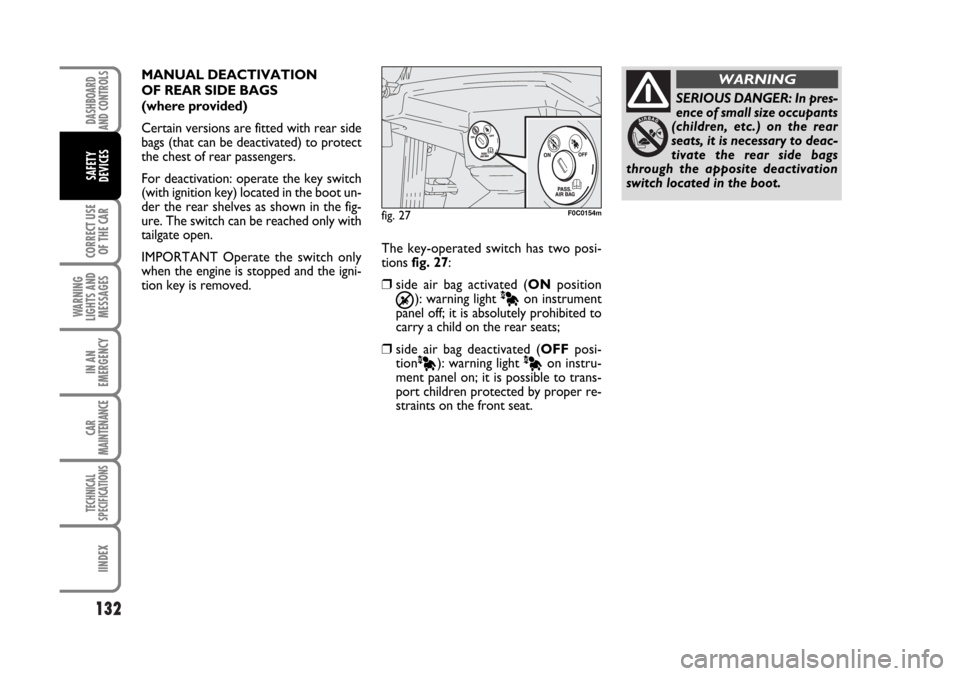
The key-operated switch has two posi-
tions fig. 27:
❒side air bag activated (ONposition
Õ): warning light Àon instrument
panel off; it is absolutely prohibited to
carry a child on the rear seats;
❒side air bag deactivated (OFFposi-
tion
À): warning light Àon instru-
ment panel on; it is possible to trans-
port children protected by proper re-
straints on the front seat.
fig. 27F0C0154m
SERIOUS DANGER: In pres-
ence of small size occupants
(children, etc.) on the rear
seats, it is necessary to deac-
tivate the rear side bags
through the apposite deactivation
switch located in the boot.
WARNINGMANUAL DEACTIVATION
OF REAR SIDE BAGS
(where provided)
Certain versions are fitted with rear side
bags (that can be deactivated) to protect
the chest of rear passengers.
For deactivation: operate the key switch
(with ignition key) located in the boot un-
der the rear shelves as shown in the fig-
ure. The switch can be reached only with
tailgate open.
IMPORTANT Operate the switch only
when the engine is stopped and the igni-
tion key is removed.
Page 184 of 274
183
WARNING
LIGHTS AND
MESSAGES
CAR
MAINTENANCE
TECHNICAL
SPECIFICATIONS
INDEX
DASHBOARD
AND CONTROLS
SAFETY
DEVICES
CORRECT USE
OF THE CAR
IN AN
EMERGENCY
E
D
D
F
A
E
B
A
B
B
B
B
B
B
B
A
B
B
A
C
A
C
C
C
A
CH1
H7
H7
D2R
W5W
H1
PY21W
WY5W
P21W
W5W
P4/21W
P21/5W
P21W
R5W
P21W
W2,3W
P21W
P21W
W5W
C5W
W5W
C5W
C10W
C5W
W5W
C5W55W
55W
55W
35W
5W
55W
21W
5W
21W
5W
4W/21W
21W/5W
21W
5W
21W
2,3W
21W
21W
5W
5W
5W
5W
10W
5W
5W
5W
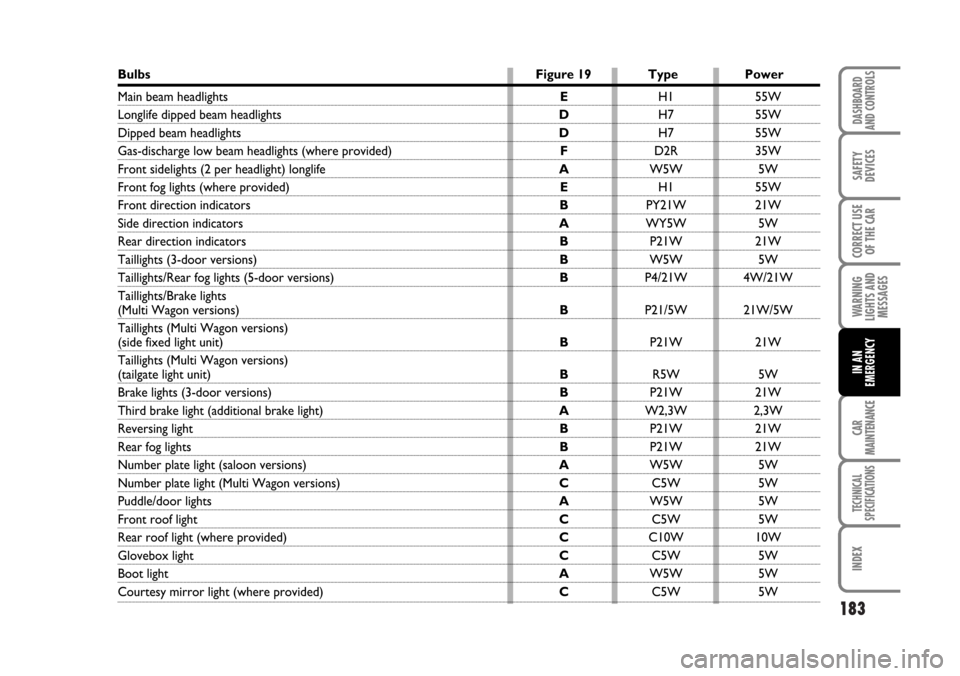
Bulbs Figure 19 Type Power
Main beam headlights
Longlife dipped beam headlights
Dipped beam headlights
Gas-discharge low beam headlights (where provided)
Front sidelights (2 per headlight) longlife
Front fog lights (where provided)
Front direction indicators
Side direction indicators
Rear direction indicators
Taillights (3-door versions)
Taillights/Rear fog lights (5-door versions)
Taillights/Brake lights
(Multi Wagon versions)
Taillights (Multi Wagon versions)
(side fixed light unit)
Taillights (Multi Wagon versions)
(tailgate light unit)
Brake lights (3-door versions)
Third brake light (additional brake light)
Reversing light
Rear fog lights
Number plate light (saloon versions)
Number plate light (Multi Wagon versions)
Puddle/door lights
Front roof light
Rear roof light (where provided)
Glovebox light
Boot light
Courtesy mirror light (where provided)
Page 188 of 274
187
WARNING
LIGHTS AND
MESSAGES
CAR
MAINTENANCE
TECHNICAL
SPECIFICATIONS
INDEX
DASHBOARD
AND CONTROLS
SAFETY
DEVICES
CORRECT USE
OF THE CAR
IN AN
EMERGENCY
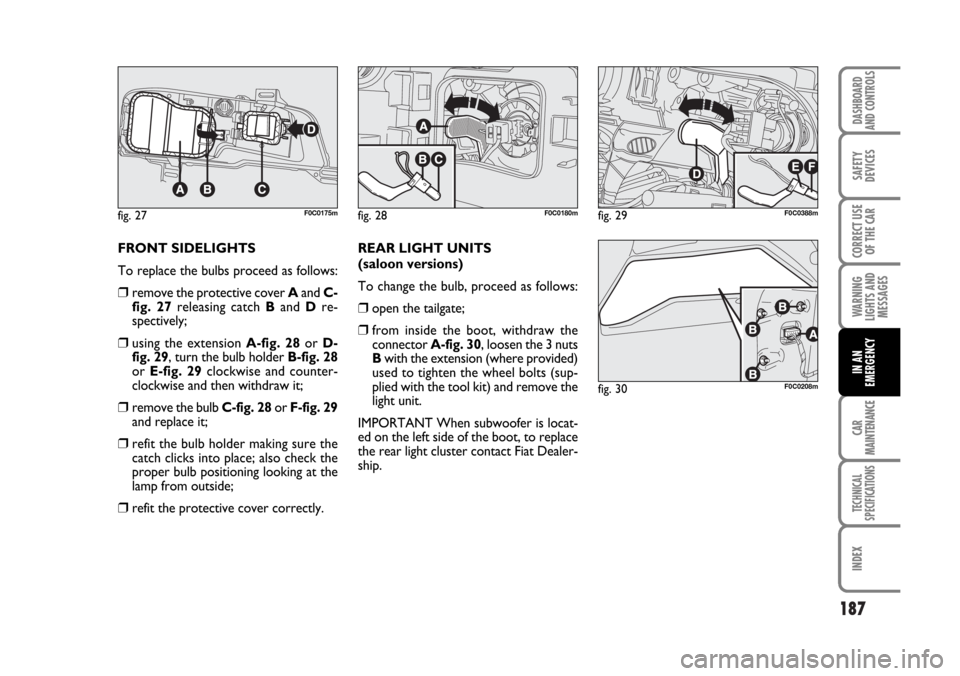
FRONT SIDELIGHTS
To replace the bulbs proceed as follows:
❒remove the protective cover Aand C-
fig. 27releasing catch Band Dre-
spectively;
❒using the extension A-fig. 28or D-
fig. 29, turn the bulb holder B-fig. 28
or E-fig. 29clockwise and counter-
clockwise and then withdraw it;
❒remove the bulb C-fig. 28or F-fig. 29
and replace it;
❒refit the bulb holder making sure the
catch clicks into place; also check the
proper bulb positioning looking at the
lamp from outside;
❒refit the protective cover correctly.REAR LIGHT UNITS
(saloon versions)
To change the bulb, proceed as follows:
❒open the tailgate;
❒from inside the boot, withdraw the
connector A-fig. 30, loosen the 3 nuts
Bwith the extension (where provided)
used to tighten the wheel bolts (sup-
plied with the tool kit) and remove the
light unit.
IMPORTANT When subwoofer is locat-
ed on the left side of the boot, to replace
the rear light cluster contact Fiat Dealer-
ship.
fig. 27F0C0175mfig. 28F0C0180mfig. 29F0C0388m
fig. 30F0C0208m
Page 190 of 274
189
WARNING
LIGHTS AND
MESSAGES
CAR
MAINTENANCE
TECHNICAL
SPECIFICATIONS
INDEX
DASHBOARD
AND CONTROLS
SAFETY
DEVICES
CORRECT USE
OF THE CAR
IN AN
EMERGENCY
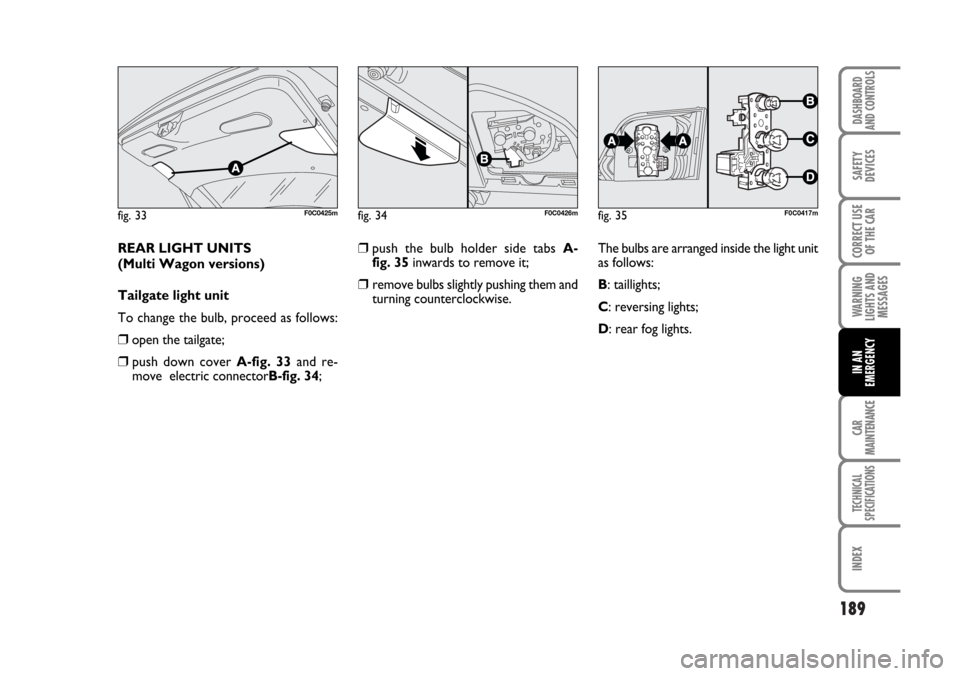
REAR LIGHT UNITS
(Multi Wagon versions)
Tailgate light unit
To change the bulb, proceed as follows:
❒open the tailgate;
❒ push down cover A-fig. 33and re-
move electric connectorB-fig. 34;
fig. 33F0C0425m
❒push the bulb holder side tabs A-
fig. 35inwards to remove it;
❒ remove bulbs slightly pushing them and
turning counterclockwise.
fig. 34F0C0426mfig. 35F0C0417m
The bulbs are arranged inside the light unit
as follows:
B: taillights;
C: reversing lights;
D: rear fog lights.
Page 191 of 274
190
WARNING
LIGHTS AND
MESSAGES
CAR
MAINTENANCE
TECHNICAL
SPECIFICATIONS
IINDEX
DASHBOARD
AND CONTROLS
SAFETY
DEVICES
CORRECT USE
OF THE CAR
IN AN
EMERGENCY
fig. 36F0C0360mfig. 37F0C0361mfig. 38F0C0419m
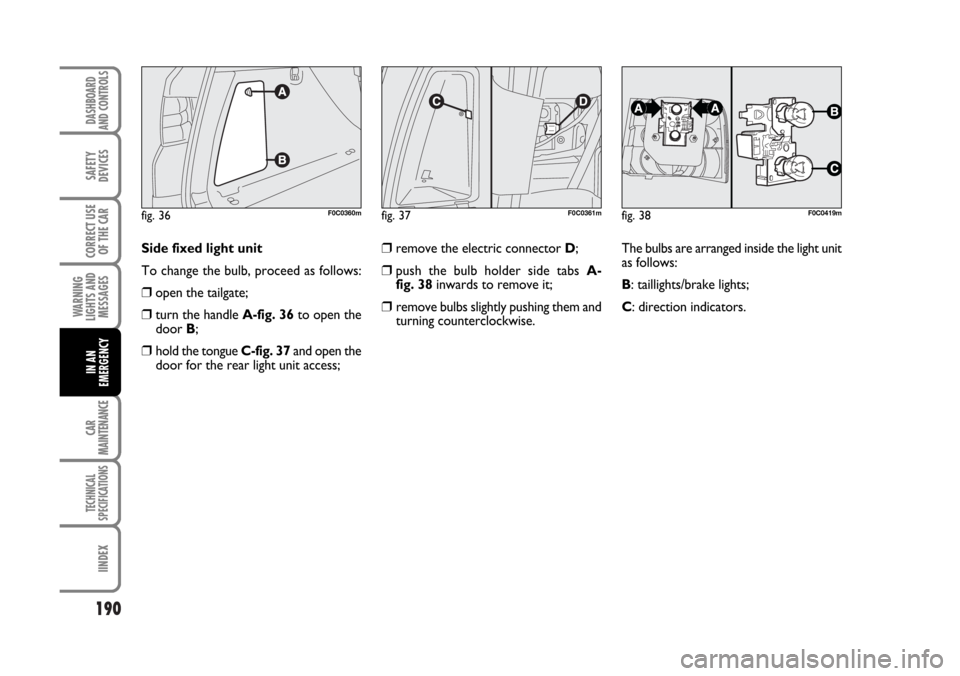
Side fixed light unit
To change the bulb, proceed as follows:
❒open the tailgate;
❒turn the handle A-fig. 36to open the
door B;
❒hold the tongue C-fig. 37and open the
door for the rear light unit access;
❒remove the electric connector D;
❒push the bulb holder side tabs A-
fig. 38inwards to remove it;
❒ remove bulbs slightly pushing them and
turning counterclockwise.The bulbs are arranged inside the light unit
as follows:
B: taillights/brake lights;
C: direction indicators.
Page 196 of 274
195
WARNING
LIGHTS AND
MESSAGES
CAR
MAINTENANCE
TECHNICAL
SPECIFICATIONS
INDEX
DASHBOARD
AND CONTROLS
SAFETY
DEVICES
CORRECT USE
OF THE CAR
IN AN
EMERGENCY
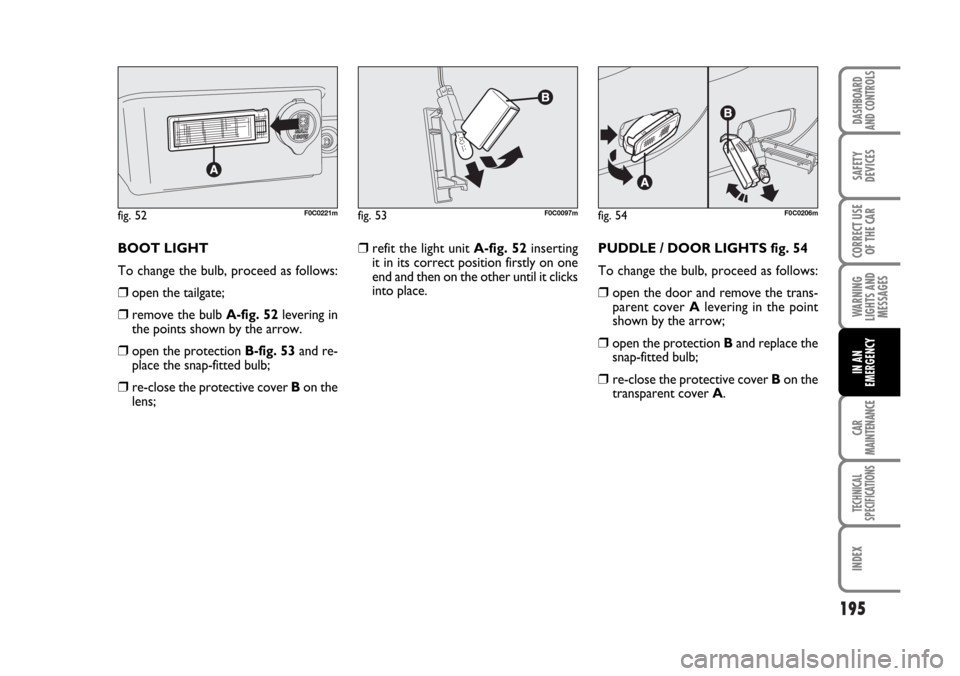
BOOT LIGHT
To change the bulb, proceed as follows:
❒open the tailgate;
❒remove the bulb A-fig. 52levering in
the points shown by the arrow.
❒open the protection B-fig. 53and re-
place the snap-fitted bulb;
❒re-close the protective cover Bon the
lens;
fig. 52F0C0221mfig. 53F0C0097mfig. 54F0C0206m
❒refit the light unit A-fig. 52inserting
it in its correct position firstly on one
end and then on the other until it clicks
into place.PUDDLE / DOOR LIGHTS fig. 54
To change the bulb, proceed as follows:
❒ open the door and remove the trans-
parent cover Alevering in the point
shown by the arrow;
❒open the protection Band replace the
snap-fitted bulb;
❒ re-close the protective cover Bon the
transparent cover A.
Page 228 of 274
227
WARNING
LIGHTS AND
MESSAGES
TECHNICAL
SPECIFICATIONS
INDEX
DASHBOARD
AND CONTROLS
SAFETY
DEVICES
CORRECT USE
OF THE CAR
IN AN
EMERGENCY
CAR
MAINTENANCE
CHANGING THE BATTERY
If required, replace the battery with a gen-
uine spare part having the same specifi-
cations.
If a battery with different specifications is
fitted, the service intervals given in the
“Service schedule” in this section will no
longer be valid.
Refer to the instructions provided by the
battery manufacturer.
Incorrect fitting of electrical
and electronic accessories can
seriously damage the car. If af-
ter buying the car, you want
to install electric accessories which re-
quire permanent electric supply
(alarm, free-hand phone kit, etc.) con-
tact Fiat Dealership whose qualified
personnel, in addition to suggesting the
most suitable devices, will evaluate the
overall electric absorption, checking
whether the car electric system is ca-
pable of withstanding the load re-
quired, or whether it should be inte-
grated with a more powerful battery.USEFUL ADVICE
FOR LENGTHENING THE LIFE
OF YOUR BATTERY
To avoid draining your battery and length-
en its life, observe the following indica-
tions:
❒when you park the car, ensure the
doors, tailgate and bonnet are closed
properly;
❒ the ceiling lights must be off. The car
is however provided with an automat-
ic system for switching off internal
lights;
❒do not keep accessories (e.g.: sound
system, hazard lights, etc.) switched on
for a long time when the engine is not
running;
❒ before performing any operation on the
electrical system, disconnect the bat-
tery negative cable;
❒ battery terminals shall always be per-
fectly tightened. Batteries contain substances
that are very harmful for the
environment. You are advised
to have the battery changed
at a Fiat Dealership, which is properly
equipped for disposing of used batter-
ies respecting nature and the law.
If the car is left inactive for
long periods at cold, remove
the battery and store it in a warm
place to prevent freezing.
WARNING
When working on the bat-
tery or near it, always wear
the proper goggles.
WARNING