lock FIAT STILO 2006 1.G Workshop Manual
[x] Cancel search | Manufacturer: FIAT, Model Year: 2006, Model line: STILO, Model: FIAT STILO 2006 1.GPages: 274, PDF Size: 4.76 MB
Page 188 of 274
187
WARNING
LIGHTS AND
MESSAGES
CAR
MAINTENANCE
TECHNICAL
SPECIFICATIONS
INDEX
DASHBOARD
AND CONTROLS
SAFETY
DEVICES
CORRECT USE
OF THE CAR
IN AN
EMERGENCY
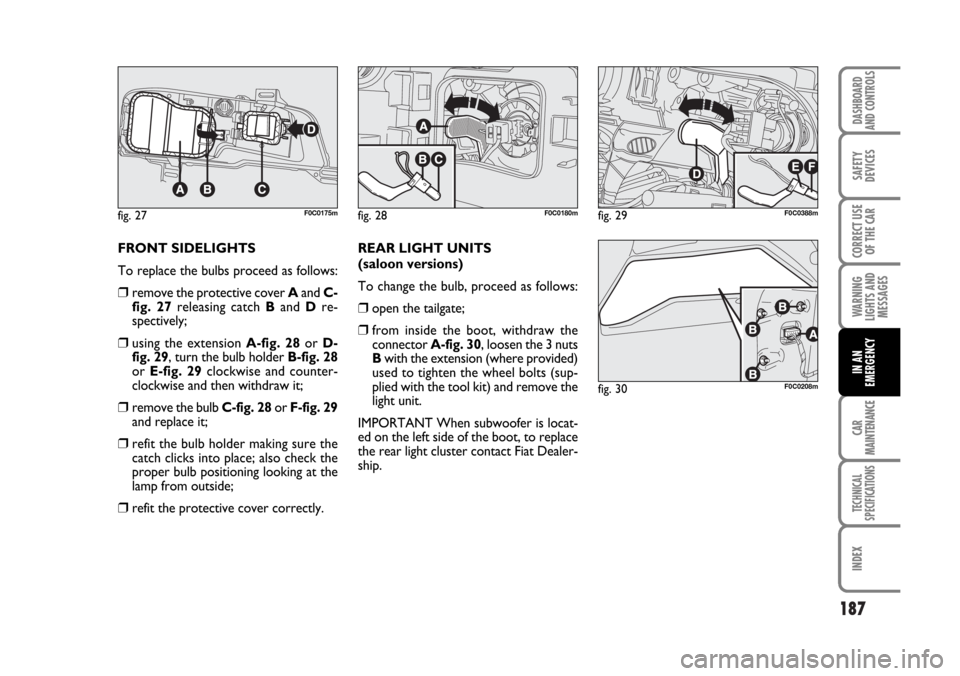
FRONT SIDELIGHTS
To replace the bulbs proceed as follows:
❒remove the protective cover Aand C-
fig. 27releasing catch Band Dre-
spectively;
❒using the extension A-fig. 28or D-
fig. 29, turn the bulb holder B-fig. 28
or E-fig. 29clockwise and counter-
clockwise and then withdraw it;
❒remove the bulb C-fig. 28or F-fig. 29
and replace it;
❒refit the bulb holder making sure the
catch clicks into place; also check the
proper bulb positioning looking at the
lamp from outside;
❒refit the protective cover correctly.REAR LIGHT UNITS
(saloon versions)
To change the bulb, proceed as follows:
❒open the tailgate;
❒from inside the boot, withdraw the
connector A-fig. 30, loosen the 3 nuts
Bwith the extension (where provided)
used to tighten the wheel bolts (sup-
plied with the tool kit) and remove the
light unit.
IMPORTANT When subwoofer is locat-
ed on the left side of the boot, to replace
the rear light cluster contact Fiat Dealer-
ship.
fig. 27F0C0175mfig. 28F0C0180mfig. 29F0C0388m
fig. 30F0C0208m
Page 189 of 274
188
WARNING
LIGHTS AND
MESSAGES
CAR
MAINTENANCE
TECHNICAL
SPECIFICATIONS
IINDEX
DASHBOARD
AND CONTROLS
SAFETY
DEVICES
CORRECT USE
OF THE CAR
IN AN
EMERGENCY
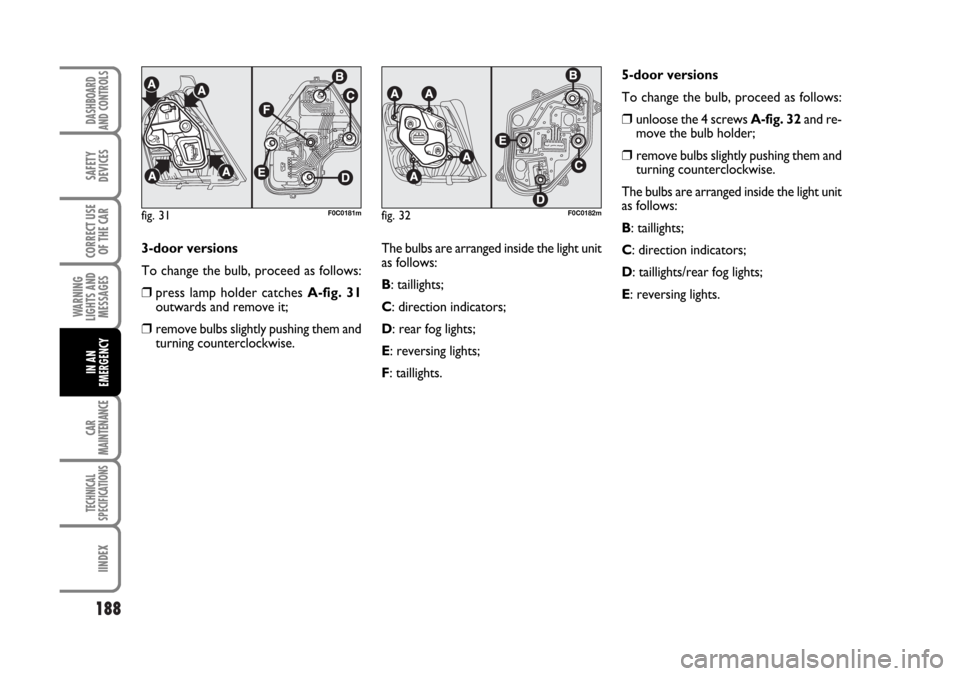
3-door versions
To change the bulb, proceed as follows:
❒press lamp holder catches A-fig. 31
outwards and remove it;
❒remove bulbs slightly pushing them and
turning counterclockwise.The bulbs are arranged inside the light unit
as follows:
B: taillights;
C: direction indicators;
D: rear fog lights;
E: reversing lights;
F: taillights.
fig. 31F0C0181mfig. 32F0C0182m
5-door versions
To change the bulb, proceed as follows:
❒unloose the 4 screws A-fig. 32and re-
move the bulb holder;
❒ remove bulbs slightly pushing them and
turning counterclockwise.
The bulbs are arranged inside the light unit
as follows:
B: taillights;
C: direction indicators;
D: taillights/rear fog lights;
E: reversing lights.
Page 190 of 274
189
WARNING
LIGHTS AND
MESSAGES
CAR
MAINTENANCE
TECHNICAL
SPECIFICATIONS
INDEX
DASHBOARD
AND CONTROLS
SAFETY
DEVICES
CORRECT USE
OF THE CAR
IN AN
EMERGENCY
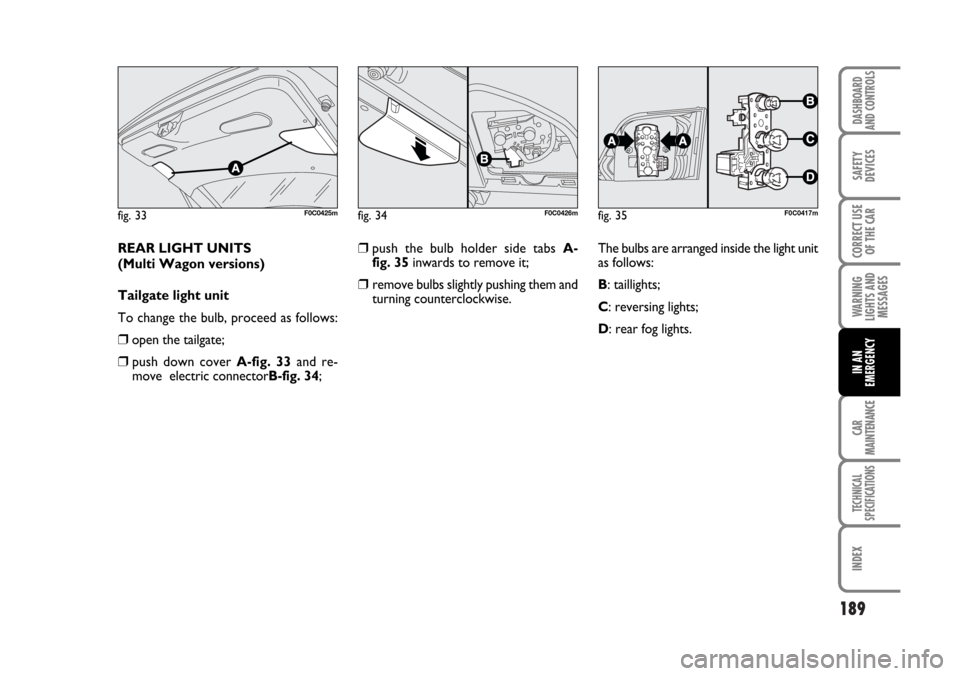
REAR LIGHT UNITS
(Multi Wagon versions)
Tailgate light unit
To change the bulb, proceed as follows:
❒open the tailgate;
❒ push down cover A-fig. 33and re-
move electric connectorB-fig. 34;
fig. 33F0C0425m
❒push the bulb holder side tabs A-
fig. 35inwards to remove it;
❒ remove bulbs slightly pushing them and
turning counterclockwise.
fig. 34F0C0426mfig. 35F0C0417m
The bulbs are arranged inside the light unit
as follows:
B: taillights;
C: reversing lights;
D: rear fog lights.
Page 191 of 274
190
WARNING
LIGHTS AND
MESSAGES
CAR
MAINTENANCE
TECHNICAL
SPECIFICATIONS
IINDEX
DASHBOARD
AND CONTROLS
SAFETY
DEVICES
CORRECT USE
OF THE CAR
IN AN
EMERGENCY
fig. 36F0C0360mfig. 37F0C0361mfig. 38F0C0419m
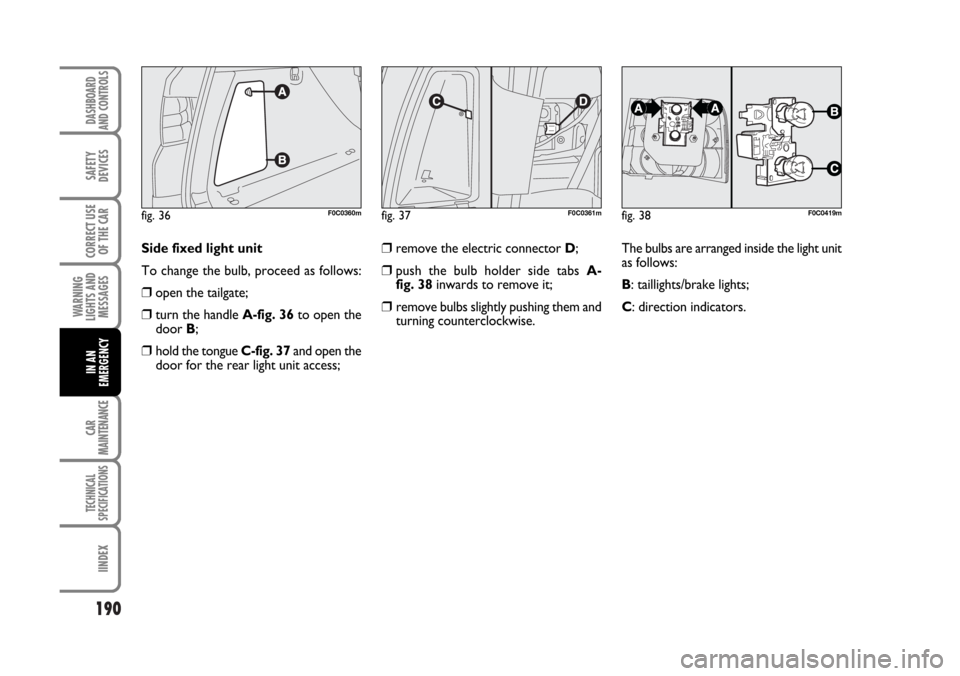
Side fixed light unit
To change the bulb, proceed as follows:
❒open the tailgate;
❒turn the handle A-fig. 36to open the
door B;
❒hold the tongue C-fig. 37and open the
door for the rear light unit access;
❒remove the electric connector D;
❒push the bulb holder side tabs A-
fig. 38inwards to remove it;
❒ remove bulbs slightly pushing them and
turning counterclockwise.The bulbs are arranged inside the light unit
as follows:
B: taillights/brake lights;
C: direction indicators.
Page 193 of 274
192
WARNING
LIGHTS AND
MESSAGES
CAR
MAINTENANCE
TECHNICAL
SPECIFICATIONS
IINDEX
DASHBOARD
AND CONTROLS
SAFETY
DEVICES
CORRECT USE
OF THE CAR
IN AN
EMERGENCY
IF AN INTERIOR LIGHT
BURNS OUT
For the type of bulb and power rating, see
“When needing to change a bulb”.
FRONT CEILING LIGHT
Versions without Skywindow
sunroof
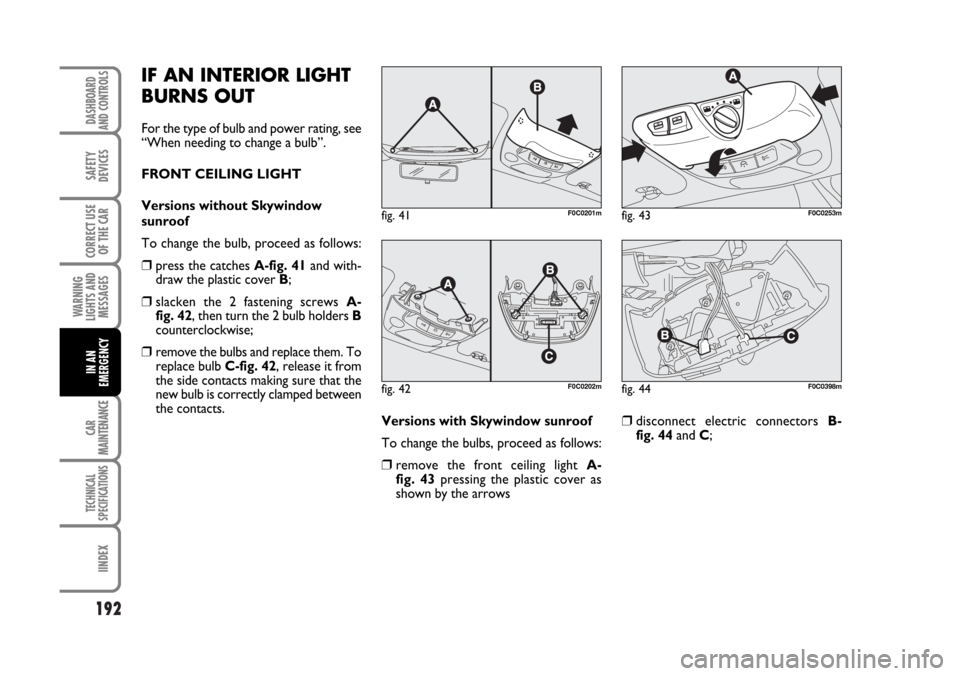
To change the bulb, proceed as follows:
❒press the catches A-fig. 41and with-
draw the plastic cover B;
❒slacken the 2 fastening screws A-
fig. 42, then turn the 2 bulb holders B
counterclockwise;
❒remove the bulbs and replace them. To
replace bulb C-fig. 42, release it from
the side contacts making sure that the
new bulb is correctly clamped between
the contacts.
Versions with Skywindow sunroof
To change the bulbs, proceed as follows:
❒remove the front ceiling light A-
fig. 43pressing the plastic cover as
shown by the arrows
❒disconnect electric connectors B-
fig. 44and C;
fig. 41F0C0201m
fig. 42F0C0202m
fig. 43F0C0253m
fig. 44F0C0398m
Page 194 of 274
193
WARNING
LIGHTS AND
MESSAGES
CAR
MAINTENANCE
TECHNICAL
SPECIFICATIONS
INDEX
DASHBOARD
AND CONTROLS
SAFETY
DEVICES
CORRECT USE
OF THE CAR
IN AN
EMERGENCY
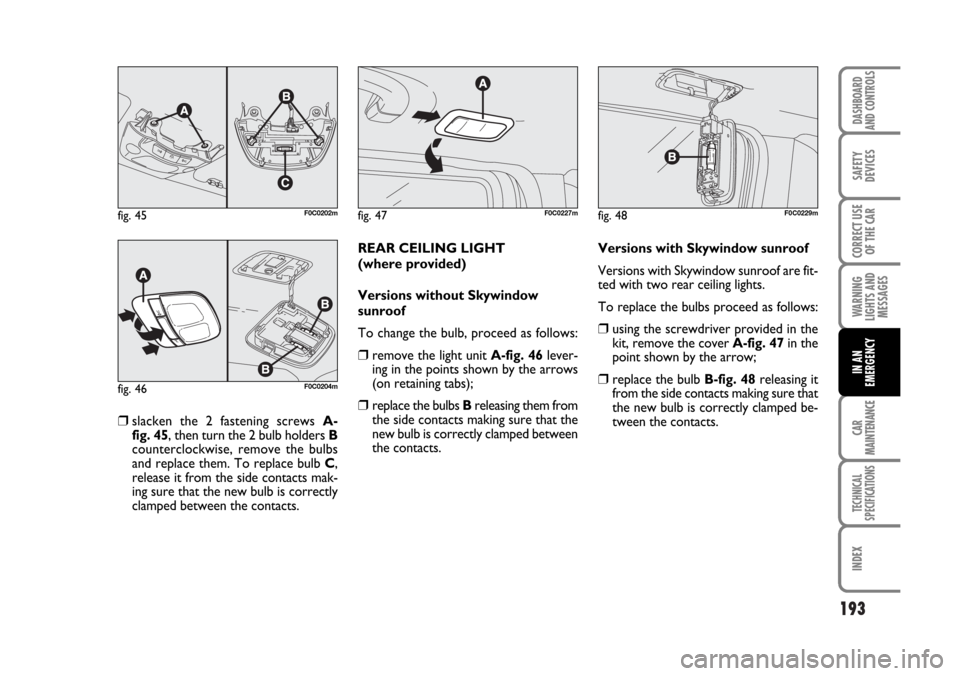
❒slacken the 2 fastening screws A-
fig. 45, then turn the 2 bulb holders B
counterclockwise, remove the bulbs
and replace them. To replace bulb C,
release it from the side contacts mak-
ing sure that the new bulb is correctly
clamped between the contacts.REAR CEILING LIGHT
(where provided)
Versions without Skywindow
sunroof
To change the bulb, proceed as follows:
❒remove the light unit A-fig. 46lever-
ing in the points shown by the arrows
(on retaining tabs);
❒replace the bulbs Breleasing them from
the side contacts making sure that the
new bulb is correctly clamped between
the contacts.Versions with Skywindow sunroof
Versions with Skywindow sunroof are fit-
ted with two rear ceiling lights.
To replace the bulbs proceed as follows:
❒using the screwdriver provided in the
kit, remove the cover A-fig. 47in the
point shown by the arrow;
❒replace the bulb B-fig. 48releasing it
from the side contacts making sure that
the new bulb is correctly clamped be-
tween the contacts.
fig. 45F0C0202m
fig. 46F0C0204m
fig. 47F0C0227mfig. 48F0C0229m
Page 203 of 274
202
WARNING
LIGHTS AND
MESSAGES
CAR
MAINTENANCE
TECHNICAL
SPECIFICATIONS
IINDEX
DASHBOARD
AND CONTROLS
SAFETY
DEVICES
CORRECT USE
OF THE CAR
IN AN
EMERGENCY
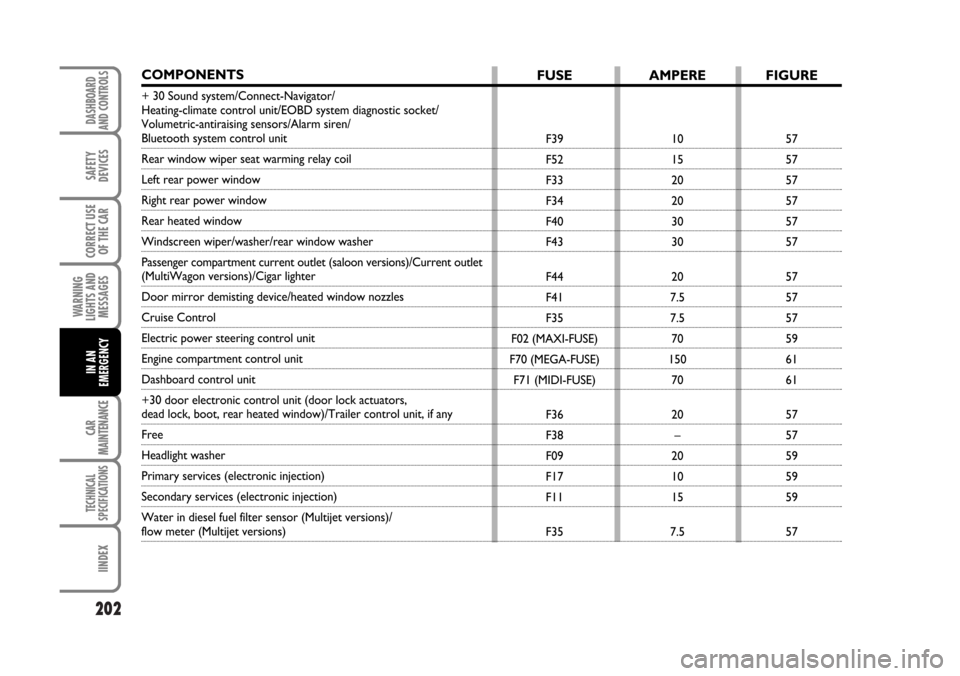
COMPONENTS
+ 30 Sound system/Connect-Navigator/
Heating-climate control unit/EOBD system diagnostic socket/
Volumetric-antiraising sensors/Alarm siren/
Bluetooth system control unit
Rear window wiper seat warming relay coil
Left rear power window
Right rear power window
Rear heated window
Windscreen wiper/washer/rear window washer
Passenger compartment current outlet (saloon versions)/Current outlet
(MultiWagon versions)/Cigar lighter
Door mirror demisting device/heated window nozzles
Cruise Control
Electric power steering control unit
Engine compartment control unit
Dashboard control unit
+30 door electronic control unit (door lock actuators,
dead lock, boot, rear heated window)/Trailer control unit, if any
Free
Headlight washer
Primary services (electronic injection)
Secondary services (electronic injection)
Water in diesel fuel filter sensor (Multijet versions)/
flow meter (Multijet versions)
FUSE
F39
F52
F33
F34
F40
F43
F44
F41
F35
F02 (MAXI-FUSE)
F70 (MEGA-FUSE)
F71 (MIDI-FUSE)
F36
F38
F09
F17
F11
F35
AMPERE
10
15
20
20
30
30
20
7.5
7.5
70
150
70
20
–
20
10
15
7.5
FIGURE
57
57
57
57
57
57
57
57
57
59
61
61
57
57
59
59
59
57
Page 208 of 274
207
WARNING
LIGHTS AND
MESSAGES
CAR
MAINTENANCE
TECHNICAL
SPECIFICATIONS
INDEX
DASHBOARD
AND CONTROLS
SAFETY
DEVICES
CORRECT USE
OF THE CAR
IN AN
EMERGENCY
fig. 67F0C0384m
fig. 68F0C0387m
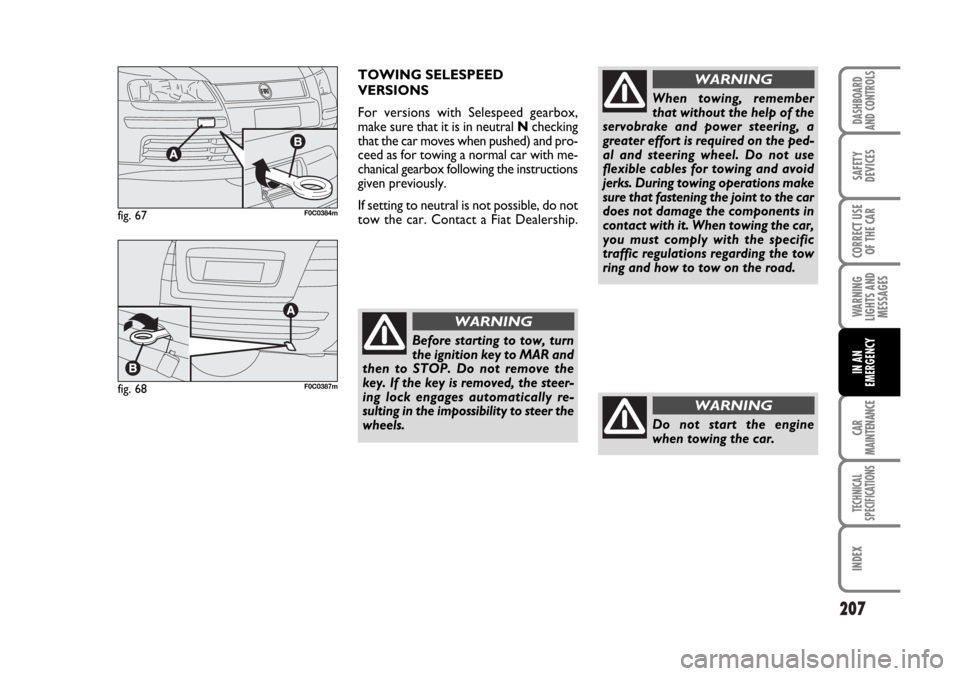
TOWING SELESPEED
VERSIONS
For versions with Selespeed gearbox,
make sure that it is in neutral Nchecking
that the car moves when pushed) and pro-
ceed as for towing a normal car with me-
chanical gearbox following the instructions
given previously.
If setting to neutral is not possible, do not
tow the car. Contact a Fiat Dealership.
Before starting to tow, turn
the ignition key to MAR and
then to STOP. Do not remove the
key. If the key is removed, the steer-
ing lock engages automatically re-
sulting in the impossibility to steer the
wheels.
WARNING
When towing, remember
that without the help of the
servobrake and power steering, a
greater effort is required on the ped-
al and steering wheel. Do not use
flexible cables for towing and avoid
jerks. During towing operations make
sure that fastening the joint to the car
does not damage the components in
contact with it. When towing the car,
you must comply with the specific
traffic regulations regarding the tow
ring and how to tow on the road.
WARNING
Do not start the engine
when towing the car.
WARNING
Page 212 of 274
211
WARNING
LIGHTS AND
MESSAGES
TECHNICAL
SPECIFICATIONS
INDEX
DASHBOARD
AND CONTROLS
SAFETY
DEVICES
CORRECT USE
OF THE CAR
IN AN
EMERGENCY
CAR
MAINTENANCE
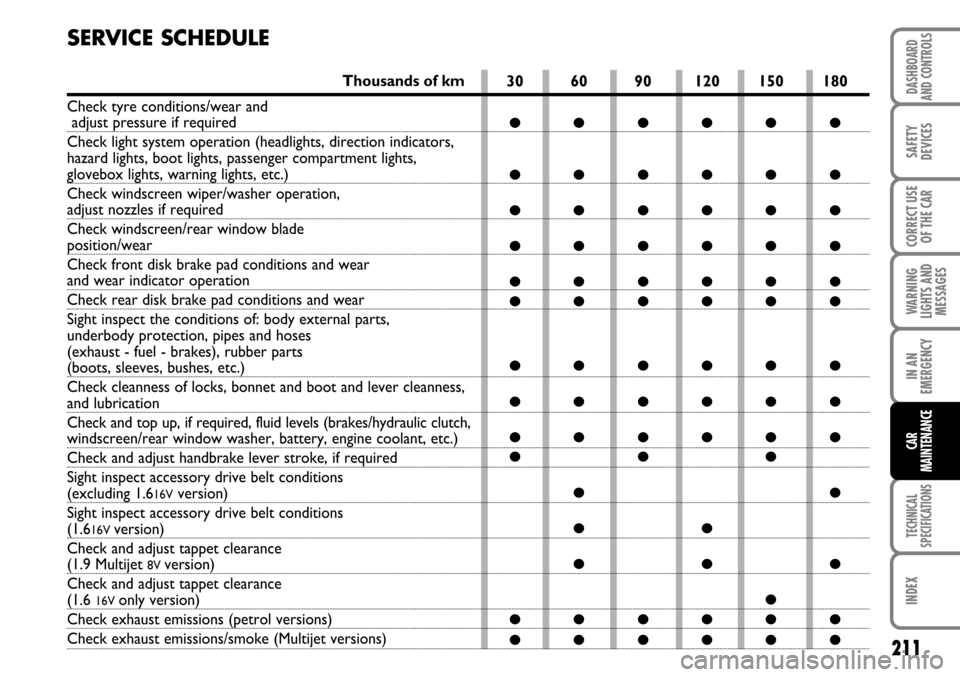
SERVICE SCHEDULE
30 60 90 120 150 180
●●●●●●
●●●●●●
●●●●●●
●●●●●●
●●●●●●
●●●●●●
●●●●●●
●●●●●●
●●●●●●
●●●
●●
●●
●●●
●
●●●●●●
●●●●●●
Thousands of km
Check tyre conditions/wear and
adjust pressure if required
Check light system operation (headlights, direction indicators,
hazard lights, boot lights, passenger compartment lights,
glovebox lights, warning lights, etc.)
Check windscreen wiper/washer operation,
adjust nozzles if required
Check windscreen/rear window blade
position/wear
Check front disk brake pad conditions and wear
and wear indicator operation
Check rear disk brake pad conditions and wear
Sight inspect the conditions of: body external parts,
underbody protection, pipes and hoses
(exhaust - fuel - brakes), rubber parts
(boots, sleeves, bushes, etc.)
Check cleanness of locks, bonnet and boot and lever cleanness,
and lubrication
Check and top up, if required, fluid levels (brakes/hydraulic clutch,
windscreen/rear window washer, battery, engine coolant, etc.)
Check and adjust handbrake lever stroke, if required
Sight inspect accessory drive belt conditions
(excluding 1.616Vversion)
Sight inspect accessory drive belt conditions
(1.616V version)
Check and adjust tappet clearance
(1.9 Multijet 8V version)
Check and adjust tappet clearance
(1.6 16V only version)
Check exhaust emissions (petrol versions)
Check exhaust emissions/smoke (Multijet versions)
Page 214 of 274
213
WARNING
LIGHTS AND
MESSAGES
TECHNICAL
SPECIFICATIONS
INDEX
DASHBOARD
AND CONTROLS
SAFETY
DEVICES
CORRECT USE
OF THE CAR
IN AN
EMERGENCY
CAR
MAINTENANCE
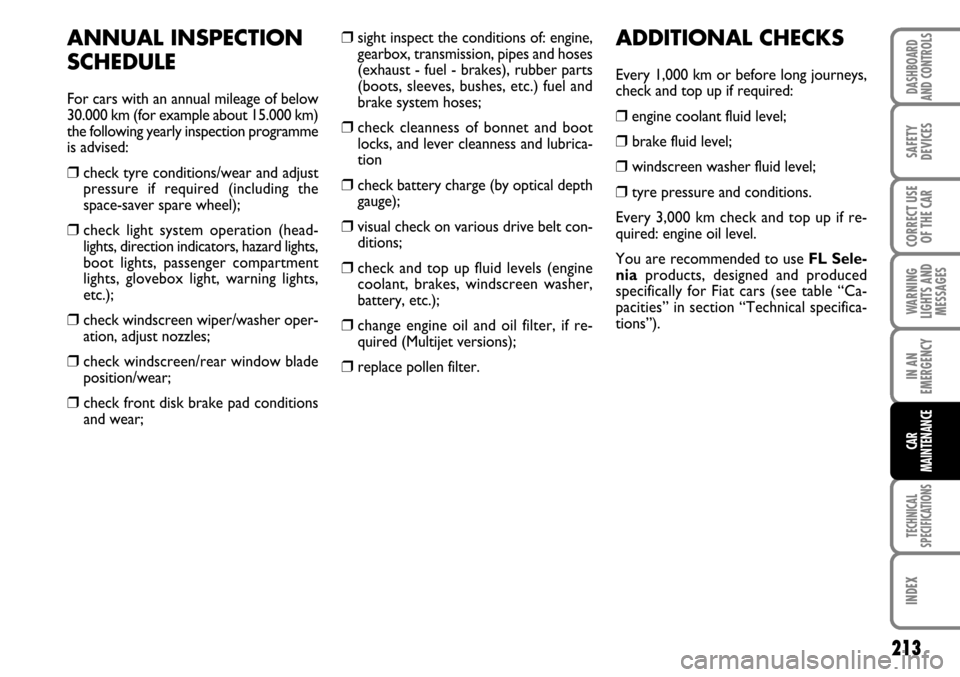
ANNUAL INSPECTION
SCHEDULE
For cars with an annual mileage of below
30.000 km (for example about 15.000 km)
the following yearly inspection programme
is advised:
❒check tyre conditions/wear and adjust
pressure if required (including the
space-saver spare wheel);
❒check light system operation (head-
lights, direction indicators, hazard lights,
boot lights, passenger compartment
lights, glovebox light, warning lights,
etc.);
❒check windscreen wiper/washer oper-
ation, adjust nozzles;
❒check windscreen/rear window blade
position/wear;
❒ check front disk brake pad conditions
and wear;
❒sight inspect the conditions of: engine,
gearbox, transmission, pipes and hoses
(exhaust - fuel - brakes), rubber parts
(boots, sleeves, bushes, etc.) fuel and
brake system hoses;
❒check cleanness of bonnet and boot
locks, and lever cleanness and lubrica-
tion
❒check battery charge (by optical depth
gauge);
❒visual check on various drive belt con-
ditions;
❒check and top up fluid levels (engine
coolant, brakes, windscreen washer,
battery, etc.);
❒change engine oil and oil filter, if re-
quired (Multijet versions);
❒replace pollen filter.
ADDITIONAL CHECKS
Every 1,000 km or before long journeys,
check and top up if required:
❒engine coolant fluid level;
❒ brake fluid level;
❒ windscreen washer fluid level;
❒tyre pressure and conditions.
Every 3,000 km check and top up if re-
quired: engine oil level.
You are recommended to use FL Sele-
niaproducts, designed and produced
specifically for Fiat cars (see table “Ca-
pacities” in section “Technical specifica-
tions”).