clock FIAT STRADA 2011 Owner handbook (in English)
[x] Cancel search | Manufacturer: FIAT, Model Year: 2011, Model line: STRADA, Model: FIAT STRADA 2011Pages: 195, PDF Size: 3.68 MB
Page 128 of 195

126
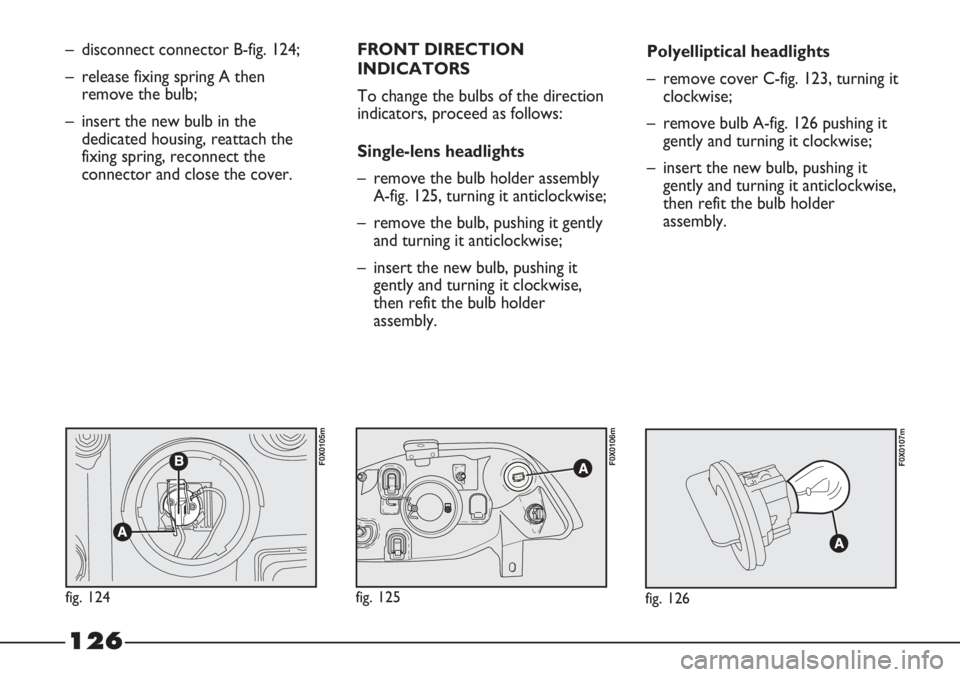
– disconnect connector B-fig. 124;
– release fixing spring A then
remove the bulb;
– insert the new bulb in the
dedicated housing, reattach the
fixing spring, reconnect the
connector and close the cover.FRONT DIRECTION
INDICATORS
To change the bulbs of the direction
indicators, proceed as follows:
Single-lens headlights
– remove the bulb holder assembly
A-fig. 125, turning it anticlockwise;
– remove the bulb, pushing it gently
and turning it anticlockwise;
– insert the new bulb, pushing it
gently and turning it clockwise,
then refit the bulb holder
assembly.Polyelliptical headlights
– remove cover C-fig. 123, turning it
clockwise;
– remove bulb A-fig. 126 pushing it
gently and turning it clockwise;
– insert the new bulb, pushing it
gently and turning it anticlockwise,
then refit the bulb holder
assembly.
fig. 126
F0X0107m
fig. 124
F0X0105m
fig. 125
F0X0106m
Page 129 of 195

127
FRONT SIDE LIGHTS
To change the bulbs of the side
lights, proceed as follows:
Single-lens headlights
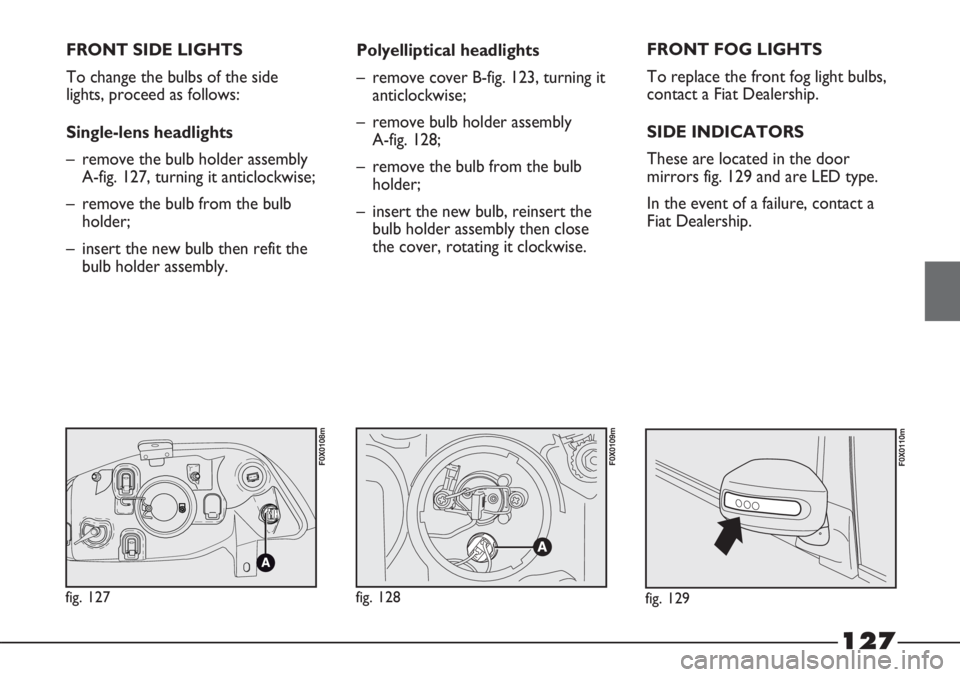
– remove the bulb holder assembly
A-fig. 127, turning it anticlockwise;
– remove the bulb from the bulb
holder;
– insert the new bulb then refit the
bulb holder assembly.Polyelliptical headlights
– remove cover B-fig. 123, turning it
anticlockwise;
– remove bulb holder assembly
A-fig. 128;
– remove the bulb from the bulb
holder;
– insert the new bulb, reinsert the
bulb holder assembly then close
the cover, rotating it clockwise.FRONT FOG LIGHTS
To replace the front fog light bulbs,
contact a Fiat Dealership.
SIDE INDICATORS
These are located in the door
mirrors fig. 129 and are LED type.
In the event of a failure, contact a
Fiat Dealership.
fig. 129
F0X0110m
fig. 127
F0X0108m
fig. 128
F0X0109m
Page 130 of 195

128
DRIVING LIGHTS
(Adventure version)
To replace the bulbs of the driving
lights, proceed as follows:
– steer the wheels inwards so that
you have a greater space in which
to work;
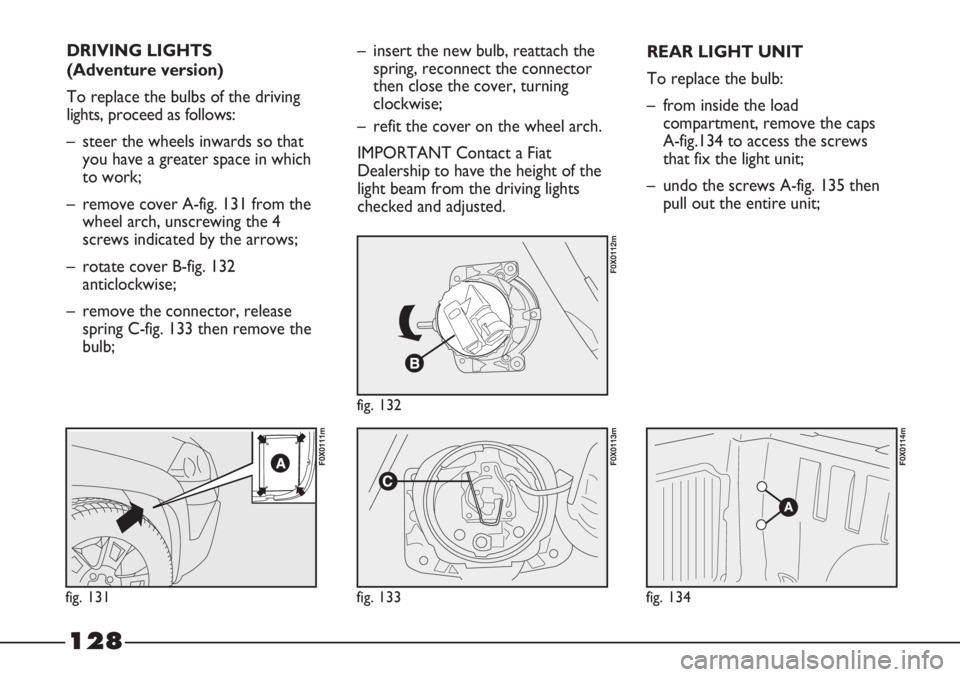
– remove cover A-fig. 131 from the
wheel arch, unscrewing the 4
screws indicated by the arrows;
– rotate cover B-fig. 132
anticlockwise;
– remove the connector, release
spring C-fig. 133 then remove the
bulb;
fig. 131
F0X0111m
fig. 132
F0X0112m
fig. 133
F0X0113m
fig. 134
F0X0114m
– insert the new bulb, reattach the
spring, reconnect the connector
then close the cover, turning
clockwise;
– refit the cover on the wheel arch.
IMPORTANT Contact a Fiat
Dealership to have the height of the
light beam from the driving lights
checked and adjusted.REAR LIGHT UNIT
To replace the bulb:
– from inside the load
compartment, remove the caps
A-fig.134 to access the screws
that fix the light unit;
– undo the screws A-fig. 135 then
pull out the entire unit;
Page 131 of 195

129
fig. 135
F0X0115m
fig. 136
F0X0116m
fig. 137
F0X0117m
– disconnect the connector then
undo the screws A-fig. 136 to
access the bulbs to be replaced;
– remove the bulbs, pushing them
slightly and turning them
anticlockwise;
The bulbs fig. 136 are:
B - 12V-P21/5W for the brake lights
C - 12V-P21W for the reversing
lights
D - 12V-P21W for the direction
indicators
E - 12V-P21/5W for the side lights
and rear fog lights.3rdBRAKE LIGHT
The third brake light is LED type.
In the event of a failure, contact a
Fiat Dealership.NUMBER PLATE LIGHT
fig. 137
To replace the bulb:
1) undo the fixing screws A and
remove the lens.
2) remove the bulb holder, rotating
it slightly, and replace press-fitted
bulb B.
Page 132 of 195

130
IF AN INTERNAL LIGHT
STOPS WORKING
FRONT ROOF LIGHT
With tilting lens
To replace the bulb:
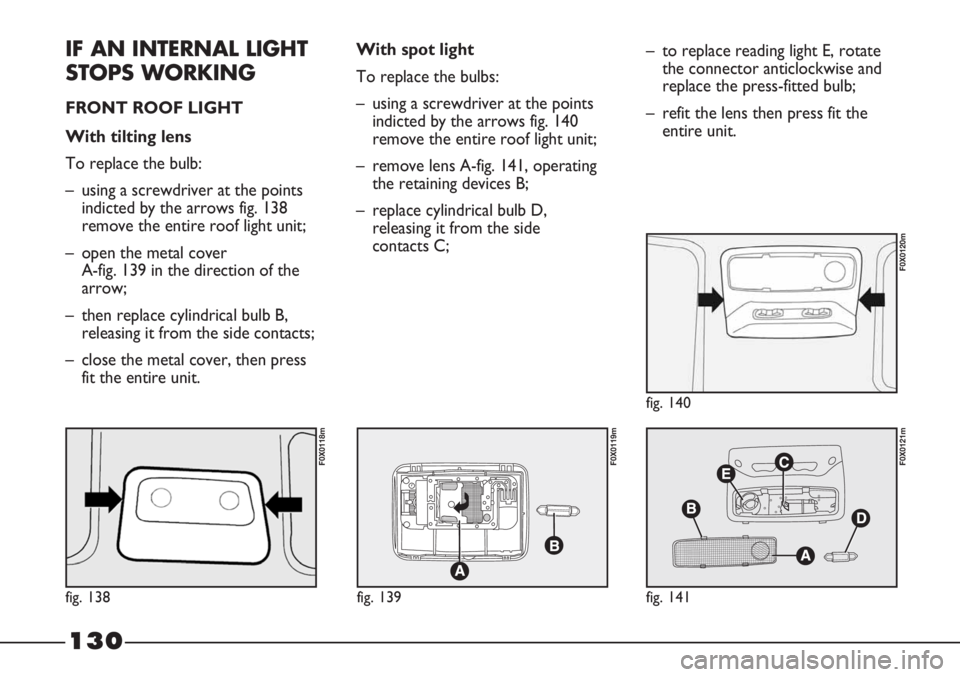
– using a screwdriver at the points
indicted by the arrows fig. 138
remove the entire roof light unit;
– open the metal cover
A-fig. 139 in the direction of the
arrow;
– then replace cylindrical bulb B,
releasing it from the side contacts;
– close the metal cover, then press
fit the entire unit.With spot light
To replace the bulbs:
– using a screwdriver at the points
indicted by the arrows fig. 140
remove the entire roof light unit;
– remove lens A-fig. 141, operating
the retaining devices B;
– replace cylindrical bulb D,
releasing it from the side
contacts C;– to replace reading light E, rotate
the connector anticlockwise and
replace the press-fitted bulb;
– refit the lens then press fit the
entire unit.
fig. 138
F0X0118m
fig. 139
F0X0119m
fig. 141
F0X0121m
fig. 140
F0X0120m