dashboard FIAT STRADA 2015 Owner handbook (in English)
[x] Cancel search | Manufacturer: FIAT, Model Year: 2015, Model line: STRADA, Model: FIAT STRADA 2015Pages: 187, PDF Size: 8.06 MB
Page 14 of 187
12
INSTRUMENT PANEL
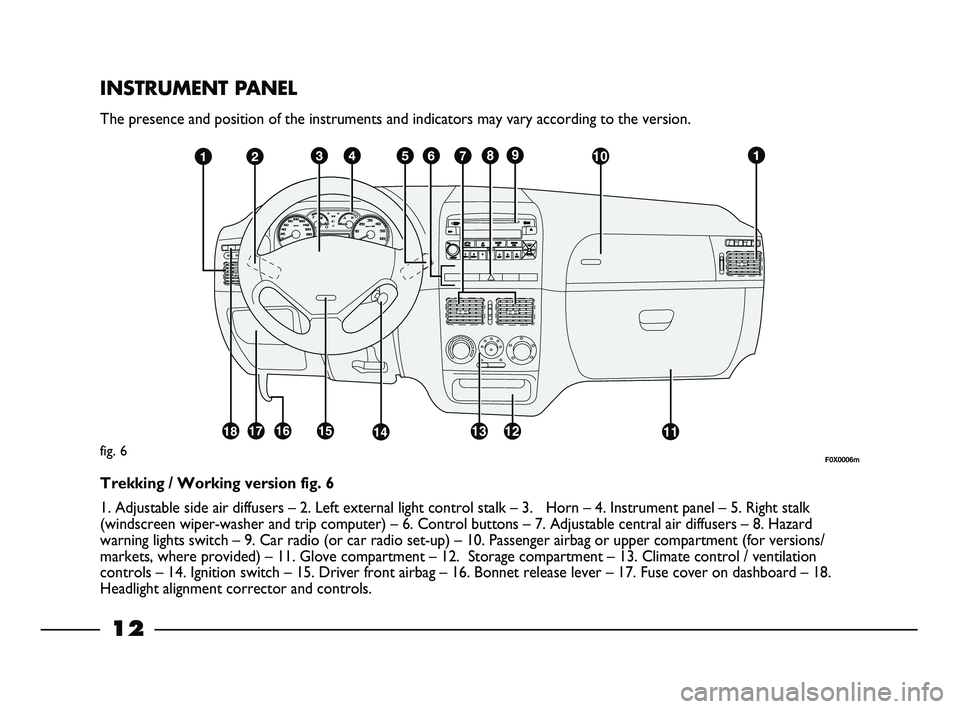
The presence and position of the instruments and indicators may vary according to the version.
fig. 6
Trekking / Working version fig. 6
1. Adjustable side air diffusers – 2. Left external light control stalk – 3. Horn – 4. Instrument panel – 5. Right stalk
(windscreen wiper-washer and trip computer) – 6. Control buttons – 7. Adjustable central air diffusers – 8. Hazard
warning lights switch – 9. Car radio (or car radio set-up) – 10. Passenger airbag or upper compartment (for versions/
markets, where provided) – 11. Glove compartment – 12. Storage compartment – 13. Climate control / ventilation
controls – 14. Ignition switch – 15. Driver front airbag – 16. Bonnet release lever – 17. Fuse cover on dashboard – 18.
Headlight alignment corrector and controls.
F0X0006m
007-044 STRADA LUM GB 1ed 9-01-2012 14:49 Pagina 12
Page 15 of 187
13
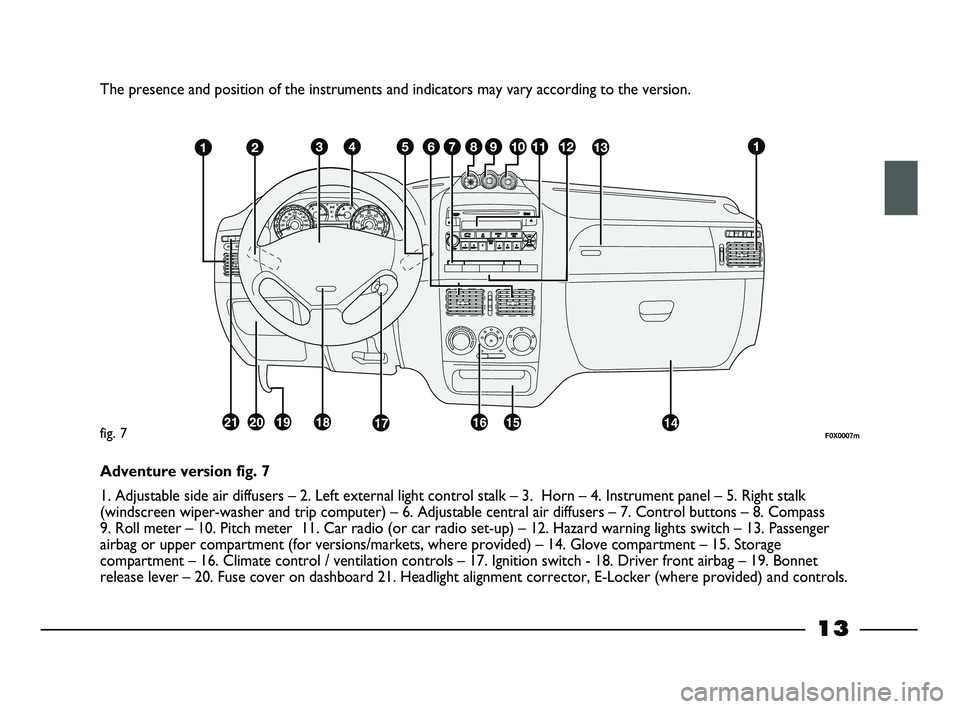
The presence and position of the instruments and indicators may vary according to the version.
F0X0007mfig. 7
Adventure version fig. 7
1. Adjustable side air diffusers – 2. Left external light control stalk – 3. Horn – 4. Instrument panel – 5. Right stalk
(windscreen wiper-washer and trip computer) – 6. Adjustable central air diffusers – 7. Control buttons – 8. Compass
9. Roll meter – 10. Pitch meter 11. Car radio (or car radio set-up) – 12. Hazard warning lights switch – 13. Passenger
airbag or upper compartment (for versions/markets, where provided) – 14. Glove compartment – 15. Storage
compartment – 16. Climate control / ventilation controls – 17. Ignition switch - 18. Driver front airbag – 19. Bonnet
release lever – 20. Fuse cover on dashboard 21. Headlight alignment corrector, E-Locker (where provided) and controls.
007-044 STRADA LUM GB 1ed 9-01-2012 14:49 Pagina 13
Page 34 of 187
32
MULTIFUNCTION
DISPLAY
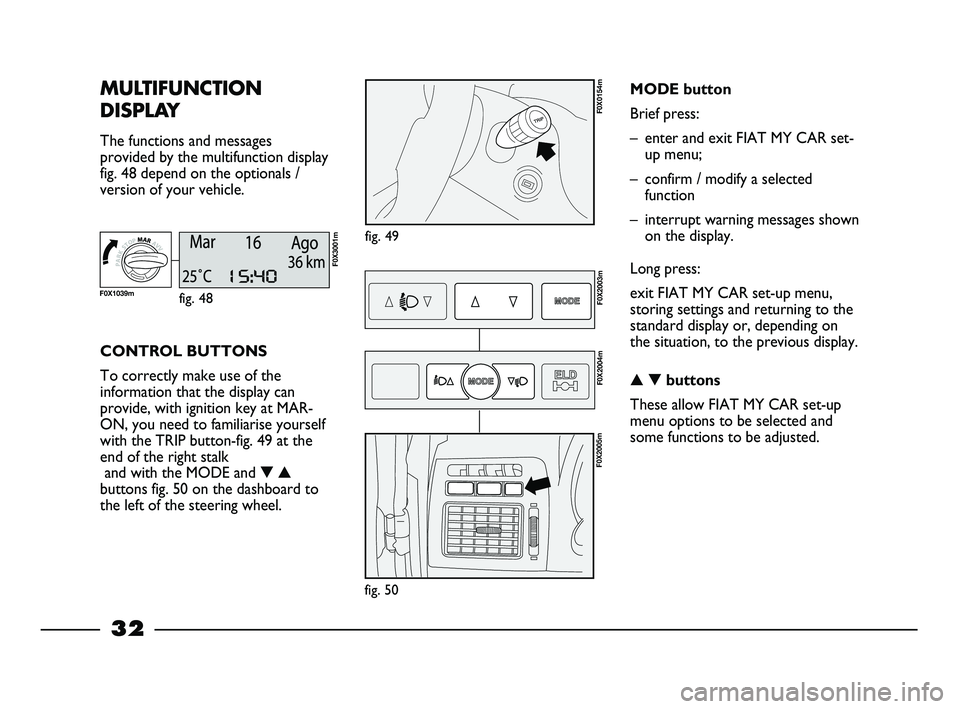
The functions and messages
provided by the multifunction display
fig. 48 depend on the optionals /
version of your vehicle.
fig. 49
F0X0154m
CONTROL BUTTONS
To correctly make use of the
information that the display can
provide, with ignition key at MAR-
ON, you need to familiarise yourself
with the TRIP button-fig. 49 at the
end of the right stalk
and with the MODE and ▼▲
buttons fig. 50 on the dashboard to
the left of the steering wheel.MODE button
Brief press:
– enter and exit FIAT MY CAR set-
up menu;
– confirm / modify a selected
function
– interrupt warning messages shown
on the display.
Long press:
exit FIAT MY CAR set-up menu,
storing settings and returning to the
standard display or, depending on
the situation, to the previous display.
▲▼buttons
These allow FIAT MY CAR set-up
menu options to be selected and
some functions to be adjusted.
fig. 48
F0X3001m
F0X1039mF0X2003m
F0X2004m
fig. 50
F0X2005m
007-044 STRADA LUM GB 1ed 9-01-2012 14:49 Pagina 32
Page 59 of 187
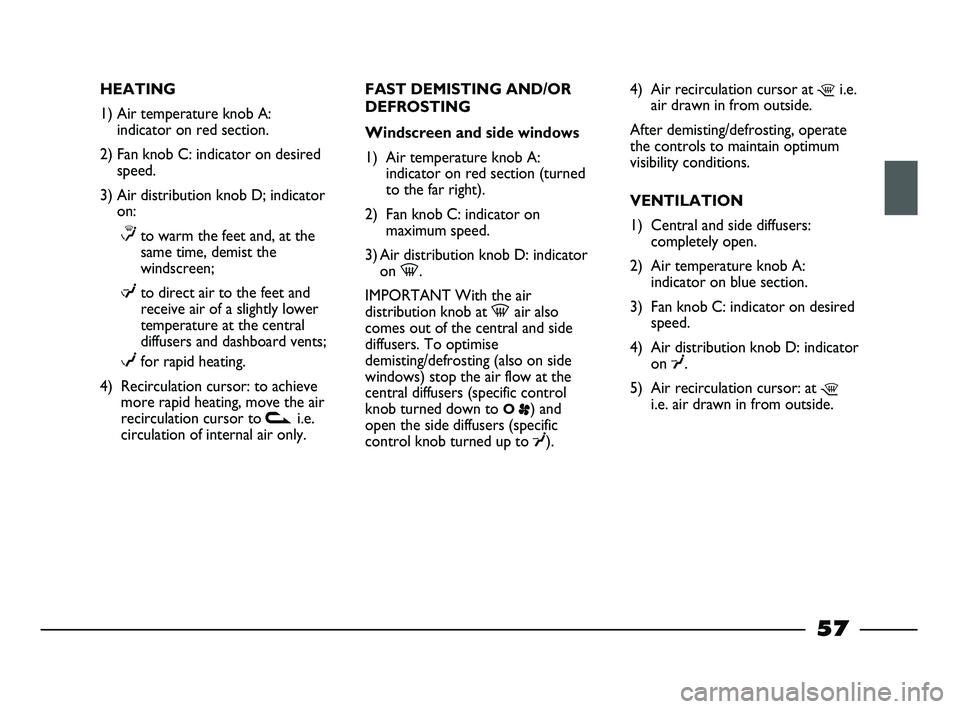
HEATING
1) Air temperature knob A:
indicator on red section.
2) Fan knob C: indicator on desired
speed.
3) Air distribution knob D; indicator
on:
≤to warm the feet and, at the
same time, demist the
windscreen;
μto direct air to the feet and
receive air of a slightly lower
temperature at the central
diffusers and dashboard vents;
wfor rapid heating.
4) Recirculation cursor: to achieve
more rapid heating, move the air
recirculation cursor to vi.e.
circulation of internal air only.FAST DEMISTING AND/OR
DEFROSTING
Windscreen and side windows
1) Air temperature knob A:
indicator on red section (turned
to the far right).
2) Fan knob C: indicator on
maximum speed.
3) Air distribution knob D: indicator
on -.
IMPORTANT With the air
distribution knob at -air also
comes out of the central and side
diffusers. To optimise
demisting/defrosting (also on side
windows) stop the air flow at the
central diffusers (specific control
knob turned down to
O
p) and
open the side diffusers (specific
control knob turned up to
¥).4) Air recirculation cursor at
¶i.e.
air drawn in from outside.
After demisting/defrosting, operate
the controls to maintain optimum
visibility conditions.
VENTILATION
1) Central and side diffusers:
completely open.
2) Air temperature knob A:
indicator on blue section.
3) Fan knob C: indicator on desired
speed.
4) Air distribution knob D: indicator
on
¥.
5) Air recirculation cursor: at
¶i.e. air drawn in from outside.
57
045-094 STRADA LUM GB 1ed 23-01-2012 9:10 Pagina 57
Page 62 of 187
IMPORTANT With the air
distribution knob at -air also
comes out of the central and side
diffusers. To optimise demisting
/defrosting (also on side windows)
stop the air flow at the central
diffusers (specific control knob
turned down to
Op) and open the
side diffusers (specific control knob
turned up to
¥).
After demisting, operate the
controls to maintain optimum
visibility conditions.
EXTERIOR LIGHTS
The left stalk operates most of the
external lights.
The ignition key has to be at MAR
for the exterior lights to switch on.
The instrument panel and the
various dashboard controls will
switch on with the external lights.
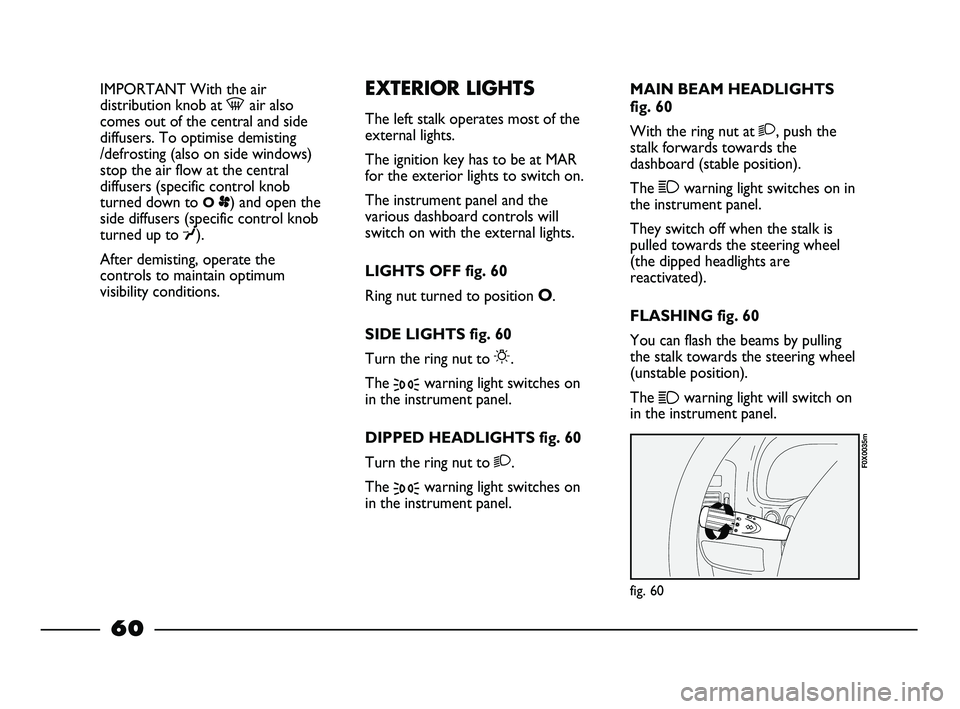
LIGHTS OFF fig. 60
Ring nut turned to position
O.
SIDE LIGHTS fig. 60
Turn the ring nut to
6.
The
3warning light switches on
in the instrument panel.
DIPPED HEADLIGHTS fig. 60
Turn the ring nut to
2.
The
3warning light switches on
in the instrument panel.MAIN BEAM HEADLIGHTS
fig. 60
With the ring nut at
2, push the
stalk forwards towards the
dashboard (stable position).
The
1warning light switches on in
the instrument panel.
They switch off when the stalk is
pulled towards the steering wheel
(the dipped headlights are
reactivated).
FLASHING fig. 60
You can flash the beams by pulling
the stalk towards the steering wheel
(unstable position).
The
1warning light will switch on
in the instrument panel.
fig. 60
F0X0035m
60
045-094 STRADA LUM GB 1ed 23-01-2012 9:10 Pagina 60
Page 85 of 187

they may not provide any additional
protection compared with seat belts,
so their activation would not be
appropriate.
In these cases, non-deployment does
not indicate a system malfunction.
Do not apply stickers or
other objects to the
steering wheel or the passenger
side airbag cover. Never put
objects (e.g. mobile phones) on
the passenger side of the
dashboard since they could
interfere with correct inflation
of the passenger air bag and
also cause serious injury to the
passengers.
WARNING
Their volume at maximum inflation
fills most of the space between the
steering wheel and the driver and
between the dashboard and the
passenger. The airbags are not
deployed in the event of minor front
collisions (for which the restraining
action of the seat belts is sufficient).
Seat belts must always be worn. In
the event of frontal impact they
guarantee correct positioning of the
passenger.
fig. 99
F0X0055m
fig. 98
F0X0054m
DRIVER SIDE FRONT
AIRBAG fig. 98
This consists of an instantly inflating
cushion contained in a special recess
in the centre of the steering wheel.
PASSENGER SIDE FRONT
AIRBAG fig. 99
(for versions/markets,
where provided)
This consists of an instantly inflating
cushion contained in a special recess
in the dashboard: this bag has a
larger volume than that on the
driver’s side.
The driver side and passenger side
front airbags have been designed and
calibrated to protect front seat
occupants wearing seat belts.
83
045-094 STRADA LUM GB 1ed 23-01-2012 9:10 Pagina 83
Page 86 of 187
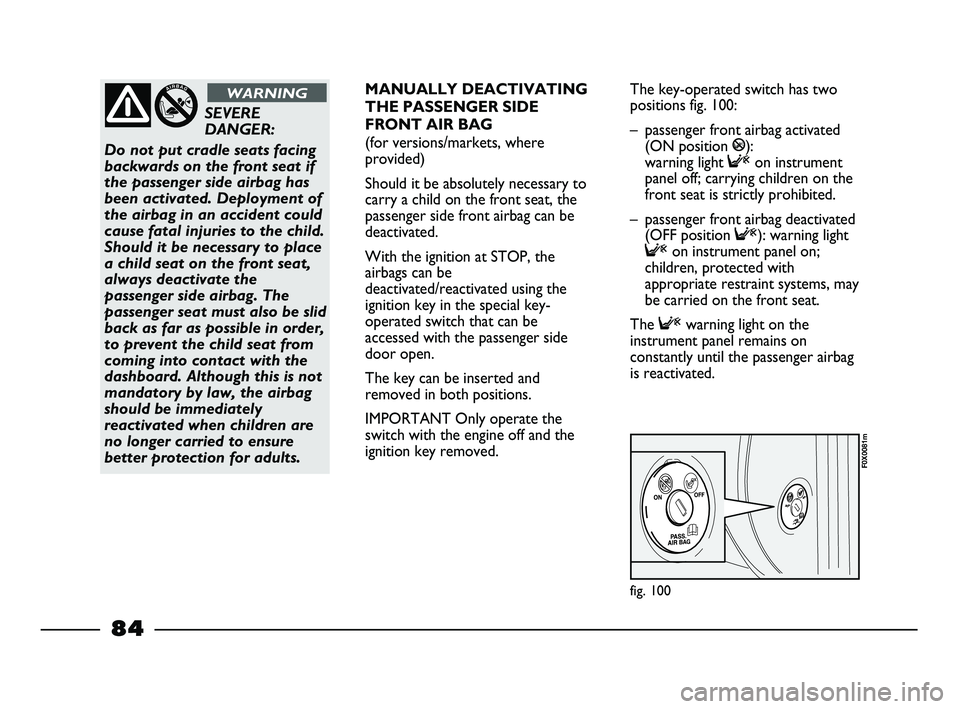
fig. 100
F0X0081m
SEVERE
DANGER:
Do not put cradle seats facing
backwards on the front seat if
the passenger side airbag has
been activated. Deployment of
the airbag in an accident could
cause fatal injuries to the child.
Should it be necessary to place
a child seat on the front seat,
always deactivate the
passenger side airbag. The
passenger seat must also be slid
back as far as possible in order,
to prevent the child seat from
coming into contact with the
dashboard. Although this is not
mandatory by law, the airbag
should be immediately
reactivated when children are
no longer carried to ensure
better protection for adults.
WARNINGMANUALLY DEACTIVATING
THE PASSENGER SIDE
FRONT AIR BAG
(for versions/markets, where
provided)
Should it be absolutely necessary to
carry a child on the front seat, the
passenger side front airbag can be
deactivated.
With the ignition at STOP, the
airbags can be
deactivated/reactivated using the
ignition key in the special key-
operated switch that can be
accessed with the passenger side
door open.
The key can be inserted and
removed in both positions.
IMPORTANT Only operate the
switch with the engine off and the
ignition key removed.The key-operated switch has two
positions fig. 100:
– passenger front airbag activated
(ON position
P):
warning light
Fon instrument
panel off; carrying children on the
front seat is strictly prohibited.
– passenger front airbag deactivated
(OFF position
F): warning light
Fon instrument panel on;
children, protected with
appropriate restraint systems, may
be carried on the front seat.
The
Fwarning light on the
instrument panel remains on
constantly until the passenger airbag
is reactivated.
84
045-094 STRADA LUM GB 1ed 23-01-2012 9:10 Pagina 84
Page 90 of 187
E-LOCKER SYSTEM
ELD - ELECTRONIC LOCKING
DIFFERENTIAL
(for versions/markets,
where provided)
Some versions may feature the
E-Locker system, used in conditions
where the vehicle may slip.
This system can lock the front
differential, supplying both front
wheels with the same rotational
speed; in doing so, the wheel with
the greatest grip will be the one
which can propel the vehicle.
The E-Locker System
must not be considered
as a kind of “four-wheel drive”:
the system must not be used on
normal surfaces (dry asphalt
etc.). In any case, the system
deactivates automatically as
soon as the vehicle speed
exceeds 20 km/h.
WARNING
You are advised to use
the E-Locker System
only when a wheel loses grip
resulting in conditions of low
friction (e.g. on roads with
mud, sand, stones, wet grass
etc.).
WARNING
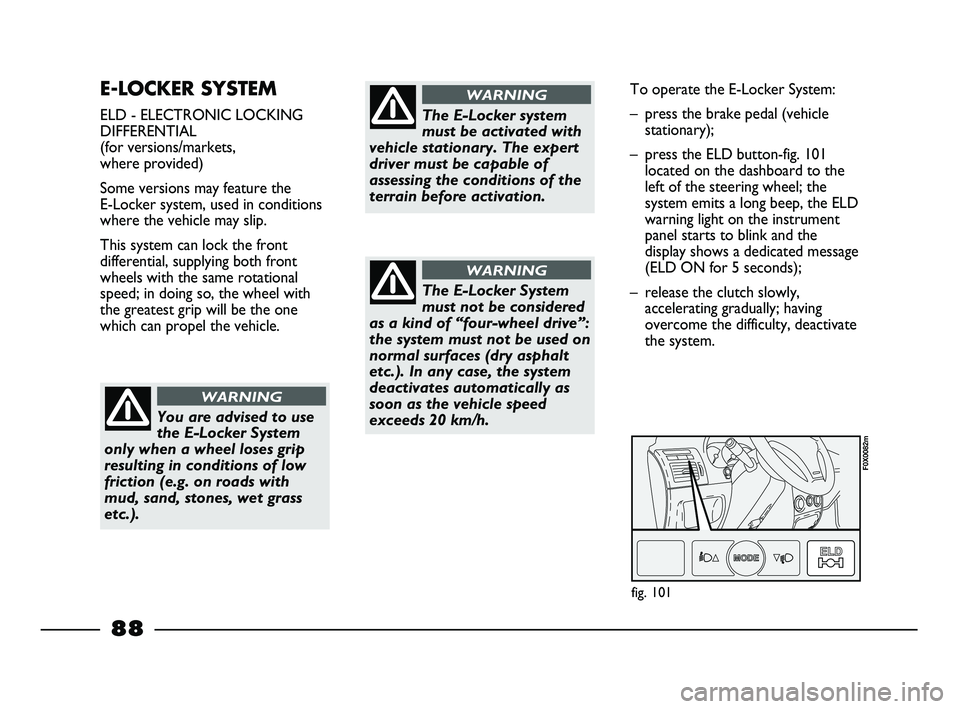
To operate the E-Locker System:
– press the brake pedal (vehicle
stationary);
– press the ELD button-fig. 101
located on the dashboard to the
left of the steering wheel; the
system emits a long beep, the ELD
warning light on the instrument
panel starts to blink and the
display shows a dedicated message
(ELD ON for 5 seconds);
– release the clutch slowly,
accelerating gradually; having
overcome the difficulty, deactivate
the system.
The E-Locker system
must be activated with
vehicle stationary. The expert
driver must be capable of
assessing the conditions of the
terrain before activation.
WARNING
fig. 101
F0X0082m
88
045-094 STRADA LUM GB 1ed 23-01-2012 9:10 Pagina 88
Page 125 of 187
123
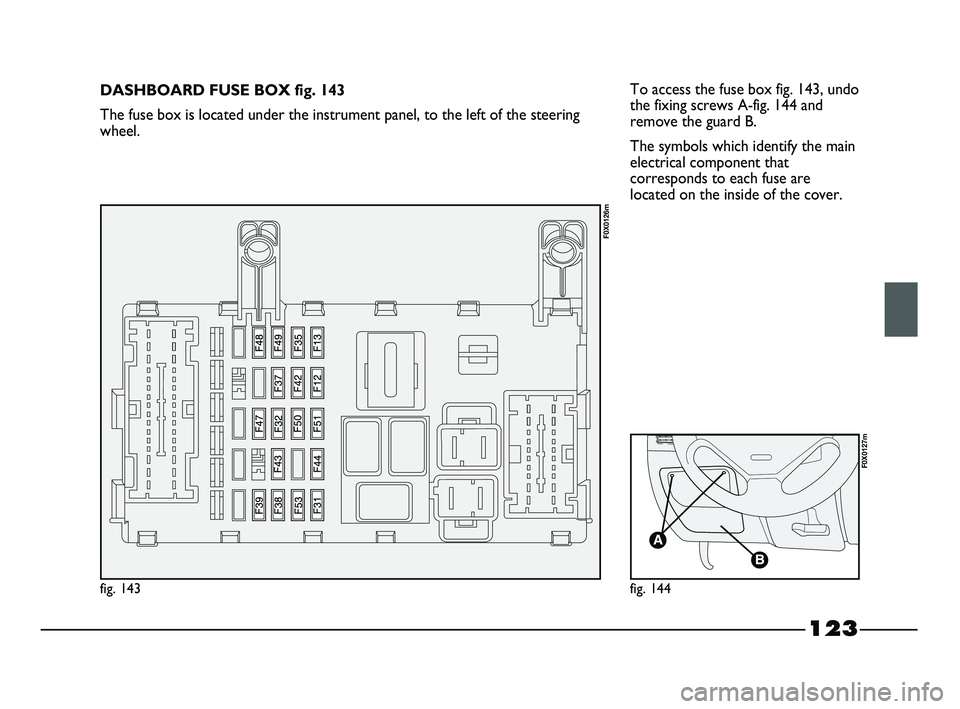
To access the fuse box fig. 143, undo
the fixing screws A-fig. 144 and
remove the guard B.
The symbols which identify the main
electrical component that
corresponds to each fuse are
located on the inside of the cover.
fig. 143
F0X0126m
fig. 144
F0X0127m
DASHBOARD FUSE BOX fig. 143
The fuse box is located under the instrument panel, to the left of the steering
wheel.
107-132 STRADA LUM GB 1ed 9-01-2012 14:52 Pagina 123
Page 128 of 187
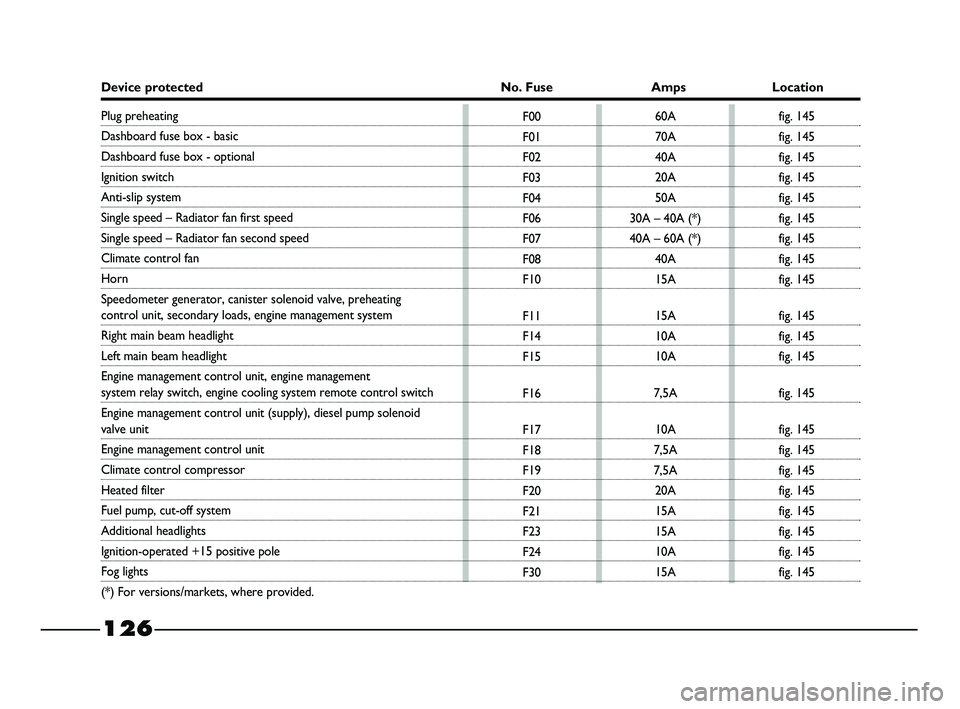
126
Device protected No. Fuse Amps Location
F00
F01
F02
F03
F04
F06
F07
F08
F10
F11
F14
F15
F16
F17
F18
F19
F20
F21
F23
F24
F3060A
70A
40A
20A
50A
30A – 40A (*)
40A – 60A (*)
40A
15A
15A
10A
10A
7,5A
10A
7,5A
7,5A
20A
15A
15A
10A
15A
Plug preheating
Dashboard fuse box - basic
Dashboard fuse box - optional
Ignition switch
Anti-slip system
Single speed – Radiator fan first speed
Single speed – Radiator fan second speed
Climate control fan
Horn
Speedometer generator, canister solenoid valve, preheating
control unit, secondary loads, engine management system
Right main beam headlight
Left main beam headlight
Engine management control unit, engine management
system relay switch, engine cooling system remote control switch
Engine management control unit (supply), diesel pump solenoid
valve unit
Engine management control unit
Climate control compressor
Heated filter
Fuel pump, cut-off system
Additional headlights
Ignition-operated +15 positive pole
Fog lights
(*) For versions/markets, where provided.fig. 145
fig. 145
fig. 145
fig. 145
fig. 145
fig. 145
fig. 145
fig. 145
fig. 145
fig. 145
fig. 145
fig. 145
fig. 145
fig. 145
fig. 145
fig. 145
fig. 145
fig. 145
fig. 145
fig. 145
fig. 145
107-132 STRADA LUM GB 1ed 9-01-2012 14:52 Pagina 126