spare wheel FIAT STRADA 2015 Owner handbook (in English)
[x] Cancel search | Manufacturer: FIAT, Model Year: 2015, Model line: STRADA, Model: FIAT STRADA 2015Pages: 187, PDF Size: 8.06 MB
Page 111 of 187
109
If alloy wheels are
purchased to replace
the steel wheels, we
suggest that you retain 4
original bolts for use only with
the spare wheel. There is a risk
of damaging the wheel hubs.
Indicate the presence
of the stationary
vehicle in accordance with
current regulations: hazard
warning lights, warning triangle
etc. Passengers should get out
of the vehicle and wait until
replacement is concluded,
avoiding the risk of traffic. If
you are on a slope or uneven
surface, place wedges or other
suitable objects under the
wheels to secure the vehicle.
WARNINGCHANGING A WHEEL
Bear in mind that:
– the mass of the jack is 2.9 kg;
– the jack requires no adjustment;
– the jack cannot be repaired. It
must be replaced with an original
part if damaged;
– no tool other than the cranking
device illustrated in this section
may be fitted on the jack.
Never start the engine
when the vehicle is
jacked up.If a trailer is used,
detach the trailer before
raising the vehicle.
WARNING
107-132 STRADA LUM GB 1ed 9-01-2012 14:52 Pagina 109
Page 112 of 187
110
ACCESSING TOOLS, JACK
AND SPARE WHEEL
Fiat Strada, Short or
Extended Cab
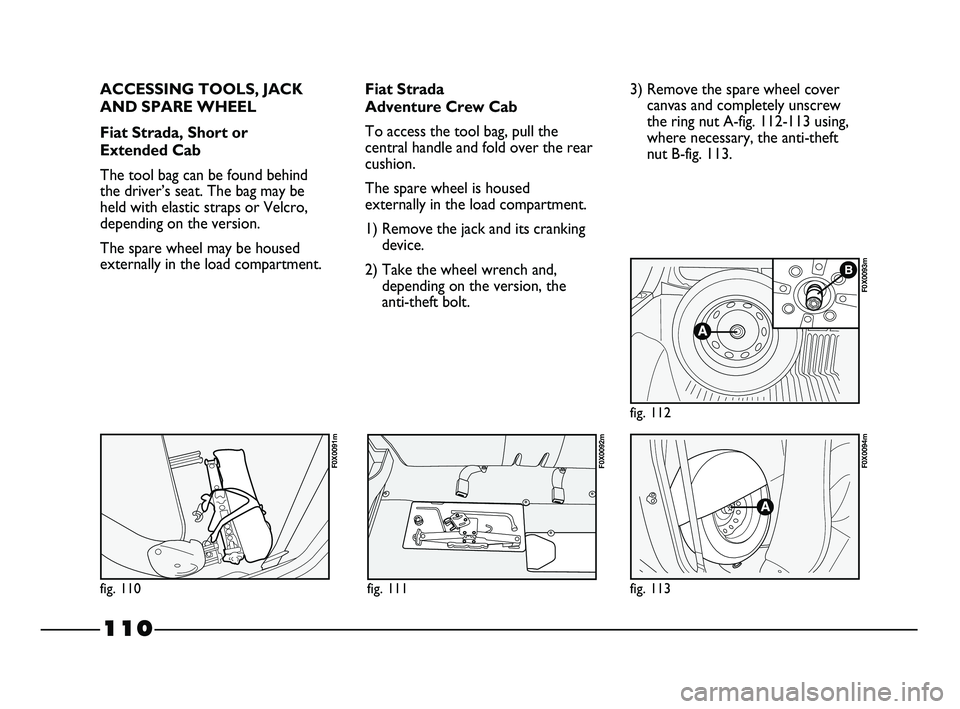
The tool bag can be found behind
the driver’s seat. The bag may be
held with elastic straps or Velcro,
depending on the version.
The spare wheel may be housed
externally in the load compartment.Fiat Strada
Adventure Crew Cab
To access the tool bag, pull the
central handle and fold over the rear
cushion.
The spare wheel is housed
externally in the load compartment.
1) Remove the jack and its cranking
device.
2) Take the wheel wrench and,
depending on the version, the
anti-theft bolt.3) Remove the spare wheel cover
canvas and completely unscrew
the ring nut A-fig. 112-113 using,
where necessary, the anti-theft
nut B-fig. 113.
fig. 113
F0X0094m
fig. 112
F0X0093m
fig. 110
F0X0091m
fig. 111
F0X0092m
107-132 STRADA LUM GB 1ed 9-01-2012 14:52 Pagina 110
Page 113 of 187
111
CHANGING THE WHEEL
1) Loosen the fixing bolts of the
wheel to be replaced by about
one turn.
2) With alloy wheels, shake the
vehicle to detach the rim from
the wheel hub more easily.
3) Turn the jack’s cranking device in
order to open it partially.
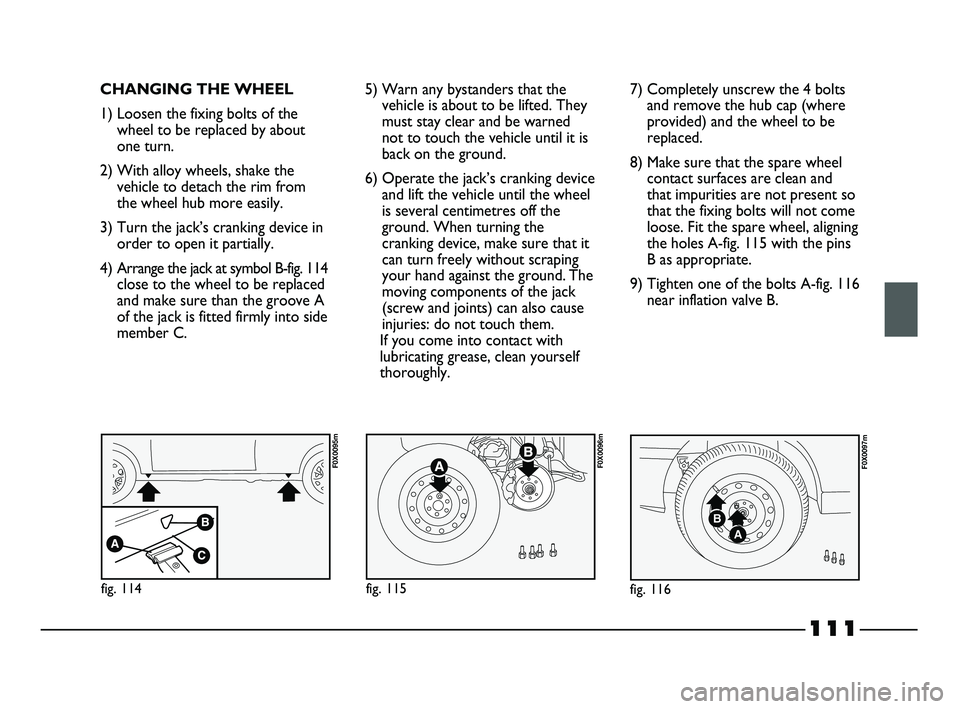
4) Arrange the jack at symbol B-fig. 114
close to the wheel to be replaced
and make sure than the groove A
of the jack is fitted firmly into side
member C.5) Warn any bystanders that the
vehicle is about to be lifted. They
must stay clear and be warned
not to touch the vehicle until it is
back on the ground.
6) Operate the jack’s cranking device
and lift the vehicle until the wheel
is several centimetres off the
ground. When turning the
cranking device, make sure that it
can turn freely without scraping
your hand against the ground. The
moving components of the jack
(screw and joints) can also cause
injuries: do not touch them.
If you come into contact with
lubricating grease, clean yourself
thoroughly.7) Completely unscrew the 4 bolts
and remove the hub cap (where
provided) and the wheel to be
replaced.
8) Make sure that the spare wheel
contact surfaces are clean and
that impurities are not present so
that the fixing bolts will not come
loose. Fit the spare wheel, aligning
the holes A-fig. 115 with the pins
B as appropriate.
9) Tighten one of the bolts A-fig. 116
near inflation valve B.
A
B
fig. 116
F0X0097m
fig. 114
F0X0095m
fig. 115
F0X0096m
107-132 STRADA LUM GB 1ed 9-01-2012 14:52 Pagina 111
Page 114 of 187
112
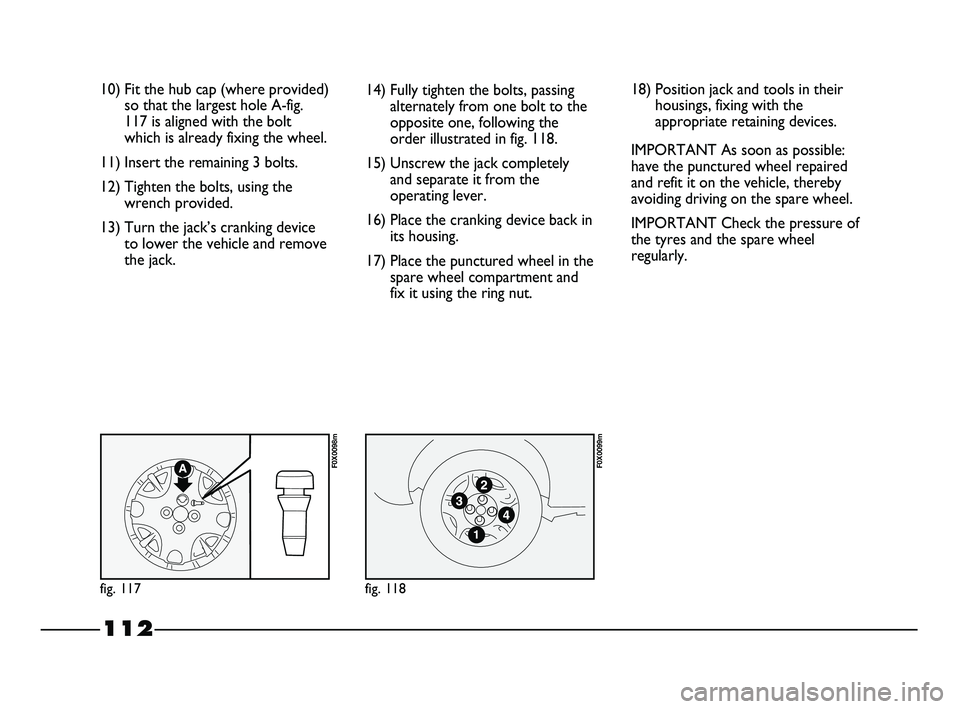
10) Fit the hub cap (where provided)
so that the largest hole A-fig.
117 is aligned with the bolt
which is already fixing the wheel.
11) Insert the remaining 3 bolts.
12) Tighten the bolts, using the
wrench provided.
13) Turn the jack’s cranking device
to lower the vehicle and remove
the jack.14) Fully tighten the bolts, passing
alternately from one bolt to the
opposite one, following the
order illustrated in fig. 118.
15) Unscrew the jack completely
and separate it from the
operating lever.
16) Place the cranking device back in
its housing.
17) Place the punctured wheel in the
spare wheel compartment and
fix it using the ring nut.
fig. 117
F0X0098m
fig. 118
F0X0099m
18) Position jack and tools in their
housings, fixing with the
appropriate retaining devices.
IMPORTANT As soon as possible:
have the punctured wheel repaired
and refit it on the vehicle, thereby
avoiding driving on the spare wheel.
IMPORTANT Check the pressure of
the tyres and the spare wheel
regularly.
107-132 STRADA LUM GB 1ed 9-01-2012 14:52 Pagina 112
Page 150 of 187

148
Tyres age even if they are not used
much. Cracks in the tread and on
the sidewalls are a sign of ageing. In
any event, have the tyres checked by
specialised personnel if they have
been fitted for longer than 6 years,
so that they can determine whether
they can still be used. Remember to
check the spare wheel with
particular care.
Always fit new replacement tyres.
Do not use any of dubious origin.
The Fiat Strada uses tubeless tyres.
Do not use inner tubes with these
tyres.
If a tyre is changed, also change the
inflation valve.
To allow even wear between the
front and rear tyres, it is advisable to
change them over every 10-15
thousand kilometres, keeping them
on the same side of the vehicle so as
not to reverse the direction of
rotation.RUBBER HOSES
For the rubber hoses of the brake,
power steering and supply system,
follow the Scheduled Servicing Plan
precisely. Ozone, high temperatures
and prolonged lack of fluid in the
system may cause hardening and
cracking of the hoses, with possible
leaks. Careful checking is therefore
necessary.Do not switch tyres
from the right hand side
of the vehicle to the left hand
side, and vice versa.
WARNING
Do not re coat alloy
wheel rims at
temperatures above 150°C. The
mechanical characteristics of
the wheels could be
compromised.
WARNING
133-154 STRADA LUM GB 1ed 9-01-2012 14:53 Pagina 148
Page 153 of 187
151
– spraying the underbody, engine
compartment, inside of wheel
arches and other parts with highly
protective wax products;
– spraying of plastic materials for
protective purposes in the most
exposed points: under the doors,
inside the wings, along the edges,
etc.;
– use of “open” boxed sections to
prevent condensation and pockets
of moisture from triggering rust
inside.
VEHICLE BODY AND
UNDERBODY WARRANTY
Your vehicle is covered by warranty
against perforation due to corrosion
of any original element of the
structure or body.
For the general terms of this
warranty, refer to the Warranty
Booklet.ADVICE FOR PRESERVING
THE BODYWORK
Paintwork
Paintwork does not only serve an
aesthetic purpose, but also protects
the underlying sheet metal.
Touch up abrasions and scratches
immediately to prevent the
formation of rust. Only use genuine
spare paint products for touch-ups
(see “Bodywork paint identification
plate” in the “Technical
Specifications” section).
Normal maintenance of paintwork
consists in washing the car: the
frequency depends on the conditions
and environment where the car is
used.
For example, it is advisable to wash
the vehicle more often in areas with
high levels of environmental
pollution or on roads spread with
salt.To correctly wash the vehicle,
proceed as follows:
– wash the body using a low
pressure jet of water;
– wipe a sponge with a slightly soapy
solution over the bodywork,
frequently rinsing the sponge;
– rinse well with water and dry with
a jet of air or a chamois leather.
If you put the vehicle through a car
wash, follow these
recommendations:
– remove the aerial from the roof so
that it does not get damaged;
– the vehicle should be washed with
water added to a soapy solution;
– rinse thoroughly to avoid soap
marks remaining on the bodywork
or less visible parts.
133-154 STRADA LUM GB 1ed 9-01-2012 14:53 Pagina 151
Page 163 of 187
161
WHEELS
RIMS AND TYRES
Pressed steel or alloy
wheels.
Tubeless radial carcass tyres. The
vehicle registration document also
lists all type-approved tyres.
IMPORTANT In the event of
discrepancies between the information
provided in the “Owner Handbook”
and the “Vehicle registration
document”, only the latter is valid.
Fit tyres of the same make and type
on all wheels, to ensure the safety of
the vehicle while driving.
IMPORTANT Do not use inner
tubes in the case of tubeless tyres.
21
3
fig. 167
F0X0151m
SPARE WHEEL
Pressed steel wheel.
Tubeless tyre, same as standard
tyre.
WHEEL GEOMETRY
Front wheel toe in:
-1 ±1 mm.
Rear wheel toe in:
0 ±2 mm.
The values refer to the vehicle in
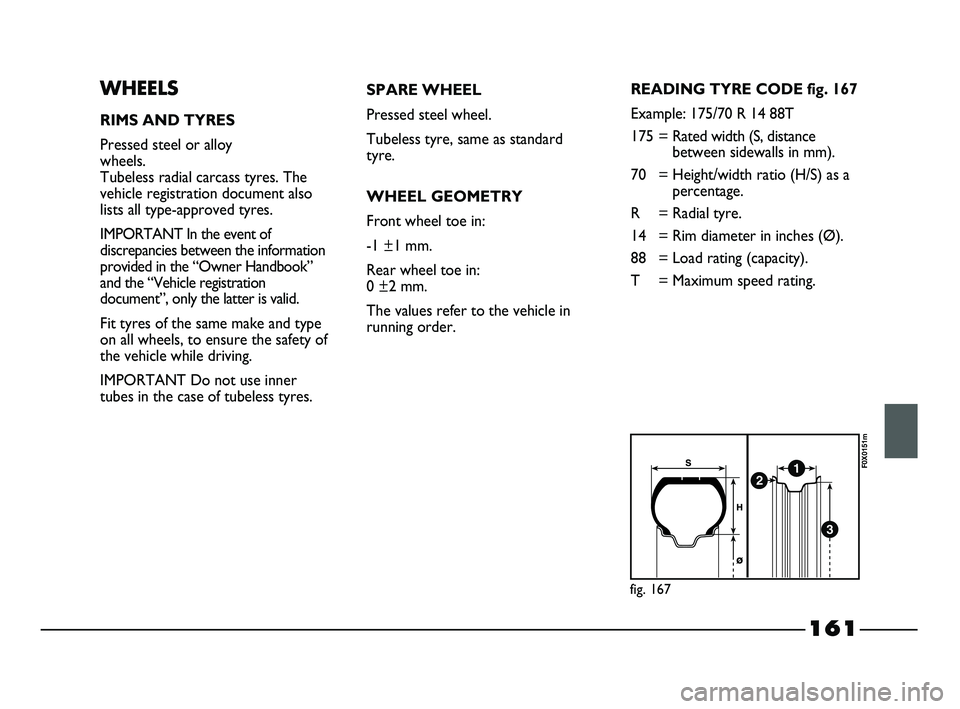
running order.READING TYRE CODE fig. 167
Example: 175/70 R 14 88T
175 = Rated width (S, distance
between sidewalls in mm).
70 = Height/width ratio (H/S) as a
percentage.
R = Radial tyre.
14 = Rim diameter in inches (Ø).
88 = Load rating (capacity).
T = Maximum speed rating.
155-184 STRADA LUM GB 1ed 20-01-2012 9:34 Pagina 161
Page 186 of 187
Fiat Group Automobiles S.p.A. - Parts & Services - Technical Services - \
Service EngineeringLargo Senatore G. Agnelli, 3 - 10040 Volvera - Torino (Italia)Print no. 603.99.088 - 04/2012 - 2 Edition
Technical specifications .................................................... 155
Third brake light ........................................................................\
.. 119
Topping up the en gine oil ........................................................... 139
Towing the vehicle....................................................................... 130
Towing tra ilers........................................................................\
...... 104
Trailers ( towing)........................................................................\
... 104
Transmi ssion........................................................................\
.......... 159
Trip compu ter ........................................................................\
...... 42
Tyre pr essure........................................................................\
........ 164
Tyres - inflation pressure............................................................. 147-164
- mainten ance........................................................................\
... 147
- reading rim code................................................................... 163
- reading t yre code .................................................................. 161
- Rim pr otector........................................................................\
162
- snow ........................................................................\
.......... 99-163
- spare wheel........................................................................\
.... 161
- specificati ons........................................................................\
.. 163
Using the gearbox .................................................................. 99
Vehicle inact ivity ..................................................................... 105
Vehicle lift ing ........................................................................\
... 128-129
Vehicle maintenance ........................................................ 133
Ventilati on ........................................................................\
........ 56-58
Warning lights and messages ................................................ 45
Warning lights and messages ..................................................... 45
Weight s ........................................................................\
.................. 167
Wheel geom etry ........................................................................\
. 161
Wheels - chang ing ........................................................... 109-110-111-112
- mainten ance........................................................................\
... 147
- specificati ons........................................................................\
.. 163
- wheel trim........................................................................\
...... 161
Window clea ning ........................................................................\
. 62
Windows - clea ning ........................................................................\
............ 62
- elect ric........................................................................\
............. 70
- manua l ........................................................................\
............. 70
- rear window ........................................................................\
... 77
Windscreen washer fluid level................................................... 141
Windscreen washer - contro l ......................................................................\
............. 62
- fluid le vel ........................................................................\
........ 141
Windscreen wiper - blade repla cement................................................................. 149
- contro l ........................................................................\
............. 62
- nozzle s ........................................................................\
............. 150
- smart w ashing........................................................................\
62
155-184 STRADA LUM GB 2ed 3-04-2012 15:00 Pagina 184