headrest FIAT TALENTO 2016 2.G Owners Manual
[x] Cancel search | Manufacturer: FIAT, Model Year: 2016, Model line: TALENTO, Model: FIAT TALENTO 2016 2.GPages: 232, PDF Size: 5.01 MB
Page 15 of 232
KNOWING YOUR VEHICLE
In-depth knowledge of your new vehicle
starts here.
The handbook that you are reading
simply and directly explains how it is
made and how it works.
That’s why we advise you to read it
seated comfortably on board, so that
you can see what is described here for
yourself.THE KEYS.................14
DOORS...................21
HEADRESTS................28
SEATS....................29
STEERING WHEEL/POWER
STEERING.................33
START&STOP SYSTEM.........34
REAR VIEW MIRRORS.........36
EXTERNAL LIGHTS...........37
INTERIOR LIGHTS............40
WINDSCREEN / REAR WINDOW
WIPERS..................41
REFUELLING THE VEHICLE......43
ADBLUE ADDITIVE RESERVOIR . . .45
IGNITION DEVICE............46
CLIMATE CONTROL...........46
RADAR PARKING.............57
REAR CAMERA..............58
ELECTRIC WINDOWS..........60
ENGINE BONNET............61
INTERIOR FITTINGS...........62
RADIO....................69
BAGGAGE COVER............70
CRUISE CONTROL
(constant speed
regulator) . . .....70
SPEED LIMITER..............73
PROTECTING THE ENVIRONMENT .75
DIESEL VERSION
PARTICULARITIES............76
13
Page 30 of 232
16)When you stop by the side of the road,
if the tailgate is completely open, the rear
lights might not be visible. Warn other road
users that your vehicle is there by placing
the pre-signal triangle or other device
allowed by law in the country you are
driving in.HEADRESTS
FRONT HEADREST
17)
Adjustment
Pull the headrest up to the desired
height. Make sure it locks into place
correctly.
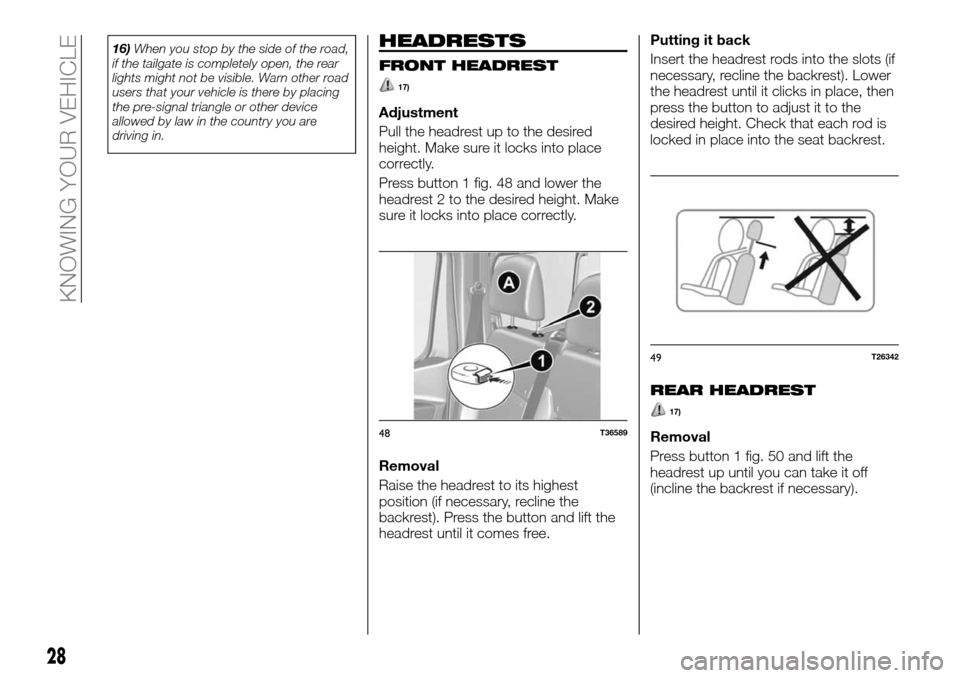
Press button 1 fig. 48 and lower the
headrest 2 to the desired height. Make
sure it locks into place correctly.
Removal
Raise the headrest to its highest
position (if necessary, recline the
backrest). Press the button and lift the
headrest until it comes free.Putting it back
Insert the headrest rods into the slots (if
necessary, recline the backrest). Lower
the headrest until it clicks in place, then
press the button to adjust it to the
desired height. Check that each rod is
locked in place into the seat backrest.
REAR HEADREST
17)
Removal
Press button 1 fig. 50 and lift the
headrest up until you can take it off
(incline the backrest if necessary).48T36589
49T26342
28
KNOWING YOUR VEHICLE
Page 31 of 232
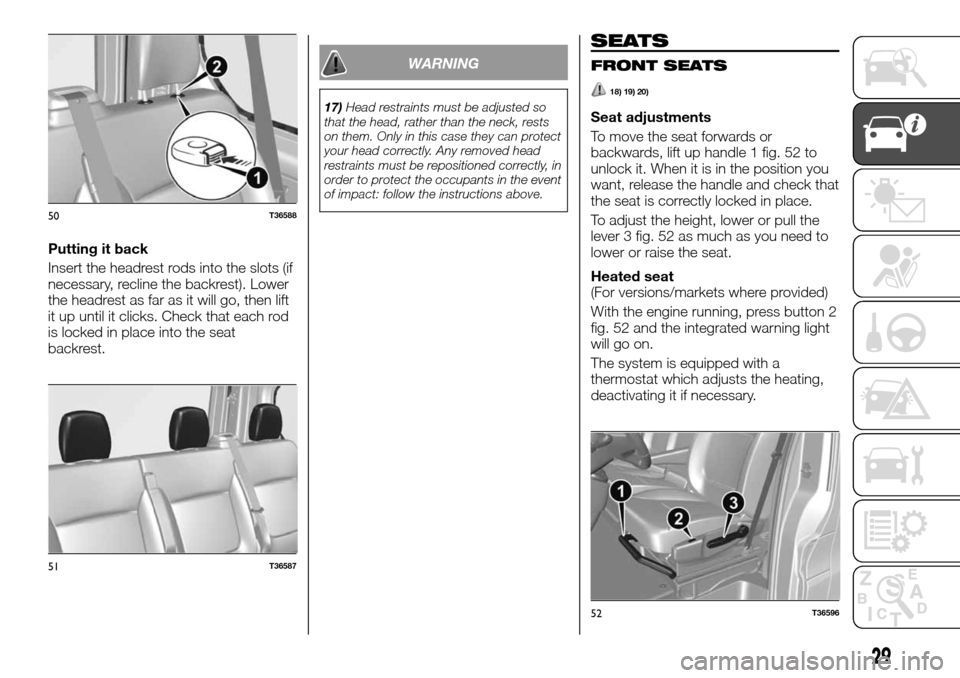
Putting it back
Insert the headrest rods into the slots (if
necessary, recline the backrest). Lower
the headrest as far as it will go, then lift
it up until it clicks. Check that each rod
is locked in place into the seat
backrest.
WARNING
17)Head restraints must be adjusted so
that the head, rather than the neck, rests
on them. Only in this case they can protect
your head correctly. Any removed head
restraints must be repositioned correctly, in
order to protect the occupants in the event
of impact: follow the instructions above.
SEATS
FRONT SEATS
18) 19) 20)
Seat adjustments
To move the seat forwards or
backwards, lift up handle 1 fig. 52 to
unlock it. When it is in the position you
want, release the handle and check that
the seat is correctly locked in place.
To adjust the height, lower or pull the
lever 3 fig. 52 as much as you need to
lower or raise the seat.
Heated seat
(For versions/markets where provided)
With the engine running, press button 2
fig. 52 and the integrated warning light
will go on.
The system is equipped with a
thermostat which adjusts the heating,
deactivating it if necessary.
50T36588
51T36587
52T36596
29
Page 96 of 232
safety, the distance between the head
and headrest must be minimum;
adjust cushion (seat) height. This
adjustment optimises visibility;
adjust the steering wheel.
ADJUSTING THE SEAT BELTS
Sit firmly on the backrest.
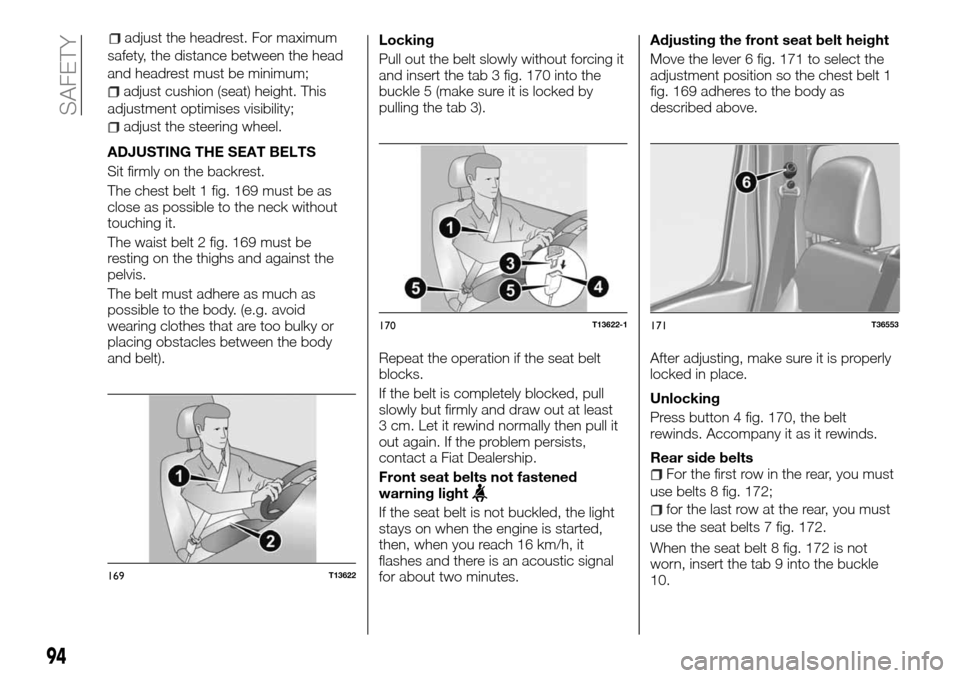
The chest belt 1 fig. 169 must be as
close as possible to the neck without
touching it.
The waist belt 2 fig. 169 must be
resting on the thighs and against the
pelvis.
The belt must adhere as much as
possible to the body. (e.g. avoid
wearing clothes that are too bulky or
placing obstacles between the body
and belt).Locking
Pull out the belt slowly without forcing it
and insert the tab 3 fig. 170 into the
buckle 5 (make sure it is locked by
pulling the tab 3).
Repeat the operation if the seat belt
blocks.
If the belt is completely blocked, pull
slowly but firmly and draw out at least
3 cm. Let it rewind normally then pull it
out again. If the problem persists,
contact a Fiat Dealership.
Front seat belts not fastened
warning light
If the seat belt is not buckled, the light
stays on when the engine is started,
then, when you reach 16 km/h, it
flashes and there is an acoustic signal
for about two minutes.Adjusting the front seat belt height
Move the lever 6 fig. 171 to select the
adjustment position so the chest belt 1
fig. 169 adheres to the body as
described above.
After adjusting, make sure it is properly
locked in place.
Unlocking
Press button 4 fig. 170, the belt
rewinds. Accompany it as it rewinds.
Rear side belts
For the first row in the rear, you must
use belts 8 fig. 172;
for the last row at the rear, you must
use the seat belts 7 fig. 172.
When the seat belt 8 fig. 172 is not
worn, insert the tab 9 into the buckle
10.
169T13622
170T13622-1171T36553
94
SAFETY
adjust the headrest. For maximum
Page 104 of 232
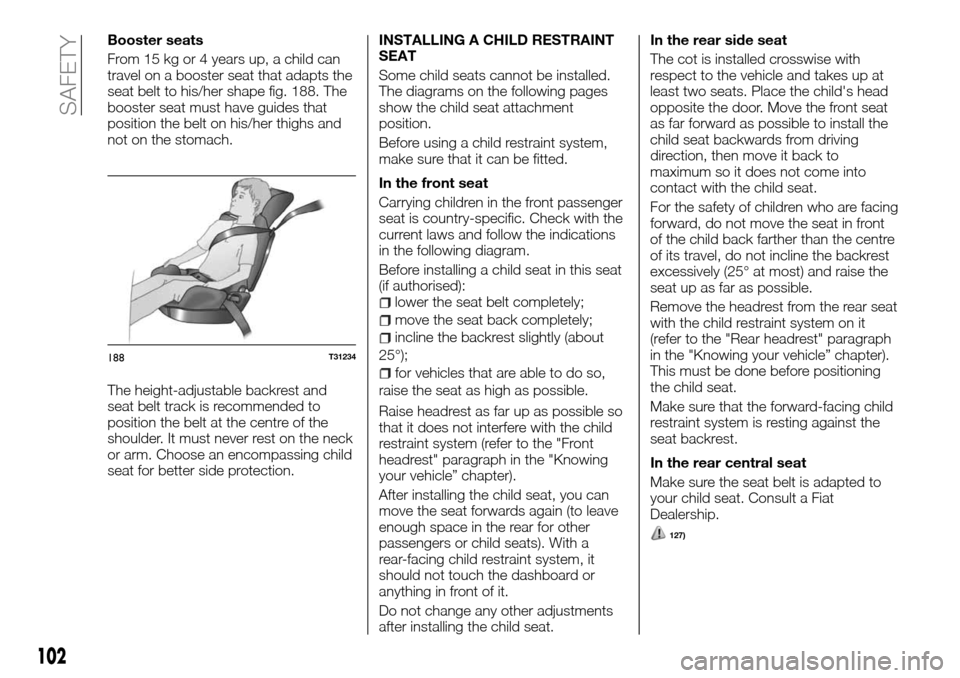
Booster seats
From 15 kg or 4 years up, a child can
travel on a booster seat that adapts the
seat belt to his/her shape fig. 188. The
booster seat must have guides that
position the belt on his/her thighs and
not on the stomach.
The height-adjustable backrest and
seat belt track is recommended to
position the belt at the centre of the
shoulder. It must never rest on the neck
or arm. Choose an encompassing child
seat for better side protection.INSTALLING A CHILD RESTRAINT
SEAT
Some child seats cannot be installed.
The diagrams on the following pages
show the child seat attachment
position.
Before using a child restraint system,
make sure that it can be fitted.
In the front seat
Carrying children in the front passenger
seat is country-specific. Check with the
current laws and follow the indications
in the following diagram.
Before installing a child seat in this seat
(if authorised):
lower the seat belt completely;
move the seat back completely;
incline the backrest slightly (about
25°);
for vehicles that are able to do so,
raise the seat as high as possible.
Raise headrest as far up as possible so
that it does not interfere with the child
restraint system (refer to the "Front
headrest" paragraph in the "Knowing
your vehicle” chapter).
After installing the child seat, you can
move the seat forwards again (to leave
enough space in the rear for other
passengers or child seats). With a
rear-facing child restraint system, it
should not touch the dashboard or
anything in front of it.
Do not change any other adjustments
after installing the child seat.In the rear side seat
The cot is installed crosswise with
respect to the vehicle and takes up at
least two seats. Place the child's head
opposite the door. Move the front seat
as far forward as possible to install the
child seat backwards from driving
direction, then move it back to
maximum so it does not come into
contact with the child seat.
For the safety of children who are facing
forward, do not move the seat in front
of the child back farther than the centre
of its travel, do not incline the backrest
excessively (25° at most) and raise the
seat up as far as possible.
Remove the headrest from the rear seat
with the child restraint system on it
(refer to the "Rear headrest" paragraph
in the "Knowing your vehicle” chapter).
This must be done before positioning
the child seat.
Make sure that the forward-facing child
restraint system is resting against the
seat backrest.
In the rear central seat
Make sure the seat belt is adapted to
your child seat. Consult a Fiat
Dealership.
127)
188T31234
102
SAFETY
Page 108 of 232
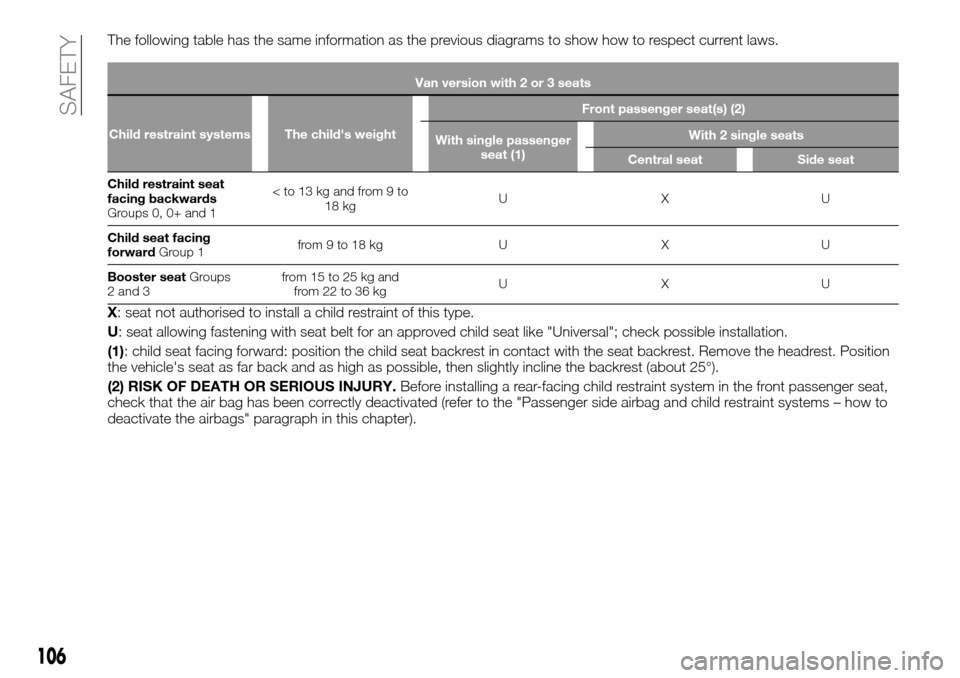
The following table has the same information as the previous diagrams to show how to respect current laws.
Van version with 2 or 3 seats
Child restraint systems The child's weightFront passenger seat(s) (2)
With single passenger
seat (1)With 2 single seats
Central seat Side seat
Child restraint seat
facing backwards
Groups 0, 0+ and 1
Child seat facing
forwardGroup 1from9to18kg U X U
Booster seatGroups
2 and 3from 15 to 25 kg and
from 22 to 36 kgUXU
X: seat not authorised to install a child restraint of this type.
U: seat allowing fastening with seat belt for an approved child seat like "Universal"; check possible installation.
(1): child seat facing forward: position the child seat backrest in contact with the seat backrest. Remove the headrest. Position
the vehicle's seat as far back and as high as possible, then slightly incline the backrest (about 25°).
(2) RISK OF DEATH OR SERIOUS INJURY.Before installing a rear-facing child restraint system in the front passenger seat,
check that the air bag has been correctly deactivated (refer to the "Passenger side airbag and child restraint systems – how to
deactivate the airbags" paragraph in this chapter).
106
SAFETY
Page 110 of 232
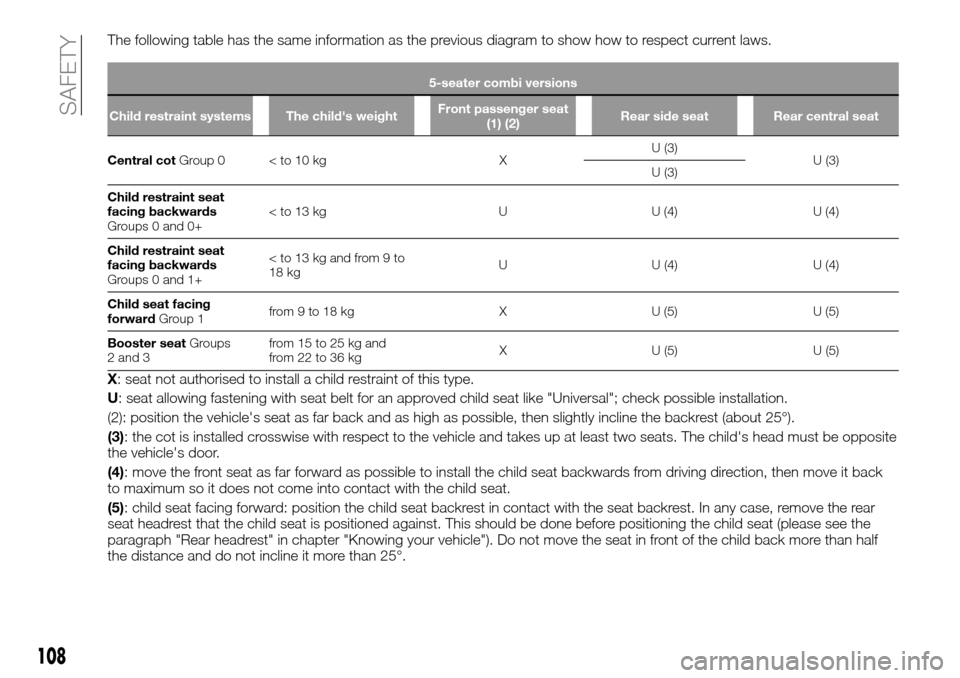
The following table has the same information as the previous diagram to show how to respect current laws.
5-seater combi versions
Child restraint systems The child's weightFront passenger seat
(1) (2)Rear side seat Rear central seat
Central cotGroup 0 < to 10 kg XU (3)
U (3)
U (3)
Child restraint seat
facing backwards
Groups 0 and 0+
facing backwards
Groups 0 and 1+
Child seat facing
forwardGroup 1from9to18kg X U(5) U(5)
Booster seatGroups
2 and 3from 15 to 25 kg and
from 22 to 36 kgX U (5) U (5)
X: seat not authorised to install a child restraint of this type.
U: seat allowing fastening with seat belt for an approved child seat like "Universal"; check possible installation.
(2): position the vehicle's seat as far back and as high as possible, then slightly incline the backrest (about 25°).
(3): the cot is installed crosswise with respect to the vehicle and takes up at least two seats. The child's head must be opposite
the vehicle's door.
(4): move the front seat as far forward as possible to install the child seat backwards from driving direction, then move it back
to maximum so it does not come into contact with the child seat.
(5): child seat facing forward: position the child seat backrest in contact with the seat backrest. In any case, remove the rear
seat headrest that the child seat is positioned against. This should be done before positioning the child seat (please see the
paragraph "Rear headrest" in chapter "Knowing your vehicle"). Do not move the seat in front of the child back more than half
the distance and do not incline it more than 25°.
108
SAFETY
Page 112 of 232
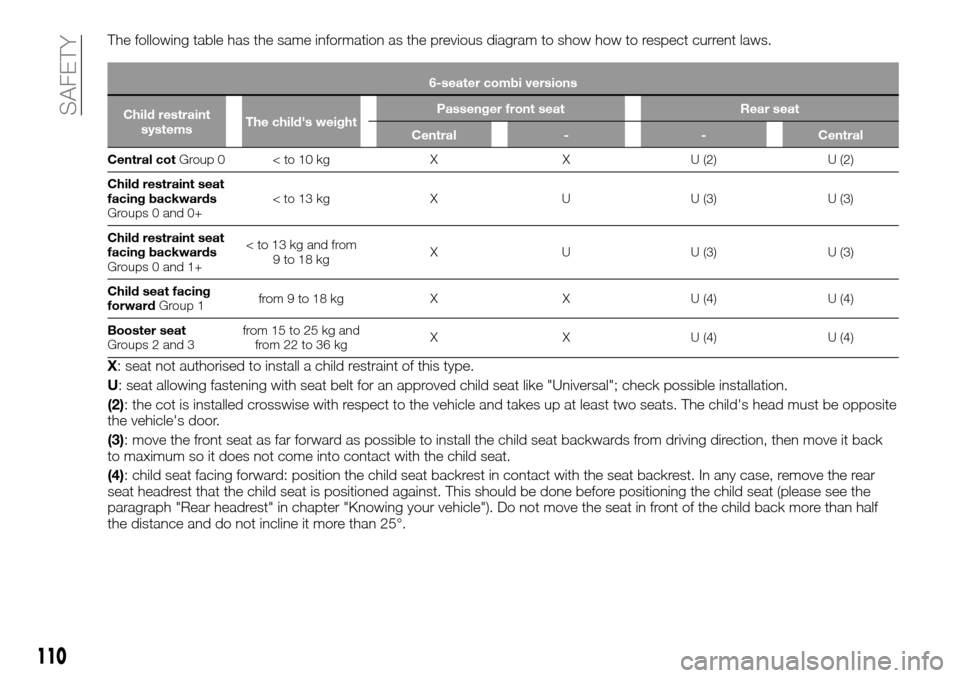
The following table has the same information as the previous diagram to show how to respect current laws.
6-seater combi versions
Child restraint
systemsThe child's weightPassenger front seat Rear seat
Central - - Central
Central cotGroup 0 < to 10 kg X X U (2) U (2)
Child restraint seat
facing backwards
Groups 0 and 0+
facing backwards
Groups 0 and 1+
Child seat facing
forwardGroup 1from 9 to 18 kg X X U (4) U (4)
Booster seat
Groups 2 and 3from 15 to 25 kg and
from 22 to 36 kgX X U (4) U (4)
X: seat not authorised to install a child restraint of this type.
U: seat allowing fastening with seat belt for an approved child seat like "Universal"; check possible installation.
(2): the cot is installed crosswise with respect to the vehicle and takes up at least two seats. The child's head must be opposite
the vehicle's door.
(3): move the front seat as far forward as possible to install the child seat backwards from driving direction, then move it back
to maximum so it does not come into contact with the child seat.
(4): child seat facing forward: position the child seat backrest in contact with the seat backrest. In any case, remove the rear
seat headrest that the child seat is positioned against. This should be done before positioning the child seat (please see the
paragraph "Rear headrest" in chapter "Knowing your vehicle"). Do not move the seat in front of the child back more than half
the distance and do not incline it more than 25°.
110
SAFETY
Page 114 of 232
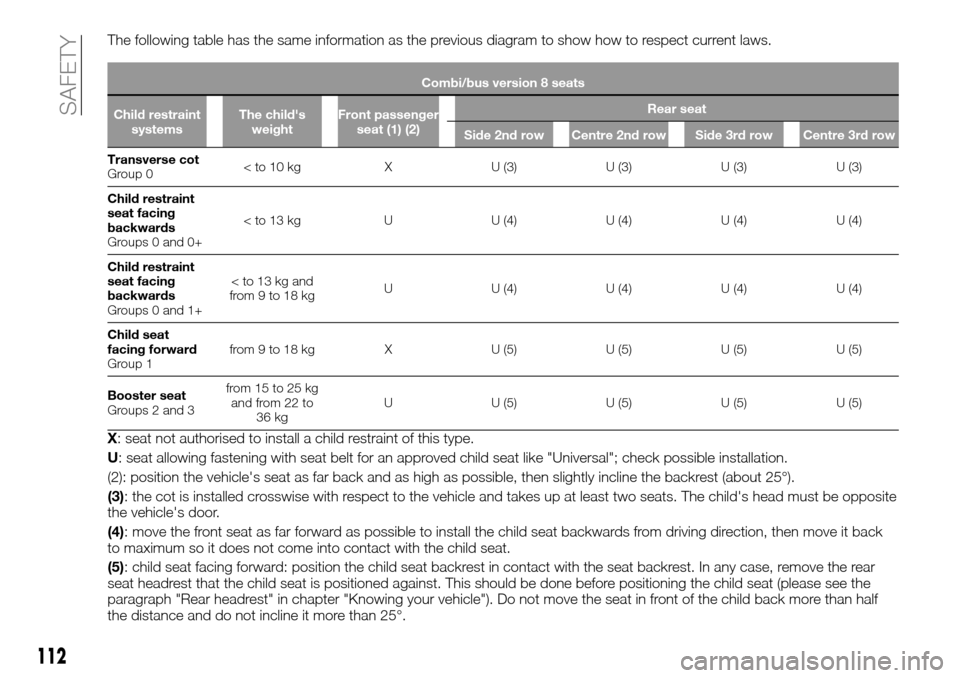
The following table has the same information as the previous diagram to show how to respect current laws.
Combi/bus version 8 seats
Child restraint
systemsThe child's
weightFront passenger
seat (1) (2)Rear seat
Side 2nd row Centre 2nd row Side 3rd row Centre 3rd row
Transverse cot
Group 0< to 10 kg X U (3) U (3) U (3) U (3)
Child restraint
seat facing
backwards
Groups 0 and 0+< to 13 kg U U (4) U (4) U (4) U (4)
Child restraint
seat facing
backwards
Groups 0 and 1+
Child seat
facing forward
Group 1from 9 to 18 kg X U (5) U (5) U (5) U (5)
Booster seat
Groups 2 and 3from 15 to 25 kg
and from 22 to
36 kgU U (5) U (5) U (5) U (5)
X: seat not authorised to install a child restraint of this type.
U: seat allowing fastening with seat belt for an approved child seat like "Universal"; check possible installation.
(2): position the vehicle's seat as far back and as high as possible, then slightly incline the backrest (about 25°).
(3): the cot is installed crosswise with respect to the vehicle and takes up at least two seats. The child's head must be opposite
the vehicle's door.
(4): move the front seat as far forward as possible to install the child seat backwards from driving direction, then move it back
to maximum so it does not come into contact with the child seat.
(5): child seat facing forward: position the child seat backrest in contact with the seat backrest. In any case, remove the rear
seat headrest that the child seat is positioned against. This should be done before positioning the child seat (please see the
paragraph "Rear headrest" in chapter "Knowing your vehicle"). Do not move the seat in front of the child back more than half
the distance and do not incline it more than 25°.
112
SAFETY
Page 117 of 232
(3): move the front seat as far forward as possible to install the child seat backwards from driving direction, then move it back
to maximum so it does not come into contact with the child seat.
(4): child seat facing forward: position the child seat backrest in contact with the seat backrest. In any case, remove the rear
seat headrest that the child seat is positioned against. This should be done before positioning the child seat (please see the
paragraph "Rear headrest" in chapter "Knowing your vehicle"). Do not move the seat in front of the child back more than half
the distance and do not incline it more than 25°.
115