remove seats FIAT TALENTO 2017 Owner handbook (in English)
[x] Cancel search | Manufacturer: FIAT, Model Year: 2017, Model line: TALENTO, Model: FIAT TALENTO 2017Pages: 228, PDF Size: 4.47 MB
Page 116 of 228
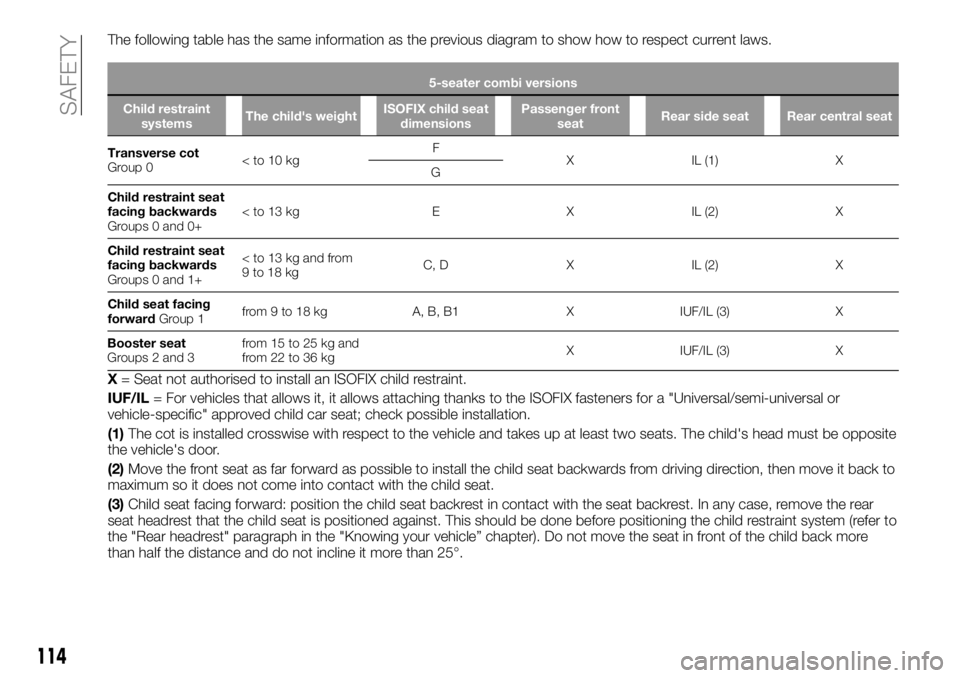
The following table has the same information as the previous diagram to show how to respect current laws.
5-seater combi versions
Child restraint
systemsThe child's weightISOFIX child seat
dimensionsPassenger front
seatRear side seat Rear central seat
Transverse cot
Group 0
G
Child restraint seat
facing backwards
Groups 0 and 0+
facing backwards
Groups 0 and 1+
Child seat facing
forwardGroup 1from 9 to 18 kg A, B, B1 X IUF/IL (3) X
Booster seat
Groups 2 and 3from 15 to 25 kg and
from 22 to 36 kgX IUF/IL (3) X
X= Seat not authorised to install an ISOFIX child restraint.
IUF/IL= For vehicles that allows it, it allows attaching thanks to the ISOFIX fasteners for a "Universal/semi-universal or
vehicle-specific" approved child car seat; check possible installation.
(1)The cot is installed crosswise with respect to the vehicle and takes up at least two seats. The child's head must be opposite
the vehicle's door.
(2)Move the front seat as far forward as possible to install the child seat backwards from driving direction, then move it back to
maximum so it does not come into contact with the child seat.
(3)Child seat facing forward: position the child seat backrest in contact with the seat backrest. In any case, remove the rear
seat headrest that the child seat is positioned against. This should be done before positioning the child restraint system (refer to
the "Rear headrest" paragraph in the "Knowing your vehicle” chapter). Do not move the seat in front of the child back more
than half the distance and do not incline it more than 25°.
114
SAFETY
Page 118 of 228
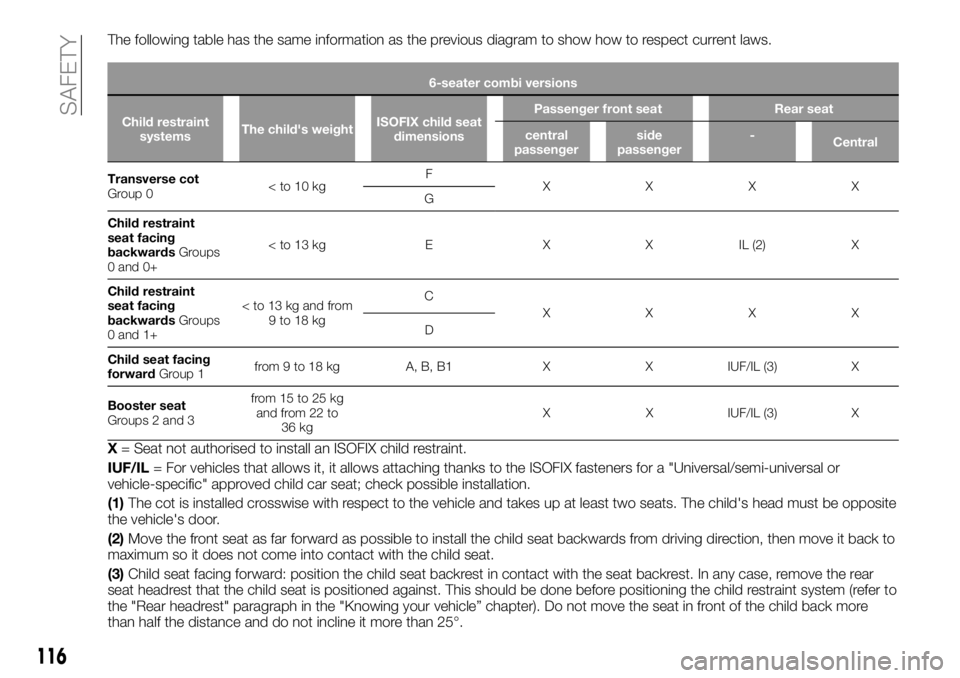
The following table has the same information as the previous diagram to show how to respect current laws.
6-seater combi versions
Child restraint
systemsThe child's weightISOFIX child seat
dimensionsPassenger front seat Rear seat
central
passengerside
passenger-
Central
Transverse cot
Gr
oup 0
G
Child restraint
seat facing
backwardsGroups
0 and 0+
seat facing
backwardsGroups
0 and 1+
XXXX
D
Child seat facing
forwardGroup 1from 9 to 18 kg A, B, B1 X X IUF/IL (3) X
Booster seat
Groups 2 and 3from 15 to 25 kg
and from 22 to
36 kgX X IUF/IL (3) X
X= Seat not authorised to install an ISOFIX child restraint.
IUF/IL= For vehicles that allows it, it allows attaching thanks to the ISOFIX fasteners for a "Universal/semi-universal or
vehicle-specific" approved child car seat; check possible installation.
(1)The cot is installed crosswise with respect to the vehicle and takes up at least two seats. The child's head must be opposite
the vehicle's door.
(2)Move the front seat as far forward as possible to install the child seat backwards from driving direction, then move it back to
maximum so it does not come into contact with the child seat.
(3)Child seat facing forward: position the child seat backrest in contact with the seat backrest. In any case, remove the rear
seat headrest that the child seat is positioned against. This should be done before positioning the child restraint system (refer to
the "Rear headrest" paragraph in the "Knowing your vehicle” chapter). Do not move the seat in front of the child back more
than half the distance and do not incline it more than 25°.
116
SAFETY
Page 120 of 228
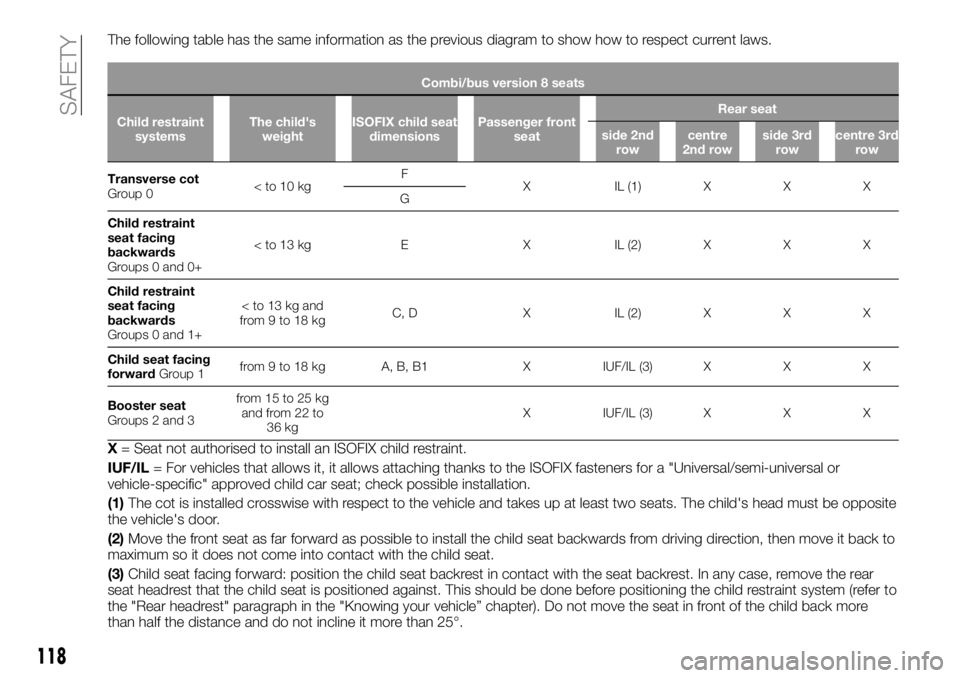
The following table has the same information as the previous diagram to show how to respect current laws.
Combi/bus version 8 seats
Child restraint
systemsThe child's
weightISOFIX child seat
dimensionsPassenger front
seatRear seat
side 2nd
rowcentre
2nd rowside 3rd
rowcentre 3rd
row
Transverse cot
Gr
oup 0
G
Child restraint
seat facing
backwards
Groups 0 and 0+
seat facing
backwards
Groups 0 and 1+
Child seat facing
forwardGroup 1from 9 to 18 kg A, B, B1 X IUF/IL (3) X X X
Booster seat
Groups 2 and 3from 15 to 25 kg
and from 22 to
36 kgX IUF/IL (3) X X X
X= Seat not authorised to install an ISOFIX child restraint.
IUF/IL= For vehicles that allows it, it allows attaching thanks to the ISOFIX fasteners for a "Universal/semi-universal or
vehicle-specific" approved child car seat; check possible installation.
(1)The cot is installed crosswise with respect to the vehicle and takes up at least two seats. The child's head must be opposite
the vehicle's door.
(2)Move the front seat as far forward as possible to install the child seat backwards from driving direction, then move it back to
maximum so it does not come into contact with the child seat.
(3)Child seat facing forward: position the child seat backrest in contact with the seat backrest. In any case, remove the rear
seat headrest that the child seat is positioned against. This should be done before positioning the child restraint system (refer to
the "Rear headrest" paragraph in the "Knowing your vehicle” chapter). Do not move the seat in front of the child back more
than half the distance and do not incline it more than 25°.
118
SAFETY
Page 123 of 228
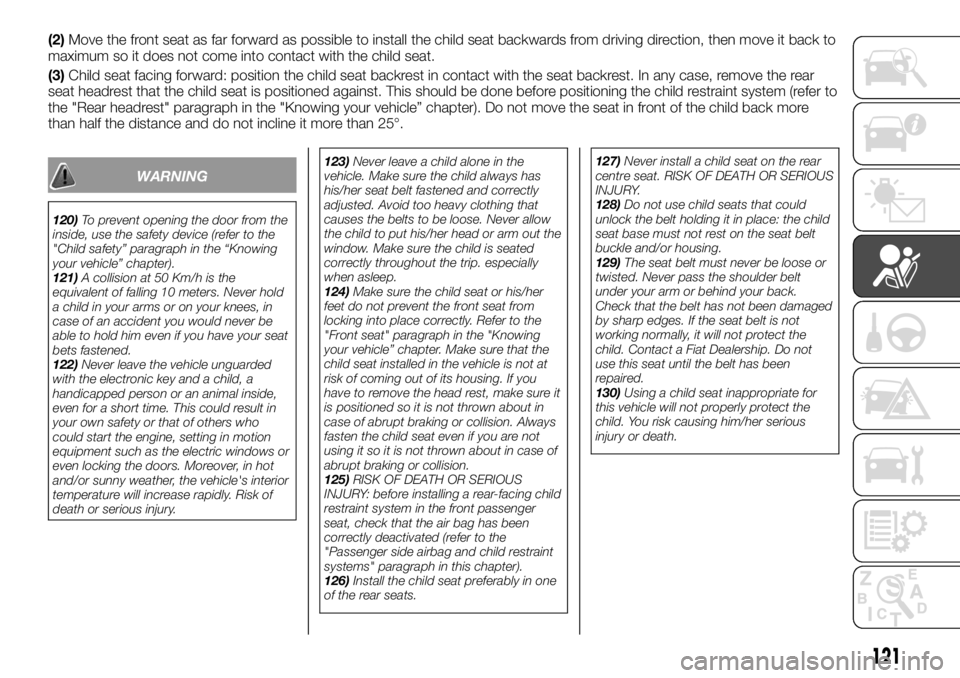
(2)Move the front seat as far forward as possible to install the child seat backwards from driving direction, then move it back to
maximum so it does not come into contact with the child seat.
(3)Child seat facing forward: position the child seat backrest in contact with the seat backrest. In any case, remove the rear
seat headrest that the child seat is positioned against. This should be done before positioning the child restraint system (refer to
the "Rear headrest" paragraph in the "Knowing your vehicle” chapter). Do not move the seat in front of the child back more
than half the distance and do not incline it more than 25°.
WARNING
120)To prevent opening the door from the
inside, use the safety device (refer to the
"Child safety” paragraph in the “Knowing
your vehicle” chapter).
121)A collision at 50 Km/h is the
equivalent of falling 10 meters. Never hold
a child in your arms or on your knees, in
case of an accident you would never be
able to hold him even if you have your seat
bets fastened.
122)Never leave the vehicle unguarded
with the electronic key and a child, a
handicapped person or an animal inside,
even for a short time. This could result in
your own safety or that of others who
could start the engine, setting in motion
equipment such as the electric windows or
even locking the doors. Moreover, in hot
and/or sunny weather, the vehicle's interior
temperature will increase rapidly. Risk of
death or serious injury.123)Never leave a child alone in the
vehicle. Make sure the child always has
his/her seat belt fastened and correctly
adjusted. Avoid too heavy clothing that
causes the belts to be loose. Never allow
the child to put his/her head or arm out the
window. Make sure the child is seated
correctly throughout the trip. especially
when asleep.
124)Make sure the child seat or his/her
feet do not prevent the front seat from
locking into place correctly. Refer to the
"Front seat" paragraph in the "Knowing
your vehicle” chapter. Make sure that the
child seat installed in the vehicle is not at
risk of coming out of its housing. If you
have to remove the head rest, make sure it
is positioned so it is not thrown about in
case of abrupt braking or collision. Always
fasten the child seat even if you are not
using it so it is not thrown about in case of
abrupt braking or collision.
125)RISK OF DEATH OR SERIOUS
INJURY: before installing a rear-facing child
restraint system in the front passenger
seat, check that the air bag has been
correctly deactivated (refer to the
"Passenger side airbag and child restraint
systems" paragraph in this chapter).
126)Install the child seat preferably in one
of the rear seats.127)Never install a child seat on the rear
centre seat. RISK OF DEATH OR SERIOUS
INJURY.
128)Do not use child seats that could
unlock the belt holding it in place: the child
seat base must not rest on the seat belt
buckle and/or housing.
129)The seat belt must never be loose or
twisted. Never pass the shoulder belt
under your arm or behind your back.
Check that the belt has not been damaged
by sharp edges. If the seat belt is not
working normally, it will not protect the
child. Contact a Fiat Dealership. Do not
use this seat until the belt has been
repaired.
130)Using a child seat inappropriate for
this vehicle will not properly protect the
child. You risk causing him/her serious
injury or death.
121
Page 148 of 228
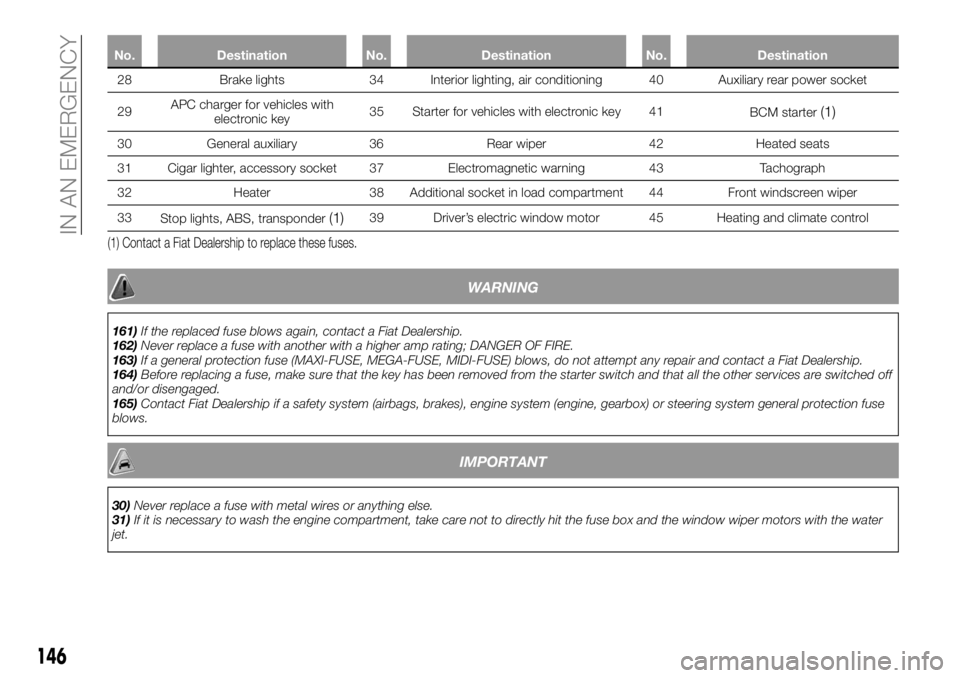
No. Destination No. Destination No. Destination
28 Brake lights 34 Interior lighting, air conditioning 40 Auxiliary rear power socket
29APCcharger for vehicles with
electronic key35 Starter for vehicles with electronic key 41
BCM starter
(1)
30 General auxiliary 36 Rear wiper 42 Heated seats
31 Cigar lighter, accessory socket 37 Electromagnetic warning 43 Tachograph
32 Heater 38 Additional socket in load compartment 44 Front windscreen wiper
33
Stop lights, ABS, transponder
(1)39 Driver’s electric window motor 45 Heating and climate control
(1) Contact a Fiat Dealership to replace these fuses.
WARNING
161)If the replaced fuse blows again, contact a Fiat Dealership.
162)Never replace a fuse with another with a higher amp rating; DANGER OF FIRE.
163)If a general protection fuse (MAXI-FUSE, MEGA-FUSE, MIDI-FUSE) blows, do not attempt any repair and contact a Fiat Dealership.
164)Before replacing a fuse, make sure that the key has been removed from the starter switch and that all the other services are switched off
and/or disengaged.
165)Contact Fiat Dealership if a safety system (airbags, brakes), engine system (engine, gearbox) or steering system general protection fuse
blows.
IMPORTANT
30)Never replace a fuse with metal wires or anything else.
31)If it is necessary to wash the engine compartment, take care not to directly hit the fuse box and the window wiper motors with the water
jet.
146
IN AN EMERGENCY
Page 149 of 228
IN THE EVENT OF A
PUNCTURE
Depending on the vehicle, there may be
a tyre inflating kit or a spare tyre (see
the following page).
CHANGING A WHEEL
166) 167) 168) 169) 170) 171)
Tools
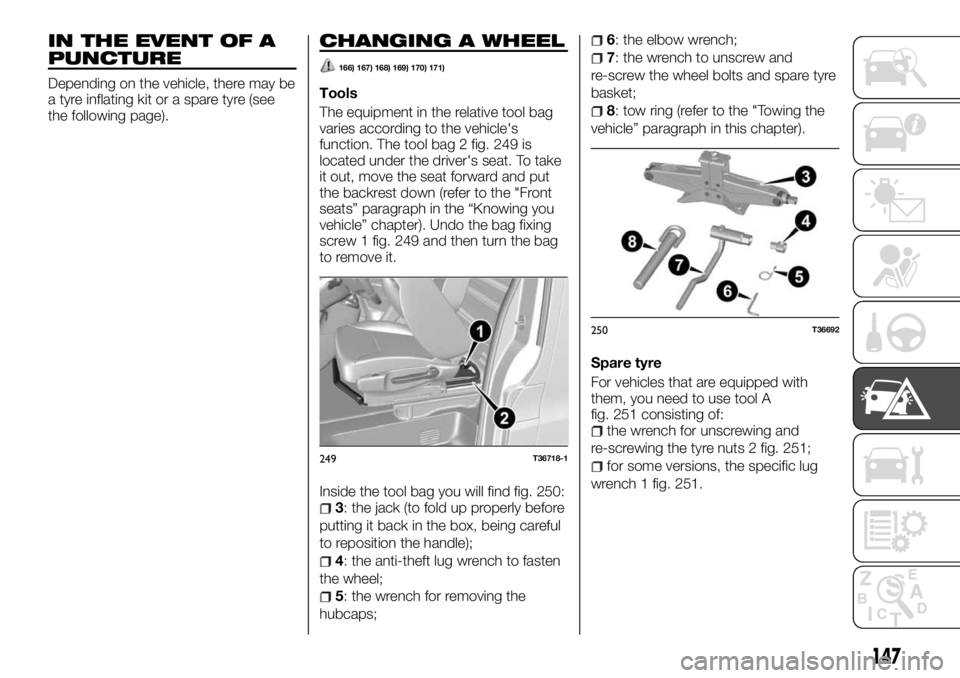
The equipment in the relative tool bag
varies according to the vehicle's
function. The tool bag 2 fig. 249 is
located under the driver's seat. To take
it out, move the seat forward and put
the backrest down (refer to the "Front
seats” paragraph in the “Knowing you
vehicle” chapter). Undo the bag fixing
screw 1 fig. 249 and then turn the bag
to remove it.
Inside the tool bag you will find fig. 250:
3: the jack (to fold up properly before
putting it back in the box, being careful
to reposition the handle);
4: the anti-theft lug wrench to fasten
the wheel;
5: the wrench for removing the
hubcaps;
6: the elbow wrench;
7: the wrench to unscrew and
re-screw the wheel bolts and spare tyre
basket;
8: tow ring (refer to the "Towing the
vehicle” paragraph in this chapter).
Spare tyre
For vehicles that are equipped with
them, you need to use tool A
fig. 251 consisting of:
the wrench for unscrewing and
re-screwing the tyre nuts 2 fig. 251;
for some versions, the specific lug
wrench 1 fig. 251.249T36718-1
250T36692
147
Page 175 of 228
What to do
Wash the car by hand, with lots of
water, using a soft cloth or sponge.
Going through an automatic car
wash
Bring the windscreen wiper to the stop
position (refer to the "Windscreen /
Rearscreen wiper” paragraph in the
"Getting to know your vehicle” chapter).
Check that external equipment is fixed
properly (additional lamps, rearview
mirrors) and remove the radio aerial (for
versions/markets where provided).
Headlight cleaning
Since the headlights are equipped with
plastic materials, use a soft cloth or
cotton pad. If this is not sufficient, wet it
slightly with soapy water, then rinse with
a soft cloth or cotton. Finish by drying
delicately with a soft, dry cloth. Do not
use alcohol-based products.
Windows
(e.g.: the instrument panel, clock,
outside temperature display panel,
radio display panel, multi-media or
multi-function display panel, etc.)
Use a soft, cotton cloth. If this is not
sufficient, use a soft cloth (or a cotton
pad) slightly wetted with soapy water,
then rinse with a soft cloth or wet
cotton.
Finish by drying delicately with a soft,
dry cloth.
Do not use alcohol-based productsand/or nebulisers on the area.
WARNING
210)In order to preserve the aesthetic
appearance of the paint, abrasive products
and/or polishes should not be used for
cleaning the vehicle.
211)Avoid washing with rollers and/or
brushes in washing stations. Wash the
vehicle only by hand using neutral pH
detergents; dry it with a dampened
chamois leather. Abrasive products and/or
polishes should not be used for cleaning
the vehicle. Bird droppings must be
washed off immediately and thoroughly as
the acid they contain is particularly
aggressive. Avoid (if at all possible) parking
the vehicle under trees; remove vegetable
resins immediately as, when dried, it may
only be possible to remove them with
abrasive products and/or polishes, which is
highly inadvisable as they could alter the
typical opaqueness of the paint. Do not
use pure windscreen washer fluid for
cleaning the front windscreen and rear
window; dilute it min. 50% with water. Only
use pure screen washer fluid when strictly
necessary due to outside temperature
conditions.
IMPORTANT
7)Detergents pollute the environment. The
vehicle should be washed in areas
equipped for collecting and purifying the
liquid used in the washing process.
INTERIOR
212) 213) 214)
62) 63)
If it undergoes correct service, the
vehicle can last longer. Therefore, we
advise you to regularly see to servicing
the interior of your vehicle.
Every spot must be seen to promptly.
Whatever caused the stain, use cold,
soapy water (possibly warm) based on
mild soap.
Detergents are prohibited (liquid
detergent for dishes, powdered
detergent, alcohol-based products).
Use a soft cloth.
Rinse and blot the excess water.
Fabric (seats, door coverings, etc.)
Dust the fabric regularly.
Liquid spots
Use soapy water.
Blot lightly (without rubbing) with a soft
cloth, then rinse and remove residual
liquid.
Solid or pasty spots
Immediately and delicately remove the
excess solid or pasty material with a
spatula (working from the edges to the
middle, keeping the spot from growing).
Clean as indicated for liquid spots.
Special procedure for candy,
chewing gum
Apply an ice cube to crystalise it, then
proceed as indicated for solid spots.
173
Page 218 of 228
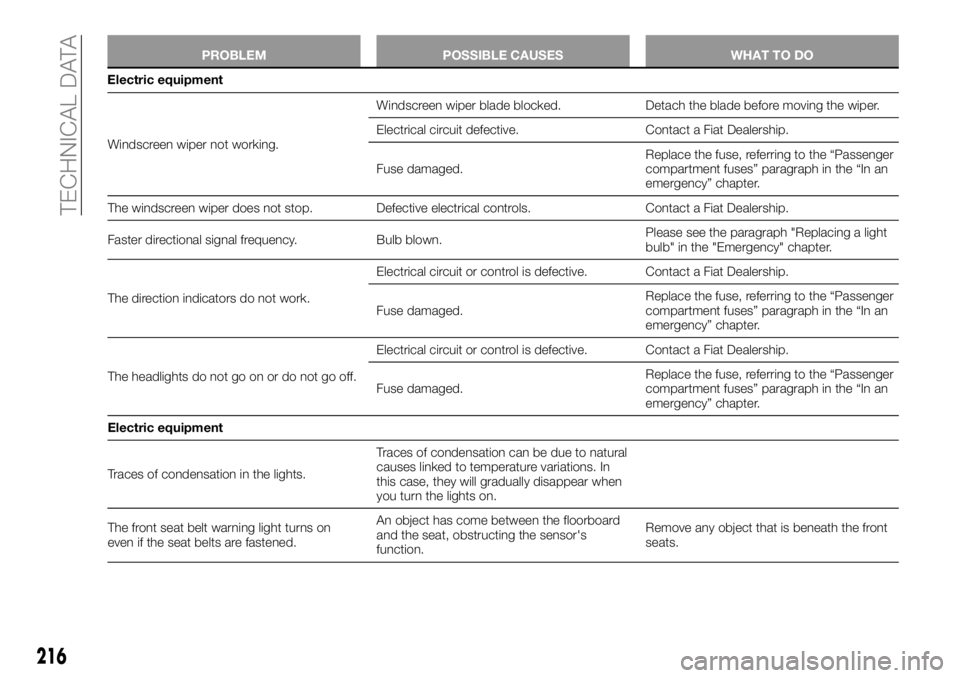
PROBLEM POSSIBLE CAUSES WHAT TO DO
Windscreen wiper not working.Windscreen wiper blade blocked. Detach the blade before moving the wiper.
Electrical circuit defective. Contact a Fiat Dealership.
Fuse damaged.Replace the fuse, referring to the “Passenger
compartment fuses” paragraph in the “In an
emergency” chapter.
The windscreen wiper does not stop. Defective electrical controls. Contact a Fiat Dealership.
Faster directional signal frequency. Bulb blown.Please see the paragraph "Replacing a light
bulb" in the "Emergency" chapter.
The direction indicators do not work.Electrical circuit or control is defective. Contact a Fiat Dealership.
Fuse damaged.Replace the fuse, referring to the “Passenger
compartment fuses” paragraph in the “In an
emergency” chapter.
The headlights do not go on or do not go off.Electrical circuit or control is defective. Contact a Fiat Dealership.
Fuse damaged.Replace the fuse, referring to the “Passenger
compartment fuses” paragraph in the “In an
emergency” chapter.
Electric equipment
Traces of condensation in the lights.Traces of condensation can be due to natural
causes linked to temperature variations. In
this case, they will gradually disappear when
you turn the lights on.
The front seat belt warning light turns on
even if the seat belts are fastened.An object has come between the floorboard
and the seat, obstructing the sensor's
function.Remove any object that is beneath the front
seats.
216
TECHNICAL DATA
Electric equipment