Doors FIAT TALENTO 2017 Owner handbook (in English)
[x] Cancel search | Manufacturer: FIAT, Model Year: 2017, Model line: TALENTO, Model: FIAT TALENTO 2017Pages: 228, PDF Size: 4.47 MB
Page 59 of 228
IMPORTANT The display will show a
reversed image. The shapes are a
projected representation on flat ground;
this information has to be ignored when
you superimpose it on a vertical object
or one resting on the ground. The items
that appear on the edge of the screen
can be distorted. If the light is too bright
(snow, vehicle is in sunshine) the video
camera's vision can be disrupted.
When the rear doors are open or not
closed properly, the dedicated message
appears and, depending on the vehicle,
the video camera image disappears.
WARNING
53)Parking and other potentially
dangerous manoeuvres are, however,
always the driver’s responsibility. While
carrying out these manoeuvres, always
make sure that no people (especially
children) or animals are in the area
concerned. The camera is an aid for the
driver, but the driver must never allow
his/her attention to lapse during potentially
dangerous manoeuvres, even those
executed at low speeds. Always keep a
slow speed, so as to promptly brake in the
case of obstacles.
IMPORTANT
15)It is vital, for correct operation, that the
camera is always kept clean and free from
any mud, dirt, snow or ice. Be careful not
to scratch or damage the camera while
cleaning it. Avoid using dry, rough or hard
cloths. The camera must be washed using
clean water, with the addition of car
shampoo if necessary. In washing stations
which use steam or high-pressure jets,
clean the camera quickly, keeping the
nozzle more than 10 cm away from the
sensors. Also, do not apply stickers to the
camera.
ELECTRIC WINDOWS
ELECTRIC WINDOWS
54) 55)
With the starter device inserted:press the button of the window
concerned to lower it to the desired
position;
lift the button of the window
concerned to raise it to the desired
position.
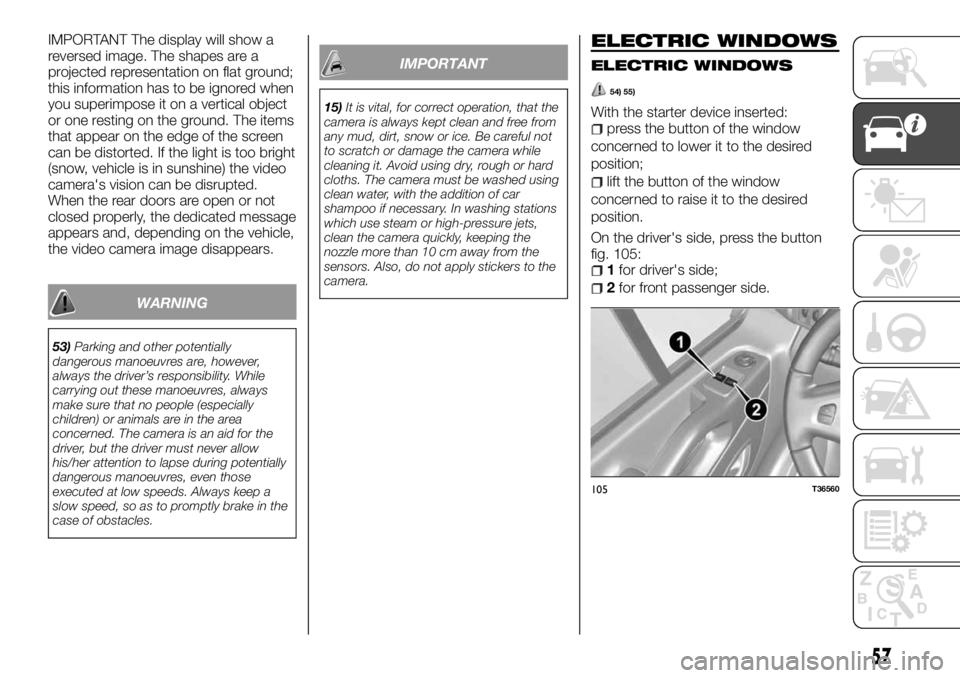
On the driver's side, press the button
fig. 105:
1for driver's side;
2for front passenger side.
105T36560
57
Page 64 of 228
PASSENGER SIDE GLOVE
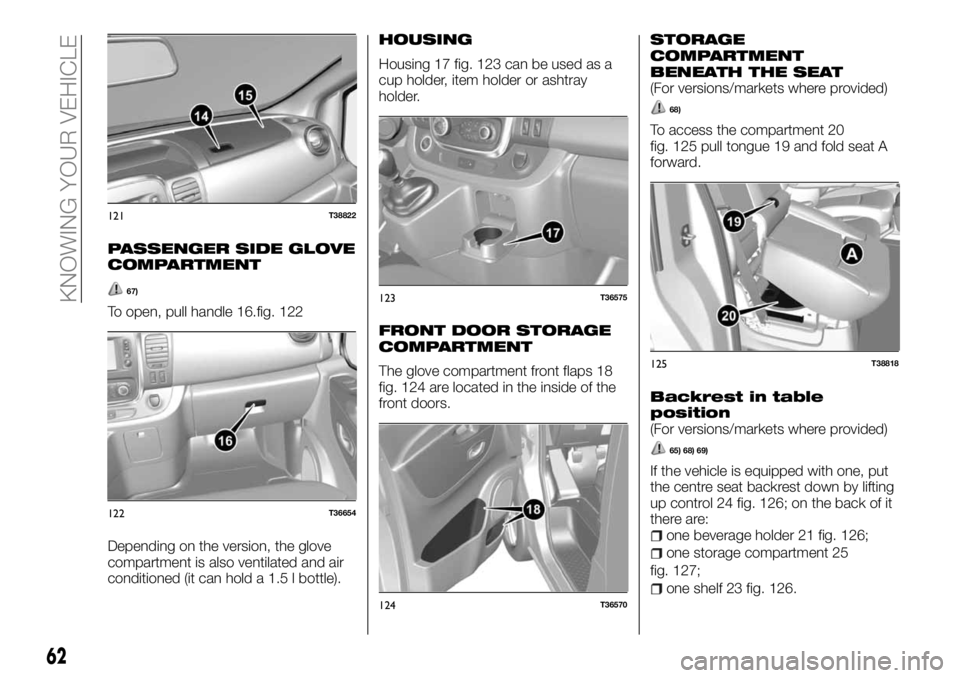
COMPARTMENT
67)
To open, pull handle 16.fig. 122
Depending on the version, the glove
compartment is also ventilated and air
conditioned (it can hold a 1.5 l bottle).
HOUSING
Housing 17 fig. 123 can be used as a
cup holder, item holder or ashtray
holder.
FRONT DOOR STORAGE
COMPARTMENT
The glove compartment front flaps 18
fig. 124 are located in the inside of the
front doors.
STORAGE
COMPARTMENT
BENEATH THE SEAT
(For versions/markets where provided)
68)
To access the compartment 20
fig. 125 pull tongue 19 and fold seat A
forward.
Backrest in table
position
(For versions/markets where provided)
65) 68) 69)
If the vehicle is equipped with one, put
the centre seat backrest down by lifting
up control 24 fig. 126; on the back of it
there are:
one beverage holder 21 fig. 126;
one storage compartment 25
fig. 127;
one shelf 23 fig. 126.
121T38822
122T36654
123T36575
124T36570
125T38818
62
KNOWING YOUR VEHICLE
Page 83 of 228
Warning light What it means
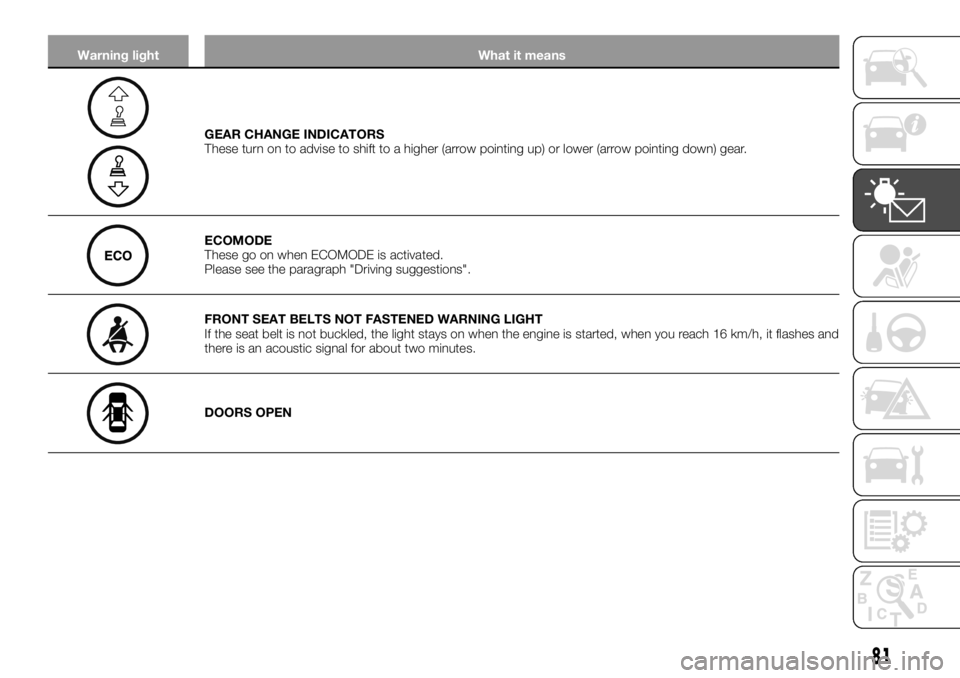
GEAR CHANGE INDICATORS
These turn on to advise to shift to a higher (arrow pointing up) or lower (arrow pointing down) gear.
ECOMODE
These go on when ECOMODE is activated.
Please see the paragraph "Driving suggestions".
FRONT SEAT BELTS NOT FASTENED WARNING LIGHT
If the seat belt is not buckled, the light stays on when the engine is started, when you reach 16 km/h, it flashes and
there is an acoustic signal for about two minutes.
DOORS OPEN
81
Page 123 of 228
(2)Move the front seat as far forward as possible to install the child seat backwards from driving direction, then move it back to
maximum so it does not come into contact with the child seat.
(3)Child seat facing forward: position the child seat backrest in contact with the seat backrest. In any case, remove the rear
seat headrest that the child seat is positioned against. This should be done before positioning the child restraint system (refer to
the "Rear headrest" paragraph in the "Knowing your vehicle” chapter). Do not move the seat in front of the child back more
than half the distance and do not incline it more than 25°.
WARNING
120)To prevent opening the door from the
inside, use the safety device (refer to the
"Child safety” paragraph in the “Knowing
your vehicle” chapter).
121)A collision at 50 Km/h is the
equivalent of falling 10 meters. Never hold
a child in your arms or on your knees, in
case of an accident you would never be
able to hold him even if you have your seat
bets fastened.
122)Never leave the vehicle unguarded
with the electronic key and a child, a
handicapped person or an animal inside,
even for a short time. This could result in
your own safety or that of others who
could start the engine, setting in motion
equipment such as the electric windows or
even locking the doors. Moreover, in hot
and/or sunny weather, the vehicle's interior
temperature will increase rapidly. Risk of
death or serious injury.123)Never leave a child alone in the
vehicle. Make sure the child always has
his/her seat belt fastened and correctly
adjusted. Avoid too heavy clothing that
causes the belts to be loose. Never allow
the child to put his/her head or arm out the
window. Make sure the child is seated
correctly throughout the trip. especially
when asleep.
124)Make sure the child seat or his/her
feet do not prevent the front seat from
locking into place correctly. Refer to the
"Front seat" paragraph in the "Knowing
your vehicle” chapter. Make sure that the
child seat installed in the vehicle is not at
risk of coming out of its housing. If you
have to remove the head rest, make sure it
is positioned so it is not thrown about in
case of abrupt braking or collision. Always
fasten the child seat even if you are not
using it so it is not thrown about in case of
abrupt braking or collision.
125)RISK OF DEATH OR SERIOUS
INJURY: before installing a rear-facing child
restraint system in the front passenger
seat, check that the air bag has been
correctly deactivated (refer to the
"Passenger side airbag and child restraint
systems" paragraph in this chapter).
126)Install the child seat preferably in one
of the rear seats.127)Never install a child seat on the rear
centre seat. RISK OF DEATH OR SERIOUS
INJURY.
128)Do not use child seats that could
unlock the belt holding it in place: the child
seat base must not rest on the seat belt
buckle and/or housing.
129)The seat belt must never be loose or
twisted. Never pass the shoulder belt
under your arm or behind your back.
Check that the belt has not been damaged
by sharp edges. If the seat belt is not
working normally, it will not protect the
child. Contact a Fiat Dealership. Do not
use this seat until the belt has been
repaired.
130)Using a child seat inappropriate for
this vehicle will not properly protect the
child. You risk causing him/her serious
injury or death.
121
Page 135 of 228
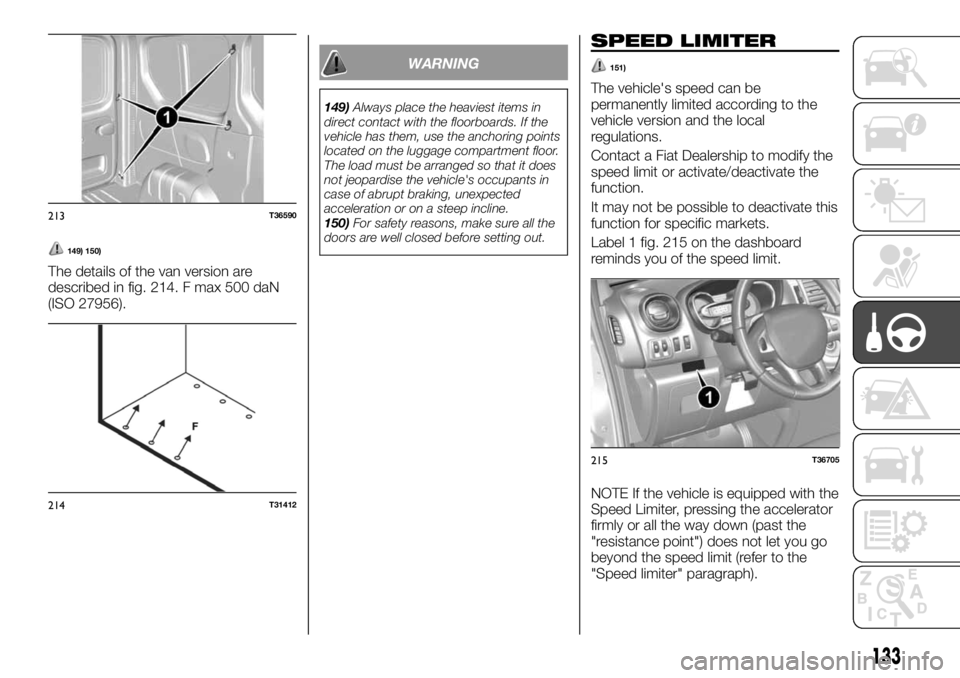
149) 150)
The details of the van version are
described in fig. 214. F max 500 daN
(ISO 27956).
WARNING
149)Always place the heaviest items in
direct contact with the floorboards. If the
vehicle has them, use the anchoring points
located on the luggage compartment floor.
The load must be arranged so that it does
not jeopardise the vehicle's occupants in
case of abrupt braking, unexpected
acceleration or on a steep incline.
150)For safety reasons, make sure all the
doors are well closed before setting out.
SPEED LIMITER
151)
The vehicle's speed can be
permanently limited according to the
vehicle version and the local
regulations.
Contact a Fiat Dealership to modify the
speed limit or activate/deactivate the
function.
It may not be possible to deactivate this
function for specific markets.
Label 1 fig. 215 on the dashboard
reminds you of the speed limit.
NOTE If the vehicle is equipped with the
Speed Limiter, pressing the accelerator
firmly or all the way down (past the
"resistance point") does not let you go
beyond the speed limit (refer to the
"Speed limiter" paragraph).
213T36590
214T31412
215T36705
133
Page 138 of 228
BehaviourRather than heat the engine while
stopped, we advise you to drive
moderately until the engine reaches its
normal operating temperature.
Speed increases fuel consumption.
Do not strain the engine by
exceeding speed in intermediary gears.
Use the highest gear.
Avoid sudden acceleration.
Brake as little as possible. By
assessing the danger or curve in
advance, it will be sufficient to lift your
foot off the accelerator.
When going uphill, we advise you to
keep a steady speed, without having to
change it.
In modern vehicles, double clutching
before stopping the engine is not
necessary and could even cause
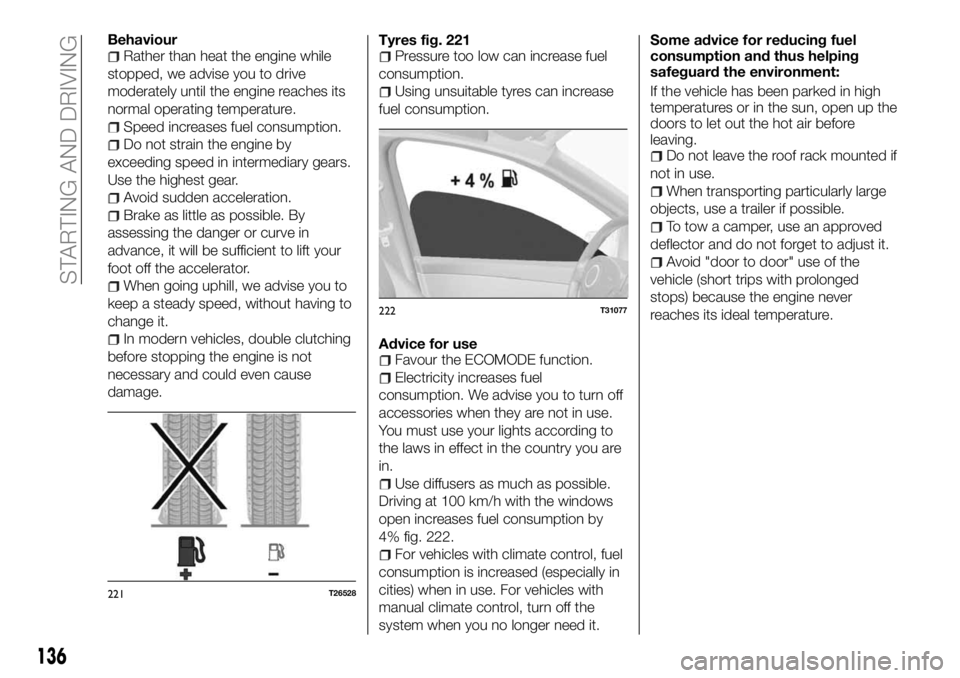
damage.Tyres fig. 221
Pressure too low can increase fuel
consumption.
Using unsuitable tyres can increase
fuel consumption.
Advice for use
Favour the ECOMODE function.
Electricity increases fuel
consumption. We advise you to turn off
accessories when they are not in use.
You must use your lights according to
the laws in effect in the country you are
in.
Use diffusers as much as possible.
Driving at 100 km/h with the windows
open increases fuel consumption by
4% fig. 222.
For vehicles with climate control, fuel
consumption is increased (especially in
cities) when in use. For vehicles with
manual climate control, turn off the
system when you no longer need it.Some advice for reducing fuel
consumption and thus helping
safeguard the environment:
If the vehicle has been parked in high
temperatures or in the sun, open up the
doors to let out the hot air before
leaving.
Do not leave the roof rack mounted if
not in use.
When transporting particularly large
objects, use a trailer if possible.
To tow a camper, use an approved
deflector and do not forget to adjust it.
Avoid "door to door" use of the
vehicle (short trips with prolonged
stops) because the engine never
reaches its ideal temperature.
221T26528
222T31077
136
STARTING AND DRIVING
Page 143 of 228
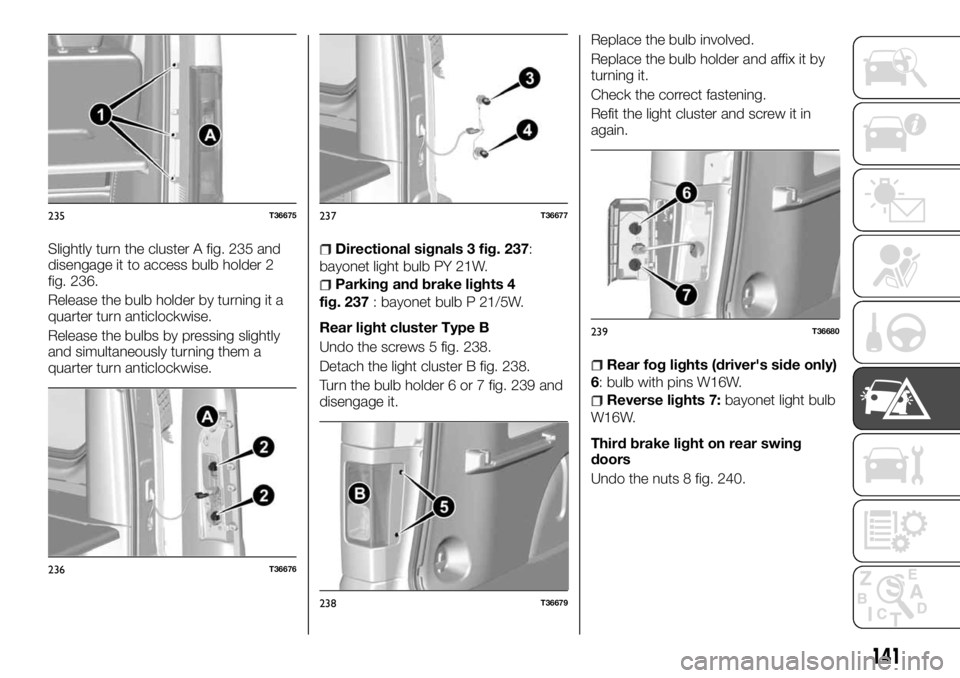
Slightly turn the cluster A fig. 235 and
disengage it to access bulb holder 2
fig. 236.
Release the bulb holder by turning it a
quarter turn anticlockwise.
Release the bulbs by pressing slightly
and simultaneously turning them a
quarter turn anticlockwise.Directional signals 3 fig. 237:
bayonet light bulb PY 21W.
Parking and brake lights 4
fig. 237: bayonet bulb P 21/5W.
Rear light cluster Type B
Undo the screws 5 fig. 238.
Detach the light cluster B fig. 238.
Turn the bulb holder 6 or 7 fig. 239 and
disengage it.Replace the bulb involved.
Replace the bulb holder and affix it by
turning it.
Check the correct fastening.
Refit the light cluster and screw it in
again.
Rear fog lights (driver's side only)
6: bulb with pins W16W.
Reverse lights 7:bayonet light bulb
W16W.
Third brake light on rear swing
doors
Undo the nuts 8 fig. 240.
235T36675
236T36676
237T36677
238T36679
239T36680
141
Page 144 of 228
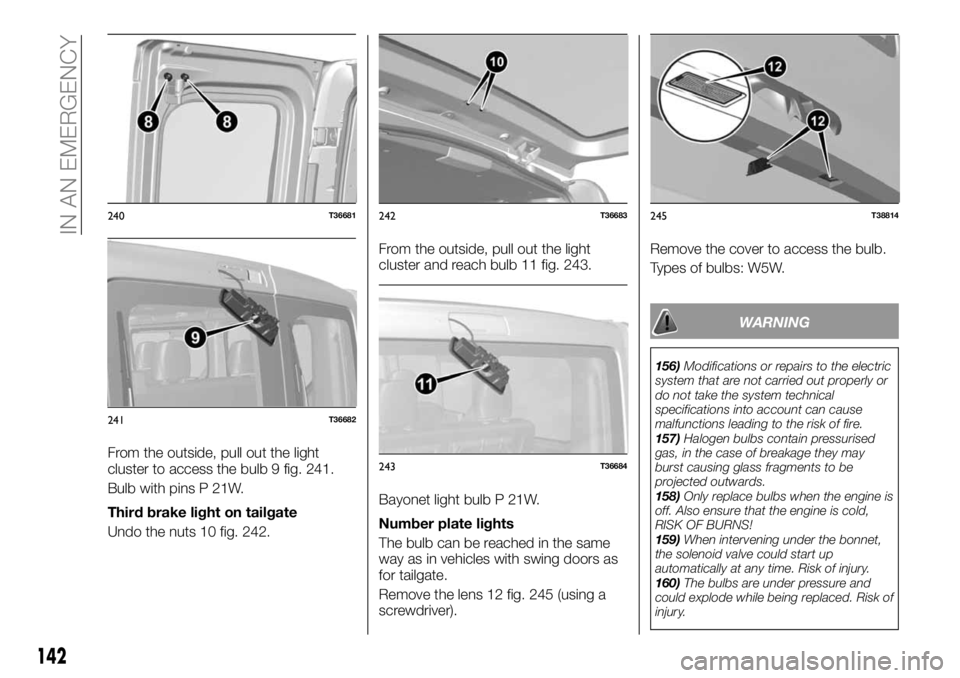
From the outside, pull out the light
cluster to access the bulb 9 fig. 241.
Bulb with pins P 21W.
Third brake light on tailgate
Undo the nuts 10 fig. 242.From the outside, pull out the light
cluster and reach bulb 11 fig. 243.
Bayonet light bulb P 21W.
Number plate lights
The bulb can be reached in the same
way as in vehicles with swing doors as
for tailgate.
Remove the lens 12 fig. 245 (using a
screwdriver).Remove the cover to access the bulb.
Types of bulbs: W5W.
WARNING
156)Modifications or repairs to the electric
system that are not carried out properly or
do not take the system technical
specifications into account can cause
malfunctions leading to the risk of fire.
157)Halogen bulbs contain pressurised
gas, in the case of breakage they may
burst causing glass fragments to be
projected outwards.
158)Only replace bulbs when the engine is
off. Also ensure that the engine is cold,
RISK OF BURNS!
159)When intervening under the bonnet,
the solenoid valve could start up
automatically at any time. Risk of injury.
160)The bulbs are under pressure and
could explode while being replaced. Risk of
injury.
240T36681
241T36682
242T36683
243T36684
245T38814
142
IN AN EMERGENCY
Page 173 of 228
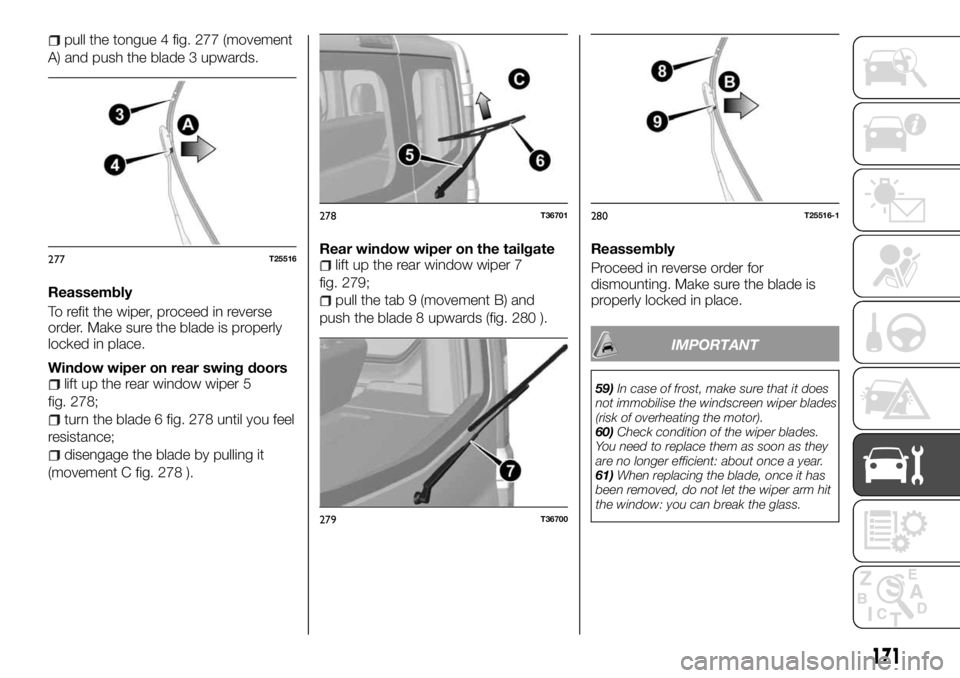
pull the tongue 4 fig. 277 (movement
A) and push the blade 3 upwards.
Reassembly
To refit the wiper, proceed in reverse
order. Make sure the blade is properly
locked in place.
Window wiper on rear swing doors
lift up the rear window wiper 5
fig. 278;
turn the blade 6 fig. 278 until you feel
resistance;
disengage the blade by pulling it
(movement C fig. 278 ).Rear window wiper on the tailgate
lift up the rear window wiper 7
fig. 279;
pull the tab 9 (movement B) and
push the blade 8 upwards (fig. 280 ).Reassembly
Proceed in reverse order for
dismounting. Make sure the blade is
properly locked in place.
IMPORTANT
59)In case of frost, make sure that it does
not immobilise the windscreen wiper blades
(risk of overheating the motor).
60)Check condition of the wiper blades.
You need to replace them as soon as they
are no longer efficient: about once a year.
61)When replacing the blade, once it has
been removed, do not let the wiper arm hit
the window: you can break the glass.
277T25516
278T36701
279T36700
280T25516-1
171
Page 174 of 228
BODYWORK
210) 211)
7)
If it undergoes correct service, the
vehicle can last longer. Therefore, we
advise you to regularly see to servicing
the exterior of your vehicle.
The vehicle takes advantage of the
most advanced anti-corrosion
technology. However, it is subject to
various factors.
Atmospheric corrosive agents.
Pollution (in cities and industry);
atmospheric salinity (coastal areas,
especially in warm weather);
seasonal weather conditions and
hygrometrics (salt spread on roads in
winter, street washing water, etc.).
Abrasive actions
Atmospheric dust, sand, mud, gravel
spattered from other vehicles, etc.
You need to take precautions against
these risk factors.
What not to do
Remove traces of oil or clean the
mechanical components (e.g. the
engine compartment), underbody,
components with hinges (e.g. inside the
doors) and exterior parts made of
painted plastic (e.g. bumpers) using
high pressure cleaners or by using
products that have not been approved
by the Fiat Dealership. This could cause
rust or poor operation.Wash the vehicle in the sun or at low
temperatures.
Scrape off the mud or dirt without first
softening it with water.
Allow dirt to build up on the exterior.
Allow rust to form on damaged parts of
the body.
Dissolve spots with solvents not
approved of by Fiat service; they could
damage the paint.
Drive in snow or mud without washing
the vehicle afterwards, especially the
wheel arches and underbody.
What to do
Wash your vehicle frequently, with the
engine stopped, with shampoos
approved by our Fiat Dealer technicians
(never with abrasives) and rinse
thoroughly with sprayed water:
resin from trees or industrial
substances;
mud, which forms a wet mass under
the wheel arches and underbody;
bird guano, which causes a chemical
reaction with the paint, causing rapid
discolouring and can even cause the
paint to detach;
you must remove these spots, as
over time, not even polishing will
remove them;
salt, especially in the wheel arches
and underbody, after driving on roads
where anti-ice substances have been
spread.Regularly remove resin, leaves etc., that
has fallen on the vehicle.
Respect the local laws concerning
washing vehicles (e.g. do not wash your
vehicle in the road).
To prevent damage to the bodywork,
keep an adequate distance from other
cars in front when you drive on gravel.
If the paint is damaged, retouch it
quickly to prevent corrosion from
forming.
If the vehicle has an anti-corrosion
warranty, do not forget to have it
checked periodically. Please see the
Scheduled Service Plan.
If you have to clean the mechanical
parts (e.g. hinges), you need to have
the protection renewed by using
products approved by the Fiat
Dealership.
IMPORTANT We have selected
products specific to maintenance
available at Fiat sales points.
Versions with matt paint
This type of vehicle requires a few
precautions.
What not to do
use wax-based products (gloss);
polish vigorously;
use automatic car washers;
wash the car with high pressure
cleaners;
apply stickers to the painted surfaces
(they might leave traces).
172
SERVICING AND CARE