lights FIAT TALENTO 2017 Owner handbook (in English)
[x] Cancel search | Manufacturer: FIAT, Model Year: 2017, Model line: TALENTO, Model: FIAT TALENTO 2017Pages: 228, PDF Size: 4.47 MB
Page 124 of 228
ACTIVE SAFETY
SYSTEMS
Depending on the version, they can
consist of:
by the anti-lock braking system
(ABS);
electronic stability control (ESC) with
understeering and traction control
system;
driving with a trailer assistance;
emergency brake assistance;
road grip control;
assisted departure on inclines.
ABS (Anti-lock Braking
System)
131) 132) 133) 134)
In case of abrupt braking,the ABS
avoids wheel locking, so it manages the
braking distance and maintains vehicle
control.
In these conditions you can carry out
manoeuvres while braking fully.
Moreover, this system optimises the
braking distance, especially on slippery
surfaces (wet roadbed, etc.).
Every time you activate this device, you
know because the brake pedal shakes.
The ABS never improves the "physical"
performance associated with the
wheel's road grip. The rules of the road
must be respected (safety distance
between vehicles, etc.).IMPORTANT In an emergency, we
advise you to apply strong, continuous
pressure to the brake pedal. You do not
need to pump it. The ABS will modulate
the force applied to the brakes.
Irregular operation:
Depending on the vehicle,and
lit on the instrument panel along
with dedicated messages mean: the
ABS, ESC and emergency power
steering have been deactivated.
Braking is always guaranteed;
andSTOPlit on the
instrument panel, along with the
dedicated message on the display,
indicates that there is a fault in the
brake system.
In both cases, contact a Fiat
Dealership.
ESC (Electronic Stability
Control) SYSTEM
135) 136)
Electronic stability control ESC
This system helps maintain control of
the vehicle in "critical" driving conditions
(avoiding an obstacle, loss of grip in a
curve, etc.).
Operating principle
A sensor on the steering wheel
recognises the driving trajectory that the
driver set.
Other sensors installed in the vehicle
measure the real trajectory.The system compares the driver's
adherence to the effective trajectory,
correcting it if necessary, braking a few
wheels and/or reducing engine power if
the system was activated and its
warning light
flashes on the
instrument panel.
Understeering control
This system optimises the ESC action
in case of noticeable understeer (loss of
front grip).
Traction Control System
This system limits the drive wheels
slipping and helps control the vehicle
when starting out, accelerating or
decelerating.
Operating principle
Thanks to the sensor in the wheels, the
system measures and compares the
drive wheel rotation speed, detecting
immediately loss of grip. If a wheel
starts sliding, the system intervenes by
braking to re-stabilise the drive that is
compatible with the level of road grip.
The system also acts on the engine
speed, adapting it to wheel road grip,
independently of the driver's use of the
accelerator.
Irregular operation
When the system detects an
operational irregularity, the dedicated
message appears on the display and
the warning lights
andturn
on. In this case, the ESC and traction
122
SAFETY
Page 125 of 228
control system are deactivated. Contact
a Fiat Dealership.
PBA (Panic Brake
Assist) SYSTEM
This is a complementary system to the
ABS that lets you reduce the vehicle's
braking distance.
Operating principle
The system detects an emergency
braking situation. In such cases, the
power brake immediately creates the
maximum braking, causing the ABS
system to also intervene.
ABS intervention lasts until the brake
pedal is released.
Hazard warning lights on
Depending on the versions, these lights
can go on when you slow down
abruptly.
Anticipated braking
Depending on the versions, when you
quickly release the accelerator, the
system anticipates braking so as to
diminish the braking distance.
When using Cruise Control:
if you are using the accelerator pedal,
with you release it, the system can
activate;
if you are not using the accelerator
pedal, the system will not activate.Irregular operation
When the system detects an
operational irregularity, the message to
that effect will appear on the instrument
panel with the alarm light
going
on.
Contact a Fiat Dealership.
TSA (Trailer Stability
Assist) DRIVING
ASSISTANCE WITH A
TRAILER
This system helps you maintain control
of the vehicle in case you are using a
trailer. It detects the swinging motion of
the trailer in certain driving conditions.
Operating conditions
The two system must be authorised
by the Fiat Dealership;
the wiring has to be approved by a
Fiat Dealership;
the trailer has to be connected to the
vehicle.
Operating principle
The function stabilises the vehicle by:
asymmetrical front wheel braking to
reduce swinging caused by the trailer;
four wheel braking and a limitation in
engine torque to reduce the vehicle
speed until the swinging stops.
The warning light
flashes on the
instrument panel to inform you of the
situation.
TRACTION PLUS (GRIP
CONTROL)
136)
22)
Where the vehicle is provided with one,
road grip check ensures easier control
of the vehicle in conditions where grip is
reduced (crumbly terrain).
"Road" mode
When the vehicle is started, the
appropriate message appears on the
display screen. The indicator light
on the instrument panel is off. This
position guarantees optimal use in
normal road conditions (dry, wet
roadbed, light snow, etc.).
The "Road" mode uses the traction
control system functions.
"Traction +" Mode
Press button 1 fig. 201: the warning
light
on the instrument panel turns
on along with the dedicated message.
123
Page 132 of 228
USING THE
GEARBOX
144)
25)
To engage reverse (vehicle
stopped)
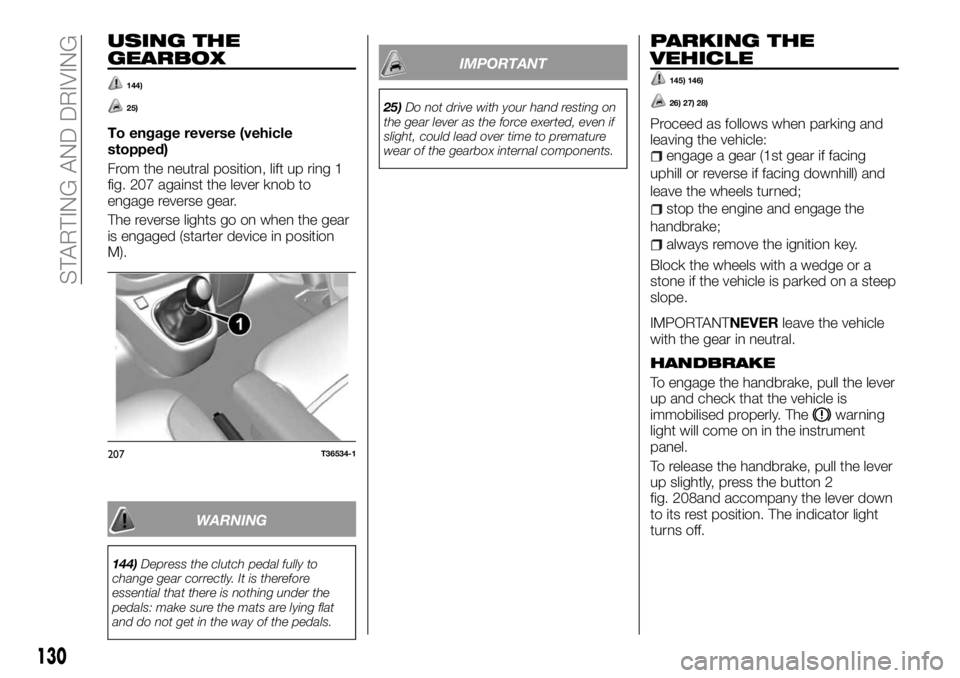
From the neutral position, lift up ring 1
fig. 207 against the lever knob to
engage reverse gear.
The reverse lights go on when the gear
is engaged (starter device in position
M).
WARNING
144)Depress the clutch pedal fully to
change gear correctly. It is therefore
essential that there is nothing under the
pedals: make sure the mats are lying flat
and do not get in the way of the pedals.
IMPORTANT
25)Do not drive with your hand resting on
the gear lever as the force exerted, even if
slight, could lead over time to premature
wear of the gearbox internal components.
PARKING THE
VEHICLE
145) 146)
26) 27) 28)
Proceed as follows when parking and
leaving the vehicle:
engage a gear (1st gear if facing
uphill or reverse if facing downhill) and
leave the wheels turned;
stop the engine and engage the
handbrake;
always remove the ignition key.
Block the wheels with a wedge or a
stone if the vehicle is parked on a steep
slope.
IMPORTANTNEVERleave the vehicle
with the gear in neutral.
HANDBRAKE
To engage the handbrake, pull the lever
up and check that the vehicle is
immobilised properly. The
warning
light will come on in the instrument
panel.
To release the handbrake, pull the lever
up slightly, press the button 2
fig. 208and accompany the lever down
to its rest position. The indicator light
turns off.
207T36534-1
130
STARTING AND DRIVING
Page 138 of 228
BehaviourRather than heat the engine while
stopped, we advise you to drive
moderately until the engine reaches its
normal operating temperature.
Speed increases fuel consumption.
Do not strain the engine by
exceeding speed in intermediary gears.
Use the highest gear.
Avoid sudden acceleration.
Brake as little as possible. By
assessing the danger or curve in
advance, it will be sufficient to lift your
foot off the accelerator.
When going uphill, we advise you to
keep a steady speed, without having to
change it.
In modern vehicles, double clutching
before stopping the engine is not
necessary and could even cause
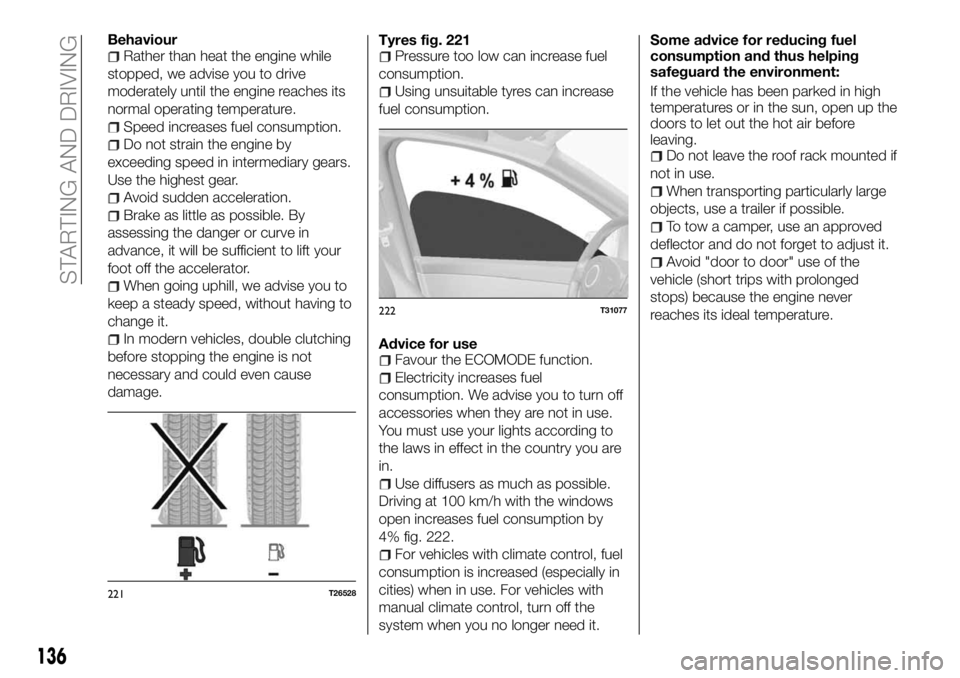
damage.Tyres fig. 221
Pressure too low can increase fuel
consumption.
Using unsuitable tyres can increase
fuel consumption.
Advice for use
Favour the ECOMODE function.
Electricity increases fuel
consumption. We advise you to turn off
accessories when they are not in use.
You must use your lights according to
the laws in effect in the country you are
in.
Use diffusers as much as possible.
Driving at 100 km/h with the windows
open increases fuel consumption by
4% fig. 222.
For vehicles with climate control, fuel
consumption is increased (especially in
cities) when in use. For vehicles with
manual climate control, turn off the
system when you no longer need it.Some advice for reducing fuel
consumption and thus helping
safeguard the environment:
If the vehicle has been parked in high
temperatures or in the sun, open up the
doors to let out the hot air before
leaving.
Do not leave the roof rack mounted if
not in use.
When transporting particularly large
objects, use a trailer if possible.
To tow a camper, use an approved
deflector and do not forget to adjust it.
Avoid "door to door" use of the
vehicle (short trips with prolonged
stops) because the engine never
reaches its ideal temperature.
221T26528
222T31077
136
STARTING AND DRIVING
Page 139 of 228
IN AN EMERGENCY
A punctured tyre or a burnt-out bulb?
At times, a problem may interfere with
our journey.
The pages on emergencies can help
you to deal with critical situations
independently and with calm.
In an emergency we recommend that
you call the toll free phone number
found in the Warranty Booklet.
It is also possible to call the national or
international universal freephone
number to search for the nearest Fiat
Dealership.HAZARD WARNING LIGHTS.....139
REPLACING AN INTERNAL BULB .139
REPLACING AN EXTERNAL BULB .140
PASSENGER COMPARTMENT
FUSES...................144
IN THE EVENT OF A PUNCTURE . .148
CHANGING A WHEEL.........148
TYRE INFLATION KIT..........151
JUMP STARTING............153
BATTERY RECHARGING.......154
TOWING THE VEHICLE........155
137
Page 140 of 228

HAZARD WARNING
LIGHTS
CONTROL
Press button 2 fig. 223. This
simultaneously activates the four
flashing arrows and those on the side. It
must be used only in case of danger to
warn other drivers that you have had to
stop in an unusual or prohibited place
or in special driving or traffic conditions.
Depending on the trim, in case you
stop abruptly, the emergency lights can
go on automatically. You can turn them
off by pressing the button 2
fig. 223 once.
REPLACING AN
INTERNAL BULB
152) 153) 154) 155)
Courtesy lights
Remove the lens from the courtesy light
concerned (1 fig. 224, 2 and 3 fig. 225,
6 and 7 fig. 226 ) using a screwdriver.
Pull the bulb downwards to remove
from its housing.
Type of bulb: W6W
Replace the bulb and reposition the
press-fit lens.
Vehicles with reading light
Type of bulb 2 fig. 227: pin type, 10W
Type of reading light bulb 3 fig. 227:
W5W
223T36520
224T36566
225T36567
226T36631
227T38811
138
IN AN EMERGENCY
Page 141 of 228
Glove compartment light
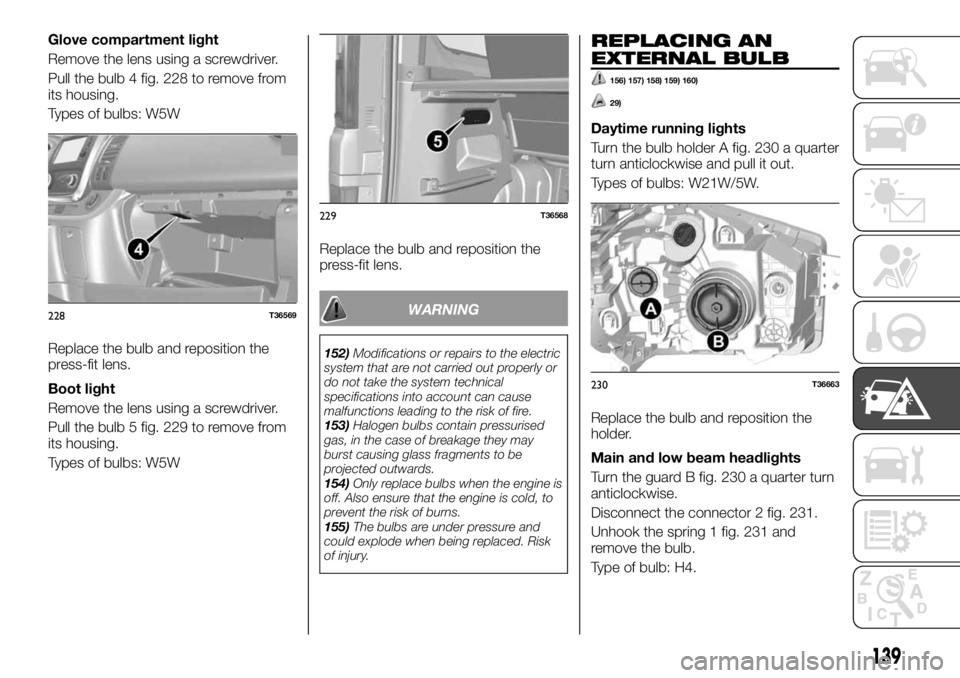
Remove the lens using a screwdriver.
Pull the bulb 4 fig. 228 to remove from
its housing.
Types of bulbs: W5W
Replace the bulb and reposition the
press-fit lens.
Boot light
Remove the lens using a screwdriver.
Pull the bulb 5 fig. 229 to remove from
its housing.
Types of bulbs: W5WReplace the bulb and reposition the
press-fit lens.
WARNING
152)Modifications or repairs to the electric
system that are not carried out properly or
do not take the system technical
specifications into account can cause
malfunctions leading to the risk of fire.
153)Halogen bulbs contain pressurised
gas, in the case of breakage they may
burst causing glass fragments to be
projected outwards.
154)Only replace bulbs when the engine is
off. Also ensure that the engine is cold, to
prevent the risk of burns.
155)The bulbs are under pressure and
could explode when being replaced. Risk
of injury.
REPLACING AN
EXTERNAL BULB
156) 157) 158) 159) 160)
29)
Daytime running lights
Turn the bulb holder A fig. 230 a quarter
turn anticlockwise and pull it out.
Types of bulbs: W21W/5W.
Replace the bulb and reposition the
holder.
Main and low beam headlights
Turn the guard B fig. 230 a quarter turn
anticlockwise.
Disconnect the connector 2 fig. 231.
Unhook the spring 1 fig. 231 and
remove the bulb.
Type of bulb: H4.
228T36569
229T36568
230T36663
139
Page 142 of 228
Do not touch the bulb crystal. Hold
it by its ends.
Replace the bulb, hook the spring back
on and reconnect the connector, taking
care to also refit the guard B fig. 230.
Turn indicator
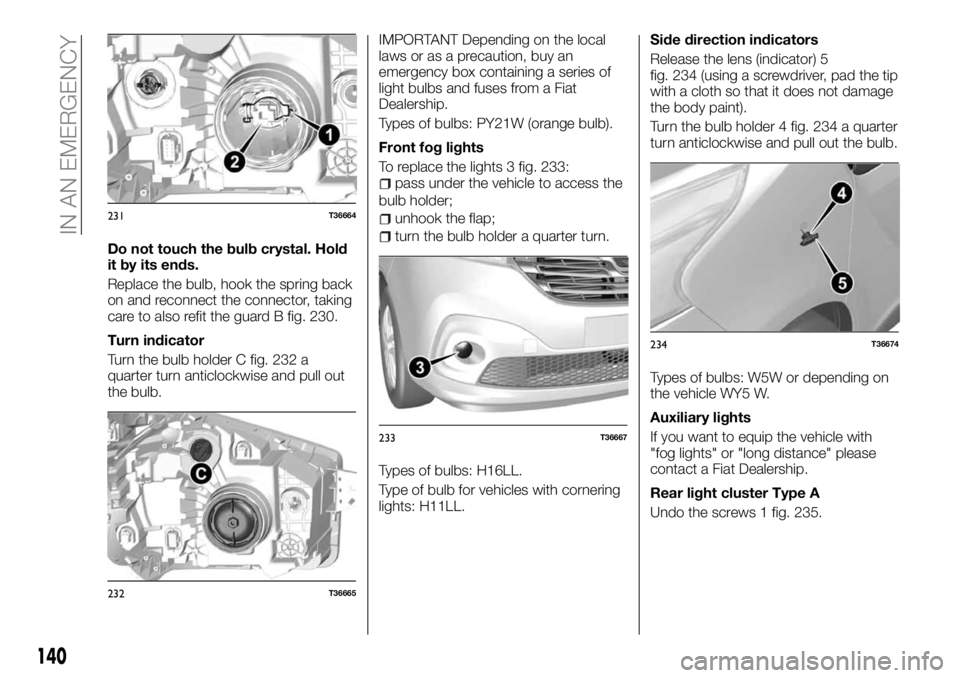
Turn the bulb holder C fig. 232 a
quarter turn anticlockwise and pull out
the bulb.IMPORTANT Depending on the local
laws or as a precaution, buy an
emergency box containing a series of
light bulbs and fuses from a Fiat
Dealership.
Types of bulbs: PY21W (orange bulb).
Front fog lights
To replace the lights 3 fig. 233:
pass under the vehicle to access the
bulb holder;
unhook the flap;
turn the bulb holder a quarter turn.
Types of bulbs: H16LL.
Type of bulb for vehicles with cornering
lights: H11LL.Side direction indicators
Release the lens (indicator) 5
fig. 234 (using a screwdriver, pad the tip
with a cloth so that it does not damage
the body paint).
Turn the bulb holder 4 fig. 234 a quarter
turn anticlockwise and pull out the bulb.
Types of bulbs: W5W or depending on
the vehicle WY5 W.
Auxiliary lights
If you want to equip the vehicle with
"fog lights" or "long distance" please
contact a Fiat Dealership.
Rear light cluster Type A
Undo the screws 1 fig. 235.
231T36664
232T36665
233T36667
234T36674
140
IN AN EMERGENCY
Page 143 of 228
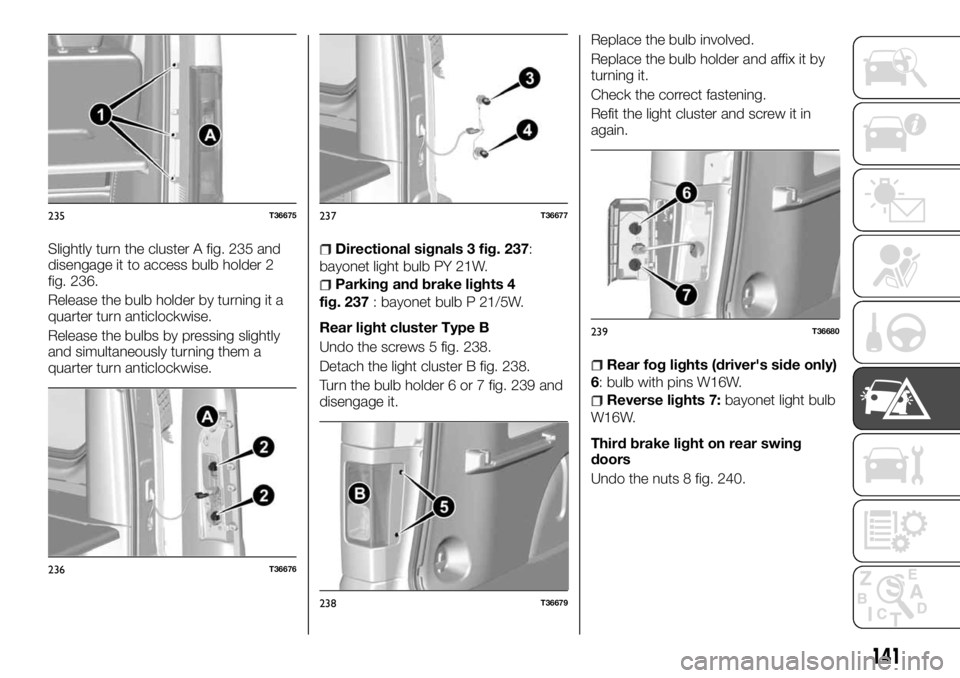
Slightly turn the cluster A fig. 235 and
disengage it to access bulb holder 2
fig. 236.
Release the bulb holder by turning it a
quarter turn anticlockwise.
Release the bulbs by pressing slightly
and simultaneously turning them a
quarter turn anticlockwise.Directional signals 3 fig. 237:
bayonet light bulb PY 21W.
Parking and brake lights 4
fig. 237: bayonet bulb P 21/5W.
Rear light cluster Type B
Undo the screws 5 fig. 238.
Detach the light cluster B fig. 238.
Turn the bulb holder 6 or 7 fig. 239 and
disengage it.Replace the bulb involved.
Replace the bulb holder and affix it by
turning it.
Check the correct fastening.
Refit the light cluster and screw it in
again.
Rear fog lights (driver's side only)
6: bulb with pins W16W.
Reverse lights 7:bayonet light bulb
W16W.
Third brake light on rear swing
doors
Undo the nuts 8 fig. 240.
235T36675
236T36676
237T36677
238T36679
239T36680
141
Page 144 of 228
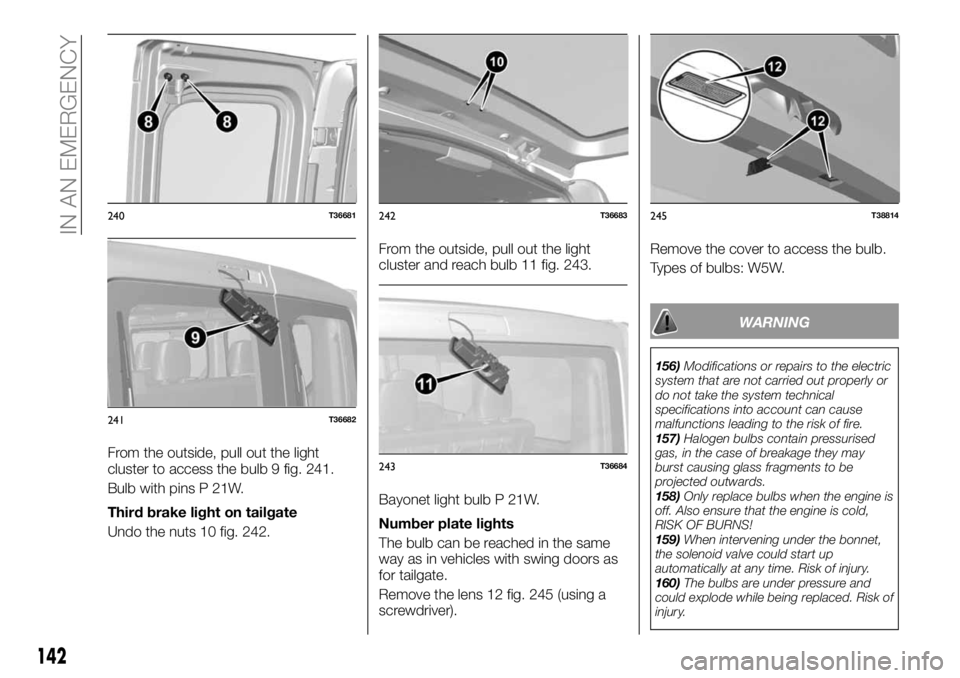
From the outside, pull out the light
cluster to access the bulb 9 fig. 241.
Bulb with pins P 21W.
Third brake light on tailgate
Undo the nuts 10 fig. 242.From the outside, pull out the light
cluster and reach bulb 11 fig. 243.
Bayonet light bulb P 21W.
Number plate lights
The bulb can be reached in the same
way as in vehicles with swing doors as
for tailgate.
Remove the lens 12 fig. 245 (using a
screwdriver).Remove the cover to access the bulb.
Types of bulbs: W5W.
WARNING
156)Modifications or repairs to the electric
system that are not carried out properly or
do not take the system technical
specifications into account can cause
malfunctions leading to the risk of fire.
157)Halogen bulbs contain pressurised
gas, in the case of breakage they may
burst causing glass fragments to be
projected outwards.
158)Only replace bulbs when the engine is
off. Also ensure that the engine is cold,
RISK OF BURNS!
159)When intervening under the bonnet,
the solenoid valve could start up
automatically at any time. Risk of injury.
160)The bulbs are under pressure and
could explode while being replaced. Risk of
injury.
240T36681
241T36682
242T36683
243T36684
245T38814
142
IN AN EMERGENCY