check engine light FIAT TALENTO 2018 Owner handbook (in English)
[x] Cancel search | Manufacturer: FIAT, Model Year: 2018, Model line: TALENTO, Model: FIAT TALENTO 2018Pages: 232, PDF Size: 5.54 MB
Page 83 of 232
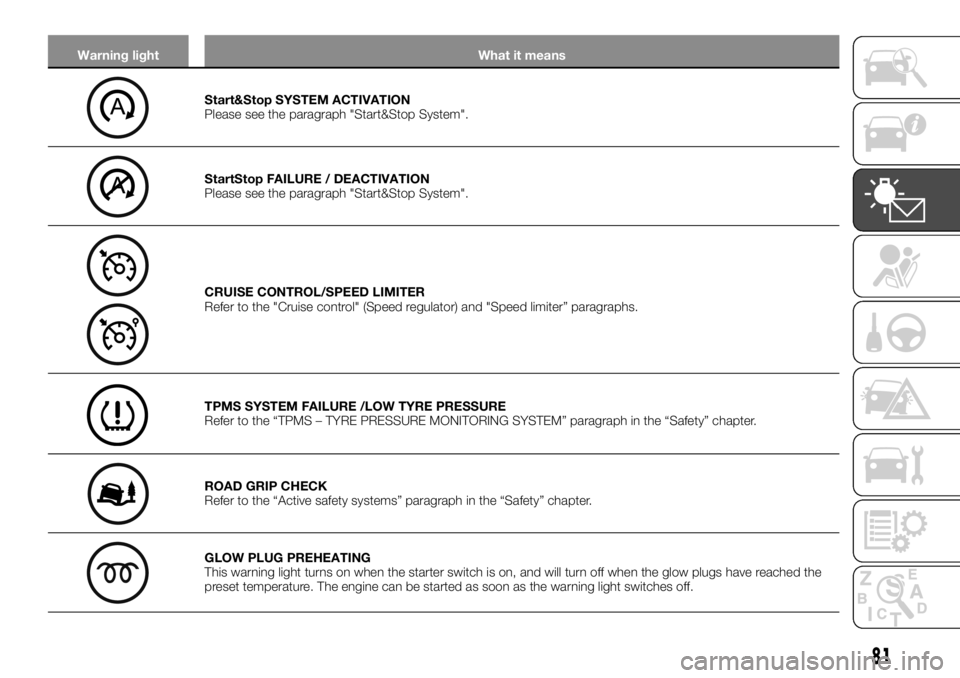
Warning light What it means
Start&Stop SYSTEM ACTIVATION
Please see the paragraph "Start&Stop System".
StartStop FAILURE / DEACTIVATION
Please see the paragraph "Start&Stop System".
CRUISE CONTROL/SPEED LIMITER
Refer to the "Cruise control" (Speed regulator) and "Speed limiter” paragraphs.
TPMS SYSTEM FAILURE /LOW TYRE PRESSURE
Refer to the “TPMS – TYRE PRESSURE MONITORING SYSTEM” paragraph in the “Safety” chapter.
ROAD GRIP CHECK
Refer to the “Active safety systems” paragraph in the “Safety” chapter.
GLOW PLUG PREHEATING
This warning light turns on when the starter switch is on, and will turn off when the glow plugs have reached the
preset temperature. The engine can be started as soon as the warning light switches off.
81
Page 86 of 232
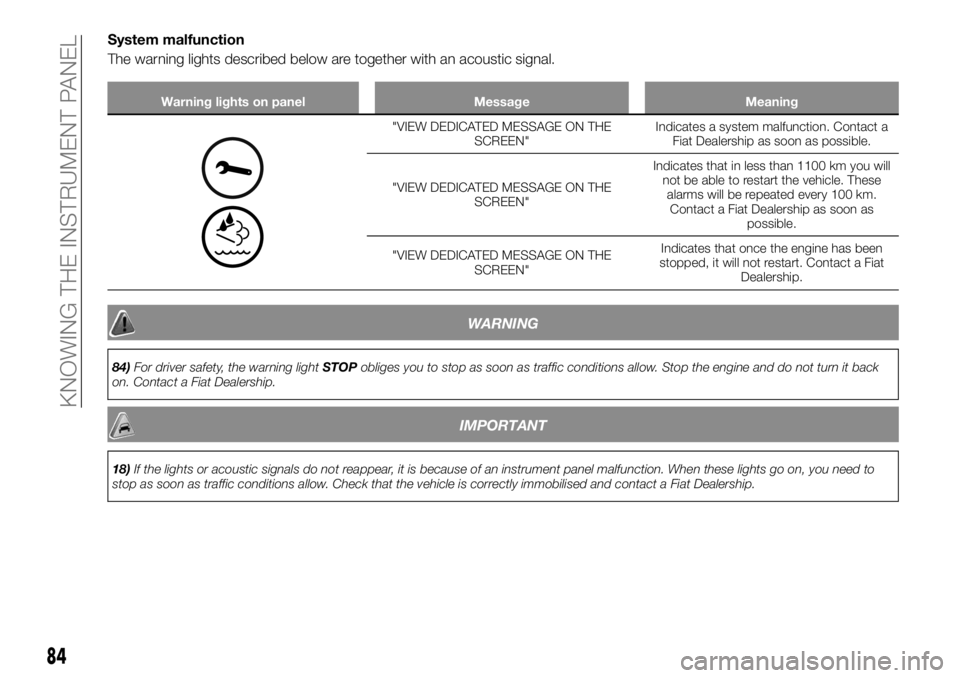
System malfunction
The warning lights described below are together with an acoustic signal.
Warning lights on panel Message Meaning
"VIEW DEDICATED MESSAGE ON THE
SCREEN"Indicates a system malfunction. Contact a
Fiat Dealership as soon as possible.
"VIEW DEDICATED MESSAGE ON THE
SCREEN"Indicates that in less than 1100 km you will
not be able to restart the vehicle. These
alarms will be repeated every 100 km.
Contact a Fiat Dealership as soon as
possible.
"VIEW DEDICATED MESSAGE ON THE
SCREEN"Indicates that once the engine has been
stopped, it will not restart. Contact a Fiat
Dealership.
WARNING
84)For driver safety, the warning lightSTOPobliges you to stop as soon as traffic conditions allow. Stop the engine and do not turn it back
on. Contact a Fiat Dealership.
IMPORTANT
18)If the lights or acoustic signals do not reappear, it is because of an instrument panel malfunction. When these lights go on, you need to
stop as soon as traffic conditions allow. Check that the vehicle is correctly immobilised and contact a Fiat Dealership.
84
KNOWING THE INSTRUMENT PANEL
Page 93 of 232
OCCUPANT
PROTECTION
SYSTEMS
85) 86)
19) 20)
3)
Depending on the trim, there could be:load limiters;
driver and front passenger airbags;
These systems are designed to function
separately or at the same time in case
of a frontal collision.
Depending on the violence of the
collision, the system activates:
seat belt locking.
seat belt pre-tensioner (which
activates the belt tension);
the airbags.
WARNING
85)Check the safety devices after every
accident.
86)Any intervention on the complete
system (pre-tensioners, airbags, electronic
modules, wiring) or re-use on another
vehicle, even if identical, is strictly
prohibited.
IMPORTANT
19)In order to prevent accidental
deployments that could cause damage,
only qualified Fiat Dealership personnel can
intervene in pre-tensioners and air bags.
20)Checking the electrical features of the
actuator can only be effected by specifically
prepared personnel using the proper tools.
IMPORTANT
3)When the vehicle is scrapped, see a Fiat
Dealership to remove the pre-tensioner gas
generator and air bags.
SEAT BELTS
87)
For obvious safety reasons, always
fasten the seat belts. In addition, always
comply with the laws of the country you
are in.
IMPORTANT For full effectiveness of the
rear seat belts, make sure that the
single rear seat is correctly locked in
place. Refer to the "Rear single seats”
paragraph in the "Knowing your vehicle”
chapter.
Before starting the engine, first adjust
the driving position and adjust the seat
belts to obtain the best possible
protection (for all the passengers).
The safety belts must always be kept
clean. Use products selected by Fiat
Dealership services or soap and warm
water, rubbing with a sponge and
drying with a dry cloth. Do not use
detergents or chemical products.
ADJUSTING THE DRIVER'S
POSITION
Sit with your back against the
backrest (after taking off clothing like
coat, jacket, etc.). This is an essential
factor for correctly positioning the back;
adjust the seat position according to
the pedals. The seat position must be
so as to allow pressing the clutch pedal
all the way. The backrest must be
inclined so arms are slightly bent;
91
Page 98 of 232
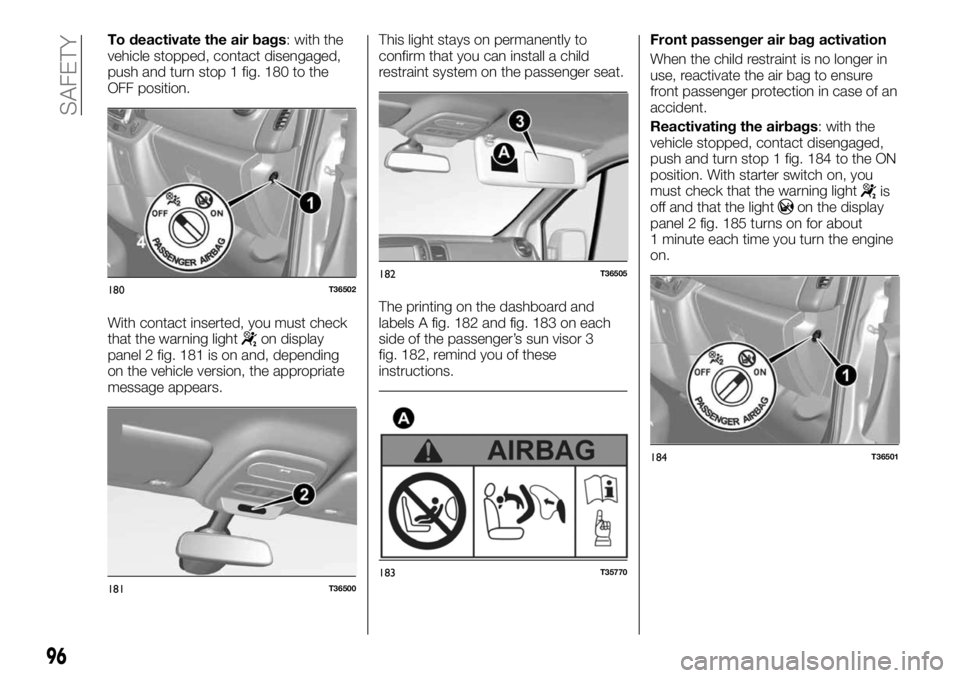
To deactivate the air bags: with the
vehicle stopped, contact disengaged,
push and turn stop 1 fig. 180 to the
OFF position.
With contact inserted, you must check
that the warning light
on display
panel 2 fig. 181 is on and, depending
on the vehicle version, the appropriate
message appears.This light stays on permanently to
confirm that you can install a child
restraint system on the passenger seat.
The printing on the dashboard and
labels A fig. 182 and fig. 183 on each
side of the passenger’s sun visor 3
fig. 182, remind you of these
instructions.Front passenger air bag activation
When the child restraint is no longer in
use, reactivate the air bag to ensure
front passenger protection in case of an
accident.
Reactivating the airbags: with the
vehicle stopped, contact disengaged,
push and turn stop 1 fig. 184 to the ON
position. With starter switch on, you
must check that the warning light
is
off and that the lighton the display
panel 2 fig. 185 turns on for about
1 minute each time you turn the engine
on.
180T36502
181T36500
182T36505
183T35770
184T36501
96
SAFETY
Page 127 of 232
In this case, the ESC and traction
control system are deactivated. Contact
a Fiat Dealership.
PBA (Panic Brake
Assist) SYSTEM
This is a complementary system to the
ABS that lets you reduce the vehicle's
braking distance.
Operating principle
The system detects an emergency
braking situation. In such cases, the
power brake immediately creates the
maximum braking, causing the ABS
system to also intervene.
ABS intervention lasts until the brake
pedal is released.
Hazard warning lights on
Depending on the versions, these lights
can go on when you slow down
abruptly.
Anticipated braking
Depending on the versions, when you
quickly release the accelerator, the
system anticipates braking so as to
diminish the braking distance.
When using Cruise Control:
if you are using the accelerator pedal,
with you release it, the system can
activate;
if you are not using the accelerator
pedal, the system will not activate.Irregular operation
When the system detects an
operational irregularity, the message to
that effect will appear on the instrument
panel with the alarm light
going
on.
Contact a Fiat Dealership.
TSA (Trailer Stability
Assist) DRIVING
ASSISTANCE WITH A
TRAILER
This system helps you maintain control
of the vehicle in case you are using a
trailer. It detects the swinging motion of
the trailer in certain driving conditions.
Operating conditions
The two system must be authorised
by the Fiat Dealership;
the wiring has to be approved by a
Fiat Dealership;
the trailer has to be connected to the
vehicle.
Operating principle
The function stabilises the vehicle by:
asymmetrical front wheel braking to
reduce swinging caused by the trailer;
four wheel braking and a limitation in
engine torque to reduce the vehicle
speed until the swinging stops.
The warning light
flashes on the
instrument panel to inform you of the
situation.
TRACTION PLUS (GRIP
CONTROL)
137)
22)
Where the vehicle is provided with one,
road grip check ensures easier control
of the vehicle in conditions where grip is
reduced (crumbly terrain).
"Road" mode
When the vehicle is started, the
appropriate message appears on the
display screen. The indicator light
on the instrument panel is off. This
position guarantees optimal use in
normal road conditions (dry, wet
roadbed, light snow, etc.).
The "Road" mode uses the traction
control system functions.
"Traction +" Mode
Press button 1 fig. 201: the warning
light
on the instrument panel turns
on along with the dedicated message.
125
Page 129 of 232
TPMS – Tyre
Pressure
Monitoring System
(For versions/markets where provided)
Tyre pressure loss warning
This system warns the driver of any
pressure loss in one or more of the
tyres.
Operating principle
Each wheel (except the spare) has a
built-in sensor in the inflation valve that
measures tyre pressure at regular
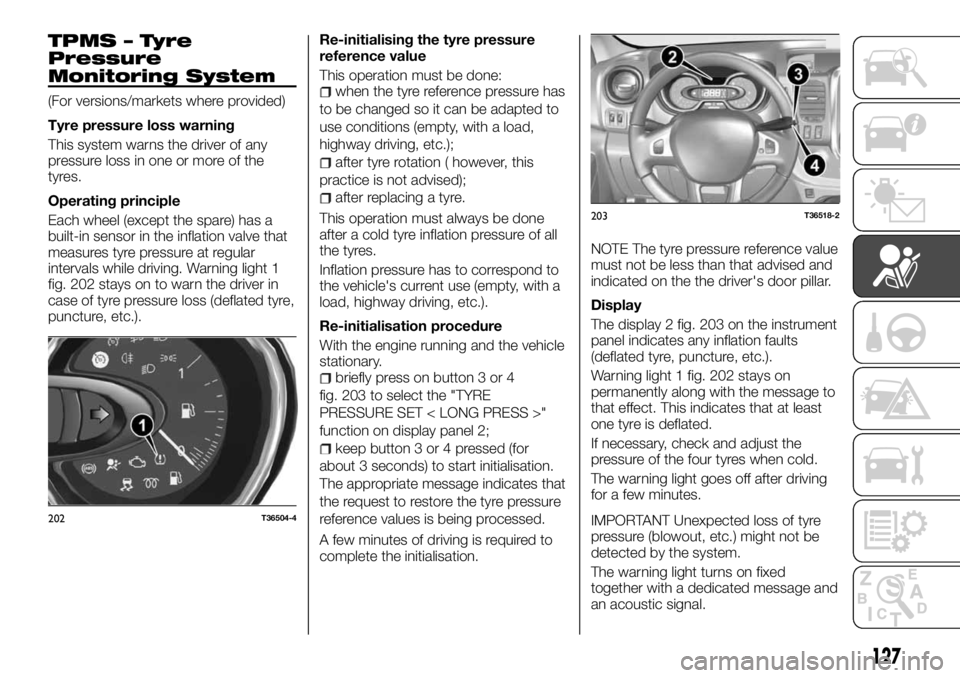
intervals while driving. Warning light 1
fig. 202 stays on to warn the driver in
case of tyre pressure loss (deflated tyre,
puncture, etc.).Re-initialising the tyre pressure
reference value
This operation must be done:when the tyre reference pressure has
to be changed so it can be adapted to
use conditions (empty, with a load,
highway driving, etc.);
after tyre rotation ( however, this
practice is not advised);
after replacing a tyre.
This operation must always be done
after a cold tyre inflation pressure of all
the tyres.
Inflation pressure has to correspond to
the vehicle's current use (empty, with a
load, highway driving, etc.).
Re-initialisation procedure
With the engine running and the vehicle
stationary.
briefly press on button 3 or 4
fig. 203 to select the "TYRE
PRESSURE SET < LONG PRESS >"
function on display panel 2;
keep button 3 or 4 pressed (for
about 3 seconds) to start initialisation.
The appropriate message indicates that
the request to restore the tyre pressure
reference values is being processed.
A few minutes of driving is required to
complete the initialisation.NOTE The tyre pressure reference value
must not be less than that advised and
indicated on the the driver's door pillar.
Display
The display 2 fig. 203 on the instrument
panel indicates any inflation faults
(deflated tyre, puncture, etc.).
Warning light 1 fig. 202 stays on
permanently along with the message to
that effect. This indicates that at least
one tyre is deflated.
If necessary, check and adjust the
pressure of the four tyres when cold.
The warning light goes off after driving
for a few minutes.
IMPORTANT Unexpected loss of tyre
pressure (blowout, etc.) might not be
detected by the system.
The warning light turns on fixed
together with a dedicated message and
an acoustic signal.
202T36504-4
203T36518-2
127
Page 134 of 232
USING THE
GEARBOX
145)
25)
To engage reverse (vehicle
stopped)
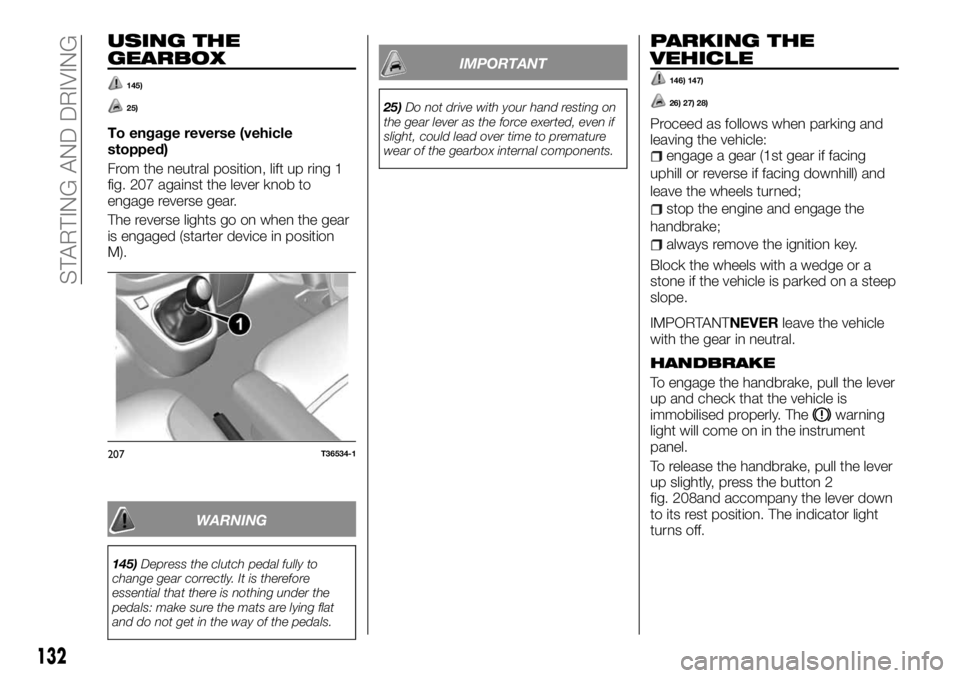
From the neutral position, lift up ring 1
fig. 207 against the lever knob to
engage reverse gear.
The reverse lights go on when the gear
is engaged (starter device in position
M).
WARNING
145)Depress the clutch pedal fully to
change gear correctly. It is therefore
essential that there is nothing under the
pedals: make sure the mats are lying flat
and do not get in the way of the pedals.
IMPORTANT
25)Do not drive with your hand resting on
the gear lever as the force exerted, even if
slight, could lead over time to premature
wear of the gearbox internal components.
PARKING THE
VEHICLE
146) 147)
26) 27) 28)
Proceed as follows when parking and
leaving the vehicle:
engage a gear (1st gear if facing
uphill or reverse if facing downhill) and
leave the wheels turned;
stop the engine and engage the
handbrake;
always remove the ignition key.
Block the wheels with a wedge or a
stone if the vehicle is parked on a steep
slope.
IMPORTANTNEVERleave the vehicle
with the gear in neutral.
HANDBRAKE
To engage the handbrake, pull the lever
up and check that the vehicle is
immobilised properly. The
warning
light will come on in the instrument
panel.
To release the handbrake, pull the lever
up slightly, press the button 2
fig. 208and accompany the lever down
to its rest position. The indicator light
turns off.
207T36534-1
132
STARTING AND DRIVING
Page 147 of 232
Bayonet light bulb P 21W.
Number plate lights
The bulb can be reached in the same
way as in vehicles with swing doors as
for tailgate.
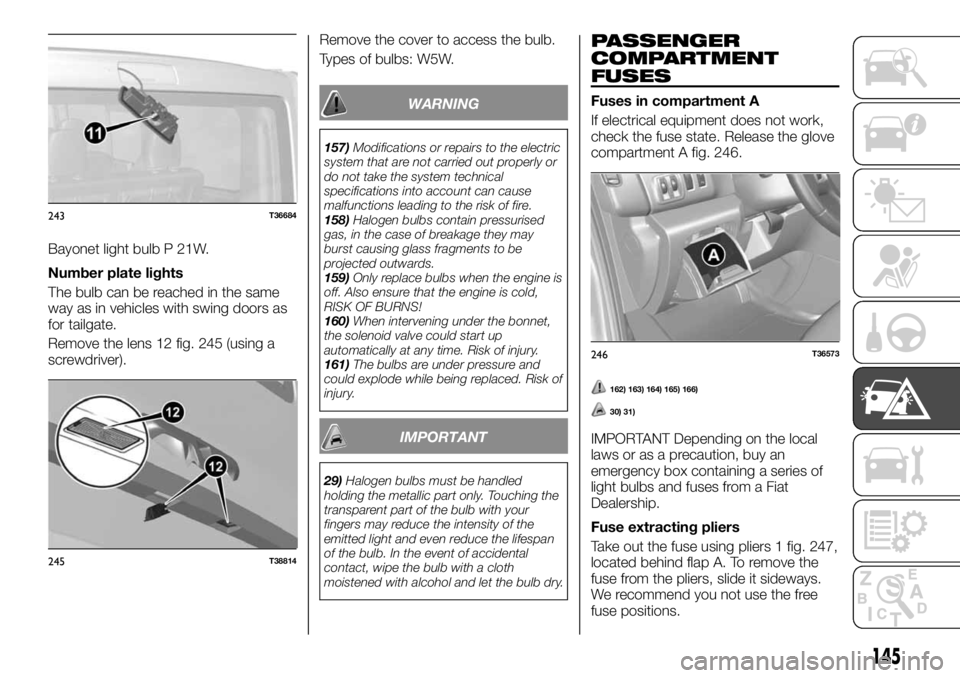
Remove the lens 12 fig. 245 (using a
screwdriver).Remove the cover to access the bulb.
Types of bulbs: W5W.
WARNING
157)Modifications or repairs to the electric
system that are not carried out properly or
do not take the system technical
specifications into account can cause
malfunctions leading to the risk of fire.
158)Halogen bulbs contain pressurised
gas, in the case of breakage they may
burst causing glass fragments to be
projected outwards.
159)Only replace bulbs when the engine is
off. Also ensure that the engine is cold,
RISK OF BURNS!
160)When intervening under the bonnet,
the solenoid valve could start up
automatically at any time. Risk of injury.
161)The bulbs are under pressure and
could explode while being replaced. Risk of
injury.
IMPORTANT
29)Halogen bulbs must be handled
holding the metallic part only. Touching the
transparent part of the bulb with your
fingers may reduce the intensity of the
emitted light and even reduce the lifespan
of the bulb. In the event of accidental
contact, wipe the bulb with a cloth
moistened with alcohol and let the bulb dry.
PASSENGER
COMPARTMENT
FUSES
Fuses in compartment A
If electrical equipment does not work,
check the fuse state. Release the glove
compartment A fig. 246.
162) 163) 164) 165) 166)
30) 31)
IMPORTANT Depending on the local
laws or as a precaution, buy an
emergency box containing a series of
light bulbs and fuses from a Fiat
Dealership.
Fuse extracting pliers
Take out the fuse using pliers 1 fig. 247,
located behind flap A. To remove the
fuse from the pliers, slide it sideways.
We recommend you not use the free
fuse positions.
243T36684
245T38814
246T36573
145
Page 158 of 232
BATTERY
RECHARGING
179) 180) 181) 182)
40)
To avoid risk of sparks:Make sure the "electrical users"
(courtesy lights, etc.) are disconnected
before disconnecting or reconnecting a
battery.
if you want to recharge the battery,
turn off the battery charger before
connecting or disconnecting the
battery;
do not place metal objects on the
battery, to prevent a short circuit
between terminals;
wait at least one minute after turning
off the engine to disconnect the battery;
check that the terminals have been
reconnected correctly after refitting.
Connecting a battery charger
The battery charger has to be
compatible with a nominal voltage of
12 Volts.
Do not disconnect the battery while the
engine is started. Follow the battery
charger manufacturer's instructions for
the battery you plan to use.
WARNING
179)Handle the battery carefully, because
it contains sulphuric acid that must not
come into contact with eyes or skin. If that
happens, rinse thoroughly with water. If
necessary, see a doctor. Keep open
flames, incandescent items and sources of
sparks far from the battery's elements: risk
of explosion. When you intervene near the
engine, this last could be hot. Moreover,
the cooling fan could start up at any time.
Risk of injury.
180)Some batteries can have specific
recharging rules, please ask for information
at a Fiat Dealership. Avoid the risk of
sparks that could cause an immediate
explosion. Charge in a well ventilated
place. Danger of serious injury.
181)Battery fluid is poisonous and
corrosive: avoid contact with your skin and
eyes. The battery should be charged in a
well ventilated place, away from naked
flames or possible sources of sparks:
danger of explosion and fire.
182)Do not attempt to charge a frozen
battery: it must be thawed first, otherwise it
may explode. If freezing has occurred, the
battery should be checked by skilled
personnel to make sure that the internal
elements are not damaged and that the
body is not cracked, with the risk of leaking
poisonous and corrosive acid.
IMPORTANT
40)The engine must be stopped before
performing any operation in the engine
compartment.
156
IN AN EMERGENCY
Page 163 of 232
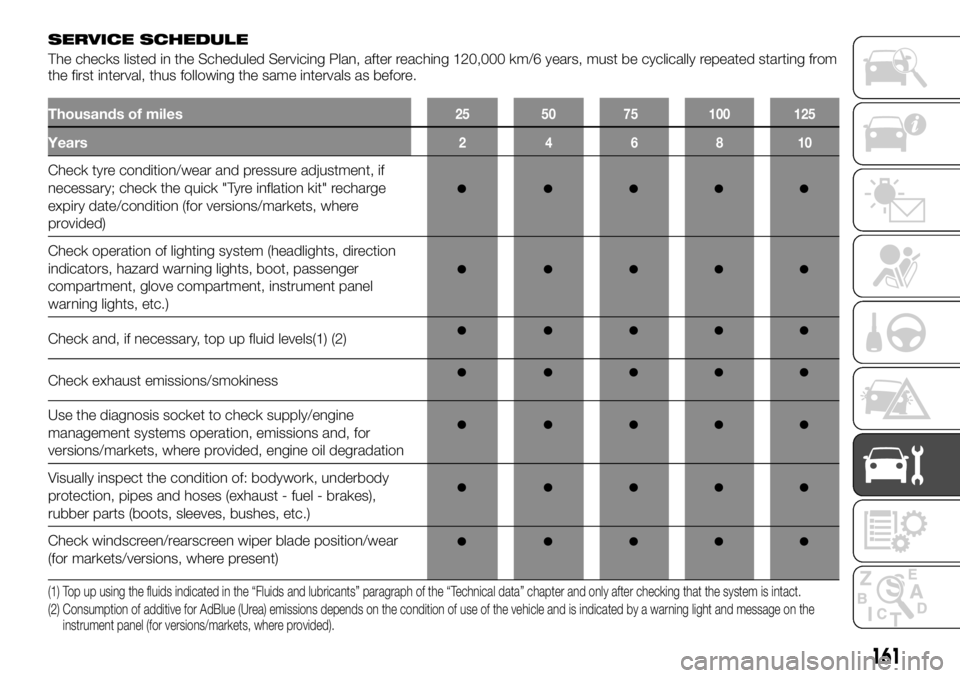
Thousands of miles25 50 75 100 125
SERVICE SCHEDULE
The checks listed in the Scheduled Servicing Plan, after reaching 120,000 km/6 years, must be cyclically repeated starting from
the first interval, thus following the same intervals as before.
Years246810
Check tyre condition/wear and pressure adjustment, if
necessary; check the quick "Tyre inflation kit" recharge
expiry date/condition (for versions/markets, where
provided)
Check operation of lighting system (headlights, direction
indicators, hazard warning lights, boot, passenger
compartment, glove compartment, instrument panel
warning lights, etc.)
Check and, if necessary, top up fluid levels(1) (2)
Check exhaust emissions/smokiness
Use the diagnosis socket to check supply/engine
management systems operation, emissions and, for
versions/markets, where provided, engine oil degradation
Visually inspect the condition of: bodywork, underbody
protection, pipes and hoses (exhaust - fuel - brakes),
rubber parts (boots, sleeves, bushes, etc.)
Check windscreen/rearscreen wiper blade position/wear
(for markets/versions, where present)
(1) Top up using the fluids indicated in the “Fluids and lubricants” paragraph of the “Technical data” chapter and only after checking that the system is intact.
(2) Consumption of additive for AdBlue (Urea) emissions depends on the condition of use of the vehicle and is indicated by a warning light and message onthe
instrument panel (for versions/markets, where provided).
161