warning light FIAT TALENTO 2018 Owner handbook (in English)
[x] Cancel search | Manufacturer: FIAT, Model Year: 2018, Model line: TALENTO, Model: FIAT TALENTO 2018Pages: 232, PDF Size: 5.54 MB
Page 54 of 232
AUTO function (automatic
operation)
Automatic air conditioning is a system
that guarantees (except when using it in
extreme conditions) interior comfort and
a good level of visibility, optimising
consumption. The system uses
ventilation speed, air distribution, air
recycling, activating or turning off the air
conditioner and air temperature.
AUTO: optimising the selected comfort
level reached according to exterior
conditions. Press button 1 fig. 94.
Ventilation speed variation
In automatic mode, the system
oversees the best ventilation speed to
reach and maintain comfort.
You can always adjust the ventilation
speed by turning control 6 fig. 94 to
increase or reduce it.
Air temperature adjustment
Use control 2 fig. 94 depending on the
desired temperature.
The farther to the right you turn it, the
higher the air temperature.
NOTE The farthest adjustments allow
the system to produce the coldest or
hottest air ("18°C" and "26°C").
MAX DEF function
Press button 3 fig. 94 and the
integrated warning light will go on.
This function lets you quickly defrost
and de-mist the windscreen and rear
windows, the side front windows andexterior rear view mirrors (depending on
the vehicle version). Set the automatic
air condition and rear window defrost
activation.
Press button 8 fig. 94 to disconnect the
rear window heat function, the
integrated warning light goes off.
To turn the function off, press button 3
fig. 94 or 1 fig. 94.
IMPORTANT Some of the buttons have
an in use light that indicates the
function status.
Passenger compartment air
distribution
Press one of the buttons 4 fig. 94. The
warning light in the selected button
goes on.
You can select two positions at a time
by pressing two of the buttons 4 fig. 94.
The airflow is distributed mainly
among all the vents, the side front
window demisting vents and the
windscreen demisting vents.
The airflow is directed mainly to the
dashboard vents.
The airflow is directed mainly to the
rear seat lower vents.
Heated rearscreen and door mirror
thermal resistance switch
(For versions/markets where provided)
Press button 8 fig. 94 and the
integrated warning light will go on. This
function lets you quickly demist the
rearscreen and door mirrors (forversions/markets where provided).
Press button 8 fig. 94 again to
deactivate the this function. The
function turns off automatically
Turning the climate control system
on/off
In automatic mode, the climate control
system turns on or off according to the
outside weather conditions.
Press button 5 fig. 94 to turn off the
climate control system and the
integrated indicator light will turn on.
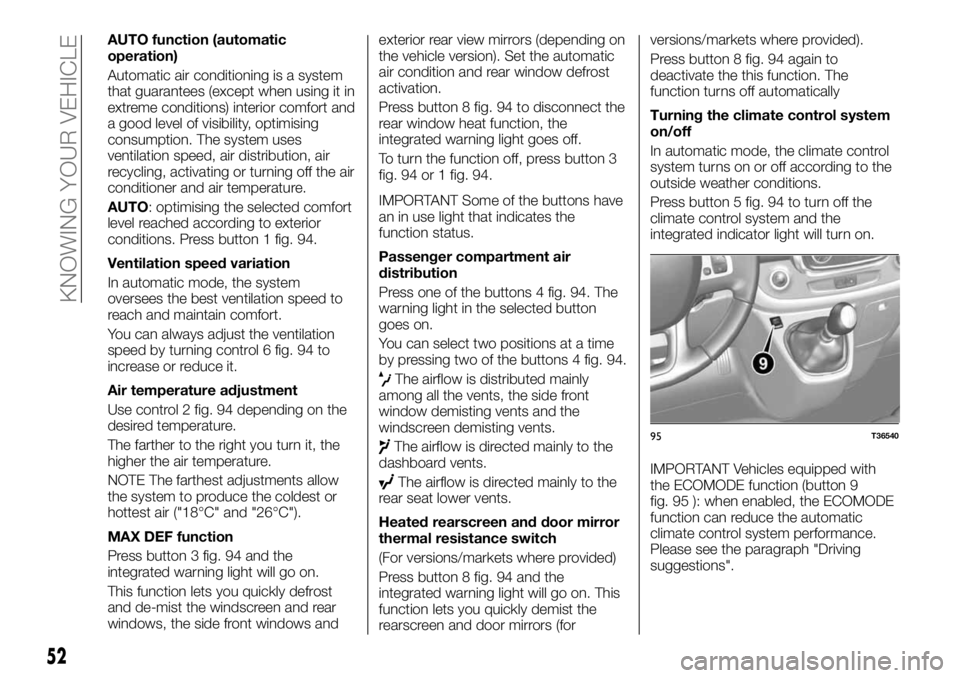
IMPORTANT Vehicles equipped with
the ECOMODE function (button 9
fig. 95 ): when enabled, the ECOMODE
function can reduce the automatic
climate control system performance.
Please see the paragraph "Driving
suggestions".
95T36540
52
KNOWING YOUR VEHICLE
Page 55 of 232
Internal air recirculation
This function is managed automatically,
but you can also enable it manually. It
can be forced on by button 7 fig. 94,
which is highlighted by the button’s led
turning on
IMPORTANT In any case,
de-misting/defrosting takes priority over
air recycling.
Note:
during recycling, the air in the
passenger compartment is recycled
without introducing outside air;
air recirculation lets you isolate the
interior from outside influences (driving
in a polluted area, e.g.);
to get the desired internal passenger
compartment temperature more
quickly.
Manual use: Press button 7
fig. 94 and the integrated warning light
will go on.
Prolonged use of the recirculation
function can create unpleasant odours
and mist up the windows as the air is
not changed.
We advise you to return to automatic
mode by pressing button 7 fig. 94 again
as soon as air recirculation is no longer
needed.
Press button 7 fig. 94 again to
deactivate the this function.System deactivation
Turn control 6 fig. 94 to the OFF
position to deactivate the system. To
turn it on again, turn control 6
fig. 94 again to adjust the fan speed, or
press button 1 fig. 94.
ADDITIONAL CLIMATE
CONTROL
(For versions/markets where provided)
If equipped with them, the vehicle has
four diffusers that can be aimed, 1
fig. 96.
These controls only act on the amount
of air in the passenger compartment:
one control for heat (air coming out
of the lower diffusers);
one control for cold (air coming out
of the upper diffusers);
NOTE Do not close all four diffusers at
the same time (you risk damaging the
system components).Climate control system
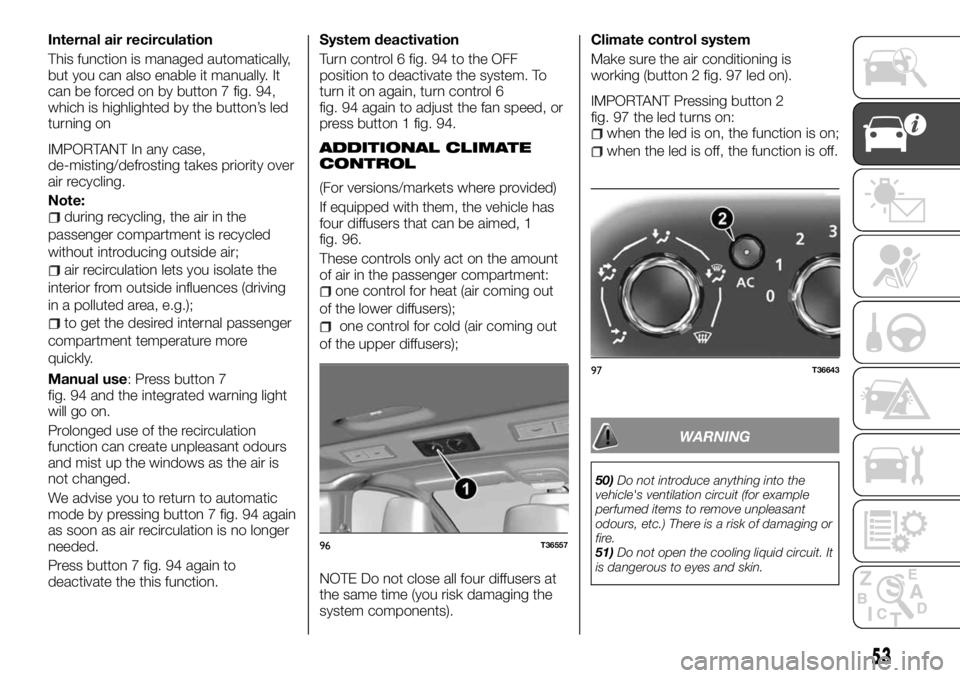
Make sure the air conditioning is
working (button 2 fig. 97 led on).
IMPORTANT Pressing button 2
fig. 97 the led turns on:
when the led is on, the function is on;
when the led is off, the function is off.
WARNING
50)Do not introduce anything into the
vehicle's ventilation circuit (for example
perfumed items to remove unpleasant
odours, etc.) There is a risk of damaging or
fire.
51)Do not open the cooling liquid circuit. It
is dangerous to eyes and skin.
96T36557
97T36643
53
Page 56 of 232
IMPORTANT
2)The system uses a coolant that is
compatible with the laws in force in the
countries where the vehicle is sold, R134a
or R1234yf (indicated on a specific plate in
the engine compartment). The use of other
coolants affects the efficiency and condition
of the system. Also the compressor
coolants used must be compatible with the
indicated coolant.
RADAR PARKING
53) 52)
12) 13) 14)
Operating principle
The ultrasound sensors installed in the
rear bumpers (depending on the vehicle
version) "measure" the distance
between the vehicle and an obstacle.
If they detect an obstacle, the sensors
set off an acoustic warning, which
frequency increases when getting
closer to the obstacle, until it becomes
a single sound when the obstacle is
about 30 centimetres from the vehicle.
NOTE Make sure you check that the
ultrasound sensors are not covered
(with dirt, mud, snow, etc.).
NOTE Depending on the versions, the
display lets you see the vehicle's
surrounding area to complement the
acoustic warning signal.Operation
When you put the gear in reverse, most
of the objects located less that
1.20 meters from the rear of the vehicle
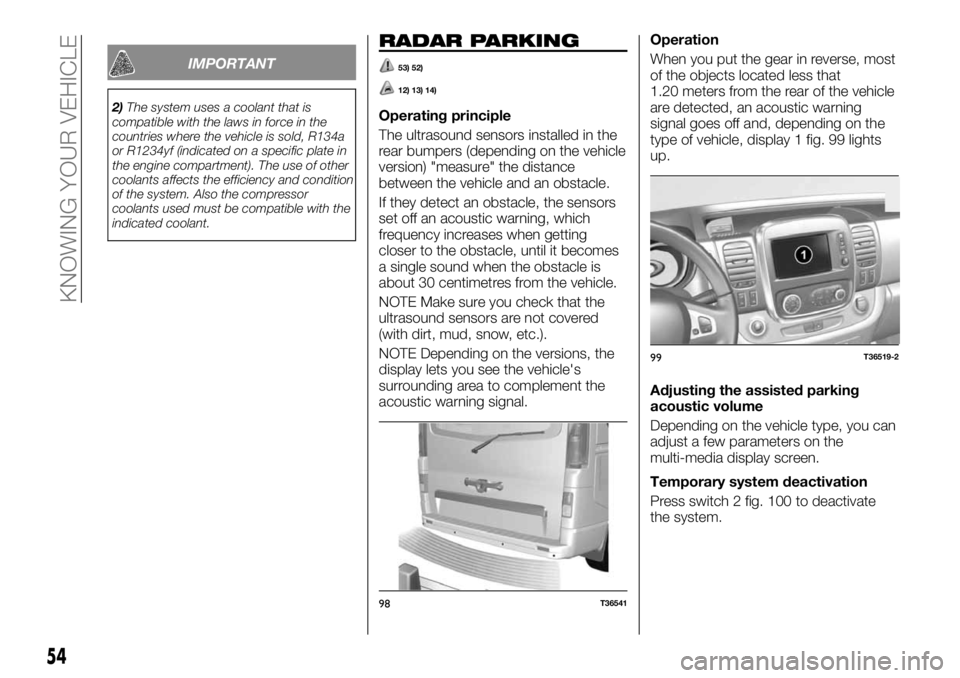
are detected, an acoustic warning
signal goes off and, depending on the
type of vehicle, display 1 fig. 99 lights
up.
Adjusting the assisted parking
acoustic volume
Depending on the vehicle type, you can
adjust a few parameters on the
multi-media display screen.
Temporary system deactivation
Press switch 2 fig. 100 to deactivate
the system.
98T36541
99T36519-2
54
KNOWING YOUR VEHICLE
Page 57 of 232
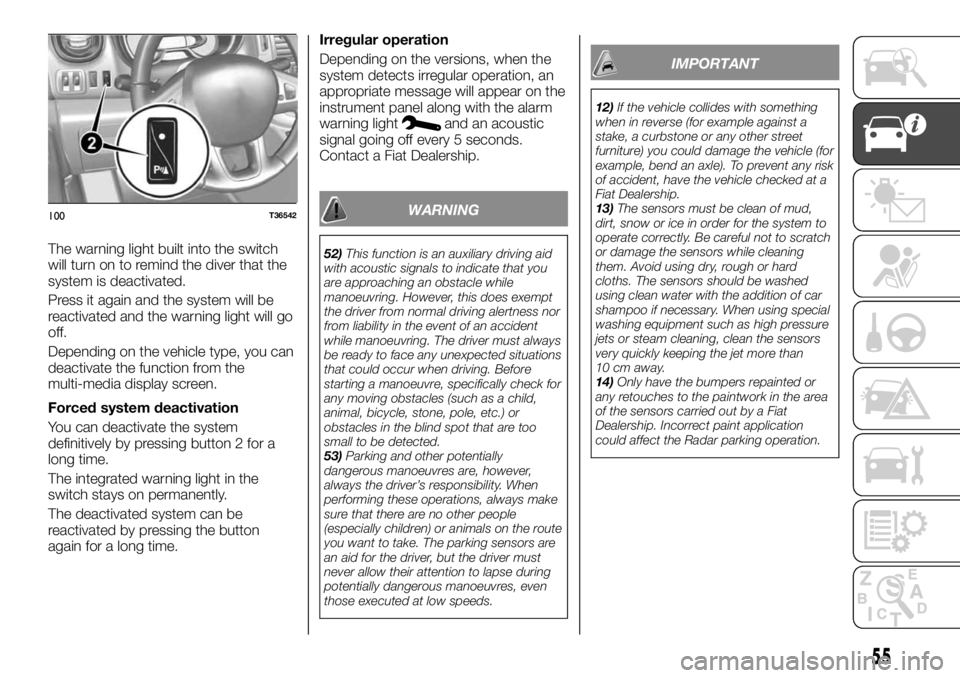
The warning light built into the switch
will turn on to remind the diver that the
system is deactivated.
Press it again and the system will be
reactivated and the warning light will go
off.
Depending on the vehicle type, you can
deactivate the function from the
multi-media display screen.
Forced system deactivation
You can deactivate the system
definitively by pressing button 2 for a
long time.
The integrated warning light in the
switch stays on permanently.
The deactivated system can be
reactivated by pressing the button
again for a long time.Irregular operation
Depending on the versions, when the
system detects irregular operation, an
appropriate message will appear on the
instrument panel along with the alarm
warning light
and an acoustic
signal going off every 5 seconds.
Contact a Fiat Dealership.
WARNING
52)This function is an auxiliary driving aid
with acoustic signals to indicate that you
are approaching an obstacle while
manoeuvring. However, this does exempt
the driver from normal driving alertness nor
from liability in the event of an accident
while manoeuvring. The driver must always
be ready to face any unexpected situations
that could occur when driving. Before
starting a manoeuvre, specifically check for
any moving obstacles (such as a child,
animal, bicycle, stone, pole, etc.) or
obstacles in the blind spot that are too
small to be detected.
53)Parking and other potentially
dangerous manoeuvres are, however,
always the driver’s responsibility. When
performing these operations, always make
sure that there are no other people
(especially children) or animals on the route
you want to take. The parking sensors are
an aid for the driver, but the driver must
never allow their attention to lapse during
potentially dangerous manoeuvres, even
those executed at low speeds.
IMPORTANT
12)If the vehicle collides with something
when in reverse (for example against a
stake, a curbstone or any other street
furniture) you could damage the vehicle (for
example, bend an axle). To prevent any risk
of accident, have the vehicle checked at a
Fiat Dealership.
13)The sensors must be clean of mud,
dirt, snow or ice in order for the system to
operate correctly. Be careful not to scratch
or damage the sensors while cleaning
them. Avoid using dry, rough or hard
cloths. The sensors should be washed
using clean water with the addition of car
shampoo if necessary. When using special
washing equipment such as high pressure
jets or steam cleaning, clean the sensors
very quickly keeping the jet more than
10 cm away.
14)Only have the bumpers repainted or
any retouches to the paintwork in the area
of the sensors carried out by a Fiat
Dealership. Incorrect paint application
could affect the Radar parking operation.
100T36542
55
Page 59 of 232
Do not consider this information if it is
superimposed onto a vertical object or
an object on the ground. The items that
appear on the edge of the screen can
be distorted. If the light is too bright
(snow, vehicle is in sunshine) the video
camera's vision can be disrupted.
When the rear doors are open or not
closed properly, the dedicated message
appears and, depending on the vehicle,
the video camera image disappears.
WARNING
54)Parking and other potentially
dangerous manoeuvres are, however,
always the driver’s responsibility. While
carrying out these manoeuvres, always
make sure that no people (especially
children) or animals are in the area
concerned. The camera is an aid for the
driver, but the driver must never allow
his/her attention to lapse during potentially
dangerous manoeuvres, even those
executed at low speeds. Always keep a
slow speed, so as to promptly brake in the
case of obstacles.
IMPORTANT
15)It is vital, for correct operation, that the
camera is always kept clean and free from
any mud, dirt, snow or ice. Be careful not
to scratch or damage the camera while
cleaning it. Avoid using dry, rough or hard
cloths. The camera must be washed using
clean water, with the addition of car
shampoo if necessary. In washing stations
which use steam or high-pressure jets,
clean the camera quickly, keeping the
nozzle more than 10 cm away from the
sensors. Also, do not apply stickers to the
camera.
ELECTRIC WINDOWS
ELECTRIC WINDOWS
55) 56)
With the starter device inserted:press the button of the window
concerned to lower it to the desired
position;
lift the button of the window
concerned to raise it to the desired
position.
On the driver's side, press the button
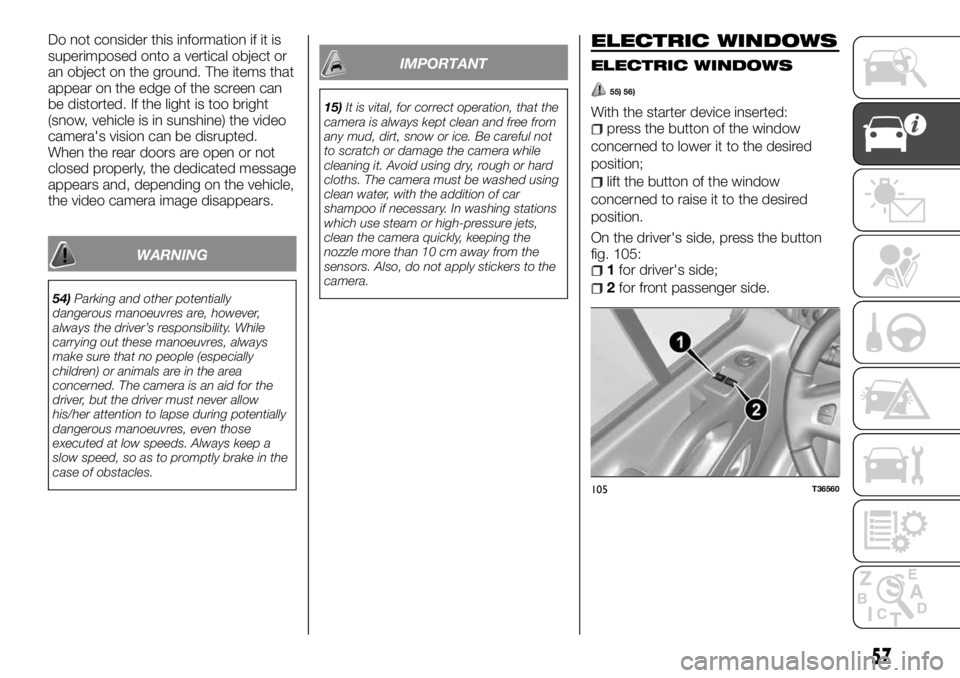
fig. 105:
1for driver's side;
2for front passenger side.
105T36560
57
Page 61 of 232
ENGINE BONNET
58) 59) 60) 61) 62) 63) 64)
16)
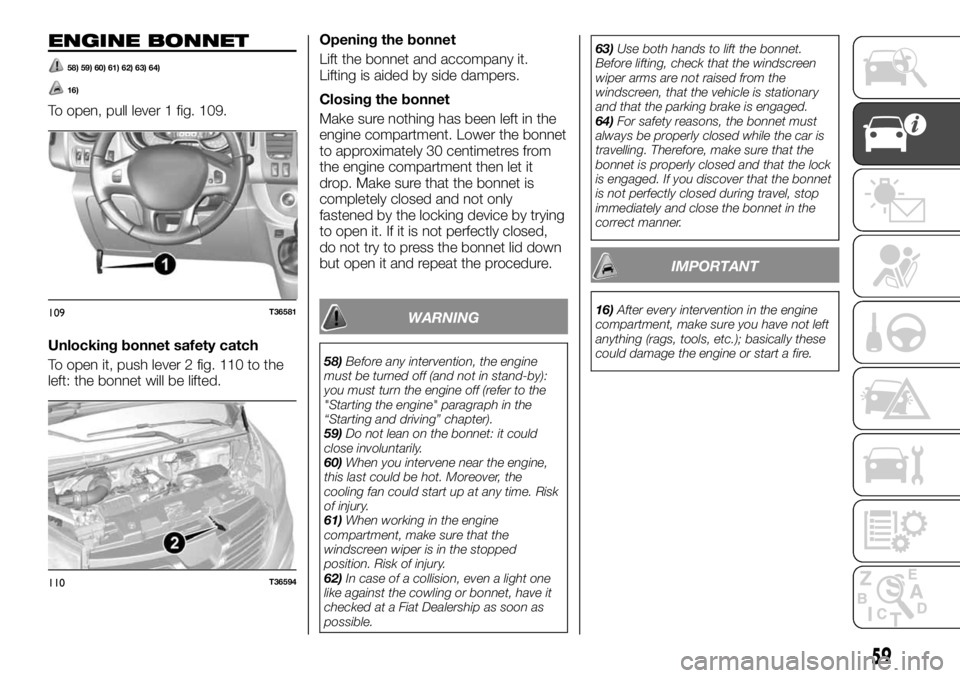
To open, pull lever 1 fig. 109.
Unlocking bonnet safety catch
To open it, push lever 2 fig. 110 to the
left: the bonnet will be lifted.Opening the bonnet
Lift the bonnet and accompany it.
Lifting is aided by side dampers.
Closing the bonnet
Make sure nothing has been left in the
engine compartment. Lower the bonnet
to approximately 30 centimetres from
the engine compartment then let it
drop. Make sure that the bonnet is
completely closed and not only
fastened by the locking device by trying
to open it. If it is not perfectly closed,
do not try to press the bonnet lid down
but open it and repeat the procedure.
WARNING
58)Before any intervention, the engine
must be turned off (and not in stand-by):
you must turn the engine off (refer to the
"Starting the engine" paragraph in the
“Starting and driving” chapter).
59)Do not lean on the bonnet: it could
close involuntarily.
60)When you intervene near the engine,
this last could be hot. Moreover, the
cooling fan could start up at any time. Risk
of injury.
61)When working in the engine
compartment, make sure that the
windscreen wiper is in the stopped
position. Risk of injury.
62)In case of a collision, even a light one
like against the cowling or bonnet, have it
checked at a Fiat Dealership as soon as
possible.63)Use both hands to lift the bonnet.
Before lifting, check that the windscreen
wiper arms are not raised from the
windscreen, that the vehicle is stationary
and that the parking brake is engaged.
64)For safety reasons, the bonnet must
always be properly closed while the car is
travelling. Therefore, make sure that the
bonnet is properly closed and that the lock
is engaged. If you discover that the bonnet
is not perfectly closed during travel, stop
immediately and close the bonnet in the
correct manner.
IMPORTANT
16)After every intervention in the engine
compartment, make sure you have not left
anything (rags, tools, etc.); basically these
could damage the engine or start a fire.109T36581
110T36594
59
Page 70 of 232
CRUISE CONTROL
(constant speed
regulator)
75) 76)
This is an electronically controlled
driving assistance device that allows the
desired vehicle speed to be maintained,
without having to press the accelerator
pedal.
This device can be used at a speed
above 30 km/h on long stretches of dry,
straight roads with few variations (e.g.
motorways).
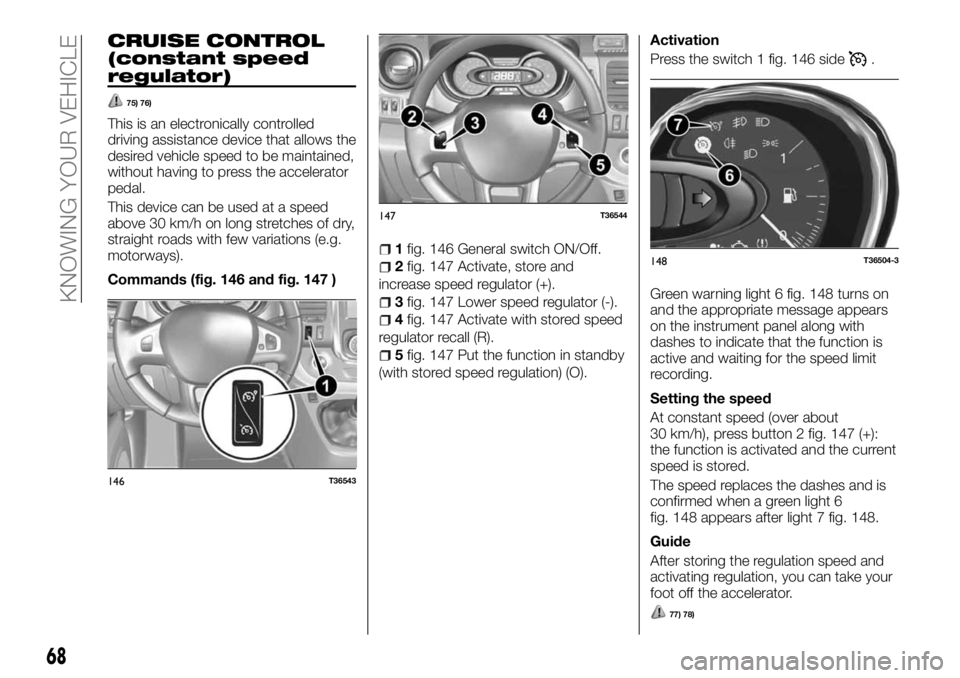
Commands (fig. 146 and fig. 147 )
1fig. 146 General switch ON/Off.
2fig. 147 Activate, store and
increase speed regulator (+).
3fig. 147 Lower speed regulator (-).
4fig. 147 Activate with stored speed
regulator recall (R).
5fig. 147 Put the function in standby
(with stored speed regulation) (O).Activation
Press the switch 1 fig. 146 side
.
Green warning light 6 fig. 148 turns on
and the appropriate message appears
on the instrument panel along with
dashes to indicate that the function is
active and waiting for the speed limit
recording.
Setting the speed
At constant speed (over about
30 km/h), press button 2 fig. 147 (+):
the function is activated and the current
speed is stored.
The speed replaces the dashes and is
confirmed when a green light 6
fig. 148 appears after light 7 fig. 148.
Guide
After storing the regulation speed and
activating regulation, you can take your
foot off the accelerator.
77) 78)
146T36543
147T36544
148T36504-3
68
KNOWING YOUR VEHICLE
Page 71 of 232
Changing the speed
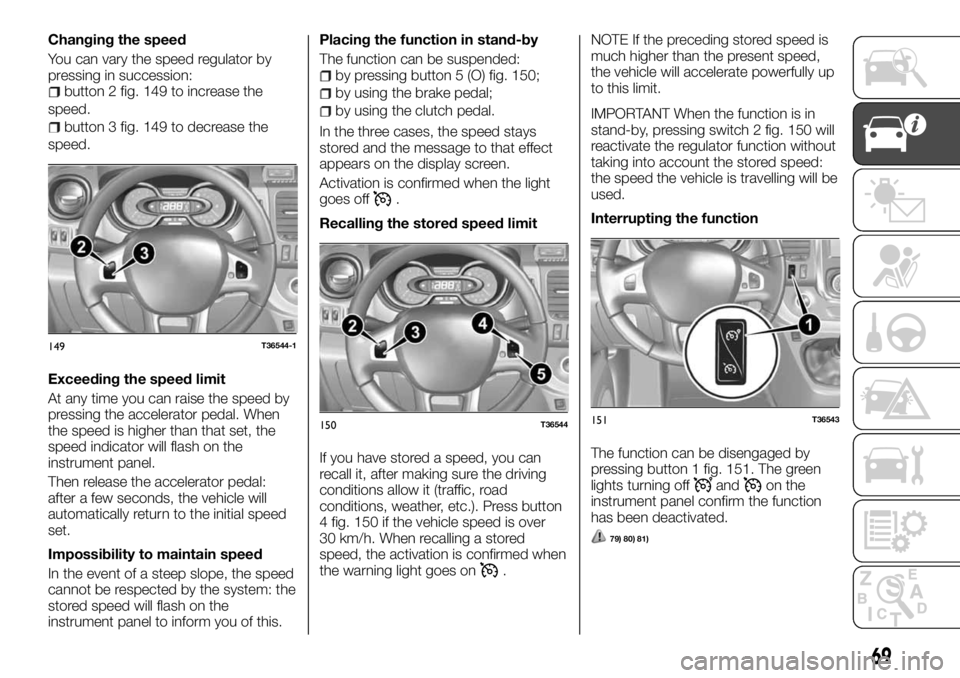
You can vary the speed regulator by
pressing in succession:
button 2 fig. 149 to increase the
speed.
button 3 fig. 149 to decrease the
speed.
Exceeding the speed limit
At any time you can raise the speed by
pressing the accelerator pedal. When
the speed is higher than that set, the
speed indicator will flash on the
instrument panel.
Then release the accelerator pedal:
after a few seconds, the vehicle will
automatically return to the initial speed
set.
Impossibility to maintain speed
In the event of a steep slope, the speed
cannot be respected by the system: the
stored speed will flash on the
instrument panel to inform you of this.Placing the function in stand-by
The function can be suspended:
by pressing button 5 (O) fig. 150;
by using the brake pedal;
by using the clutch pedal.
In the three cases, the speed stays
stored and the message to that effect
appears on the display screen.
Activation is confirmed when the light
goes off
.
Recalling the stored speed limit
If you have stored a speed, you can
recall it, after making sure the driving
conditions allow it (traffic, road
conditions, weather, etc.). Press button
4 fig. 150 if the vehicle speed is over
30 km/h. When recalling a stored
speed, the activation is confirmed when
the warning light goes on
.NOTE If the preceding stored speed is
much higher than the present speed,
the vehicle will accelerate powerfully up
to this limit.
IMPORTANT When the function is in
stand-by, pressing switch 2 fig. 150 will
reactivate the regulator function without
taking into account the stored speed:
the speed the vehicle is travelling will be
used.
Interrupting the function
The function can be disengaged by
pressing button 1 fig. 151. The green
lights turning off
andon the
instrument panel confirm the function
has been deactivated.
79) 80) 81)
149T36544-1
150T36544151T36543
69
Page 72 of 232
WARNING
75)The Cruise Control does not impact the
braking system in any case.
76)It provides a supplementary driving aid.
However, it does not replace the driver. It
cannot take the place of local speed limit
observations, attentiveness (always be
ready to brake) or driver responsibility. The
Cruise Control must not be used when
traffic is heavy, on winding or slippery
roads (ice, aquaplaning, gravel) or when
weather conditions are unfavourable (fog,
rain, wind gusts, etc.). Risk of accident.
77)Warning: keep your feet near the
pedals so they are ready to intervene in an
emergency.
78)When travelling with the device active,
never move the gear lever to neutral.
79)Putting the engine in stand-by or
deactivating the Cruise Control does not
rapidly lower the speed: you need to brake
using the brake pedal.
80)In case of a malfunction or failure of the
device, contact a Fiat Dealership.
81)The electronic Cruise Control can be
dangerous if the system cannot keep a
constant speed. In specific conditions
speed may be excessive, resulting in the
risk of losing control of the vehicle and
causing accidents. Do not use the device
in heavy traffic or on winding, icy, snowy or
slippery roads.
SPEED LIMITER
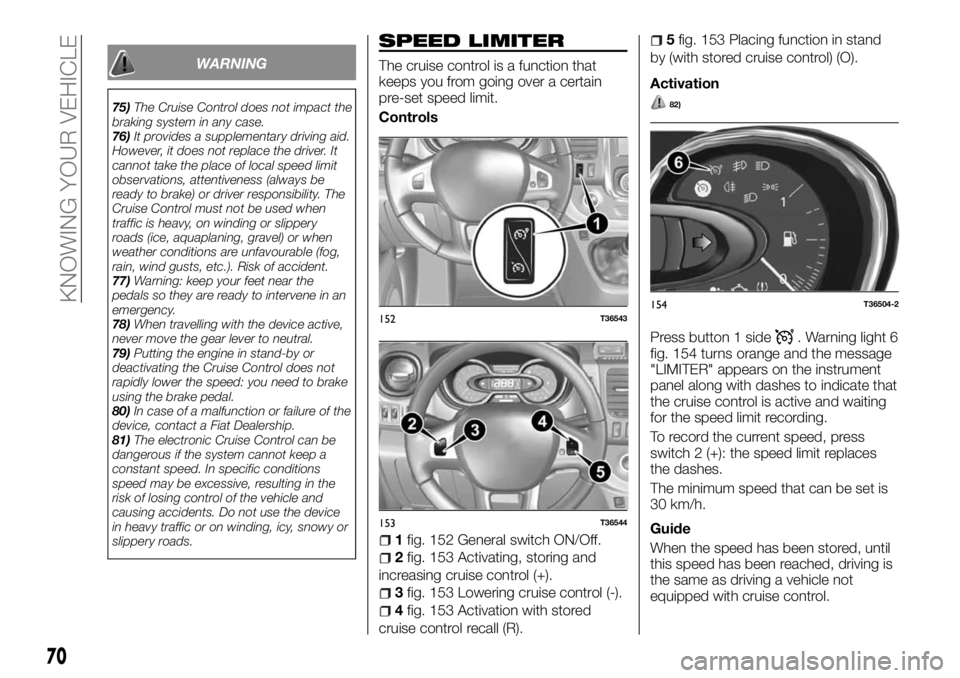
The cruise control is a function that
keeps you from going over a certain
pre-set speed limit.
Controls
1fig. 152 General switch ON/Off.
2fig. 153 Activating, storing and
increasing cruise control (+).
3fig. 153 Lowering cruise control (-).
4fig. 153 Activation with stored
cruise control recall (R).
5fig. 153 Placing function in stand
by (with stored cruise control) (O).
Activation
82)
Press button 1 side. Warning light 6
fig. 154 turns orange and the message
"LIMITER" appears on the instrument
panel along with dashes to indicate that
the cruise control is active and waiting
for the speed limit recording.
To record the current speed, press
switch 2 (+): the speed limit replaces
the dashes.
The minimum speed that can be set is
30 km/h.
Guide
When the speed has been stored, until
this speed has been reached, driving is
the same as driving a vehicle not
equipped with cruise control.
152T36543
153T36544
154T36504-2
70
KNOWING YOUR VEHICLE
Page 73 of 232
Once this limit has been reached, when
you press the accelerator, you cannot
exceed the programmed speed except
in the event of an emergency (refer to
the "Exceeding the set speed limit”
paragraph).
Variation in the speed limit
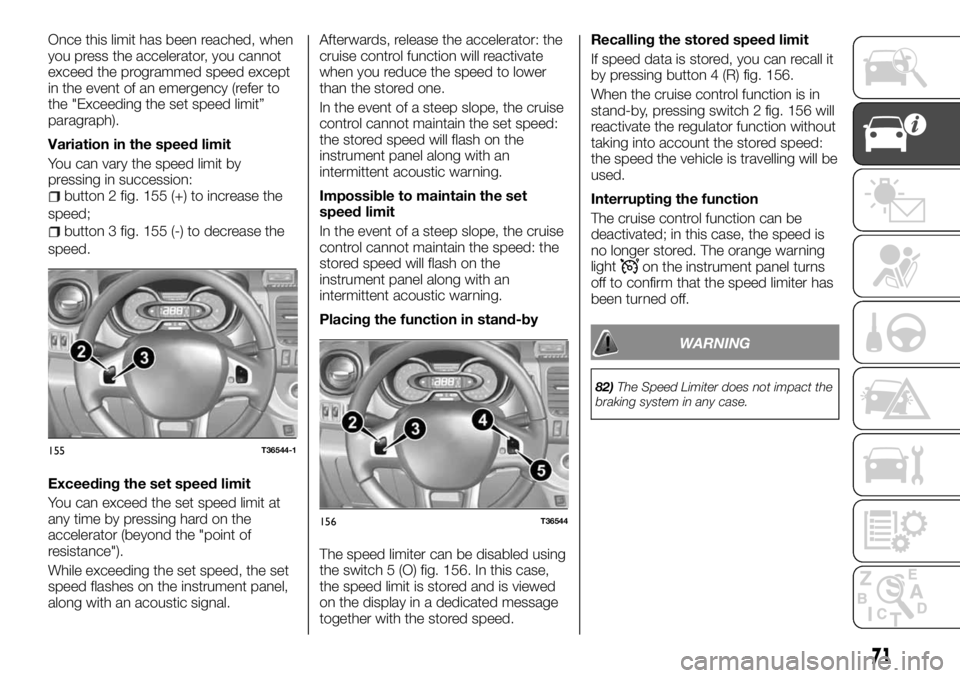
You can vary the speed limit by
pressing in succession:
button 2 fig. 155 (+) to increase the
speed;
button 3 fig. 155 (-) to decrease the
speed.
Exceeding the set speed limit
You can exceed the set speed limit at
any time by pressing hard on the
accelerator (beyond the "point of
resistance").
While exceeding the set speed, the set
speed flashes on the instrument panel,
along with an acoustic signal.Afterwards, release the accelerator: the
cruise control function will reactivate
when you reduce the speed to lower
than the stored one.
In the event of a steep slope, the cruise
control cannot maintain the set speed:
the stored speed will flash on the
instrument panel along with an
intermittent acoustic warning.
Impossible to maintain the set
speed limit
In the event of a steep slope, the cruise
control cannot maintain the speed: the
stored speed will flash on the
instrument panel along with an
intermittent acoustic warning.
Placing the function in stand-by
The speed limiter can be disabled using
the switch 5 (O) fig. 156. In this case,
the speed limit is stored and is viewed
on the display in a dedicated message
together with the stored speed.Recalling the stored speed limit
If speed data is stored, you can recall it
by pressing button 4 (R) fig. 156.
When the cruise control function is in
stand-by, pressing switch 2 fig. 156 will
reactivate the regulator function without
taking into account the stored speed:
the speed the vehicle is travelling will be
used.
Interrupting the function
The cruise control function can be
deactivated; in this case, the speed is
no longer stored. The orange warning
light
on the instrument panel turns
off to confirm that the speed limiter has
been turned off.
WARNING
82)The Speed Limiter does not impact the
braking system in any case.
155T36544-1
156T36544
71