engine FIAT TALENTO 2018 Owner handbook (in English)
[x] Cancel search | Manufacturer: FIAT, Model Year: 2018, Model line: TALENTO, Model: FIAT TALENTO 2018Pages: 232, PDF Size: 5.54 MB
Page 129 of 232
TPMS – Tyre
Pressure
Monitoring System
(For versions/markets where provided)
Tyre pressure loss warning
This system warns the driver of any
pressure loss in one or more of the
tyres.
Operating principle
Each wheel (except the spare) has a
built-in sensor in the inflation valve that
measures tyre pressure at regular
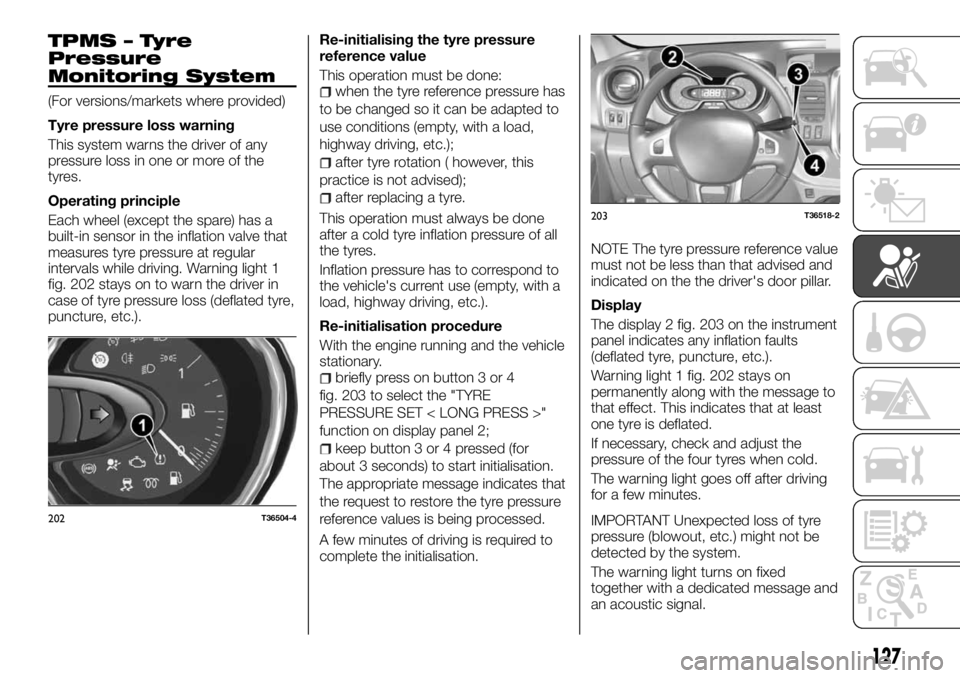
intervals while driving. Warning light 1
fig. 202 stays on to warn the driver in
case of tyre pressure loss (deflated tyre,
puncture, etc.).Re-initialising the tyre pressure
reference value
This operation must be done:when the tyre reference pressure has
to be changed so it can be adapted to
use conditions (empty, with a load,
highway driving, etc.);
after tyre rotation ( however, this
practice is not advised);
after replacing a tyre.
This operation must always be done
after a cold tyre inflation pressure of all
the tyres.
Inflation pressure has to correspond to
the vehicle's current use (empty, with a
load, highway driving, etc.).
Re-initialisation procedure
With the engine running and the vehicle
stationary.
briefly press on button 3 or 4
fig. 203 to select the "TYRE
PRESSURE SET < LONG PRESS >"
function on display panel 2;
keep button 3 or 4 pressed (for
about 3 seconds) to start initialisation.
The appropriate message indicates that
the request to restore the tyre pressure
reference values is being processed.
A few minutes of driving is required to
complete the initialisation.NOTE The tyre pressure reference value
must not be less than that advised and
indicated on the the driver's door pillar.
Display
The display 2 fig. 203 on the instrument
panel indicates any inflation faults
(deflated tyre, puncture, etc.).
Warning light 1 fig. 202 stays on
permanently along with the message to
that effect. This indicates that at least
one tyre is deflated.
If necessary, check and adjust the
pressure of the four tyres when cold.
The warning light goes off after driving
for a few minutes.
IMPORTANT Unexpected loss of tyre
pressure (blowout, etc.) might not be
detected by the system.
The warning light turns on fixed
together with a dedicated message and
an acoustic signal.
202T36504-4
203T36518-2
127
Page 131 of 232
STARTING AND DRIVING
Let’s get to the core of the vehicle:
seeing how you can exploit all of its
potential to the full.
We’ll look at how to drive it safely in any
situation, so that it can be a welcome
companion, with our comfort and our
wallets in mind.ENGINE RUN-IN.............130
STARTING THE ENGINE.......130
USING THE GEARBOX........132
PARKING THE VEHICLE........132
INSTALLING THE TOW HOOK. . . .133
LOADING ADVICE...........134
SPEED LIMITER.............135
MINIMUM SPEED............136
SUGGESTIONS FOR DRIVING. . . .136
129
Page 132 of 232
ENGINE RUN-IN
Until you have gone 1,500 km, do not
exceed 130 km/h on the highest ratio,
or 2,500 rpm. After that mileage, you
can push the engine harder, but the
vehicle will perform better only after
having travelled 6,000 kilometres.
During the running-in period, do not
accelerate abruptly while the engine is
cold, and avoid running it too fast.
Coupon frequency:refer to the
"Scheduled Service Plan".
STARTING THE
ENGINE
139) 140) 141) 142) 143)
Vehicles with a key and remote
control
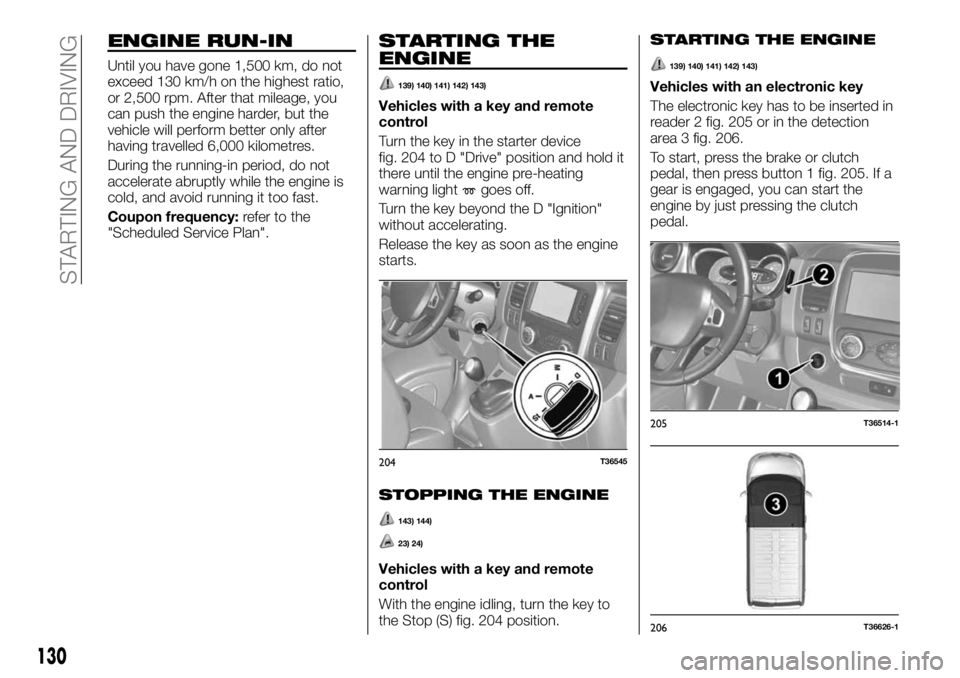
Turn the key in the starter device
fig. 204 to D "Drive" position and hold it
there until the engine pre-heating
warning light
goes off.
Turn the key beyond the D "Ignition"
without accelerating.
Release the key as soon as the engine
starts.
STOPPING THE ENGINE
143) 144)
23) 24)
Vehicles with a key and remote
control
With the engine idling, turn the key to
the Stop (S) fig. 204 position.
STARTING THE ENGINE
139) 140) 141) 142) 143)
Vehicles with an electronic key
The electronic key has to be inserted in
reader 2 fig. 205 or in the detection
area 3 fig. 206.
To start, press the brake or clutch
pedal, then press button 1 fig. 205. If a
gear is engaged, you can start the
engine by just pressing the clutch
pedal.
204T36545
205T36514-1
206T36626-1
130
STARTING AND DRIVING
Page 133 of 232
RemarksIf the vehicle does not start, a
dedicated message appears on the
instrument panel;
In some cases, you will need to
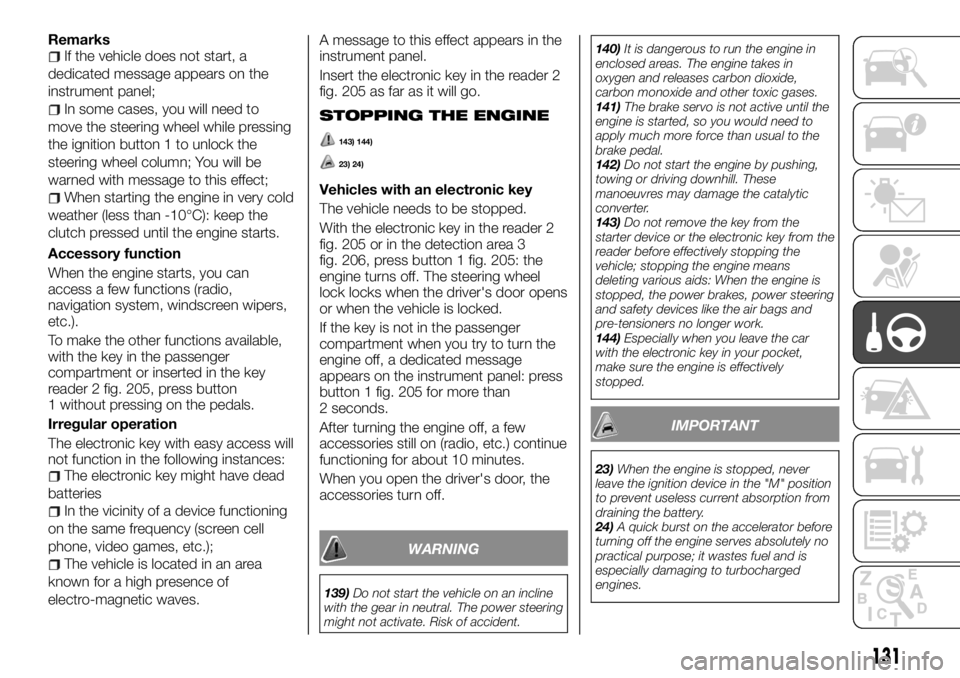
move the steering wheel while pressing
the ignition button 1 to unlock the
steering wheel column; You will be
warned with message to this effect;
When starting the engine in very cold
weather (less than -10°C): keep the
clutch pressed until the engine starts.
Accessory function
When the engine starts, you can
access a few functions (radio,
navigation system, windscreen wipers,
etc.).
To make the other functions available,
with the key in the passenger
compartment or inserted in the key
reader 2 fig. 205, press button
1 without pressing on the pedals.
Irregular operation
The electronic key with easy access will
not function in the following instances:
The electronic key might have dead
batteries
In the vicinity of a device functioning
on the same frequency (screen cell
phone, video games, etc.);
The vehicle is located in an area
known for a high presence of
electro-magnetic waves.A message to this effect appears in the
instrument panel.
Insert the electronic key in the reader 2
fig. 205 as far as it will go.
STOPPING THE ENGINE
143) 144)
23) 24)
Vehicles with an electronic key
The vehicle needs to be stopped.
With the electronic key in the reader 2
fig. 205 or in the detection area 3
fig. 206, press button 1 fig. 205: the
engine turns off. The steering wheel
lock locks when the driver's door opens
or when the vehicle is locked.
If the key is not in the passenger
compartment when you try to turn the
engine off, a dedicated message
appears on the instrument panel: press
button 1 fig. 205 for more than
2 seconds.
After turning the engine off, a few
accessories still on (radio, etc.) continue
functioning for about 10 minutes.
When you open the driver's door, the
accessories turn off.
WARNING
139)Do not start the vehicle on an incline
with the gear in neutral. The power steering
might not activate. Risk of accident.140)It is dangerous to run the engine in
enclosed areas. The engine takes in
oxygen and releases carbon dioxide,
carbon monoxide and other toxic gases.
141)The brake servo is not active until the
engine is started, so you would need to
apply much more force than usual to the
brake pedal.
142)Do not start the engine by pushing,
towing or driving downhill. These
manoeuvres may damage the catalytic
converter.
143)Do not remove the key from the
starter device or the electronic key from the
reader before effectively stopping the
vehicle; stopping the engine means
deleting various aids: When the engine is
stopped, the power brakes, power steering
and safety devices like the air bags and
pre-tensioners no longer work.
144)Especially when you leave the car
with the electronic key in your pocket,
make sure the engine is effectively
stopped.
IMPORTANT
23)When the engine is stopped, never
leave the ignition device in the "M" position
to prevent useless current absorption from
draining the battery.
24)A quick burst on the accelerator before
turning off the engine serves absolutely no
practical purpose; it wastes fuel and is
especially damaging to turbocharged
engines.
131
Page 134 of 232
USING THE
GEARBOX
145)
25)
To engage reverse (vehicle
stopped)
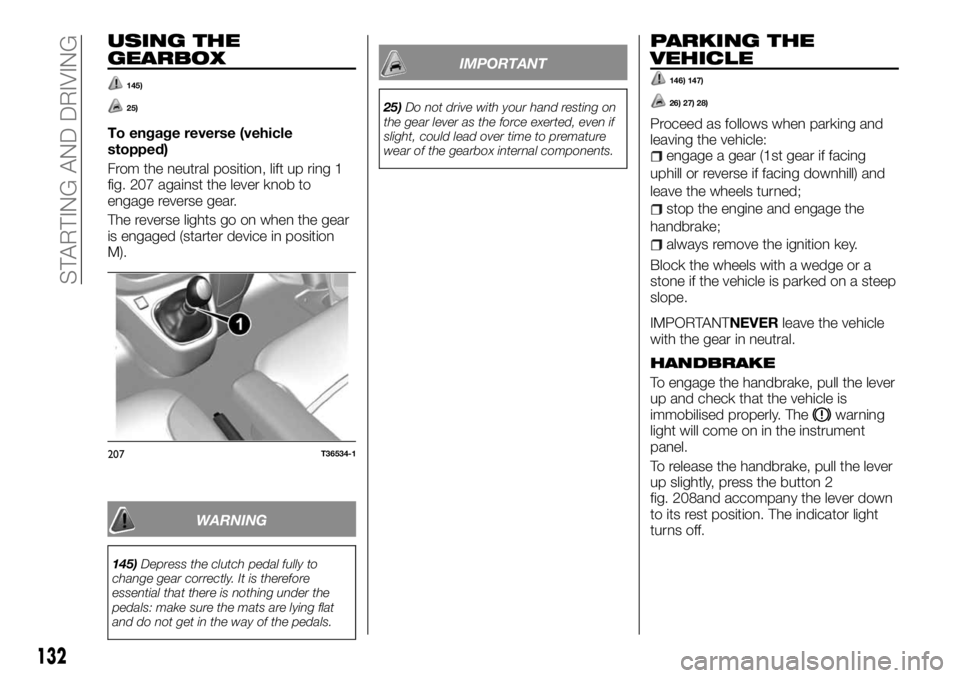
From the neutral position, lift up ring 1
fig. 207 against the lever knob to
engage reverse gear.
The reverse lights go on when the gear
is engaged (starter device in position
M).
WARNING
145)Depress the clutch pedal fully to
change gear correctly. It is therefore
essential that there is nothing under the
pedals: make sure the mats are lying flat
and do not get in the way of the pedals.
IMPORTANT
25)Do not drive with your hand resting on
the gear lever as the force exerted, even if
slight, could lead over time to premature
wear of the gearbox internal components.
PARKING THE
VEHICLE
146) 147)
26) 27) 28)
Proceed as follows when parking and
leaving the vehicle:
engage a gear (1st gear if facing
uphill or reverse if facing downhill) and
leave the wheels turned;
stop the engine and engage the
handbrake;
always remove the ignition key.
Block the wheels with a wedge or a
stone if the vehicle is parked on a steep
slope.
IMPORTANTNEVERleave the vehicle
with the gear in neutral.
HANDBRAKE
To engage the handbrake, pull the lever
up and check that the vehicle is
immobilised properly. The
warning
light will come on in the instrument
panel.
To release the handbrake, pull the lever
up slightly, press the button 2
fig. 208and accompany the lever down
to its rest position. The indicator light
turns off.
207T36534-1
132
STARTING AND DRIVING
Page 139 of 232
Gear change indicators
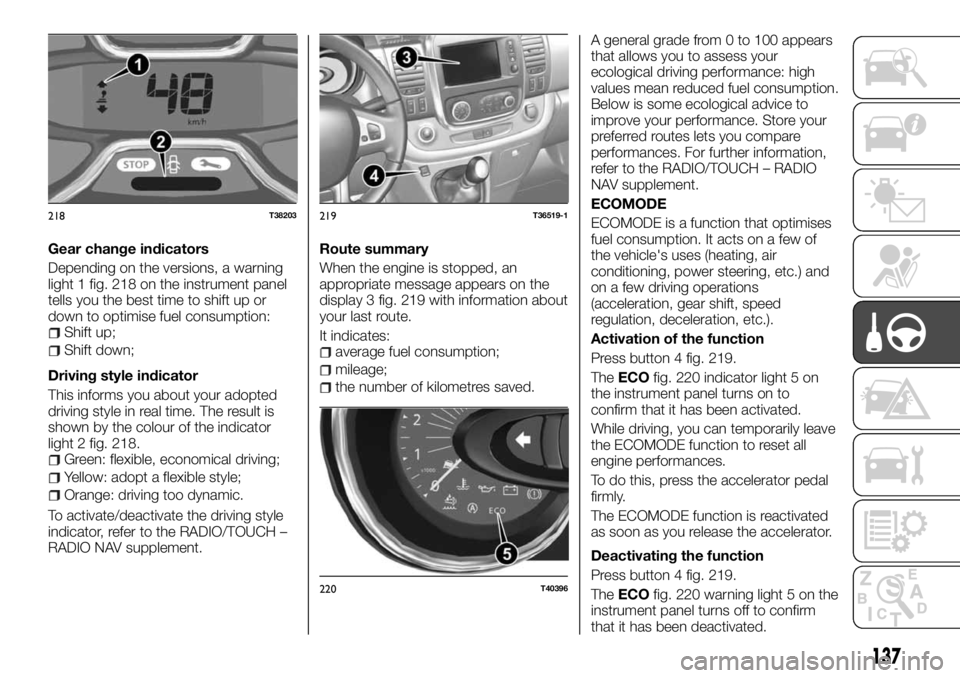
Depending on the versions, a warning
light 1 fig. 218 on the instrument panel
tells you the best time to shift up or
down to optimise fuel consumption:
Shift up;
Shift down;
Driving style indicator
This informs you about your adopted
driving style in real time. The result is
shown by the colour of the indicator
light 2 fig. 218.
Green: flexible, economical driving;
Yellow: adopt a flexible style;
Orange: driving too dynamic.
To activate/deactivate the driving style
indicator, refer to the RADIO/TOUCH –
RADIO NAV supplement.Route summary
When the engine is stopped, an
appropriate message appears on the
display 3 fig. 219 with information about
your last route.
It indicates:
average fuel consumption;
mileage;
the number of kilometres saved.A general grade from 0 to 100 appears
that allows you to assess your
ecological driving performance: high
values mean reduced fuel consumption.
Below is some ecological advice to
improve your performance. Store your
preferred routes lets you compare
performances. For further information,
refer to the RADIO/TOUCH – RADIO
NAV supplement.
ECOMODE
ECOMODE is a function that optimises
fuel consumption. It acts on a few of
the vehicle's uses (heating, air
conditioning, power steering, etc.) and
on a few driving operations
(acceleration, gear shift, speed
regulation, deceleration, etc.).
Activation of the function
Press button 4 fig. 219.
TheECOfig. 220 indicator light 5 on
the instrument panel turns on to
confirm that it has been activated.
While driving, you can temporarily leave
the ECOMODE function to reset all
engine performances.
To do this, press the accelerator pedal
firmly.
The ECOMODE function is reactivated
as soon as you release the accelerator.
Deactivating the function
Press button 4 fig. 219.
TheECOfig. 220 warning light 5 on the
instrument panel turns off to confirm
that it has been deactivated.
218T38203219T36519-1
220T40396
137
Page 140 of 232

BehaviourRather than heat the engine while
stopped, we advise you to drive
moderately until the engine reaches its
normal operating temperature.
Speed increases fuel consumption.
Do not strain the engine by
exceeding speed in intermediary gears.
Use the highest gear.
Avoid sudden acceleration.
Brake as little as possible. By
assessing the danger or curve in
advance, it will be sufficient to lift your
foot off the accelerator.
When going uphill, we advise you to
keep a steady speed, without having to
change it.
In modern vehicles, double clutching
before stopping the engine is not
necessary and could even cause
damage.Tyres fig. 221
Pressure too low can increase fuel
consumption.
Using unsuitable tyres can increase
fuel consumption.
Advice for use
Favour the ECOMODE function.
Electricity increases fuel
consumption. We advise you to turn off
accessories when they are not in use.
You must use your lights according to
the laws in effect in the country you are
in.
Use diffusers as much as possible.
Driving at 100 km/h with the windows
open increases fuel consumption by
4% fig. 222.
For vehicles with climate control, fuel
consumption is increased (especially in
cities) when in use. For vehicles with
manual climate control, turn off the
system when you no longer need it.Some advice for reducing fuel
consumption and thus helping
safeguard the environment:
If the vehicle has been parked in high
temperatures or in the sun, open up the
doors to let out the hot air before
leaving.
Do not leave the roof rack mounted if
not in use.
When transporting particularly large
objects, use a trailer if possible.
To tow a camper, use an approved
deflector and do not forget to adjust it.
Avoid "door to door" use of the
vehicle (short trips with prolonged
stops) because the engine never
reaches its ideal temperature.
221T26528
222T31077
138
STARTING AND DRIVING
Page 143 of 232
Glove compartment light
Remove the lens using a screwdriver.
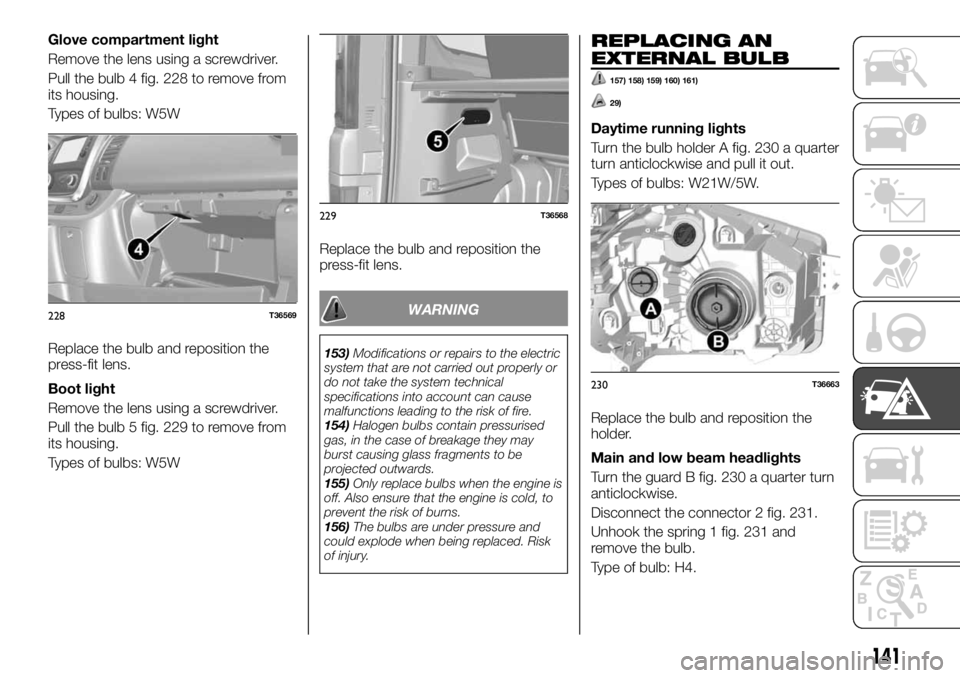
Pull the bulb 4 fig. 228 to remove from
its housing.
Types of bulbs: W5W
Replace the bulb and reposition the
press-fit lens.
Boot light
Remove the lens using a screwdriver.
Pull the bulb 5 fig. 229 to remove from
its housing.
Types of bulbs: W5WReplace the bulb and reposition the
press-fit lens.
WARNING
153)Modifications or repairs to the electric
system that are not carried out properly or
do not take the system technical
specifications into account can cause
malfunctions leading to the risk of fire.
154)Halogen bulbs contain pressurised
gas, in the case of breakage they may
burst causing glass fragments to be
projected outwards.
155)Only replace bulbs when the engine is
off. Also ensure that the engine is cold, to
prevent the risk of burns.
156)The bulbs are under pressure and
could explode when being replaced. Risk
of injury.
REPLACING AN
EXTERNAL BULB
157) 158) 159) 160) 161)
29)
Daytime running lights
Turn the bulb holder A fig. 230 a quarter
turn anticlockwise and pull it out.
Types of bulbs: W21W/5W.
Replace the bulb and reposition the
holder.
Main and low beam headlights
Turn the guard B fig. 230 a quarter turn
anticlockwise.
Disconnect the connector 2 fig. 231.
Unhook the spring 1 fig. 231 and
remove the bulb.
Type of bulb: H4.
228T36569
229T36568
230T36663
141
Page 147 of 232
Bayonet light bulb P 21W.
Number plate lights
The bulb can be reached in the same
way as in vehicles with swing doors as
for tailgate.
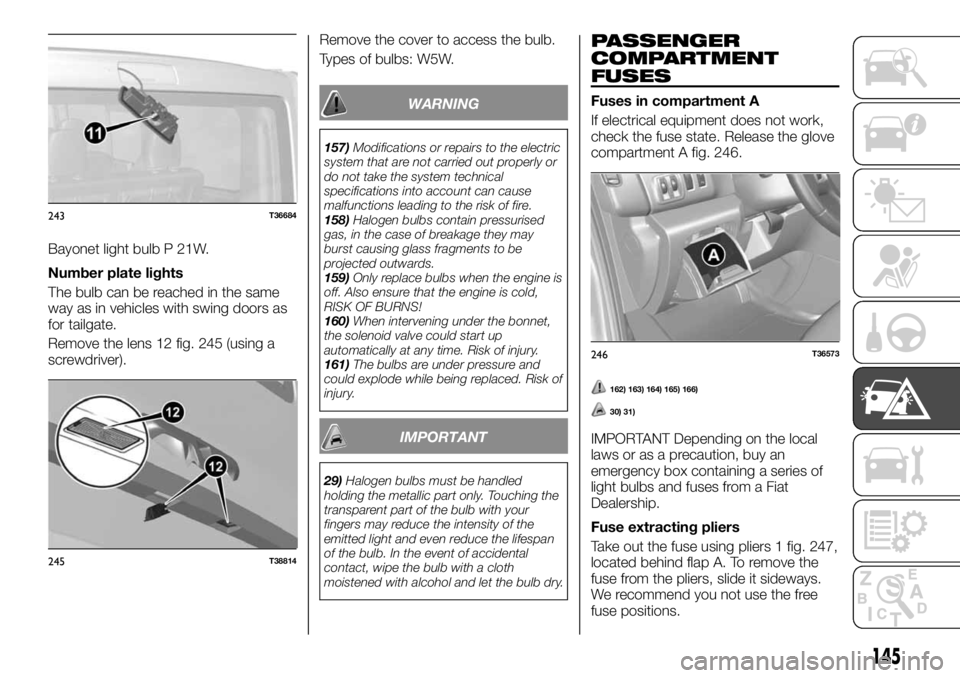
Remove the lens 12 fig. 245 (using a
screwdriver).Remove the cover to access the bulb.
Types of bulbs: W5W.
WARNING
157)Modifications or repairs to the electric
system that are not carried out properly or
do not take the system technical
specifications into account can cause
malfunctions leading to the risk of fire.
158)Halogen bulbs contain pressurised
gas, in the case of breakage they may
burst causing glass fragments to be
projected outwards.
159)Only replace bulbs when the engine is
off. Also ensure that the engine is cold,
RISK OF BURNS!
160)When intervening under the bonnet,
the solenoid valve could start up
automatically at any time. Risk of injury.
161)The bulbs are under pressure and
could explode while being replaced. Risk of
injury.
IMPORTANT
29)Halogen bulbs must be handled
holding the metallic part only. Touching the
transparent part of the bulb with your
fingers may reduce the intensity of the
emitted light and even reduce the lifespan
of the bulb. In the event of accidental
contact, wipe the bulb with a cloth
moistened with alcohol and let the bulb dry.
PASSENGER
COMPARTMENT
FUSES
Fuses in compartment A
If electrical equipment does not work,
check the fuse state. Release the glove
compartment A fig. 246.
162) 163) 164) 165) 166)
30) 31)
IMPORTANT Depending on the local
laws or as a precaution, buy an
emergency box containing a series of
light bulbs and fuses from a Fiat
Dealership.
Fuse extracting pliers
Take out the fuse using pliers 1 fig. 247,
located behind flap A. To remove the
fuse from the pliers, slide it sideways.
We recommend you not use the free
fuse positions.
243T36684
245T38814
246T36573
145
Page 151 of 232
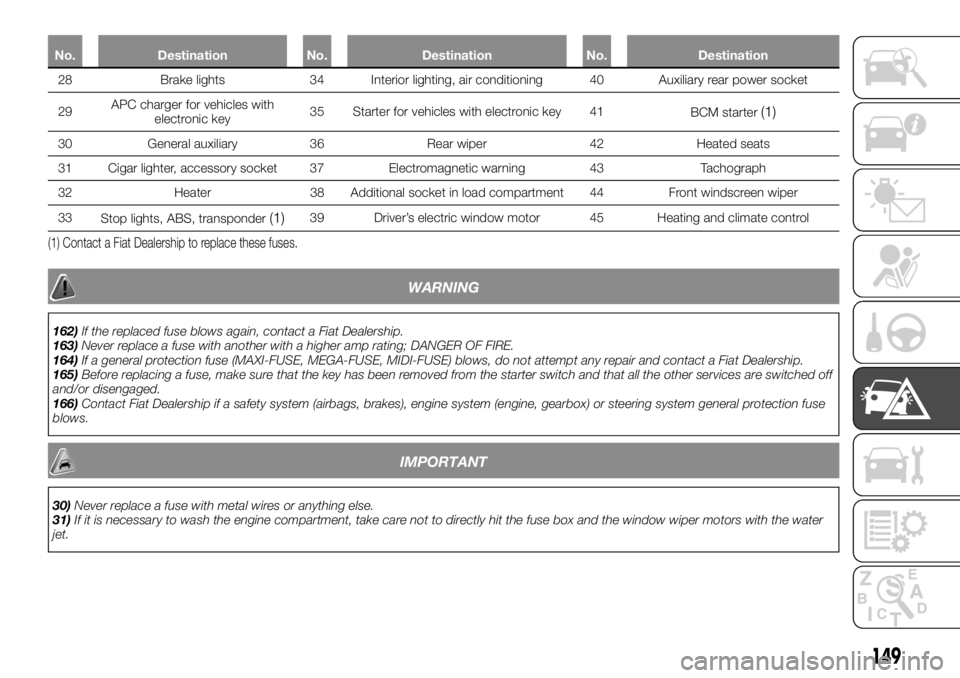
No. Destination No. Destination No. Destination
28 Brake lights 34 Interior lighting, air conditioning 40 Auxiliary rear power socket
29APCcharger for vehicles with
electronic key35 Starter for vehicles with electronic key 41
BCM starter
(1)
30 General auxiliary 36 Rear wiper 42 Heated seats
31 Cigar lighter, accessory socket 37 Electromagnetic warning 43 Tachograph
32 Heater 38 Additional socket in load compartment 44 Front windscreen wiper
33
Stop lights, ABS, transponder
(1)39 Driver’s electric window motor 45 Heating and climate control
(1) Contact a Fiat Dealership to replace these fuses.
WARNING
162)If the replaced fuse blows again, contact a Fiat Dealership.
163)Never replace a fuse with another with a higher amp rating; DANGER OF FIRE.
164)If a general protection fuse (MAXI-FUSE, MEGA-FUSE, MIDI-FUSE) blows, do not attempt any repair and contact a Fiat Dealership.
165)Before replacing a fuse, make sure that the key has been removed from the starter switch and that all the other services are switched off
and/or disengaged.
166)Contact Fiat Dealership if a safety system (airbags, brakes), engine system (engine, gearbox) or steering system general protection fuse
blows.
IMPORTANT
30)Never replace a fuse with metal wires or anything else.
31)If it is necessary to wash the engine compartment, take care not to directly hit the fuse box and the window wiper motors with the water
jet.
149